Clinical Records
Clinical Records Tab
The Clinical Records system is used to record structured information for an individual test, procedure or operation. The tab contains a customisable navigation tree on the left and an area where the currently selected record is displayed.
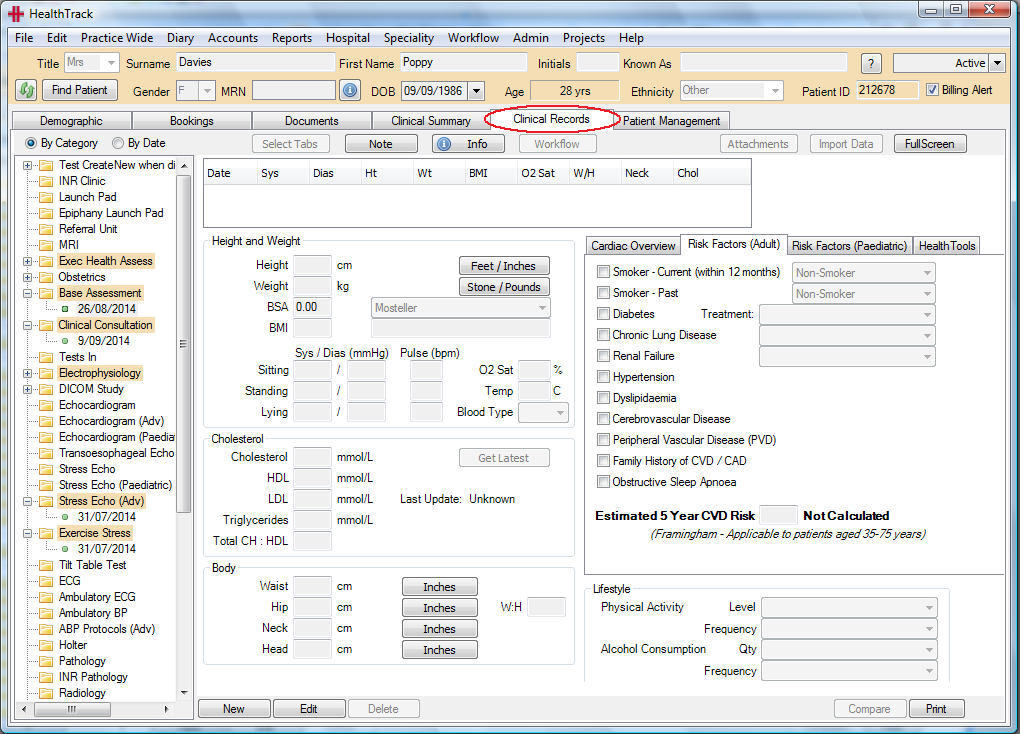
This navigation tree contains:
-
Group headers (e.g. Invasive, Ophthalmology, Hepatology).
-
Test /Procedure headers (e.g. Echocardiogram, Holter, Skin Allergen).
-
Patient records. These are visible under a header and display the record’s test date.
The Clinical Records tab automatically opens the most recent record when changing patients or selecting the tab for the first time. selected even when selecting a new record. The tree can also be configured to automatically expand specific entries if desired (e.g. always expand Echocardiogram records).
If a report is available for the selected clinical record, it may be
accessed by pressing the
 button.
This will first display a list of available print layouts depending on
the record type.
button.
This will first display a list of available print layouts depending on
the record type.
The
 button is for attaching a note
to the current record. This is useful to flag the record as unusual.
When the Note button is clicked the Modify Note window will open to
enter or clear an existing note.
button is for attaching a note
to the current record. This is useful to flag the record as unusual.
When the Note button is clicked the Modify Note window will open to
enter or clear an existing note.
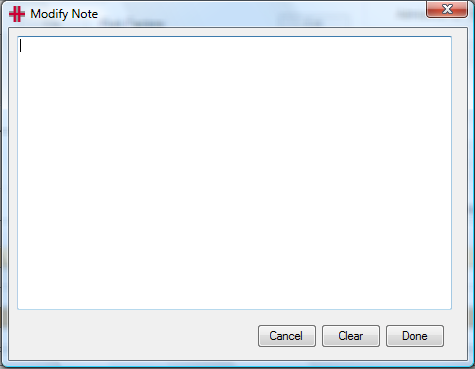
If a note has been added, a green tick will display to indicate that
there is a note for this record

The
 button opens the clinical
report in the Document Management window.
button opens the clinical
report in the Document Management window.
The
 button toggles between normal
and full screen modes. Full screen mode is mainly designed for data
entry/comparison and only displays the current medical record area,
hiding the current patient and navigation tree.
button toggles between normal
and full screen modes. Full screen mode is mainly designed for data
entry/comparison and only displays the current medical record area,
hiding the current patient and navigation tree.
Compare Clinical Measurements
The Compare function can quickly track the variation of a particular
measurement over time. Pressing the
 button changes the display area to a grid. Each record in the group is
displayed as a single row. The measurements taken for the record are
visible as columns across the top of the grid. Scroll across to view all
columns.
button changes the display area to a grid. Each record in the group is
displayed as a single row. The measurements taken for the record are
visible as columns across the top of the grid. Scroll across to view all
columns.
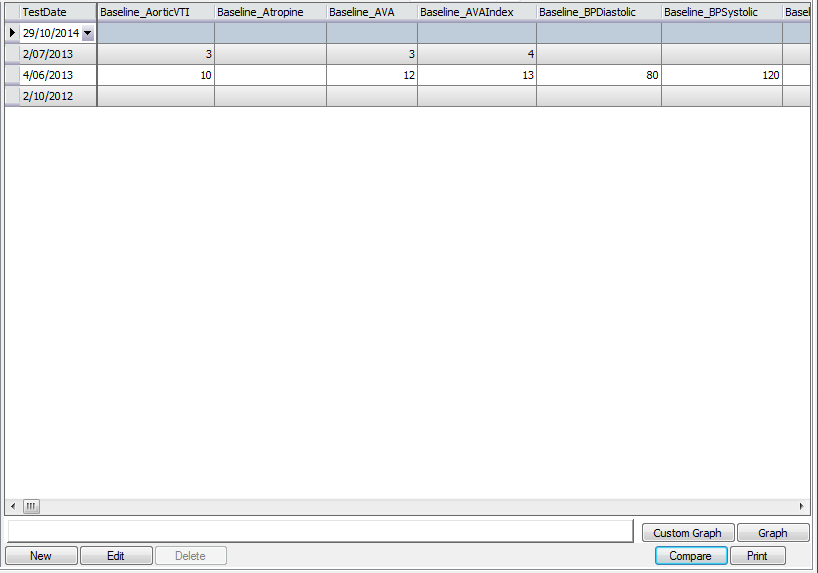
To stop viewing the measurements in the compare view, click the
button again to return to the
original clinical record view.
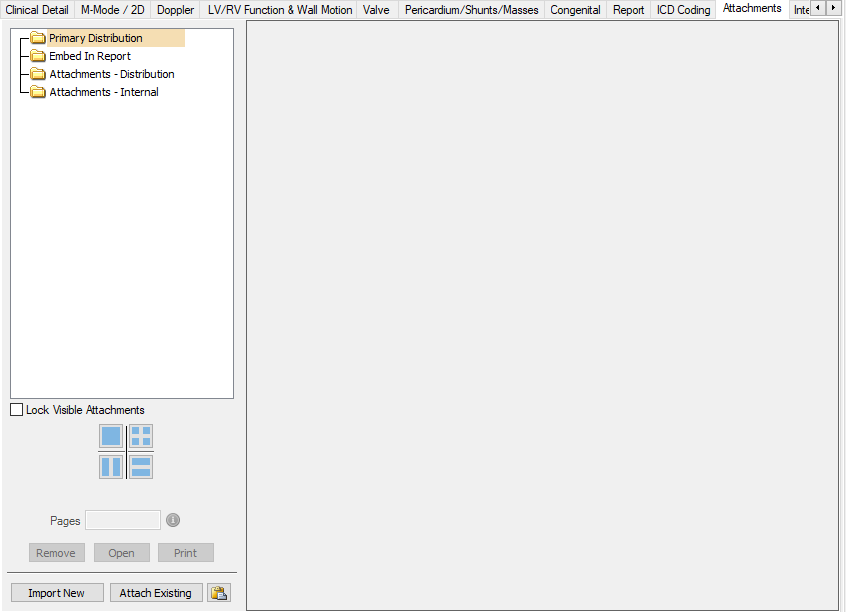
Add an Attachment to a Clinical Record
The Attachments tab can be used to import or attach images or other files to clinical records. Attachments can be noted as:
-
Primary Distribution – to be distributed as the Clinical Record e.g. an Echocardiogram Report imported from an external reporting program
-
Embed in Report – allows images to be embedded in report for distribution.
-
Attachments – Distribution - attached as additional pages to the clinical report generated from the clinical record
-
Attachments – Internal – attached to the record but will not to be distributed with the report
Adding a New Attachment
Files (i.e. images and/or documents) can be attached by importing an external file/s or by attaching an existing file from within the system.
External file/s can be imported via either the
-
*Import New* button
-
Quick Paste button
 or
or -
‘Drag & Drop’ functionality.
To import via the *Import New* button, select the button and the Import Documents & Images screen will open.
Refer “Document and Letters> How to import documents and images” section of the Usability Guide for use of this screen.
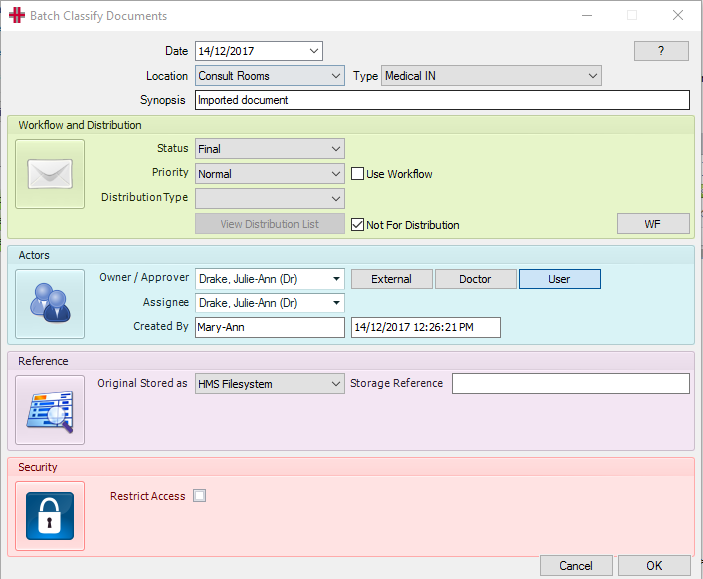
To import via the Quick Paste icon, copy file/s to the clipboard and select the Quick Paste icon and the files will import with the caption ‘Imported document’. The caption can then be updated by double clicking on the line item and inserting the required caption.


One or multiple file/s can be imported via this method and these can include a mix of file types e.g. pdf; jpeg; txt etc.
To import via the ‘drag & drop’ function, highlight the file/s to be imported and drag them across to the attachments panel and this will automatically open the Import Documents & Images screen and display a list of the documents selected. Then select the *Import* button and the Batch Classify Documents screen will open. The user updates details as required. If multiple files are being imported any updates in this screen will be applied to all files. Select *OK* to finalise the import.
Adding an Existing Attachment
To add an existing file as an attachment to the Clinical Record, select the *Attach Existing* button and the Attach Existing Document screen will open.
Select the folder where the file is located from the Category list of values and the folder contents will display in the Documents field.
Highlight to file to be attached and a preview of the file will display, then select the *Attach* button to finalise.

Attachment Screen Functions
Once files have been attached to the clinical record they can be viewed one at a time or multiple files at a time by selecting the different view options.

-
The top left is a single file view
-
The top right displays up to 4 files
-
The bottom left displays 2 files side by side in a vertical view
-
The bottom right displays 2 files on top of each other in a horizontal view
When viewing using option 2,3 or 4 above a Position column appears in the file list with a number that aligns with the files being viewed. The position of files in the viewer can be changed by right-clicking on an attachment and choosing the new position for it. To keep the selected documents as the required display, tick the ‘Lock Visible Documents’ tick box.
The files can be dragged and dropped to reorder to reorder the order that the attachments appear when included in the report, as required.
The Info Button
The
 button in a Clinical Record
opens the Clinical Record Information screen, which is colour coded into
5 information panels:
button in a Clinical Record
opens the Clinical Record Information screen, which is colour coded into
5 information panels:
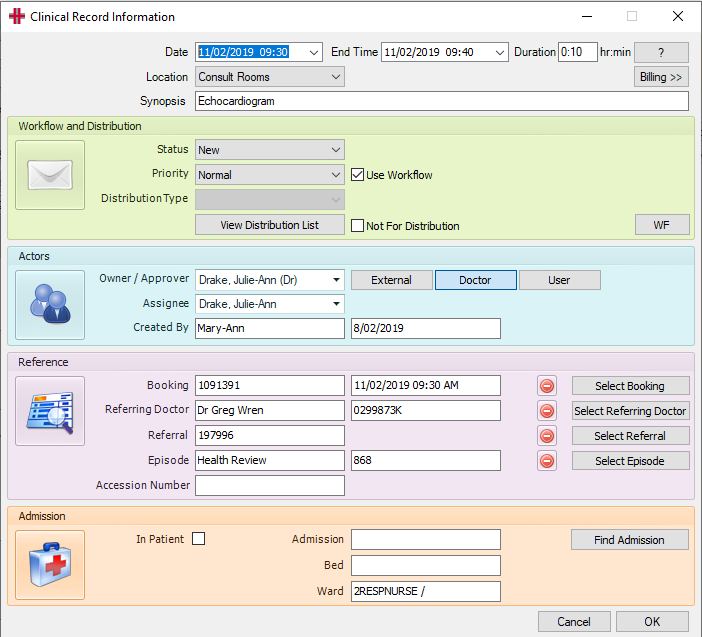
General Information (grey panel)
-
Test Date, End Time and Duration: Booking Date and Time
-
Location: Booking or logged on location
-
Synopsis: Clinical Record Name
Workflow and Distribution (green panel)
-
Status – Document Workflow status
-
Priority – can be used to mark the record as urgent
-
Distribution Type – Automatically assigned for Clinical Records
-
 View, add and remove
distribution parties
View, add and remove
distribution partiesActors (aqua panel)
-
Owner / Approver - is the Reporting Doctor – If not already set click the
 button and select
from the drop-down list.
button and select
from the drop-down list. -
Assignee is the person who drafted the clinical report (Technician or Reporting Doctor).
-
Created By the creator of the document, will display SYSTEM or FEED if created from a worklist or an integration to another system.
Reference (pink panel)
-
Booking details showing – If not click the
 button and choose the booking.
 -
Referring Doctor showing – If not click the
 button and choose the Doctor.
 -
Referral showing – If not click the
 button and choose the
referral.
button and choose the
referral. -
Episode showing - If not click the
 button and choose the
referral.
button and choose the
referral. -
Accession Number – automatically populates from worklist item, when record is auto created from external machine.
Admission (apricot panel)
-
If an inpatient tick “In Patient”, select
 to populate the Admission
number, Ward and Bed number.
to populate the Admission
number, Ward and Bed number. -
Once finished click the
 button
to close the screen.
button
to close the screen.When working on a clinical record, the Status should be “New” or “Draft”. If the information is being captured by a Technician or a staff member who is not the Reporting Doctor, once the record has been completed, to mark it ready for the Doctor to review, change the Status to “Approval Waiting”. The Doctor must be entered as the Originator. This will add the report to the Doctor’s HealthTrack Doctor Dashboard for review and approval.
If the clinical record has been marked as a Workflow Document and the Not for Distribution checkbox is left unticked, when ready to send/distribute the clinical report, change the Status to “Final”
 and click the
button. The report will then
be added to the HealthTrack Distribution List for sending to the
recipients.
and click the
button. The report will then
be added to the HealthTrack Distribution List for sending to the
recipients.
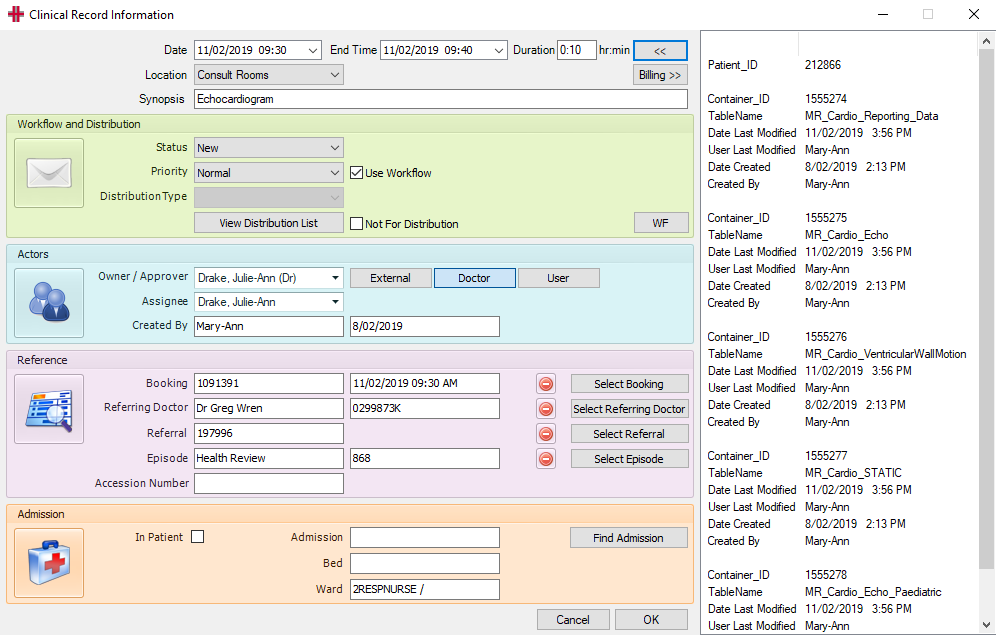
The
 button opens a side panel on
the Info screen, to view details of when the clinical record was
created, last modified etc.
button opens a side panel on
the Info screen, to view details of when the clinical record was
created, last modified etc.
Flag - Attention Required
The Attention Required flag can be set for any clinical record as a means to alert the Doctor to something important and prevent them from setting the record to Final without having first read the associated note and removed the Attention Required flag. Once a Doctor has removed the Attention Required flag the record can now be set to Final.
The Attention Required flag can be switched on within any Clinical Record, or from within the Document Management screen. Records that have been flagged with Attention Required will be highlighted on the Document Management screen with a red colour.
Within Clinical Records the user can click the Note button to see the Modify Note popup. This popup has the Attention Required flag.
! Graphical user interface, text Description automatically generated (image30.png)
On the Document Management screen’s Document Management tab the user can click on note icon in the Note column to see the popup. Tick the Attention Required tickbox, fill in a note below, and click OK to save the changes.
! Graphical user interface, text, application, email Description automatically generated (image31.png)
Alternatively, if you use the Previewer tab then the flag and note is displayed on the right-hand side.
! Graphical user interface, text, application Description automatically generated (image32.png)
If the user attempts to set a clinical record to Final from the Document Management or Clinical Records tabs then they will be presented with a warning:
! Graphical user interface, text, application Description automatically generated (image33.png)
This warning serves to warn the Doctor and prevent them from setting the record to Final without reading and acknowledging the Attention Required flag. To proceed they must untick the Attention Required flag, but presumably they will have actioned the note first. Since the flag is now removed they will then be able to set the record to Final.
Base Assessment Record – Cardiac Overview
The Cardiac Overview checklist can be accessed from the Base Assessment clinical record.
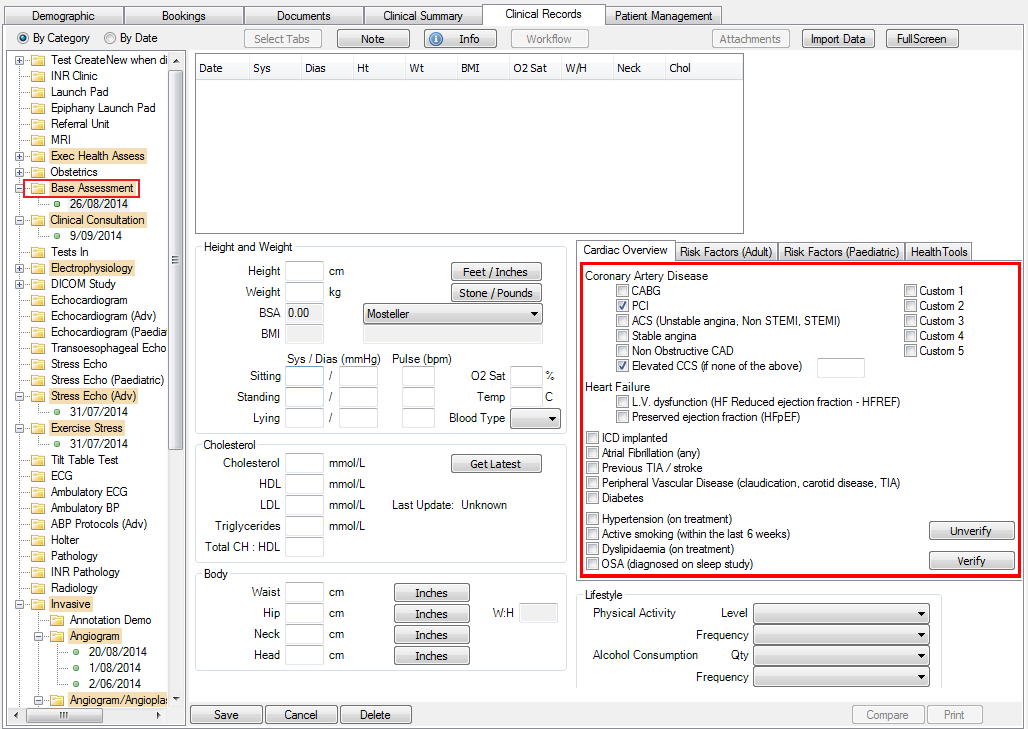
Initially there will be a red box around the items in the Cardiac Overview tab, to indicate that the items have not been verified.
To verify the items, click the Edit button at the bottom of the clinical record and click the Verify button. The box will change from red to green and the user who verified the record will be displayed, along with the date and time. Remember to Save the clinical record.
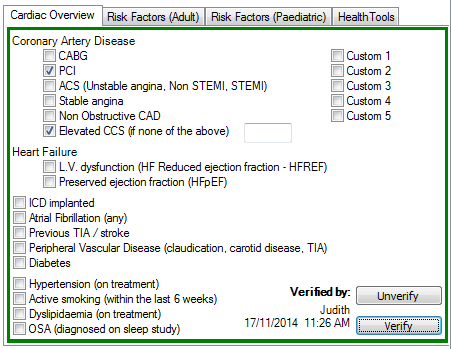
The Unverify button can be used to reverse a verified set of items and the box colour will change from green to red again.
Clinical Records – Shortcut Keys
No special shortcut keys exist in clinical records but if a button or menu item has a particular character underlined, this indicates it may be accessed by pressing the Alt key in combination with the underlined character.
| Alt – N |

|
|---|---|
| Alt – S |

|
| Alt – E |

|
| Alt – C |

|