Smart Text and Smart Templates
Smart Text and Smart Text Templates are an easy way to quickly create and compile a report using predefined words, phrases, paragraphs or even a complete user defined ‘Smart Text Template’.
Smart Text and Smart Text Templates functionality is available in many areas including:
-
All Clinical Records - see the ‘Report’ tab
-
Clinical Consultation - see the ‘Report’ tab
-
General Purpose Reporting for Consulting and Procedures - see the ‘Report’ tab
-
Admissions – see the ‘Report’ tab for Discharge report
‘Security & Permissions’ for Smart Text Editor and Smart Text Template Manager
Users require the necessary permissions to access the Smart Text Editor and Smart Text Template Manager. These permissions are ‘EditSmartTextConfig’ and ‘EditSmartTextTemplates’ respectively and will be available automatically to all users within the ‘HMS-MR_Admin’ group.
Managing Smart Text
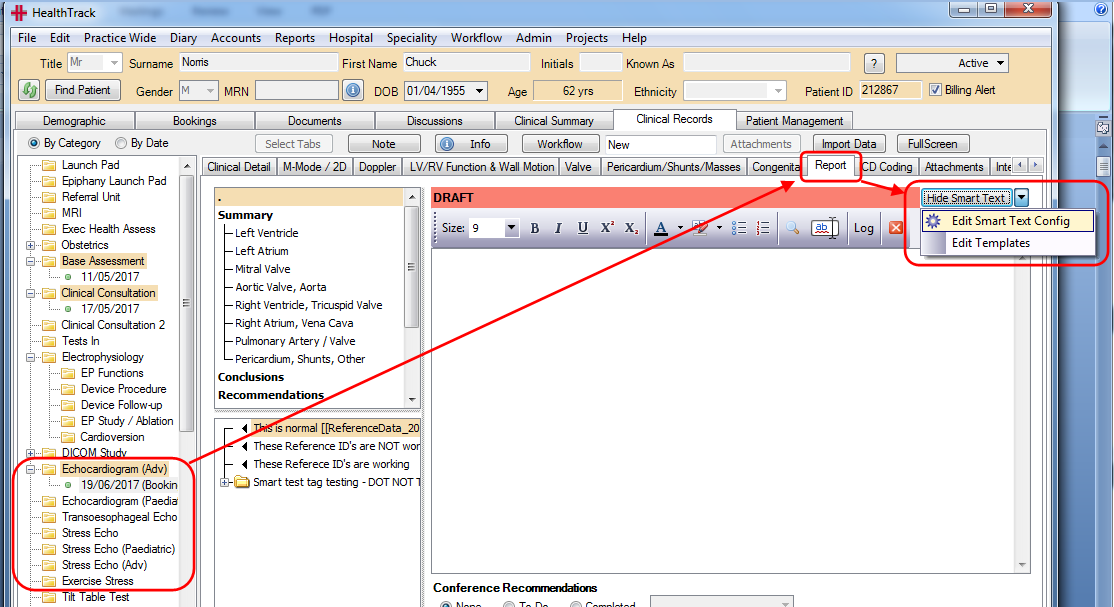
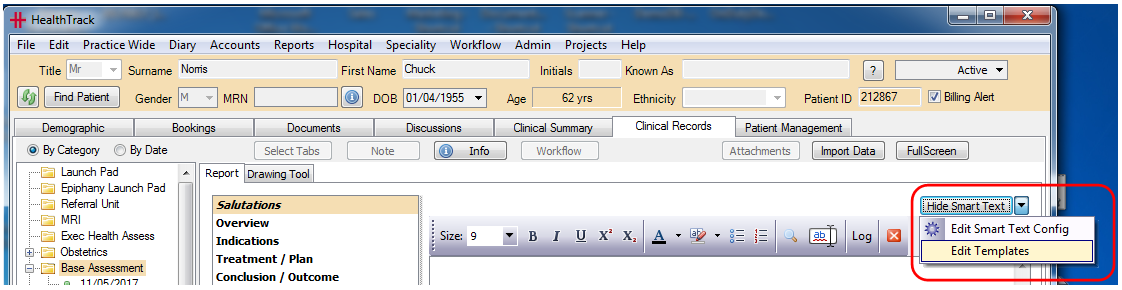
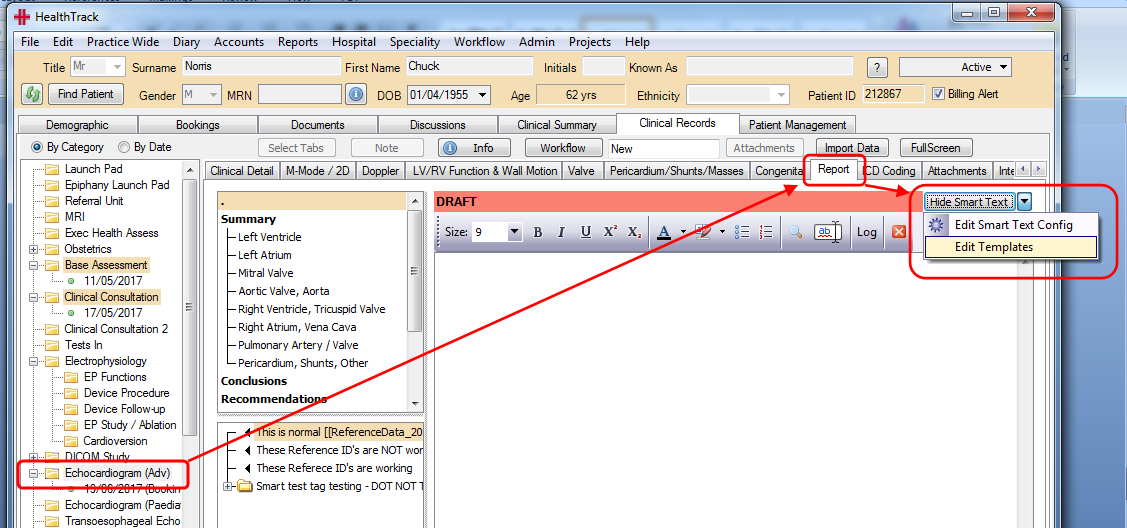
To set up ‘Smart Text’, go to the smart text enabled “Report” tab and click on the ‘dropdown arrow’ next to the ‘Hide Smart Text’ button and click on ‘Edit Smart Text Config’.
Or
This will open the ‘Smart Text Editor’ screen and automatically load this record’s smart text.

Smart Text Groups
Smart Text is tree of Groups and Smart Text. A group is used to bundle similar smart text together, such as “Summary”, “Conclusions”, or even to refer to specific areas of the body such as “Left Ventricle” or “Upper Endoscopic Region”. This groups the information together to make it faster to find smart text relevant to the part of the report you’re writing.
A characteristic of a Smart Text group is the style and include:
None This group type is for keeping related text and phrases together.
Header 1
Header 2
Header 3
Invisible
When Headers are used in a report, the editor will maintain the order as defined by the tree. Nodes can be reordered by ‘drag and drop’.
Smart Text Header Features
There is the ability to add ‘Header Groups’ that are invisible when added to the rich text Report writer. Smart text can be added to these ‘Invisible’ groups, but the group will still appear as a header node in the rich text editor. However, when you double-click to add the smart text the header node will not be added as a heading to the Clinical report. An example usage would be for signatures at the bottom of the report, salutations, or other comments that you want to insert into the middle of your report without necessarily having a header of their own.
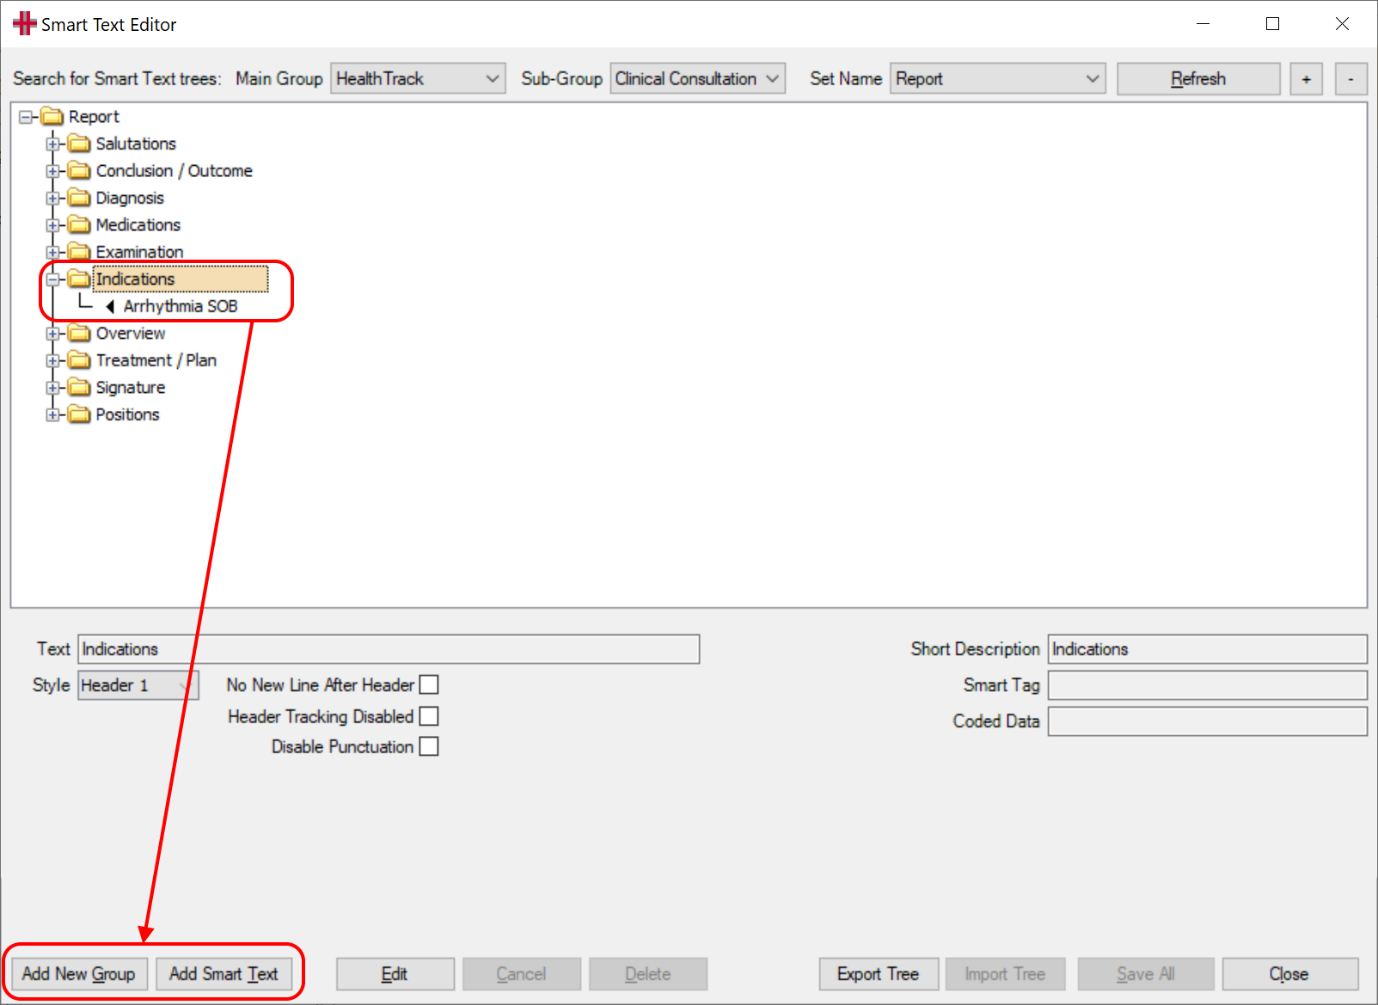
Adding a new Smart Text Group
To add a New Group to the Smart Text Tree, position the cursor on the
parent node, then click the [Add New Group] button at the bottom of
the screen.
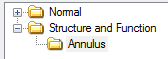
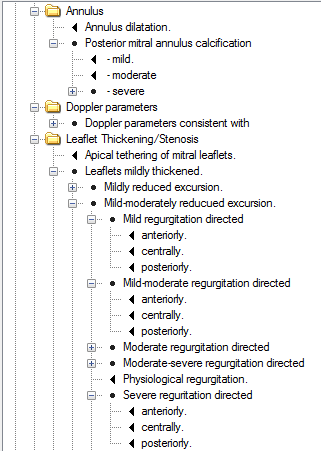
In the example below the group Structure and Function is selected first before clicking Add New Group, the new group for Annulus is now positioned underneath it.
|
Smart Text - Add or Edit
Click on the Group (Folder) that you would like to add smart text to and use the [Add Smart Text] button at the bottom of the screen. The text to be inserted can be written into the Text box, including formatting options such as bold, italics and underline. If the information you wish to enter is available in a document outside of HealthTrack it can be copied and pasted into this field. Tables and other images can also be inserted here by copying out of another document or image editor and pasted. Once entered, you can add a Short Description and a “Smart Tag”.
To edit an existing Smart Text, click on the entry and then the ‘Edit’ button.
NB: Most HealthTrack Letter Tags available to auto populate patient information will work when added to the Display Text field.

In the example above, the text that has just been added “Leaflets thin and mobile. Unremarkable annulus.” is only the start of the comments that can be added by the user. To add 3 alternative endings to this Smart Text select the text as shown (highlighted in blue above) and then click the ‘Add Smart Text’ button. Once you have then entered and saved this Smart Text it will sit the next level down in the tree. It is possible to add as many options/levels as you like. Please ensure you are selecting the Group or Smart Text that you want the new text to be linked to. Alternatively you could set the Smart Text up to be a complete sentence or paragraph (up to 4000 characters in length).
The screen shot below shows many options being added to the above sentence.
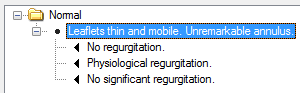
When using Smart Text in the clinical record, if the patient’s comment was “Leaflets thin and mobile. Unremarkable annulus. Physiological regurgitation.” Then the user will expand the normal Smart Text tree and double click on the “Physiological regurgitation” option and the complete sentence will be added for the user – no typing required.
Since sometimes the smart text information can be quite sizeable, such as a large section of a report, there is a Short Description field off to the right-hand side that can be used to more succinctly describe the smart text. An example would be writing “Normal” in the Short Description box for a section of report that would normally be several paragraphs in size.
To save any changes to new/existing groups or smart text nodes, click the ‘Save’ button below.
Other changes can be made to the layout of the tree by dragging the nodes around to re-order or re-position them. Groups or smart text nodes you no longer need can be deleted with the ‘Delete’ button.
Once all changes have been made on the screen the final step is to click the ‘Save All’ button. This button saves the positioning, layout, order and any other changes you have made. Click the Close button once you are finished.

Buttons
[Input Request] To highlight where input is required from a user in a report
[Selection Options] This button will bring up the selection options screen. See “Selection Options“ below.
[Measurement Data] This button that will generate a “Smart Tag” to import measurement data by typing in the corresponding Reference ID for the field.
[<ENTER>] This button will insert a <ENTER> “Smart Tag” into the Smart Text.
Selection Options
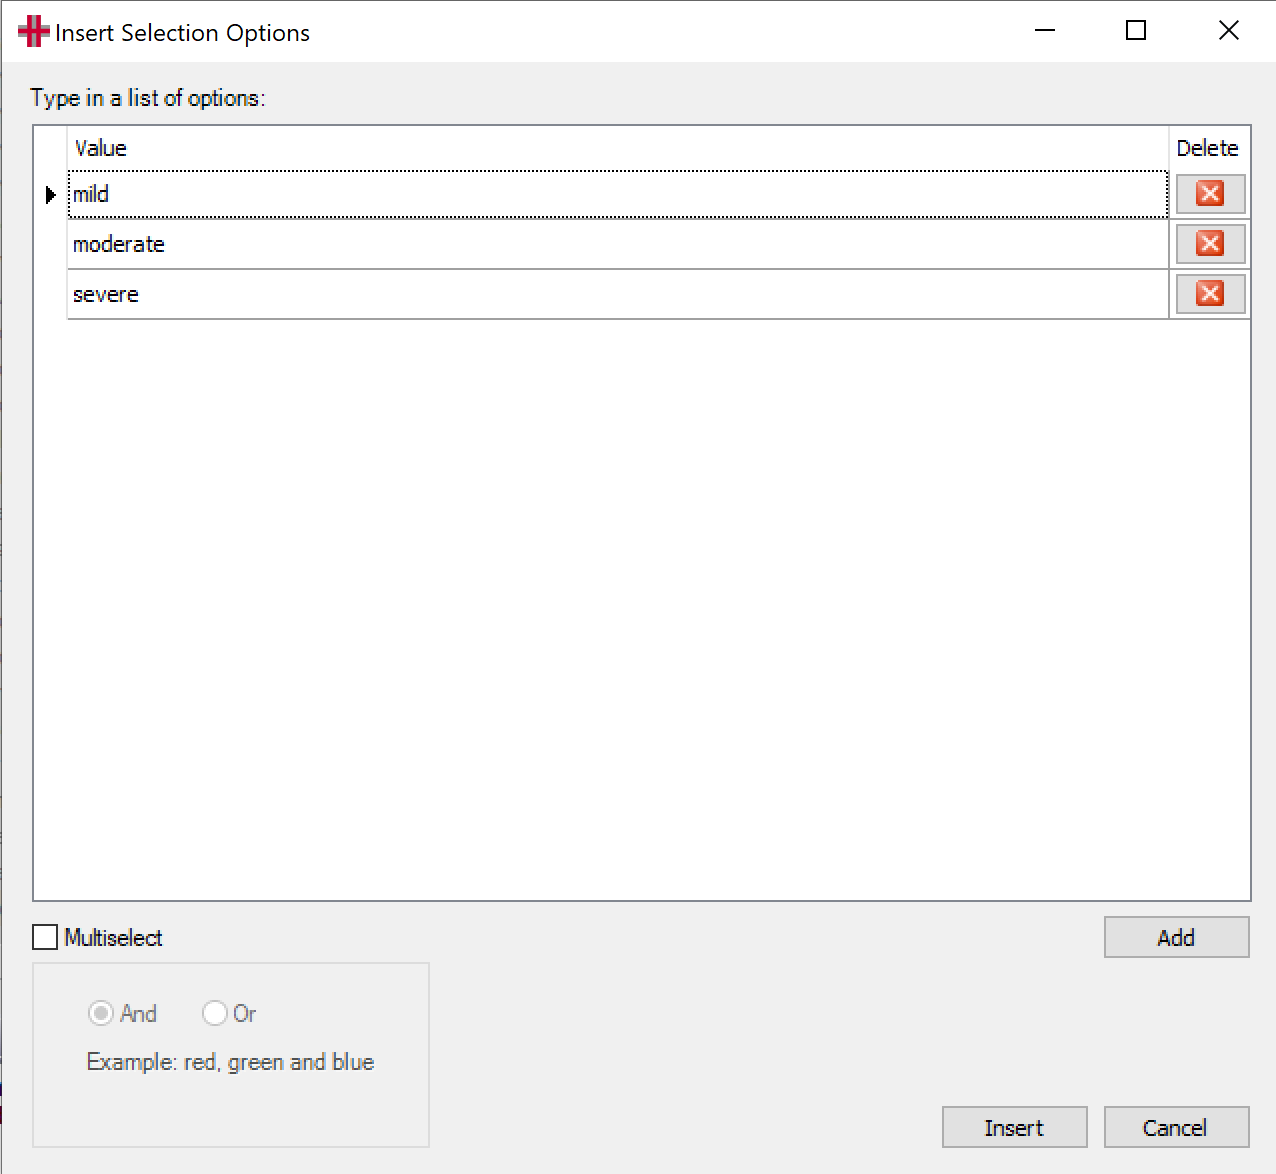 |
[Multiselect]Not Selected: When this option is not selected you may click [Add] to add a number of single selectable option. Selected: When this option is selected you may click [Add] to add a number of selectable option, that will be joined by either “and” or “or”. |
Smart Text Features
The Smart Text Editor supports rich text for most clinical record types. Rich smart text can be inserted into the Report editor along with images, tables and other font styles and can be included in the printed report.
The Smart Text Editor and associated smart text lists will show the Short Description for a smart text node if it is available. This allows the smart text reporting tab to show the shortened version of a smart text node instead of potentially multiple paragraphs of text.
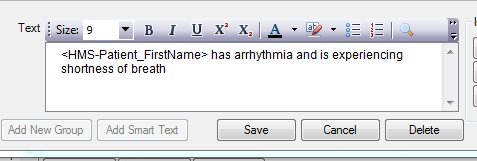
The smart text reporting tool supports <HMS-..> letter tags such as those used by the letter template system. Letter tags can be added to the Smart Text so that when the smart text is added to the reporting tool the tags are automatically replaced with data retrieved live from HealthTrack. An examples: <HMS-Patient_Firstname> will allow the patient’s first name to be automatically written into the report, <HMS-Booking_..> will retrieve information from the clinical record’s linked booking etc. (For more information about what tags are available for your smart text please consult the Letter Tags documentation for letter templates).
Smart text can be inserted into the Report editor without the cursor being moved to the end of the section first. This will only occur if the smart text to be inserted belongs to the same section where the cursor is currently positioned.
Typing over green highlighted “Smart Text” tag will automatically remove the green highlight.
The ‘Smart Text Editor’ will now automatically expand the topmost node.
The ‘Smart Text Editor’ can now delete smart text node/group and all child nodes at once.
The ‘Smart Text Editor’ now has tables and font on the toolbar in most areas .
Smart text inserted in the rich text Report writer will now always highlight “Smart Tags” with the [[ ]] brackets around them in green, regardless of whether they’re highlighted in the smart text configuration screen or not.
Nested smart text will now automatically compose sentences. The first letter of inserted text will be automatically capitalised if necessary (requires a period or new line before the inserted text). The end of the inserted text will be cleaned of punctuation and a full stop automatically added if necessary.
In the Smart Text system you do not need to capitalise the first letter of your smart text strings nor do you need to put a full stop at the end. The smart text system is designed so you can right-click on an item in the list on the left and choose other options, such as a comma, full stop, words like “and” or “or” etc. Any punctuation such as full stops or commas on the end of smart text is trimmed by the system.
E.g. in your configuration the smart text states “patient is doing well” then when you double-click that item it will automatically be added with correct punctuation and will appear as “Patient is doing well.” Also, when right-clicking the “patient is doing well” item and choosing the menu option that says <and>, it would appear as “Patient is doing well and” (the word “and” is added to the end, not a full stop). You could then subsequently double-click another item in the list that says “the patient does not need to attend again”. The system would recognise the previous sentence was not closed so would not capitalise the “the” to a “The”. The system would put a full stop on the end because double-clicking means you want to end the sentence. The end result would be a sentence that says “Patient is doing well and the patient does not need to attend again.”
For nouns such as a person’s name or a location name, you do need to capitalise the first letter. Example: “Asperger’s” not “asperger’s”, and “Victoria” not “victoria”.
Rich Text Editor now has a ‘right click’ menu option to Print All Text.
Rich Text Editor now has a ‘right click’ menu option to Copy All Text to Clipboard.
Rich Text Editor now has tables and font (not available everywhere) in the toolbar.
Smart Text Templates
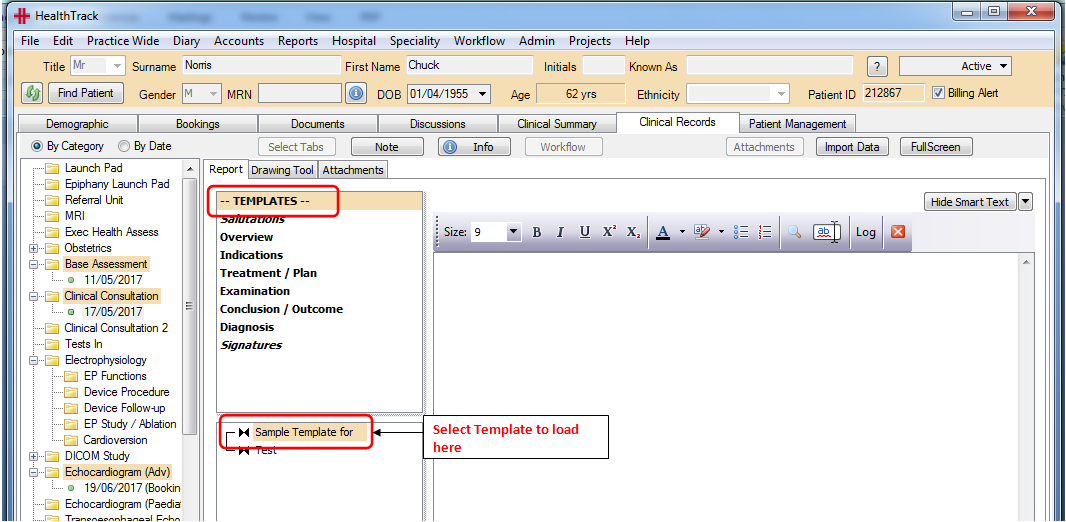
The ‘Smart Text Templates’ system is now supported by all Clinical Records that have a Report Tab. Once a template has been created and saved, HealthTrack will open the Template Selection by default to show any available templates
Double click on the template required, to load and open a new template
To create a new ‘Smart Text Template’, select the clinical record and click on the ‘New’ button and then the Report tab. Use the dropdown arrow next to ‘Hide Smart Text’ to select ‘Edit Templates’.
This will open the ‘Smart Text Template Manager’ window. Click on the ‘New’ button to create a new template, and enter a name for the template. You can set the new template to be Visible To – Anyone (the default setting0 or set the new template to be ‘private’ and limit the view to a specific user.

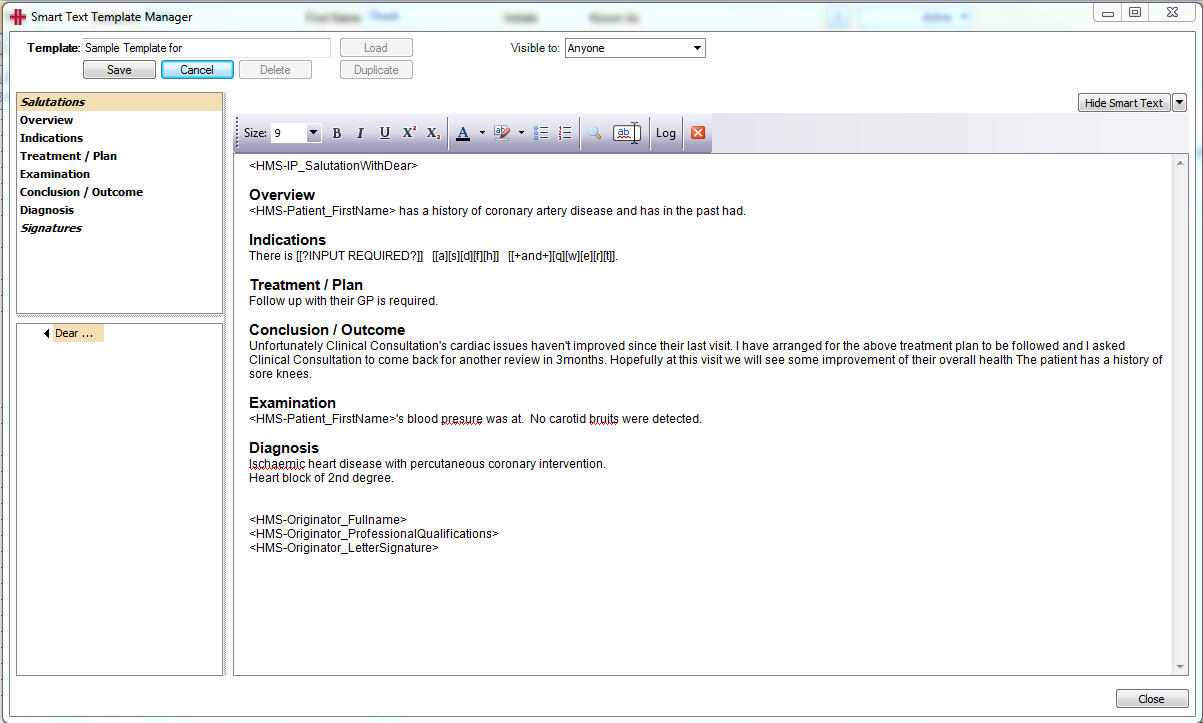
You can now create a template using the Groups/Headers on the left and the smart text already added to those headers or you can use the headers and manually type or cut and paste text below the headers to create your smart text template.
The [Duplicate] button allows users to easily create copies of existing templates and make minor changes.
The [Visible to] field allows a user to limit who can see and therefore use their templates.
-
“Anyone” means any user or doctor will be able to access the template.
-
A doctor name means only that clinician can see a smart text template.
Important: When creating a ‘smart text template’ from an existing report it is important not to ‘Copy & Paste’ the complete report including Headers. Doing this will cause the Template manager not to remember the report heading formatting and order and will cause issues when you later try to edit the template. Always double click on the header and then copy and paste the body of the text under the header only.
Click ‘Save’ to save your new Smart Text Template. Your new smart text template will be available for you the next time that you want to create a new clinical record.
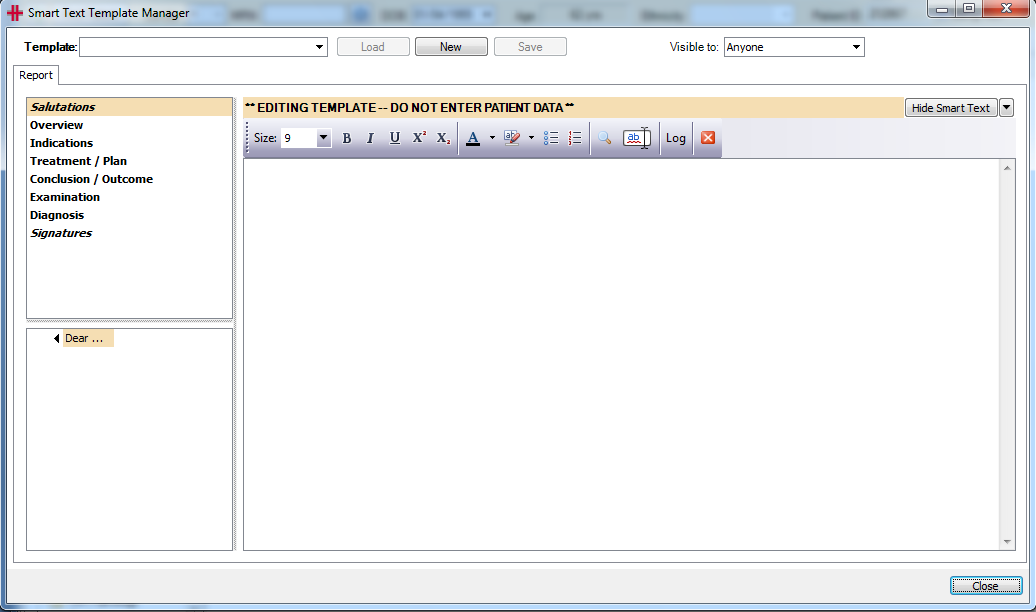
Clicking on ‘Edit Templates’ will open the ‘Smart Text Template Manager’ with a list of available smart text headers and text, as well as rich text formatting options such as size, font, bolding and colour etc.
Trying to save a Template without adding a heading first will bring up a warning message.
Multiple Smart Text Templates
Multiple Smart Text Templates can now be added to a report. If smart text is already in the box and you double-click a Template, it will ask you whether you want to APPEND the template to the end, or to CLEAR and REPLACE by clearing all text then replacing it with just the template. Appending the new template to the end will remove header tracking systems from newly inserted text. You can append an unlimited number of templates, but all appended text will be without header tracking.
Quick Reference Sheet
Smart Tags
| Smart Tag | Description | Usage |
|---|---|---|
| <ENTER> | Tag will be automatically replaced with a carriage return when the text is loaded to the screen. | This tag will force a carriage return to appear at this position. |
| [[TIME12]] | Double-click tag for “current time” in 12 hr format (5:55 pm). | Time tracking during a procedure |
| [[TIME24]] | Double-click tag for “current time” in 24 hr format (17:55). | Time tracking during a procedure |
| [#CLEAR] | [#CLEAR] is a reserved hashtag. When you double-click [#CLEAR] It will remove the entire "smart tag" without resolving it. This is best combined with single-select lists, where the user would be choosing from a specific outcome or wish to clear the tag entirely. |
Remove the "smart tag" without resolving it. |
| [[HMS_xxx]] | Smart Text Reporting and Templates supports [[HMS_xxx]] tags that, when evaluated, insert a value into the report that has been retrieved from elsewhere in the clinical record. Eg: [[HMS_12345]] |
When evaluated, the tag will draw a value from a data field elsewhere in the record that matches the number specified and inserts it. |
| [[mild][moderate][severe]] | Select one of the options contained within the square brackets [] |
Choice of one from a range of options. |
[[+or+][red][green][blue][black]] or [[+and+][red][green][blue][black]] |
Select multiple of the options Choices separated by comma (,) and last pair by either “or” or “and”. |
Multi-select of options from a range of options. E.g. Red, blue or black. |
| [[&", "&][[HMS_100]][[HMS_101]]] | Joins the list of results with the joiner specified in double quotes. Empty result values are not included. Also supports CR as the joiner. Eg: [[&", "&][[HMS_100]][[HMS_101]]] Arrhythmia, Hypertension |
Useful for joining multiple tickbox values together. |
Hash Tags
| Hash Tag | Description | Usage |
|---|---|---|
| #hashtag | A single word to represent a “Smart Text” node/blob of text. When a #hashtag is used inside a “Smart Tag”, the #hashtag is not resolved until the user interacts with the "smart tag". #hashtag’s are recursive i.e. the #hashtag text may contain another #hashtag, etc. |
A quick way to include the text from a “Smart Text” node. |
Multi-select Options
-
All “Multi-select” “smart tags” will result in a pop-up window for the user to select one or more options, as defined in the “smart tags”.
-
The first embedded pair of square brackets [] may contain formatting options separated by the plus (+) symbol. Multiple formatting options can be included within this first section, such as combining +”; “+ with +and+ (eg: [+”; “+and+] )to result in an outcome such as red; blue and black.
-
“Multi-select” does not capitalise the first word and does not add any ending punctuation.
| Smart Tag | Description | Usage |
|---|---|---|
[+or+] E.g. [[+or+][a][b][c]] |
Choices separated by comma (,) and last pair by “or”. | Example: Red, blue or black. |
[+and+] E.g. [[+and+][a][b][c]] |
Choices separated by comma (,) and last pair by “and”. | Example: Red, blue and black. |
[+”; “+] E.g. [[+”; “+][a][b][c]] |
The characters within the double quote will be used as the separator between the selected options. No capitalisation of ending punctuation is added. Examples: [[+”; “+][Red][Green][Blue][Black]] [[+” “+][Red.][Green.][Blue.][Black.]] |
Use this to provide a list on a single line with no conjunctive. i.e. a serial list of statements not joined. |
[+CR+] E.g. [[+CR+][a][b][c]] |
The CR between the plus symbols (+) represents a “carriage return”. Thus, each selected option will be on a new line. |
Use this when you want a list such as:
|
[+LD+] E.g. [[+LD+][a][b][c]] |
The LD between the plus symbols (+) represents a “list of dot-points”. Thus, each selected option will be on a new line with a dot-point out the front. NOTE: Available in Web Reporting only. |
Use this when you want a list such as:
|
[+LN+] E.g. [[+LN+][a][b][c]] |
The LN between the plus symbols (+) represents a “list of numbers”. Thus, each selected option will be on a new line with an incrementing number out the front. NOTE: Available in Web Reporting only. |
Use this when you want a list such as:
|
#hashtag [[#myHashTag][#CLEAR]] |
When a #hashtag is used inside a “single-select” smart tag, the resulting text in the pop-up selector will resolve #hashtags to ONLY ONE Level (i.e. not recursively). | Using #hashtags is a great way to hide long “smart text” blobs from the user until they need to see the text to make a choice. |
Smart Tag Modifiers
The [[HMS_xxxxx]] Smart Tags support a range of modifiers that can be added to the smart tag to modify the result of the smart tag. This can occur regardless of whether a HMS reference ID returns a string or a number, ie: return values such as “Male” and “3.6666” can be modified.
| Smart Tag Modifier | Description |
|---|---|
| [[HMS_xxx_WithUnits]] | Adds the field’s Units to the end of the result. This modifier is not available for all fields. Example: 5.2 mL |
| [[HMS_xxx_Format:"dd/MM/yy"]] | Formats the value with the format string provided. Supports the full range of available date / time formats from letter template tags, and numbers can be formatted to show a number of decimal places. |
[[HMS_xxx_M:a]] or [[HMS_xxx_D:b]] or [[HMS_xxx_R:c]] |
Performs arithmetic on the resultant value. M for Multiply, eg: M:100 will multiply the value by 100. D for Divide, eg: D:100 will divide the value by 100. R for Rounding, eg: R:3 will round the result to 3 decimal places. These modifiers can be added together to multiply a value and then round it, or divide a number then round it. There is no benefit to using both multiply and divide. Example: [[HMS_12345_M:100_R1]] could take a field from the screen with a value of 0.666666667 and convert it into a result of 66.7% |
[[HMS_xxx_Prefix:”aaa”]] and [[HMS_xxx_Affix:”aaa”]] |
If a value is found for “xxx”, these modifiers will add additional text before or after the value. If there is no value found for “xxx” then nothing will occur. This can be useful for specifying your own units to appear after a value using Affix, or specifying a field label to appear before a value using Prefix. [[HMS_12345_Prefix:”Height: ”_Affix:”cm.”]] Results in: Height: 180cm. Both Prefix and Affix modifiers support the <ENTER> smart tag. |
| [[HMS_xxx_V]] | Dropdowns, radio buttons and checkboxes store raw values in the database such as “1”, “2”, etc, as well as the displayed text, such as “Yes” or “No”. Using this modifier will display the underlying raw value for a field instead of its displayed text. This is most useful when performing Case logic. |
| [[HMS_xxx_Case:1=”..”]] | Added to an HMS tag, or by utilising the modifier [[HMS_xxx_V]], you can perform case logic on the result value. This is useful when the user has chosen a specific option from a dropdown list, radio button or checkbox, and you wish to display some specific text when that value is chosen. The Case modifier supports multiple chained interpretations so you can cater for several different outcomes for a single dropdown list. Using the option default=”aaa” will display the resultant text aaa if no match occurs. Default would be used if you wish to cater for one or two specific options from the dropdown list, but in all other cases default to something else, such as an empty output. Each multiple operation can be joined with a comma, and the order of the operations is not important. Eg: [[HMS_12345_V_Case:default=””,1=”Sample text”,2=”Some other text”]] For a raw Value of “1” this would instead print the text Sample text. For a raw Value of “2” this would print the text “Some other text”. For a raw Value of anything else, such as 3 or 4, this would print nothing. |
Modifier Tips: Most modifiers can be chained together to create a complex outcome for a single field.
Eg: [[HMS_12345_V_Case:default=””,1=”Sample text”,2=”Some other text”_Prefix:”Outcome: “
_Affix:”<ENTER>”]]
With an input value of “2” this might result in something like:
Outcome: Some other text (and a new line afterwards)
Examples
All the above options may be used in combination, in any order. Examples:
| Smart Text | Result |
|---|---|
[[#ChooseColour][#CLEAR]] In the above example, the hashtag #ChooseColour has been bound to equate to smart text that looks like: [[+”;”+CR+][red][green][blue][black]] When the user double-clicks on the #ChooseColour hashtag, it will result in the above smart text being displayed on the screen. The user can interact with that smart text tag by double-clicking on the smart tag, resulting in a popup selector being displayed. If the user selected red and green and black the following would result: |
red; green; black |
[[Option 1][Option 2][Option 3][#CLEAR]] Double-clicking on #CLEAR will remove the entire tag with no resultant text. |
Entire tag removed |
[[+CR+][- red][- green][- blue][- black]] If the user selected red and green and black the following would result: |
- red - green - black |
[[+”;”+][red][green][blue][black]] If the user selected red and green and black the following would result: |
red; green; black |
[[&CR&][[HMS_100_Prefix:”- “]][[HMS_101_Prefix:”- “]]][[HMS_102_Prefix:”- “]]] In the example, fields 100 and 101 have results but 102 does not (unticked). |
- Arrhythmia - Hypertension |
Text Flow
| Option | Description | Usage |
|---|---|---|
Add Template [Append] |
Adding more than one ‘Smart Text Template’ to a single report | Combining two or more ‘Smart Text Template Reports’ |
Add Template [Clear and Replace] |
Clearing & Replacing a ‘Smart Text Template’ report with another | Replacing a ‘Smart Text Template’ report with another without first having to delete the first selected report |
| F4 the navigate to tags | Pressing F4 will skip through to the next ‘Smart Tag’ in the report with the tag highlighted including opening/closing [] brackets. Once you have reached the end of the report, pressing F4 will start from the top of the report again. After having pressed F4 to target a tag it will become highlighted on the screen. Typing anything on the keyboard will overwrite the tag with what you type. |
This shortcut allows you to quickly complete a ‘Smart Text’ coded report by jumping to each of the ‘Smart Text’ blocks like they were bookmarks and typing in content for your report. |
| Highlighting ‘text’ | Using the tag [[]], or e.g. [[?WEIGHT?]] kg, and will highlight all text including the [[ and ]] brackets | To highlight where input is required from a user in a report |
| Typing over highlighted text | Typing over highlighted a “Smart Tag” will automatically remove the green highlight | To highlight where input is required from a user in a report |
| Copy/Paste | Support for copy-paste of rich text that has come from other Report tabs, including the headings, images, etc. | able to copy/paste existing text or images into a new report |
| Disabling Header Tracking | Disabling the Header Tracking system: In Smart Text Editor, select a group with a Header style and tick the Header Tracking Disabled checkbox. All smart text and groups that are owned by this Heading will have header tracking disabled, | Disabling the Header Tracking system provides two benefits: 1) Double-clicking a header with “Header Tracking Disabled” will insert the header where the cursor is with no regard for display order. The header can be added in multiple times, wherever the cursor is 2) Double-clicking a smart text node where its immediate header has Header Tracking Disabled will insert the smart text where the cursor is, and will not automatically insert its owner header. |
HealthTrack Administrator
Imported External Smart Text
Smart Text Reporting system can now import external measurements/text directly into the smart text tree. This function is enabled on a per-record basis by HealthTrack support and is dependent upon the type of data that is provided to HealthTrack via 3rd party integrations.
Clinical Report Configuration
In the Admin > Clinical Report Configuration screen:
if a smart text report section has been selected in a report and the smart text header is deleted or no longer has a ‘Header 1’ Style, then the report section will now display ‘Smart Text Heading Missing’.
Report section called ‘Structured Report Fallback’ can be added to reports from the “Clinical Report Configuration” screen that will only print when no other report text has been printed from the ‘Structured Report’ sections. This is intended to catch cases where the smart text was not entered correctly. The ‘Structured Report Fallback’ report section must appear at the end of the report.
Notes:
-
Smart Text Editor: You can paste images.
-
Smart Text Editor: Undo will not go past most recently inserted Heading.
-
Smart Text Editor: Does not clear bullet points and replaces with punctuation when inserting Smart Text node that ends with a bullet point.
-
Smart Text Editor: Smart Text reporting tags formatted with bold, underline, etc, will retain their font formatting when they are replaced via the template tag system.
-
Rich Text Editor: Inserting Smart Text in the Rich Text Editor does not remove highlights contained further in the document.
-
Rich Text Editor: Will not insert Headers into tables if tables are last text of a section.
-
Rich Text Editor: Works with bullet points containing Smart Text quick select tags.
-
Rich Text Editor: Multiline Smart Text can be embedded in the Rich Text Editor under different headers.
-
Rich Text Editor: When using the Double-Click “Smart Tag” system the highlight will remain within the [[ ]] tag.
-
Rich Text Editor: When changing the originator via Info in a clinical record it will flow through to signatures tags used in the smart text system (the old/previous originator value was used).
Reference Range Field Labels
-
The HMS_ReferenceID table’s RangeLabelOverride field can be set to a string that will override the normal range value label. This field supports including the low/high normal range values (NormalMinValue and NormalMaxValue).
-
The HMS_ReferenceID_Lookup table’s RangeLabelOverride field can be set to a string that will override the range label derived from the FormulaDescriptorLowValue and FormulaDescriptorHighValue fields.
-
The default normal range format string is: {0} – {1}. Where {0} is the min value and {1} is the max value.
-
To change the format of the {0} or {1} value, such as making the number appear as 3.55, the HMS_ReferenceID.NormalRangeFormatString field needs to be set. By default it’s 0.#, but could be changed to 0.00 to force two decimal places at all times. Your RangeLabelOverride would still be Z: {0}, and when evaluated the {0} would be replaced by 3.55.
-
Other examples:
- Z: {0} would equate to “Z: 3.5” where the 3.5 is from HMS_ReferenceID.NormalMinValue OR calculated from HMS_ReferenceID_Lookup.FormulaDescriptorLowValue if using lookups.