Clinical Summary
Clinical Summary Tab Overview
The Clinical Summary tab provides an overview of a patient’s history. This includes:
-
Measurements
-
Conditions/Diagnoses
-
Current Medications
-
Procedures
-
Clinical Notes
-
Custom Fields (fields used to identify the patient for clinical trials, research projects, medication studies, etc.)
Allergies, Family History, and Vaccinations/Immunisations for the patient can also be recorded in the Clinical Summary tab.
Measurements
The Measurements section displays a table to list a patient’s blood pressure, height, weight, and BMI, as well as oxygen saturation. Measurements will list the date and location of a patient’s booking.
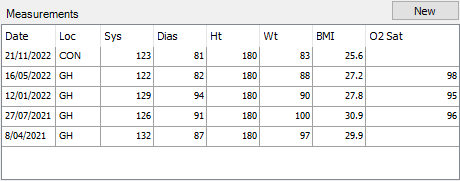
The measurements displayed in this table are recorded in the ‘Base Assessment’ Clinical Record.
You can double-click on a row to go to the ‘Base Assessment’ record to view more information.
To add a new set of measurements:
-
Create a new ‘Base Assessment’ Clinical Record.
-
This can be added from the Clinical Summary tab by selecting the New button above the measurements; or
-
From a Clinical Consultation, select the Base Assessment button; or
-
In the Clinical Records tab, highlight the ‘Base Assessment’ folder and select the New button at the bottom of the screen.
-
-
Fill in the relevant fields to record various measurement details, such as the patient’s height, weight, blood pressure, pulse, oxygen saturation, temperature, or blood type.
-
Select the Save button at the bottom of the screen.
After refreshing the patient’s record, the new measurements will be displayed in the Clinical Summary tab.
Graphing Measurements
Measurements can be viewed on a graph by double-clicking the column headings of the Measurements table.
Conditions
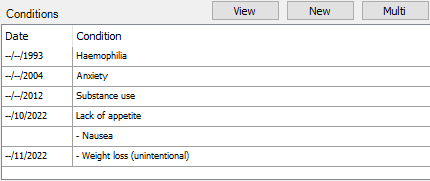
The Conditions section will list any conditions recorded for the patient that are marked as Current.
Current conditions are those that the doctor has deemed to have current clinical relevance.
New conditions can be added individually by selecting the New button above the listed conditions, or multiple conditions can be entered by selecting the Multi button.
To add a single condition:
-
Select the New button.
-
Choose from the Summary drop-down, and/or enter the condition in the Additional Text field.
-
Set the Start End Date for the condition.
- The Accuracy option allows you to enter a full date, or can be reduced to enter a month/year or only a year.
-
Fill in any further information about the condition.
-
Select the Save & Close button.
A new condition can also be added via the Clinical Notes.
To add multiple conditions:
-
Select the Multi button.
-
In the Conditions Multi Adder window, enter each condition on a new line.
-
Select the Add button to have all conditions added to the patient with today’s date.
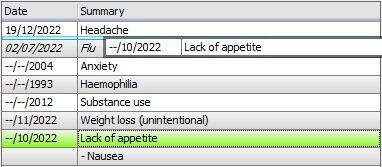
Selecting the View button will open the Conditions window, which displays a list of all conditions and additional information for each. In this window, conditions listed in italics are those that are no longer current.
From the Conditions window, conditions can be added or edited, and can be configured with a parent/child relationship if related.
To re-order the conditions:
-
Select the View button to open the Conditions window.
-
Highlight an existing condition.
-
Drag each condition up or down the list, or use the arrow buttons to the right of the condition list to move the highlighted condition up or down the list.
-
Choose the Save Ordering button to save the changes made to the condition order, or the Reset Ordering button to discard these changes.
To create parent/child relationships for related conditions:
-
Select the View button to open the Conditions window.
-
Drag the child item into the parent item.
-
The child item will be listed below the parent item, and will be prepended with a hyphen/dash to signify it is a child of the un-hyphened condition above.
-
Select the Save Ordering button.
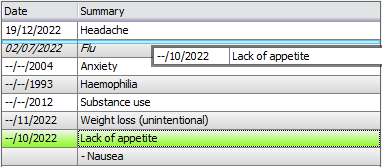
| To re-order items, one condition can be dragged above or below another. In this example, Lack of appetite is being added between Headache and Flu, as the blue line is below the line that divides Headache and Flu. |
|
|---|---|
| To create a parent/child relationship, a child condition can be dragged below the item which is to be the parent. In this example, Lack of appetite is being added as the child of Headache, as the blue line is above the line that divides Headache and Flu. |
|
Reports for conditions can be recorded in the Report tab of the appropriate record in the Clinical Records tab. These are reports that can be distributed to interested parties. For more information, please see the Clinical Records page.
Current Medications
The Current Medications section displays a list of medications that a patient is known to be taking.
Medications highlighted brown are unapproved prescriptions, such as those added by a user that is not a doctor. Medications highlighted orange are expired prescriptions, which are those that are not ongoing.
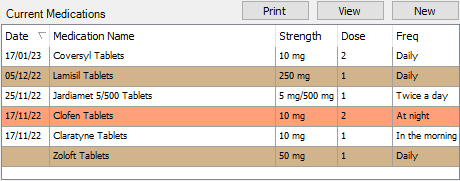
Above the list of medications are three buttons:
Print – prints a list of the patient’s current medications.
View – opens the Medication Review window to show all current, past, and cancelled medications for the patient.
New – opens the Medication Prescriber window to create a new prescription.
For more information, please see the Prescription Module section.
Procedures
The Procedures section will list any procedures recorded for the patient that are marked as Current.
Current procedures are those that the doctor has deemed to have current clinical relevance.
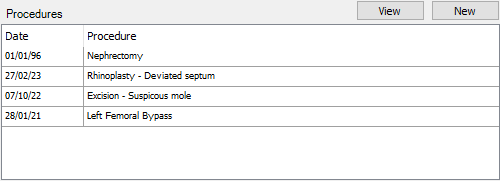
New procedures can be added by selecting the New button above the listed procedures.
-
Select the New button.
-
Choose from the Procedure drop-down, and/or enter the procedure in the Additional Text field.
-
Set the Start/End Date for the procedure.
-
Fill in any further information about the procedure.
-
Select the Save & Close button.
A new procedure can also be added via the Clinical Notes.
Selecting the View button will open the Procedures window, which displays a list of all procedures and additional information for each. From this window, procedures can be added or edited.
The order that procedures are listed can also be customised in this window.
-
Select the View button to open the Procedures window.
-
Highlight an existing procedure.
-
Use the arrow buttons to the right of the procedure list to move the highlighted procedure up or down the list.
-
Choose the Save Ordering button to save the changes made to the procedure order, or the Reset Ordering button to discard these changes.
Reports for procedures can be recorded in the Report tab of the appropriate record in the Clinical Records tab. These are reports that can be distributed to interested parties. For more information, please see the Clinical Records page.
Clinical Notes (Medical History)
At the bottom of the Clinical Summary tab is the Clinical Notes section, which can be used for providers to record information internally.
The Clinical Consultation record in the Clinical Records tab can be used to write a report following a patient’s consultation. This report is often distributed to the patient’s Referring Doctor and/or GP as necessary.
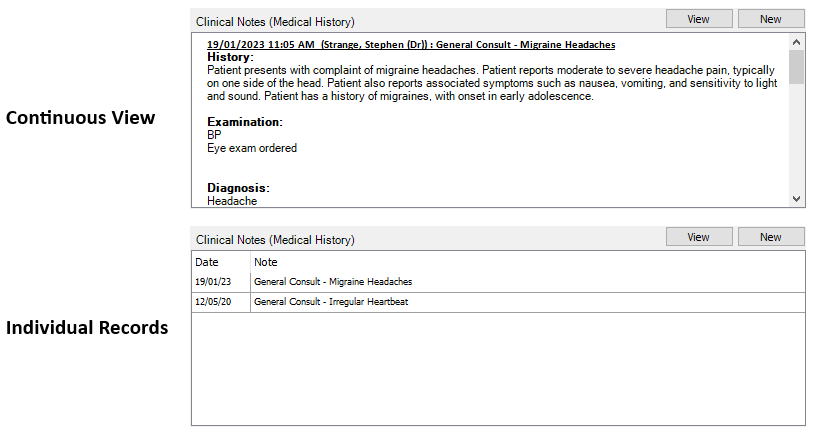
The preview of the Clinical Notes section can list notes as individual records, or as a continuous view. Users can set their preference in File > User Preferences > Clinical Details > Default Clinical Notes View.
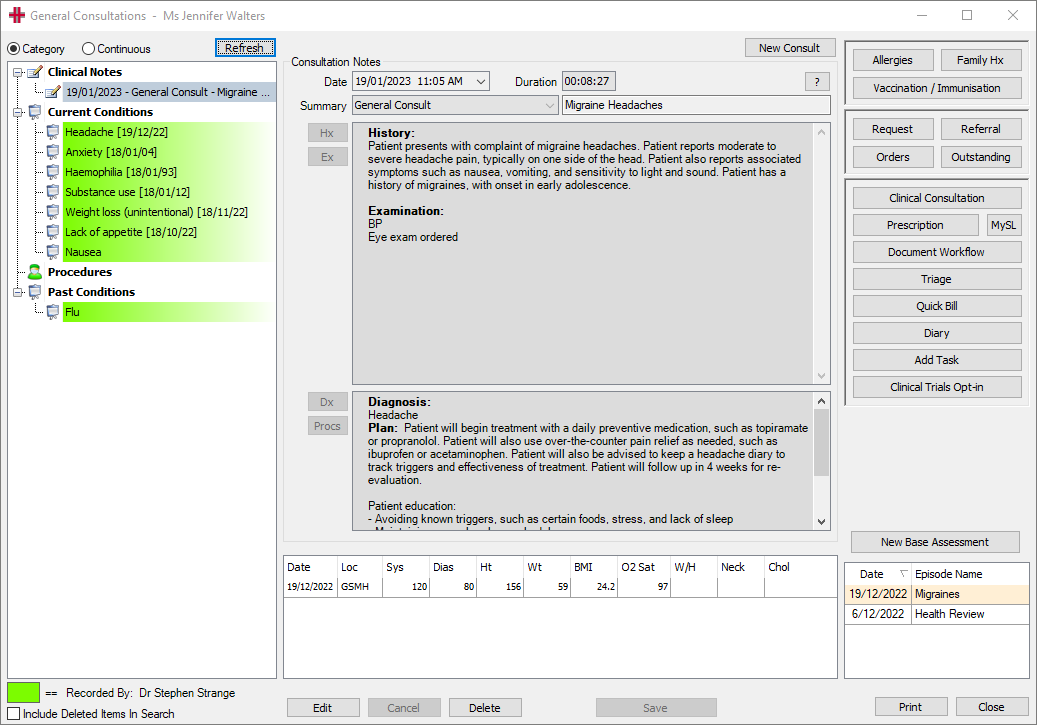
The General Consultations Window
The General Consultations window is the screen that opens when creating a new clinical note, or by selecting the View button.
There are four main sections to this window:
-
The left-hand side displays a list of clinical notes, current and past conditions, and procedures.
- This panel can be viewed in a Category mode, with distinctions between notes, conditions, and procedures; alternatively, the Continuous mode groups items based on the date, and the preview will only show notes.
-
The centre of the screen displays the details for the note/condition/procedure selected on the left-hand side. The centre of the screen is also used when entering new notes.
-
The right-hand side features various buttons for navigation. These are the same buttons listed on the right-hand side of the Clinical Summary tab. Please see the Other Clinical Functions section for more information.
-
The bottom of the screen lists an overview of measurements for the patient.
Adding a Clinical Note
-
Select the New button.
-
If prompted, select an episode to associate the consult with, then choose the Select button.
-
Select from the Summary drop-down and/or enter a description for the consult. The Summary list provides consistency across all users and assists in reporting functions.
-
In the top text box, record details of the History and/or Examination. The Hx and Ex buttons can be used for accessing Smart Text templates for the consult notes.
-
In the bottom text box, use the Dx button to add a new Condition, and the Procs button to add a new Procedure.
-
Select the Finish button at the top of the screen to stop the timer if the patient’s consult has ended.
-
Select the Save button to save the consult note.
Episodes allow for consultations to be grouped together. For example, if your patient is diabetic, you can capture all consultation notes relating to their diabetes into a Diabetic episode. This can be used to identify consultations related to their diabetes, as opposed to consultations for separate conditions or comorbidities.
A new note can also be added directly from the Diary by right-clicking a booking and selecting Go to Clinical Note <F4>.
Edit or Amend a Clinical Note
A Clinical Note is editable for 24 hours from the time it was created, by the user that created the note.
-
Select the View button above the Clinical Notes section in the Clinical Summary tab.
-
Ensure the Category view is selected in the top left of the General Consultations window.
-
Highlight the note which is to be edited.
-
Select the Edit button.
-
Make the changes required.
-
Select the Save button.
After 24 hours, it is no longer possible to edit a Clinical Note, but the notes can be amended.
-
Select the View button above the Clinical Notes section in the Clinical Summary tab.
-
Ensure the Category view is selected in the top left of the General Consultations window.
-
Highlight the note which is to be amended.
-
Select the Amend button.
-
Enter any information relevant for the note’s amendments.
-
Select the Done button.
The amendments to the note will be displayed below the existing history and examination information recorded.
Clinical Notes can be amended by the user that created the note, however additional permissions can be provided to allow a user to amend any note. Please speak to your manager for assistance.
Deleting a Clinical Note
Some users will have the ability to delete Clinical Notes, in the event this is required.
Once deleted, it is not possible to restore a Clinical Note.
-
Select the View button above the Clinical Notes section in the Clinical Summary tab.
-
Ensure the Category view is selected in the top left of the General Consultations window.
-
Highlight the note which is to be deleted.
-
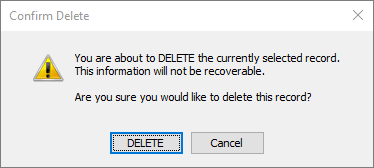
Select the Delete button.
-
You will be prompted to confirm you wish to delete the record; select the DELETE button to proceed.
- You will additionally be prompted to enter a reason for the deletion; type the reason for deleting the note, then select the Done button.
Clinical Notes Security Permissions
The following permissions can generally be provided to users by an administrator to allow a user to perform additional tasks surrounding the clinical notes.
| Permission | Description |
|---|---|
| ClinicalNotesSecurityAdmin | Allow all Secured Clinical Notes to be viewed, any Doctors and Groups with this permission can change the security settings on this record (but not modify the record itself). |
| ClinicalSummary_ClinicalNotes_Amend | Allow the user to amend any Clinical Note not just their own. Intended for Administrators |
| ClinicalSummary_ClinicalNotes_CreateNew | Allow user to create new clinical notes on the Clinical Summary screen. |
| ClinicalSummary_ClinicalNotes_Delete | Allow user to delete any Clinical Note, not just their own. Intended for administrators. |
Custom Fields
Custom Fields can be added to patients, which allows users to track or identify a set of patients at a later date. Custom Fields may often be used for clinical trials, teaching cases, and research studies, among other things.
For more information, please see the Custom Fields page.
Allergies
The Allergies button can be used to record a patient’s allergies and reactions.
-
In the Clinical Summary tab, select the Allergies button from the buttons available on the right-hand side.
-
Select the New button.
-
Enter any details known about the allergy, such as the Allergy Type, Allergy Code, and Allergy Severity.
-
Enter any additional Notes about the allergy.
-
Tick the Alert box if users should be alerted of the specific allergy when accessing the patient’s record.
-
Select the Save button.
When allergies are recorded for a patient, the Allergies button will display a green tick.
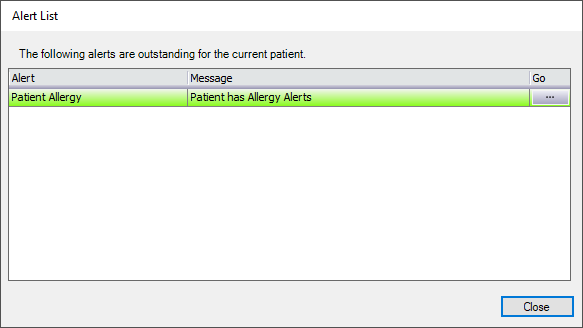
When the Alert option is ticked for allergies, users will be prompted with the Alert List window when accessing the patient’s record. Clicking the … button will open the Patient Allergy window for the user to view further details about the allergy. Users will also see this alert in the bottom right of the patient’s Demographic screen.
Family History
The Family Hx button can be used to record details about which family members have a history of certain conditions. The rows highlighted in red indicate that there is history recorded for the condition; ticking the Show only items with history option in the top right will refine the list to only these specific factors.
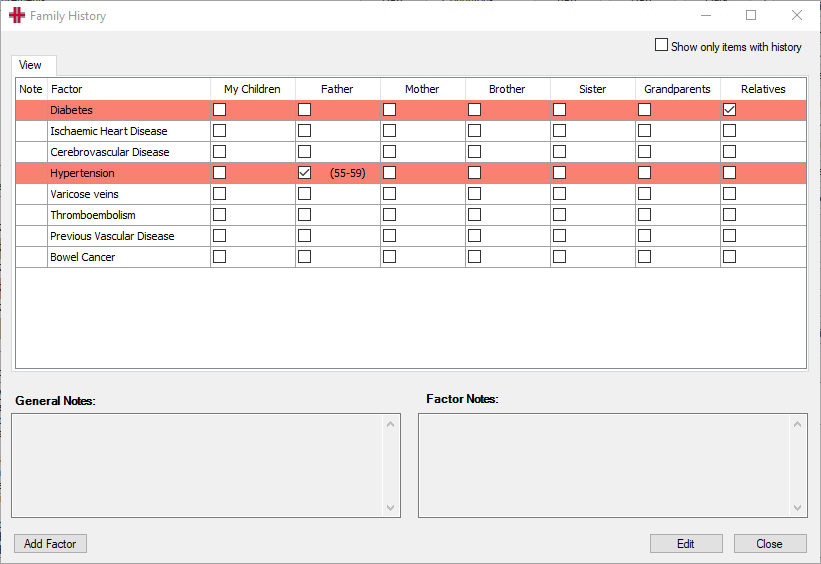
Please see the steps below for instructions on recording family history.
-
In the Clinical Summary tab, select the Family Hx button from the buttons available on the right-hand side.
-
Select the Edit button.
-
Tick the boxes for each family member that is known to have a particular condition
- In the Detail tab, you can optionally record an age bracket to reflect the age the family member was diagnosed.
-
Enter any General Notes or Factor Notes at the bottom of the screen.
- Any General Notes will always display in the Family History window, but the Factor Notes relate a specific condition.
-
Select the Save button.
If there are conditions not listed in the Family History window, they can be added using the below steps.
Any conditions added using the below steps will be available for selection on all patients in HealthTrack.
-
In the Clinical Summary tab, select the Family Hx button from the buttons available on the right-hand side.
-
Select the Add Factor button in the bottom left.
-
In the HMS List Manager window, select the Edit List button.
-
Select the Add Item button.
-
Enter the name of a condition in the Value field.
-
Select the Save Item button.
- Repeat Steps 4-6 for each condition to be added.
-
Select the Save List button after all conditions have been added.
-
Select the Close button to return to the Family History window.
-
Restart HealthTrack for the newly added items to be available for selection.
Other Clinical Functions
The other buttons on this screen provide quick access to other functions within the HealthTrack system such as Pathology Requests and Prescriptions.
Allergies – this button opens the Patient Allergy window, which can be used for recording allergies and reactions. When an allergy has been recorded, this button will appear with a green tick. For more information, please see the Allergies section above.
Family Hx – this button opens the Family History window, which can be used to record conditions, and which family member has a history of the condition/s. When family history has been recorded, this button will appear with a green tick. For more information, please see the Family History section above.
Vaccination / Immunisation – this button will open the Vaccination / Immunisation window to record previous vaccines and schedule future vaccines. When vaccinations have been recorded, this button will appear with a green tick. For more information, please see the Vaccinations & Immunisations page.
Request – this button will open the Requests window, and can be used for creating pathology and radiology test requests. For more information, please see the Requests page.
Referral – this button opens the Add/Modify Referral screen, and can be used to create an outbound referral. For more information, please see the Referrals page.
Orders – this button opens the Orders window to request tests with certain machine integrations. For more information, please see the Orders page.
Outstanding – this button opens the Outstanding Outbound Requests window, which can be used to view requests for a specific patient or by a specific doctor. For more information, please see the Outstanding Requests section.
Clinical Consultation – this button will take the user to the ‘Clinical Consultation’ in the Clinical Records tab, which can be used to write a report for a patient’s consult. For more information, please see the Clinical Records page.
Prescription – this button will open the Medication Prescriber button, and can be used to record medications a patient is taking or prescribe medication. For more information, please see the Prescription Module page.
MySL – this button will open the Patient Active Script List (MySL) window the patient. This is a feature of ePrescribing, and can be used to access details of medications prescribe externally. For more information, please see the Viewing a Patient’s Active Script List (MySL) section.
Document Workflow – this button opens the Document Management window. For more information, please see the Document Workflow System section.
Triage – this button will prompt open the Triage and Waiting List Monitor window. For more information, please see the Triage page.
Quick Bill – this button is used to add pending item numbers for a patient, which can then be invoiced accordingly. Please see the Quick Bill section for more information.
Diary – this button can be used as a shortcut to open the diary. For more information, please see the Diary page.
Add Task – this button can be used to open a new task related to the current patient. For more information, please see the Tasks page.
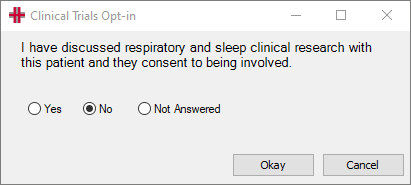
Clinical Trials Opt-in – this button will open a Clinical Trials Opt-in prompt, which can be used to note that a patient has consented to being involved in clinical trials. The answer recorded will be listed in the Custom Fields section for the patient. Please contact HealthTrack Support to configure this option.