Accounts
How to create a ‘Bank Deposit’
The Bank Deposit screen can be opened through the Accounts menu >> Bank Deposit. This screen is used to manage the bank deposits for the practice.
1.0
! Bank Deposit pic 1 (image1.png)
The Bank Deposit Slip History screen can be divided into five sections.
Box A: Previous Deposits allows the user to filter the display of previous deposits. These filters include billing locations and date range. The user can also select to only see current deposits or show all deposits included Voided.
Box B: The deposits are displayed in the table in box B. At the bottom of this table is a totals summary displaying totals for Unbanked payments (the total of all payments listed in the Unbanked Payment Screen. This is explained in Box D), “In-Progress” deposits (the total of all deposits with an In-Progress Status), “Sent to Bank” deposits (all deposits with a Sent to Bank status) and a Combined Total. When any deposit is selected in this table, the details of the deposit will populate box C.
! Graphical user interface, application, table, Excel Description automatically generated (image2.png)
Box C: This section displays the details of any deposit that has been
selected in the Deposit list table. Any notes regarding the deposit can
be entered into the ‘Notes’ field and then saved by
pressing
 .
.
! Graphical user interface, text, application, email Description automatically generated (image4.png)
Box D: This section contains buttons for common banking tasks.
! Diagram Description automatically generated with low confidence (image5.png)
 This button opens the following
window:
This button opens the following
window:
! Graphical user interface, application, table, Excel Description automatically generated (image7.png)
This screen displays any payments that have not been created into a Bank
Deposit. To create a new bank deposit click
 . This creates a bank deposit on the
Bank Deposit Slip History screen with a status of In-Progress.
. This creates a bank deposit on the
Bank Deposit Slip History screen with a status of In-Progress.
 This button is for creating a new
bank deposit without entering the Unbanked Payments Summary. The user
can specify criteria using the drop down menus in box C to select the
location MO and dates to include in the new deposit. Once New is
pressed the deposit will appear in the Deposit List table in the Bank
Deposit Slip History screen.
This button is for creating a new
bank deposit without entering the Unbanked Payments Summary. The user
can specify criteria using the drop down menus in box C to select the
location MO and dates to include in the new deposit. Once New is
pressed the deposit will appear in the Deposit List table in the Bank
Deposit Slip History screen.
 To print the Deposit Slip of the
selected Bank Deposit.
To print the Deposit Slip of the
selected Bank Deposit.
 To use this button select a Bank
Deposit and new dates in the ‘Up to and including’ field in box C, then
when ‘Recalculate’ is pressed it will add any payments (that fit the
criteria entered) from Unbanked Payments into the Bank Deposit. This
will recalculate the bank deposit total and include these new payments.
To use this button select a Bank
Deposit and new dates in the ‘Up to and including’ field in box C, then
when ‘Recalculate’ is pressed it will add any payments (that fit the
criteria entered) from Unbanked Payments into the Bank Deposit. This
will recalculate the bank deposit total and include these new payments.
 To print the details of the Bank
Deposit. This is similar to Deposit Slip, but contains a more detailed
list of the payments included in the deposit.
To print the details of the Bank
Deposit. This is similar to Deposit Slip, but contains a more detailed
list of the payments included in the deposit.
 This button changes the status
from ‘In-Progress’ to ‘Sent for Banking’. This button should be pressed
when a deposit is submitted to the bank. Once the deposit is send for
banking the payments contained in the deposit can not be edited or
adjusted.
This button changes the status
from ‘In-Progress’ to ‘Sent for Banking’. This button should be pressed
when a deposit is submitted to the bank. Once the deposit is send for
banking the payments contained in the deposit can not be edited or
adjusted.
 This allows the user to select an
In-Progress Deposit and send all the payments back into Unbanked
payments. The following confirmation will appear.
This allows the user to select an
In-Progress Deposit and send all the payments back into Unbanked
payments. The following confirmation will appear.
! Graphical user interface, application Description automatically generated (image15.png)
Void can be used to adjust or reverse individual payments within the deposit. Payments can not be adjusted when in the process of being banked
 This button is pressed after the
deposit has been sent to the bank. It allows the user to enter the bank
details, the bank reference number and any other information about the
deposit. This will finalise the Bank Transactions.
This button is pressed after the
deposit has been sent to the bank. It allows the user to enter the bank
details, the bank reference number and any other information about the
deposit. This will finalise the Bank Transactions.
! Graphical user interface, application, email Description automatically generated (image17.png)
 Closes the Bank Deposit Slip
History screen.
Closes the Bank Deposit Slip
History screen.
Batch Billing
The idea of batch billing is to combine multiple invoices (for different patients), for the one Doctor at the one location, to the same company who will be paying the claims. Batch billing is used for Medicare Care bulk bill claims, Health Fund claims, DVA claims and third party claims.
To access the Batch Billing module go to the Accounts Menu >> Batch Billing.
! Graphical user interface, table Description automatically generated (image19.png)
Figure 31 - Batch Billing History
The Batch Billing History screen lists all current batches for the selected location by default. This list is determined by the filters at the top of the screen changing these settings will change the batches listed. The filters include Location, Date Range, Show Current Only and Show Voided.
Find Claim Number and Find Batch ID can be used to assist you in finding a specific batch. Below the list of batches are the totals of the amount of money outstanding for each the following groups (based on batch status)
-
Unbatched
-
In Progress
-
Sent to Fund (including Online Ready and Online Sent)
-
Combined
The bottom section of the Batch billing History screen relates to the batch selected in the table. The left-hand side provides details of the selected batch including the date and time of the batch, the location, MO, company claimed from, batch note, batch ID, current status, total batch amount, earliest date in the batch and the date the batch was finalised.
! Graphical user interface, text, application, email Description automatically generated (image20.png)
The Now button adds any outstanding invoices into the batch and updates the date and time to the current time.
Show Outstanding Invoices shows any invoices that have not been included in a current batch (Unbatched invoices). This opens the Unbatched Invoices Summary screen:
1.1
! Table Description automatically generated (image21.png)
This can also be limited to a Location Search (as shown in box A of picture 1.1). Or it can show outstanding invoices for Non Health Fund companies (3rd Party invoices) by ticking the Company Mode box at the bottom of picture 1.1. Next to this box is the outstanding non-health fund total which brings up a detailed view of the invoices.
! Graphical user interface, text, application, table, Excel Description automatically generated (image22.png)
This view can be limited to only show selected MOs by unticking the box next to this option at the bottom of the screen, or limit it to a certain location by unticking the box next to this option. These invoices can be created into batches just like health fund invoices.
In the Unbatched Invoice Summary screen, clicking on a group of invoices and then pressing Create new Batch will put the invoices in the Batch Billing History screen in a batch with a status of ‘In Progress’.
Clicking once on a batch selects it and the batch details will appear at the bottom of the screen. To change batches simply click on another batch in the list. The options buttons at the bottom right are enabled once a batch has been selected. These include Adjust This Item, Print Batch Detail, Add Batch Note, Print Resubmission, Send to Fund, Void, Online Submission and Finalise.
1.2
! Table Description automatically generated (image23.png)
Adjust this Item: This is for viewing all of the invoices in the batch and changing which invoices are included in the batch before it is sent, to limit the chances of a payment rejection. Picture 1.2 shows the Invoice Selection screen for adjusting batches. To select which invoices should be included in the batch, click on the box in the Inc column for the individual invoice. This will place a green tick in the box to indicate that this invoice will be included in the batch. To select all the invoices press Select All. To select none of the invoices press Select None.
Print Batch Detail prints the details for the batch including any notes. It also gives an itemised list of patient and invoice details. A legal disclaimer will be included on the Cover Sheet and must be filled out and signed by the user (as shown in picture 1.3).
Add Batch Note: is for adding notes to the Cover Sheet for the batch when sending it to be claimed.
1.3
! Table Description automatically generated (image24.png)
Print Resubmission: is for printing a cover sheet showing the Batches that are being resubmitted. This is used for any invoices that the fund did not pay for reasons such as no referral details or provider numbers, these invoices can be adjusted according to general accounting standards and resubmitted to the fund. Much like the Print Cover Sheet option, it shows all of the invoices in the batch with an itemised list of the patient and invoice details to be resubmitted. A legal disclaimer is included on the Cover Sheet and must be filled out and signed before sending.
Send to Fund is for manual batching (when the paperwork is sent by post). Clicking this button will bring up a prompt to enter the Claim Number for this Batch.
! Graphical user interface Description automatically generated with medium confidence (image25.png)
Once the Claim number is entered it will change the Batch Status to Sent to Fund:
1.4
! Graphical user interface, application, table Description automatically generated (image26.png)
The Batch Billing History screen displays the date the Batch was sent to the health fund and the claim number. Sometimes it may take more then one payment to balance a batch. So the batch will sit in this screen until all the invoices are balanced within the batch.
Void: Removes the batch and releases the invoices ready for adding to a new batch or ready for correcting, by reversing and reloading the invoices.
Online Submission: Moves an online batch from ‘In Progress’ to ‘Online Ready’. Refer to the Online Batching section of the Usability Guide for more details.
Finalise: When a payment is received from a fund finalise is the process of receipting the payment. Once Finalise is clicked the Advanced Finalise Batch Billing screen will appear:
1.5
! Graphical user interface, application Description automatically generated (image27.png)
The Advanced Finalise Batch Billing screen displays all the batches for the selected health fund (shown in box A) for the MO selected at a certain Location (shown in box B). These can be changed to alter the results displayed in the Outstanding Batches section at the lower half of the screen.
The batches in the Outstanding Batches section can be displayed either as whole batches (this shows up in HealthTrack as orange), with a drop down view of the individual invoices available by clicking the + on the left of the screen (shown in box C).
Picture 1.6 is an example of the screen showing invoices included in the batch (shown in HealthTrack as green). This screen can also be displayed in Patient Mode, which will show all the invoices rather than whole batches (as shown in picture 1.7). This can be done by pressing Switch to Patient Mode As shown at the bottom of picture 1.5 or pressing Switch to Batch Mode to go back to the screen displayed in Batch Mode. There is also an auto-filter bar at the top of the Outstanding Batches section. This changes the order in which the batches are displayed. Each column has an option of order of display, by pressing one of these it will change the order of all the batches shown.
1.6

1.7
! Graphical user interface, table Description automatically generated (image29.png)
The invoices have a tick box in the Inc. column of the Outstanding Batches section (as shown in picture 1.7). When ticked the invoice is included in the batch. When it is unticked the following screen will appear.
! Graphical user interface, text, application Description automatically generated (image30.png)
This is for either sending the invoice back for rebatching - the invoice will then be included in the next batch created with matching details (such as Fund details, MO and Location). Or the user can select Remove from Batching, which will remove the invoice from the batching system completely and the invoice will appear in the patient’s Transaction Listing. The batch will then be recalculated with the invoice removed.
Receive New Payment (As shown at the top of the Advanced Finalise Batch Billing screen in picture 1.7). This button will bring up the payment screen. Enter the payment type with the options (as shown in box A of picture 1.9), and the details will appear (as shown in box B of picture 1.8). Pressing the Received Payment button at the bottom right of this screen will bring the payment to the Received Payments section in Advanced Finalise Batch Billing screen (as shown in picture 1.9).
1.8
! Graphical user interface, application, table Description automatically generated (image31.png)
1.9
! Batch Billing pic 8 (image32.png)
Now the payment needs to be allocated to the batch or batches that have been paid. This is done in the Advanced Finalised Batch Billing Screen (as shown in picture 1.9).
To allocate the payment tick the Allocation circle (as shown next to circle A in picture 1.9). Using the Plus and Minus buttons (as shown in circle B in picture 1.9) will select the whole batch. Allocations can also be made to individual invoices in a batch by opening the batch to see the individual invoices, then using the Plus and Minus buttons next to the individual invoices. Or this can be done by double-clicking on the item to allocate the payment to and making any adjustments required.
When a payment is received for part of a batch, it needs to be allocated to the invoices within the batch. Once the payment is received and the invoice has been selected for allocation click the … button to open the following screen.
2.0
! Graphical user interface, application Description automatically generated (image33.png)
There are options to adjust the balance of the batch after the payment has been received. This would be used when no more payments will be made for the batch. A reason will need to be entered as to why the balance has been adjusted and this will be kept as a permanent record.
The payment can be received and the batch balance can be left outstanding. This will leave the remaining invoices in the batch in the Batch Billing History screen waiting on further payments. A reason will need to be entered as to why only a part payment was received.
The payment can be received and the remaining balance moved to the patient. This means the fund has paid and now the patient has to pay the remaining balance or the gap. A reason will need to be entered as to why the balance was moved to the patient.
Once all of the payment is allocated click Save Allocations and Close to return to the Advanced Finalise Batch Billing screen. If working with more then one payment the Save Allocations and Reload button will save the current allocations and any remaining payments can then be allocated to other batches.
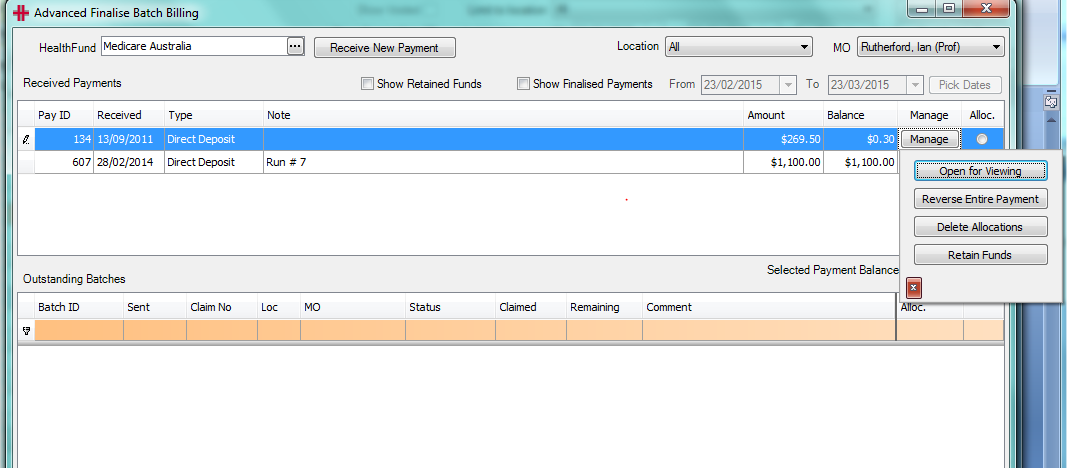
The Manage button (as shown in circle A in picture 1.9) brings up following menu.
! Graphical user interface, text, application Description automatically generated (image34.png)
These buttons are for the payment that is highlighted or selected in the Advanced Finalise Batch Billing screen.
Open for Viewing will open the payment details.
Reverse Entire Payment will reverse the payment. Before reversing any payment a Reason Entry menu will appear to enter why the payment is being reversed. This will remove the payment from HealthTrack completely.
! Graphical user interface, application, Word Description automatically generated (image35.png)
Delete Allocations will delete the current allocations made for the payment. This action occurs immediately and can not be reversed.
Retain Funds will hide the payment from the list, so it will not keep appearing in the received payments part of the Advanced Finalised Batch Billing screen. This is used when too much has been paid and the user will not be allocating the remaining money to an invoice. The payment can be shown in the payments received section of the Advanced Finalised Batch Billing screen by ticking the Show Retained Funds box above the Received Payments section (see picture 2.1).
2.1
! Graphical user interface, text, application Description automatically generated (image36.png)
Batch Allocations Report
The Batch Allocations Report is fantastic for analysing finalised batches, as it lists the patients, item numbers, payments, allocations and adjustments for each batch.
The Batch Allocations Report is accessed from the Accounts menu >> Batch Allocations Report.
! Graphical user interface, application, Word Description automatically generated (image37.png)
The Batch Creation Date Range filters the results to only those batches created within the specified date range. The Batch Location is the billing location that a batch was created for.
The Grouping section can be used to customise how the report displays results. Grouping by Batches and then Payments will list results on a per-batch basis and then break that batch down into its received payments. Grouping by Payments then Batches will reverse the grouping accordingly.
The Specific Items section can be used to limit the results to a single batch or payment.
Sample Batch Allocations Report for a date range, grouped by Batches and then Payments:
! Table Description automatically generated (image38.png)
Statements
Statements can be printed individually or in bulk.
Individually printed statements
Printing of statements individually is performed via the patient’s Transaction Listing. Click the Statement button highlighted below:
! Graphical user interface, application Description automatically generated (image39.png)
Figure 28 - Statement (Transaction Listing)
Select which “Billed To” the statement is for
! Graphical user interface, text, application Description automatically generated (image40.png)
Then click on the Go button. There are two forms of the statement: The first is a single statement that summarises all outstanding invoices and invoice items. The second Statement is the medical ‘Overdue Invoices’ format that provides sufficient details for the patient to claim from Medicare.
! Graphical user interface, text, application Description automatically generated (image41.png)
! Table Description automatically generated (image42.png)
Figure 29 - Single Statement
! Table Description automatically generated with medium confidence (image43.png)
Figure 30 - Single Overdue Invoices
If printing many individual invoices please remember that you can change patient in the transaction listing screen by using the Find Patient button.
Bulk Printing of Statements
The report for bulk printing of statements allows the user to quickly print out overdue invoices and statements that match various criteria. To access this report open the Accounts Menu >> Statements.
The statements to be printed can be customised and filtered using the Statement screen along with a field for the number of records that need to be printed.
! Graphical user interface Description automatically generated (image44.png)
“Statement Type”: There are two forms of the Statement: The first is a batch of statements that summarise all outstanding invoices and invoice items per patient. The second statement type is the medical ‘Overdue Invoices’ format that provides sufficient details for the patient to claim from Medicare.
“Location”: Select the individual location to print the statements for or All Locations.
“Statements older than”: The Statements older than section allows you to choose which statements are to be displayed and printed based on the age of the statement. If you would like to print all statements from the most recent to the oldest then choose ‘Now’. To print statements older than 120 days, chose ‘120 days (or more)’.
“Include Previously Sent After”: This is for selecting the start date for the statements.
“Include Previously Sent Before”: This is for selecting the end date for the statements.
“Number of Records to Print”: If there are 25 statements that need printing and the Number of Records to Print is 10 then only the first 10 of those statements will be printed. On the other hand if there are 25 statements and the number of records is 0, then all 25 statements will print. Essentially, if 0 is specified it will automatically print all available statements matching your criteria. Be sure when you choose 0 as the Number of Records to Print that you are aware of how many statements may print. Since the Print Now button prints immediately, there is no way of cancelling this print job.
“Billed To”: Prints statements matching only the specified Billed to.
Print Now: This button will immediately commence printing the statements matching the specified criteria - no preview appears.
Receipts Listing
The Receipts Listing Report is opened from the Accounts menu >> Receipts Listing. This report lists payments received within a specified date range and at a specific billing location. This report is run as part of the End of Day Procedures as a reconciliation of received payments.
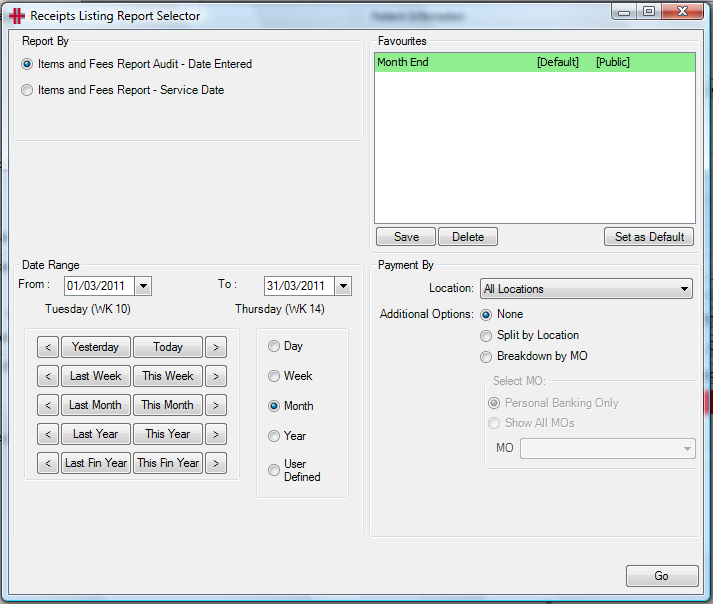
The report can be generated to show the receipts either by date entered or by service date. Next select the date range from the selection buttons or by clicking in the date From and To fields.
The last step in creating a Receipts Listing is to select the location and whether the report should be broken down by Doctor/MO. For a Receipts Listing printed at the end of the day for reconciliation it is recommended the report is for the Location where you are situated at.
If the Breakdown by MO selector is left unchecked the report will encompass receipts for all Doctors/MOs at the selected location. But if this is selected the Receipts Listing will be separated into each Doctor. There is the option to run the report for a single Doctor only.
The Favourites table enables users to save reports that they wish to run regularly with the filter settings required, so that these do not need to be selected each time the report is run.
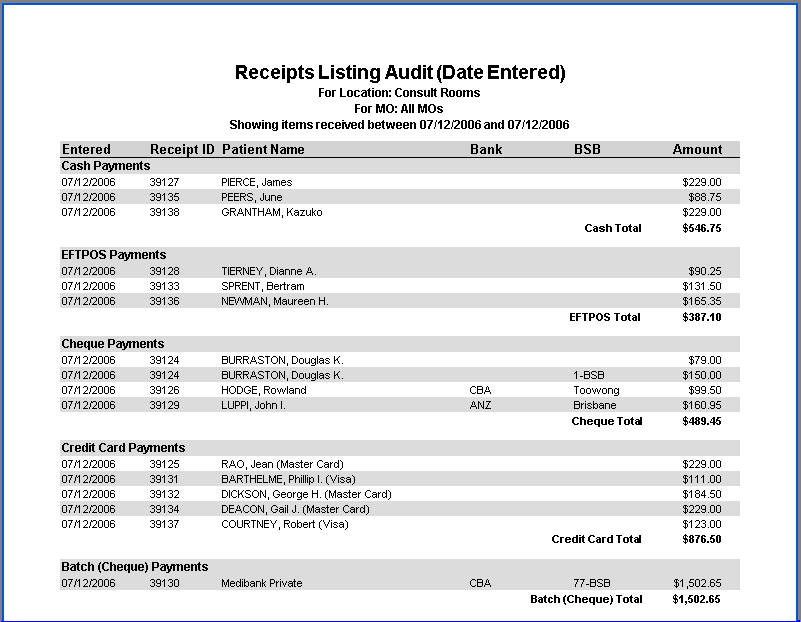
Example of Receipts Listing details layout:
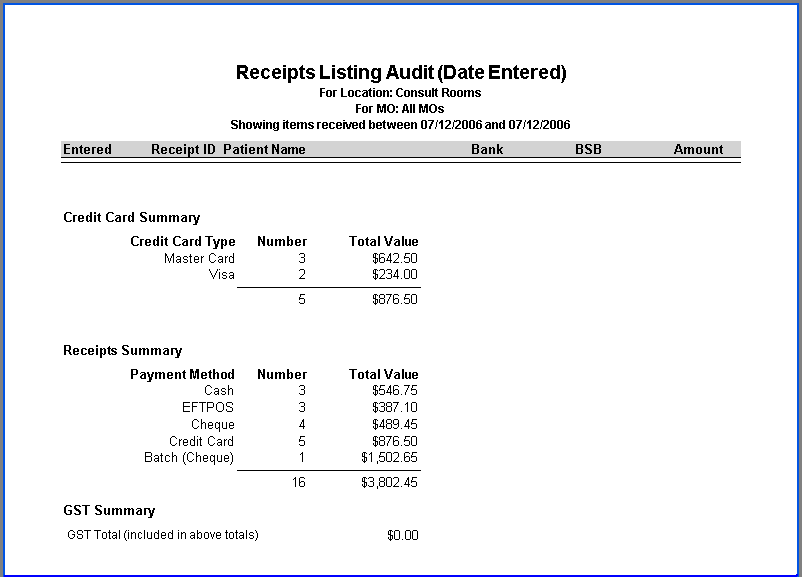
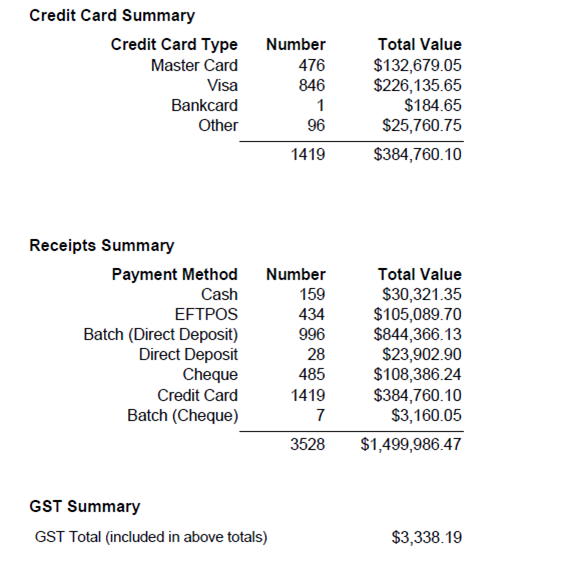
Example of Receipts Listing Summary layout (last page of the Receipts Listing Report):
Reconciliation - End of Day
End of Day procedures primarily involve reconciling the day’s transactions. This involves a combination of HealthTrack reports and other non-HealthTrack records e.g. receipts, bank statements. The reconciliation helps to address any mistakes and identify any improprieties.
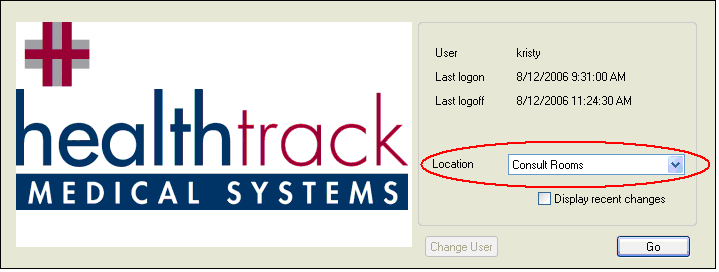
When thinking about ‘End of Day Procedures’ consider that invoices and receipts are created at a specific location based on the logged on location, unless explicitly changed, as the invoice or receipt is being created. The logged on location is defined when logging into HealthTrack. If a user is working at Location A, but their Logon screen says Location B, then by default invoices and receipts will be created at Location B. This must be considered during End of Day procedures.
The receipts that need to be accounted for come from the following sources:
-
Reception
-
Debtors Admin
-
In-Patient Billing
For each source any of the following receipt types may have been received that day:
-
Cash
-
Cheques
-
EFTPOS
-
Credit Card
-
HiCaps
-
Direct Deposit
The documents required to reconcile the days finances are:
| Settlement Listing | The EFTPOS machine will have a settlement transaction type that will close off the day’s EFTPOS transactions. If this is not invoked manually, then most machines will do an automatic settlement in the evening. The settlement will print a tally slip of all transactions (Credit, EFTPOS and Direct Debit) made on the machine since the last settlement. This slip can then be reconciled with the EFTPOS and Credit receipts (printed from the EFTPOS machine) from each individual transaction. |
|---|---|
| Banking | The HealthTrack Bank Deposit system is used to manage the banking of Cash, Cheques and manual credit card vouchers. The system will provide a listing of all payments that need to be banked. These bank deposits are generally done the next day, but some sites may batch up the banking for longer periods. |
| Receipts Listing | The HealthTrack Receipts Listing shows all forms of payment. The payments are grouped into the type of payment e.g. cash, credit card, EFTPOS etc. The last page is a summary as in the following example:
|
Reception and Debtors Clerk Reconciliation
HealthTrack can create a Receipts Listing report to give a detailed list all forms of payments made on a particular day. This needs to be reconciled with the EFTPOS settlement and any cash or cheques received throughout the day. This is usually when any mistakes or improprieties are found.
-
At the end of each day Reception should print the Receipts Listing for the day for the location. This will list in detail all monies received at the location. The last page of the Receipts Listing summaries the total for each type of payment and can be used for quick reconciliation if all amounts balance.
-
Add up all the cash received and subtract the float amount.
-
Add up each of the money types received at reception.
-
Check each of the money types against the totals on the last page of the Receipts Listing. If they are the same, then you have reconciled.
-
If the taking does not balance, then the totals should be checked to see if an incorrect money type has been recorded.
Back-Office Reconciliation
The HealthTrack Receipts Listing identifies the inpatient billing receipts as batch payments. These need to be reviewed by inpatient billing staff to reconcile.
Reconciliation - End of Period
Reconciliation – Bank Deposits
The Receipts Listing is used to validate that all monies have been received and recorded correctly. The reconciling of the bank deposits is a little more complicated due to:
-
The time delay between receiving cash and cheques and depositing these in the bank.
-
The credit card settlement process will result in a deposit each day and this will represent multiple credit card payments appearing as a single settlement for the day.
-
Each EFTPOS transaction is recorded on the day as a single entry, but can be reconciled against the Receipts Listing.
-
Direct Deposits will appear on the bank statement within a day of the actual transaction, but the receipt will probably not be created until a number of days later.
Banking
Banking is the process of creating a Bank Deposit from the day’s transactions and printing a Bank Deposit Slip for banking the payments. This is explained in more detail earlier in this Usability Guide in the ‘How to create a ‘Bank Deposit’ section. The Bank Deposit Slip can then be reconciled with the Receipts Listing.
Bank Deposit Listing
This report summarises all deposits that HealthTrack has recorded as deposited on that day or in that period. It makes the following assumptions:
-
Credit Card Transactions for a day are grouped into a single settlement
-
EFTPOS Transactions appear individually for receipt
-
HiCaps Transactions appear individually for receipt
-
Direct Deposit Transactions appear individually for receipt
-
Cash and Cheques Transactions are summed together then grouped based on a Bank Deposit
Debtors Listing
The Debtors Listing displays the current debts for the practice. The Debtors Listing is a point-in-time report and is current at the time it is run. The Report may be produced as a Summary or a Detailed Debtors Listing.
The Debtors Listing is accessed from the Accounts menu >> Debtors Listing >> select either “Detailed” or “Summary”.
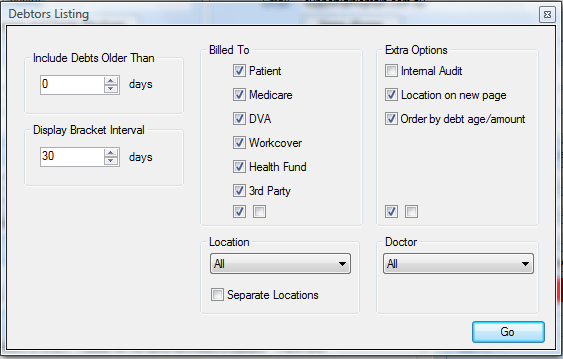
The Debtors Listing can be limited in the following ways:
- Limit by age of the debt by entering a number of days into the “Include Debts Older Than” section.
Should a patient have a debt within the date range, then all of that patient’s debts will be listed. For example include debts older than 30 days, will include invoices for which a payment has not been allocated and is overdue by more than 30 days.
-
Limit by who the invoice was addressed to / “Billed To”. Multiple options can be selected and these will appear as separate rows in the report.
-
Limit the invoices to a single location or all locations. To breakdown debtors by location tick “Separate Locations”.
-
Limit the invoices to a single Doctor or all Doctors.
The “Display Bracket Interval” is the bracket range in days displayed in the report. 30 days is the default. For example if “Include Debts Older Than” is set to 30 days, and the “Display Bracket Interval” is 30 days the report will group debts into columns for 30-59 days, 60-89 days, 960-119 days etc.
The “Extra Options” section can be used to customise how the report will be printed. ‘Location on new page’ will ensure that each new billing location is on a new page of its own. ‘Order by debt age/amount’ will orders the items printed.
Once the required options have been selected, click the Go button to generate the report.
Finance Summary
The Finance Summary is an overall Financial Report for the practice that totals counts of services provided and whether these services have been invoiced and receipted.
The Finance Summary is accessed from the Accounts menu >> Finance Summary.
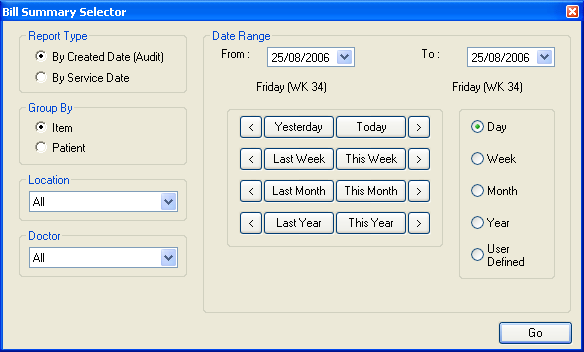
The Finance Summary Report can be run by Created Date which is auditable, or by Service Date. The Report can be filtered by Doctor and location and can also be grouped by item number or per patient. A date range can be specified by selecting a From date to start at and a To date to finish at.
Once the required options have been selected, click the Go button to generate the report.
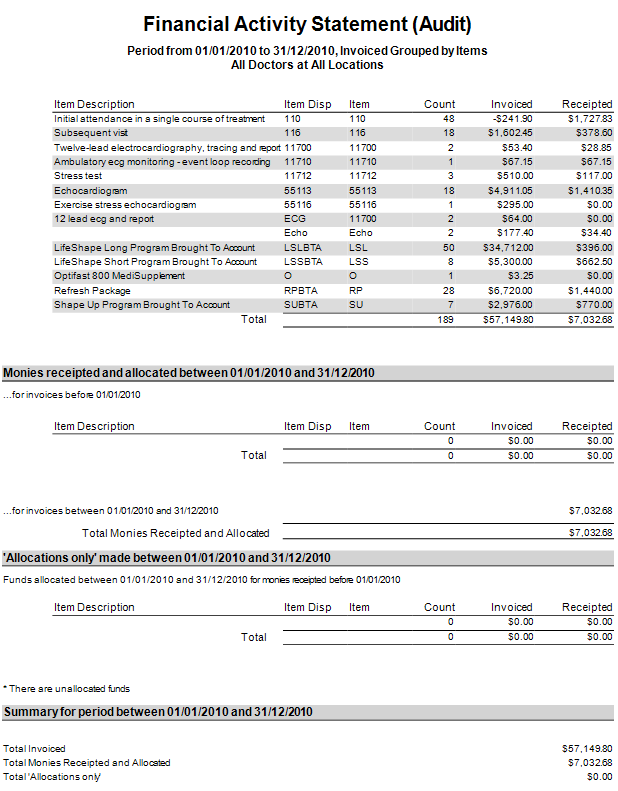
Sample Finance Summary Report by Created Date:
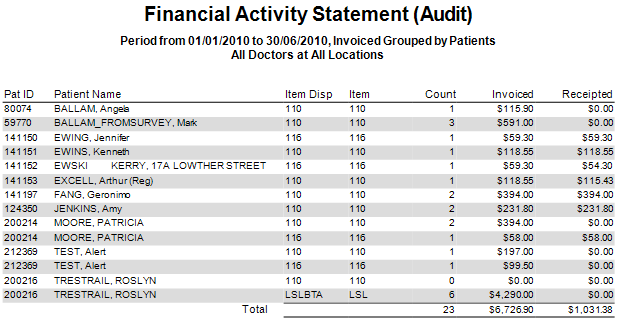
Sample top section of a Finance Summary Report grouped by Patient:
Adjustments Summary
The Adjustments Summary Report provides a view into the amount of ‘repeat’ work that is being performed in the practice. If invoices or payments are being incorrectly received, and then having to be corrected afterwards, the adjustments are captured by the Adjustments Summary.
The Adjustments Summary is accessed from the Accounts menu >> Adjustments Summary.

A Date Range can be set for the period of time you wish to report on, and the type(s) of Payment Adjustment or Invoice Adjustment can be selected for specifically customised reports. The information that is displayed can then be grouped and ordered by using the Report Grouping Options.
Once the required options have been selected, click the Go button to generate the report.
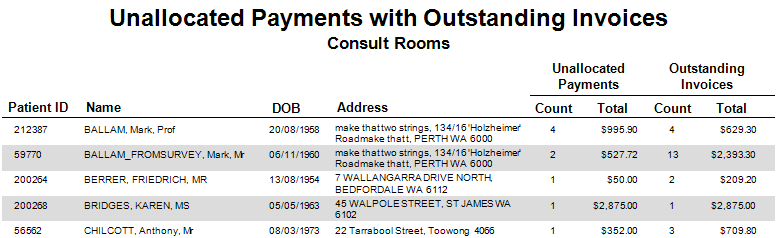
Unallocated Payments Report
The Unallocated Payments Report provides a listing of all payments that have been received in the system but haven’t been entirely allocated yet.
The Unallocated Payments Report is accessed from the Accounts menu >> Allocations >> Unallocated Payments.
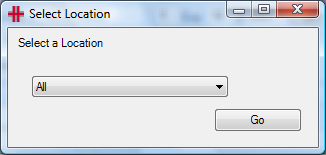
The Select Location window will appear. The report can be generated for a single location or for all locations.
Sample Unallocated Payments Report:
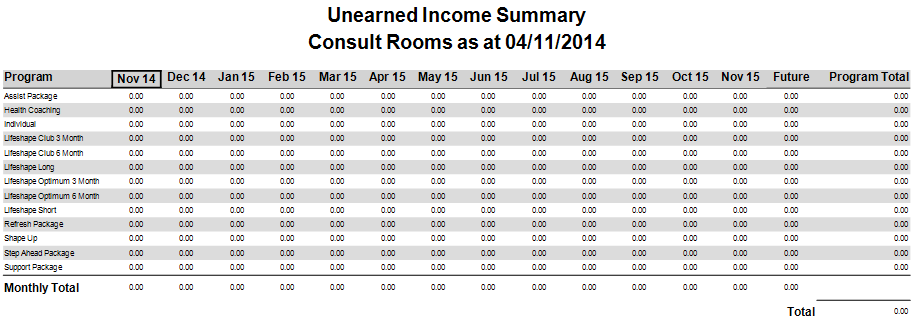
Unearned Income Summary
The Unearned Income Summary prints out totals for all invoices that have been billed but their future-dated items haven’t yet been brought to account. This report is specifically designed for programs and brought-to-account payment plans.
The Unearned Income Summary is accessed from the Accounts menu >> Unearned Income.
The Unearned Income Selector window will appear. The report can be generated for a single location only.

Sample Unearned Income Summary:
Distribute Income
Many Practices and Departments have provider agreements that include how revenue is distributed. To deliver on these arrangements requires significant time from administration staff which has to be repeated each period: weekly, fortnightly or monthly. There can be issues with data availability and the accuracy of the manual process.
The HealthTrack Distribute Income function delivers an extremely easy, effective and fast system to automate this process and manage the associated GST. The function is based on a rules system that is granular to:
-
Doctor
-
Location
-
Item number
-
In-patient or Out-patient
The rules are processed in order of precedence, from most specific to least specific.
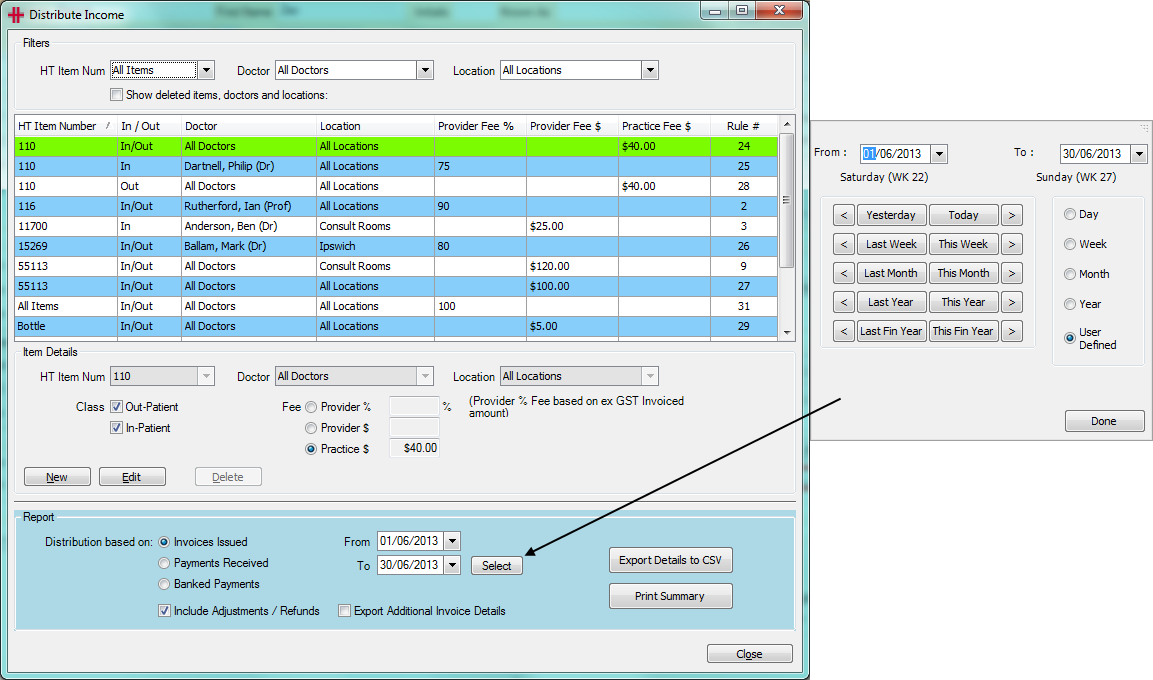
Figure 32 - Distribute Income
The Distribute Income function is accessed from the Reports menu >> Distribute Income. Security permission is required to access this area.
The screen is divided into 4 logical sections:
-
The top contains a series of filters.
-
The next section of this screen lists all the rules the site has defined.
-
The middle is used to review, add, modify or delete a rule.
-
The bottom of the screen is the action area. The Dr Distribution Report can be generated on either invoices or receipts.
Order of Precedence Rule
The order of precedence is as follows:
-
Item
-
Doctor
-
Location
Rules can be set in any combination. There is always a “catch all” rule which can be edited by the site. The sample report below uses a single rule to split all income simply - 80% to the provider and 20% to the business.
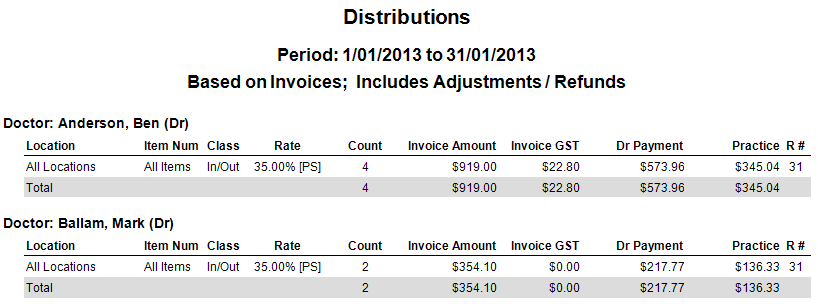
The ‘Rate’ column lists either the percentage fee or dollar value followed by:
The R# column identifies which rule was applied to calculate the payment. The rule numbers show in the Distribute Income screen (see Figure 32).
Once the catch all rule is in place other specific rules can be added as required.
Each rule can be implemented in any one of the following ways:
-
The percentage of the fee that the Doctor receives (e.g. Doctor 80% and 20% to business).
-
The dollar value paid to the Doctor for the service, with the balance of the invoiced amount going to the business.
-
The dollar value received by the business for the service, with the balance of the invoiced amount going to the Doctor.
Distribution
Distribution is between the practice/business and the service provider. You can elect to perform the distribution based on:
| Invoices Issued | This would be the most common. The business issues invoices for services provided and accepts responsibility to collect the revenue. The system will gather all the invoices issued in the selected period based on the invoice date created. Adjustments and reversals that were entered in the selected period will then be included. Note that the adjustments could be positive or negative and may well be for invoices in a previous period as reversals are included. If the invoice line item has been paid, then the receipt information will be included. HealthTrack will then apply the rules that have been defined. *NB – If there is no provider for an item on an invoice, the payment is not associated with a particular doctor and will not appear in the distribute income results. |
|---|---|
| Payments Received | This option will recognise payments allocated to invoices. Please remember that payments received but NOT Allocated will not be recognised, so you should run the Unallocated Payments Report first and allocate these payments. A single payment could apply to line items within one or more invoices and maybe for different Doctors. The allocation relates a part of or all of the payment to a Doctor’s service line item. The system will gather all the allocations completed in the selected period based on the allocation date created. Unallocated payments that were completed in the selected period will then be included. Note that the unallocated payments could be for payments in a previous period. HealthTrack will then list the payment, bank deposit information and the invoice information. HealthTrack will then apply the rules that have been defined. |
| Banked Payments | This option will include payments that meet the following criteria:
|
IMPORTANT: This option is not an “Audit” report (ie repeatable) unless all banking has been completed for dates up to and including the reporting end dated. Before running this report, you should always complete all banking and the HealthTrack “Bank Deposit” Show Unbanked Payments should be zero. The HealthTrack “Bank Deposit” system is used for “Cash” and “Cheque” payment types. Other payment types are auto banked. |
Data Export
Should the detail of the individual transactions that make up the distributions be required, there is an integrated export of the data for easy analysis in Excel.
After selecting the distribution options for the report and entering the date range, click the Export Details to CSV button to generate an Excel spreadsheet of the data.

Reports Available
|
System Setup for RCTI (Recipient Created Tax Invoices)
There are a few steps to setup your HealthTrack system to use RCTIs.
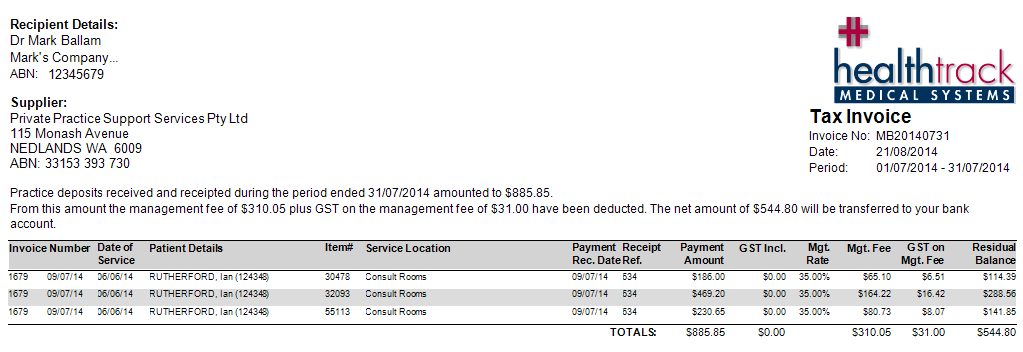
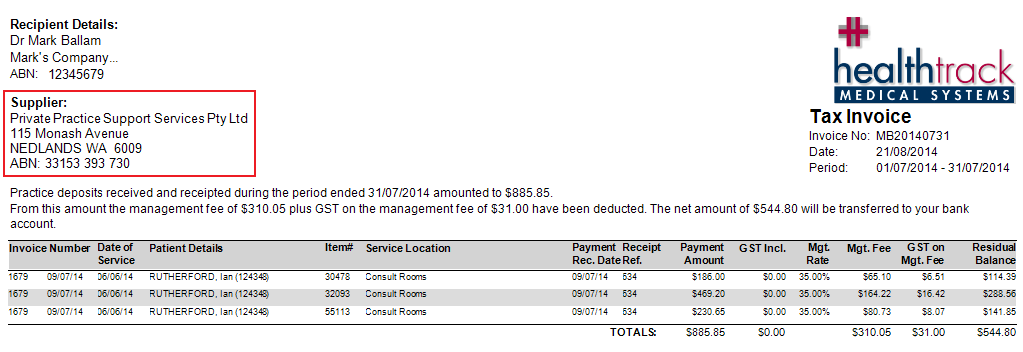
Firstly, a Company must be created for your Practice by going to the menu Practice Wide >> Companies. The Company details will be displayed on the RCTI in the Supplier section:
On the RCTI the Recipient Details come from the Doctor’s Private Company Information which is stored at Admin >> Internal MO >> Manage Internal MOs:
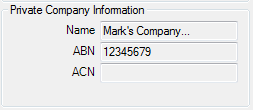
For the process to add a new company, please refer to the ‘Adding Companies / Third Parties’ section of the HealthTrack Usability Guide. When a company is created, HealthTrack will automatically assign a Company ID:

Secondly, the Company ID must be entered so that HealthTrack knows which company’s details to print on the invoice. Go to the menu Admin >> Maintenance >> System Settings. Search for the property ‘TaxInvoiceSupplierID’:
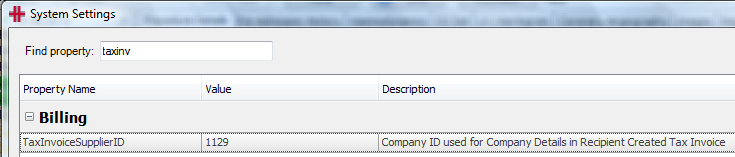
Click the Edit button to enter the Company ID into the Value field, and once entered click Save. Please restart your HealthTrack system to pickup this change. The details of this Company will now appear on your RCTIs generated from HealthTrack.
Retained Funds
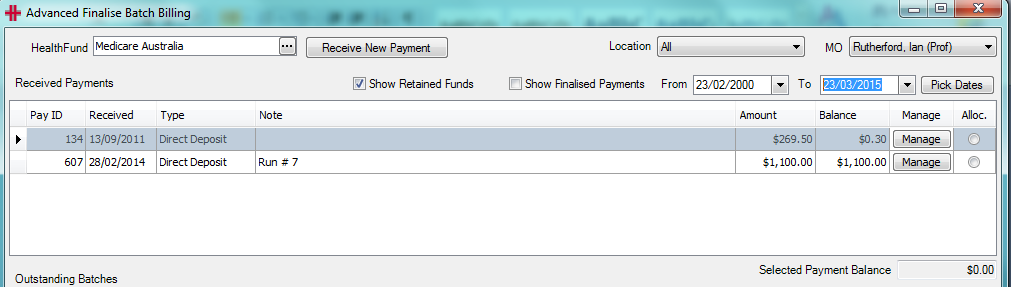
The purpose of the ‘Retain Funds’ feature is to be able to easily balance small discrepancies between amounts claimed and received. This is so that Payments Received does not fill up with numerous small unallocated payment balances that will never be allocated. This feature can be found in the ‘Advanced Finalise Batch Billing’ screen shown below.
Intention of ‘Retained Funds’
-
For small amounts only, e.g. rounding errors.
-
Large overpayments should be dealt with at the time by contacting the Health Fund immediately.
-
HealthTrack is a ‘Debtors System’. Should a duplicate payment be received from a Health Fund and received into HealthTrack and the Practice’s bank account, then the duplicate payment should be should be deleted in HealthTrack and the refund processed from the Practice’s external accounting system.
Using ‘Retained Funds’
-
In ‘Advanced Finalise Batch Billing’, highlight the payment, showing the payment balance that you would like to retain. Click on the manage button and select ‘Retain Funds’. HealthTrack will round the balance to zero and will record the transaction in the database. The unallocated ‘balance amount’ will no longer be displayed.
-
A listing of all ‘Retained Funds’ can be viewed by setting the desired date range and ticking the ‘Show Retained Funds’ tick-box. (Please see screenshot below)
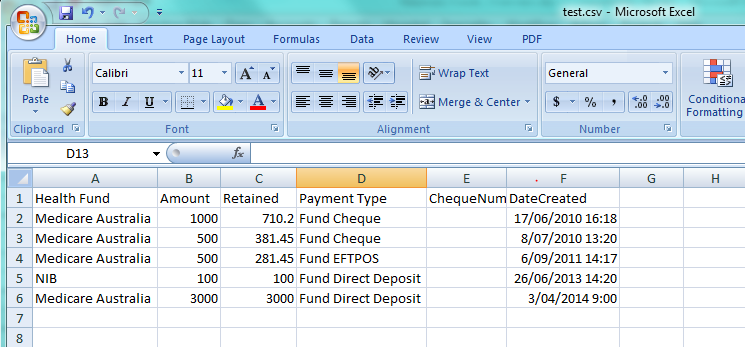
Spreadsheet export for ‘Retained Funds’
- HealthTrack provides a excel ‘Data Export’ under Admin Menu >> Export Data .

-
This export will show the Health Fund, the amount paid, the amount retained, cheque number (if recorded) and date and time created.
-
HealthTrack does not provide a record of any refunds of retained funds to Medicare or Health Funds.
‘Unallocated Payments’ Report
The ‘Unallocated Payment’ report includes a section that will list “Retained Funds”.
Clearing ‘retained funds’
After carrying ‘Retained Funds’ as an accounting ‘liability’ for a period of time (see your accounts for duration such as 3 months) your accounts departments may request you to transfer the amount to ‘revenue’. To do this you will need to follow the following instrauctions:
-
Create a patient for your company name
-
Create an non-medicare item number call ‘retained funds’
-
Create an invoice with the following characteristics
-
‘Invoice to’ as 3rd party,
-
Mark the line items as ‘Batch Billing’
-
Add item for ‘retained funds’ selecting “other” for pricing and amount to be cleared.
-
Issue
-
-
In the transaction listing, ‘Right click’ on the invoice and “Create New Batch’
-
Go to ‘Batch Billing’
-
Select the batch and “Send To Fund”
-
Select the batch and “Finalise”
-
Click show ‘retained funds’
-
Select the retained funds to allocate
-
Allocate to the batch created above
-
Save Allocations
-