Online Batching
Provider Setup
In order to submit claims electronically to Medicare, DVA, and eligible private health funds, you should ensure that all provider numbers have been registered against your Minor/Location ID with Medicare, and that Medicare has details on record for where to issue payments.
Within HealthTrack, the following areas should also be configured.
In Admin > Internal MO > Manage Internal MOs, you should ensure the following details have been set accordingly for the provider.
-
Speciality – the requirements for online claiming will differ between specialists and general practitioners, so you should ensure the correct speciality has been entered.
-
Location & Health Fund Specific Provider Numbers – ensure the doctor has a provider number recorded for each location required for invoicing.
-
Edit Health Fund Relationships button – if the provider will be performing health fund claims, they should have a relationship recorded for each of their provider numbers with each specific health fund. This can also be configured in Practice Wide > Companies. This is not required for Medicare and DVA billing.
In Admin > Billing > Add/Modify Bill Practice Number, the Practice ID can be recorded for each of a doctor’s provider numbers for the health funds that require it.
Health Fund Relationships
There are two ways to set the doctor’s health fund relationships. For any provider number that will be used for health fund billing, a relationship needs to be set for the specific fund.
You may need to contact health funds directly to confirm what the doctor’s billing relationship is.
The relationship options are:
-
Bulk Bill
-
Scheme – this relationship typically means the doctor is permitted by the fund to charge the patient a gap/out of pocket fee.
-
Agreement – this relationship typically means the doctor will not be charging the patient a gap/out of pocket fee.
-
None – no relationship has been nominated.
Setting fund relationship via Internal MOs:
-
Navigate to Admin > Internal MO > Manage Internal MOs.
-
Select the Edit Health Fund Relationships button in the upper right.
-
In the Online Billing Doctor Relationships window, select the doctor from the drop-down menu.
-
For each health fund and provider number combination row, select the cell in the Relationship column and pick the appropriate relationship.
-
Select the Save and Close button once all changes have been made.
Setting fund relationships via Companies:
-
Navigate to Practice Wide > Companies.
-
Choose the Select Company button.
-
Type a Company Name and choose the Find button.
-
Double-click on the health fund to open the record.
-
Choose the Health Fund Details tab.
-
Select the Show Online Billing Relationships button.
-
In the Health Fund and Doctor Relationships window, review the doctor/provider number combinations for the fund, and the relationship specified.
-
If a doctor/provider number combination is not listed, choose the Add button.
-
For the new row added, choose a doctor/provider number combination in the Doctor column, and choose the appropriate relationship in the Relationship column.
-
-
Select the Save and Close button once all changes have been made.
Health Fund Payee/Practice ID
Some health funds will require a Payee ID or Practice ID for claims submitted electronically.
To enter a Practice ID:
-
Navigate to Admin > Billing > Add/Modify Bill Practice Number.
-
Choose a doctor from the drop-down in the top left.
-
Choose a health fund from the drop-down in the top right.
-
For each provider number that will be used for health fund claims, select the cell in the Practice ID column and type in the ID provided by the fund.
-
Select the Save button once all IDs have been entered.
-
Repeat for each health fund for each doctor.
If there is a health fund that requires a Practice ID but is not listed in the Practice Number Manager window, you can set the requirement for a Practice ID in Practice Wide > Companies.
-
Navigate to Practice Wide > Companies.
-
Choose the Select Company button.
-
Type a Company Name and choose the Find button.
-
Double-click on the health fund to open the record.
-
Choose the Health Fund Details tab.
-
Select the Edit button.
-
Tick the Requires Practice ID ☑ box.
-
Select the Save button.
Location Setup
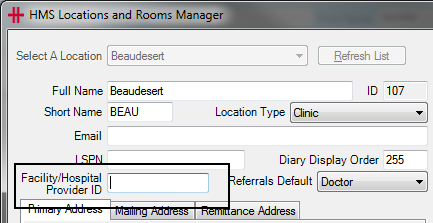
Some locations will require specific configuration for electronic claiming, such as a hospital Facility ID and/or a Location Specific Practice Number (LSPN).
Locations that are configured in HealthTrack with Location Type as a type of hospital will create an Inpatient invoice by default.
Hospital Facility ID
All hospitals will need to have a Facility ID recorded for submitting health fund claims electronically. You can obtain a list of Facility IDs from the Department of Health and Aged Care page for List of declared hospitals.
To enter a Facility ID:
-
Navigate to Admin > Locations & Rooms > Locations & Rooms Manager.
-
Select the location from the drop-down in the top left.
-
Select the Edit button in the bottom left.
-
Enter the Facility/Hospital Provider ID. A green tick ✔ will appear to indicate that the value entered is valid.
-
Select the Save button.
Location Specific Practice Number (LSPN)
A LSPN may be required for diagnostic imaging and/or radiation oncology services. The Health Professional Online Services page has a LSPN Register that may assist in identifying a LSPN.
To enter a LSPN:
-
Navigate to Admin > Locations & Rooms > Locations & Rooms Manager.
-
Select the location from the drop-down in the top left.
-
Select the Edit button in the bottom left.
-
Enter the LSPN. A green tick ✔ will appear to indicate that the value entered is valid.
-
Select the Save button.
Invoicing Requirements for Online Claiming
From Dolomites version 4.4.1, HealthTrack uses the Medicare Web Services technology for online claiming. The change to Web Services included a number of changes to invoices and claiming. Please see the Medicare Web Services & > PRODA page for more information.
Some invoices require additional information to be recorded before they can be submitted online. This can be added by selecting the Details button towards the top right of an invoice.
For more information, please see the Invoicing page.
Batching & Submitting Claims
Any claim that is submitted to an organisation can be batched before submission. This includes claims to Medicare, health funds, worker’s compensation, and other third-party organisations that will issue payment for services.
Batches can be created, submitted, and receipted in Accounts > Batch Billing.
Batch Statuses
The Batch Billing History window is organised around a series of statuses, as follows:
| In Progress | You’re still working on this batch, it hasn’t been sent yet. |
|---|---|
| Sent to Fund | Manual submission by post or email, e.g. deceased patients, organisations that do not use ECLIPSE for submitting claims (e.g. worker’s compensation claims, insurance companies, etc.). This will not submit the batch online. |
| Online Ready | Waiting for HealthTrack to send the batch electronically, please wait approximately 30 minutes. |
| Online Error | An error has occurred whilst trying to submit a batch. Please read the error text in blue and correct the batch as necessary. After making corrections, use the Online Submission button to attempt submission again. |
| Online Sent | HealthTrack has submitted the claim to Medicare, you will now need to wait for Medicare or the health fund to process the claim. |
| Online Received | HealthTrack has received payment processing advice from Medicare/health fund and you can now view this in Receive Online Payments. |
| Finalised | All items in the batch have been paid or accounted for. |
| Void | The batch has been cancelled, or all items have been removed from the batch. |
Ensure that Limit to Location is set to the location you are creating batches for or All locations if required.
Online Submission
There are three workflows that can be used to create and submit batches electronically:
-
Auto-Batch Online Invoices
-
Show Online Invoices
-
Create New Batch (This Invoice Only)
Batches submitted electronically should ideally move through the following statuses in this order:
-
In Progress
-
Online Ready
-
Online Sent
-
Online Received
-
Finalised
Auto-Batch Online Invoices:
The recommended method for creating valid online batches is to use the Auto-Batch Online Invoices button. This will split the available invoices into appropriate batches for the selected location and submit them to the relevant organisation.
-
Navigate to Accounts > Batch Billing.
-
Set a Location filter using the drop-down at the top of the screen.
-
Select the Auto-Batch Online Invoices button towards the bottom right of the screen.
A progress window will appear to show the progress of the batches being created. These batches will all be placed in the Online Ready status to be submitted electronically.
Show Online Invoices:
If you prefer to handle online batching in the same manner as paper batching you can instead create a batch to send online by using the Show Online Invoices button. This will show invoices for Medicare and health funds that are active for online transmission and which contain all the data required for online processing.
-
Navigate to Accounts > Batch Billing.
-
Select the Show Online Invoices button towards the bottom right of the screen.
-
A progress window will be displayed as HealthTrack verifies each batch.
-
The Online Capable Batches window will open. This window will list each organisation, and the different doctor/location combinations that can be batched.
-
Select the Create Batch button for each doctor/location combination to create each new batch.
-
Choose the Close button when you have finished creating batches.
-
The created batches will be listed in the In Progress status. Highlight each batch and choose the Online Submission button to submit to the relevant organisation.
-
The batch will move to the Online Ready status to be sent to the relevant organisation.
Create New Batch (This Invoice Only):
This process can be used to create a batch for a single invoice via the patient’s Transaction Listing.
-
While viewing the relevant patient’s record, navigate to Accounts > Transaction Listing.
-
Right-click on the invoice that is to be batched.
-
Select the option for Create New Batch (This Invoice Only).
-
The Batch Billing History window will open to show the new batch. This will be in the In Progress status. Highlight the batch, then choose the Online Submission button to submit to the relevant organisation.
-
The batch will move to the Online Ready status to be sent to the relevant organisation.
Online Error Status
Preliminary checks are performed on each batch to ensure there is no missing or invalid data before it is submitted for processing. If HealthTrack is able to identify anything amiss, the batch will move to the Online Error status for review.
Common causes for claims to appear in the Online Error status include:
-
Issues with a referral:
-
There is no referral included for the services.
-
The servicing provider on the invoice is the same individual used as the referring doctor; you may need to remove the referral and mark the item/s as being Self-Deemed.
-
The dates of the referral do not encompass the date of service; make sure that the correct referral has been used, and that the dates on this referral are entered correctly.
-
-
The patient’s Medicare/Health Fund/DVA information has not been verified recently; from the patient’s Demographic screen, select the OPV , PVF , or OVV buttons as necessary to verify the patient’s details.
-
Issues with providers:
-
The Health Fund Relationships have not been configured/have been incorrectly configured for the doctor’s provider number.
-
The servicing provider or referring doctor do not have a provider number recorded.
-
Some batches may include a description of the issue in blue text below the batch.
You may find more detail about an error by selecting the Online Submission button again for the batch, which will present an Online Errors window.
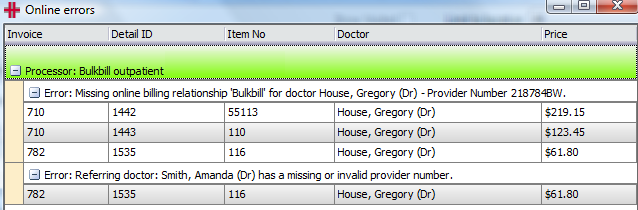
To create a worklist of the patients with online errors, at the bottom of the Online errors screen, select the To Worklist button. These errors will need to be resolved; once resolved, select the Online Submission button again to move the batch to the Online Ready status.
Every 30 minutes HealthTrack will attempt to send all batches in the Online Ready section to the relevant organisation. If any further errors are encountered whilst sending these batches, online the batch will be moved into the Online Error status again and the error reason will be written in blue text below the batch.
Manual Submission
There are two workflows that can be used to create and submit batches manually.
-
Show Outstanding Invoices
-
Create New Batch (This Invoice Only)
Batches submitted electronically should ideally move through the following statuses in this order:
-
In Progress
-
Sent to Fund
-
Finalised
This option is used as an indication to show that batches have been submitted manually outside of HealthTrack. This is intended as a way to show that the invoices have been sent to the organisation.
There will not be any electronic reports receiving into HealthTrack for these batches; any reports to advise the outcoming of processing and the payment issued will be received externally from the organisation.
Show Outstanding Invoices:
This method is similar to Show Online Invoices , however it includes invoices that cannot be submitted electronically.
-
Navigate to Accounts > Batch Billing.
-
Select the Show Outstanding Invoices button towards the bottom right of the screen.
-
The Unbatched Invoices Summary window will open. This window will list each different doctor/location/organisation combination that can be batched.
-
Select the Create Batch button for each doctor/location/organisation combination to create each new batch.
-
Choose the Close button when you have finished creating batches.
-
The created batches will be listed in the In Progress status. Highlight each batch and choose the Send to Fund button to reflect that the batch is being sent manually for processing.
-
The batch will move to the Sent to Fund status.
Use the Print Batch Detail button to print the invoices related to the batch.
Create New Batch (This Invoice Only):
This process can be used to create a batch for a single invoice via the patient’s Transaction Listing.
-
While viewing the relevant patient’s record, navigate to Accounts > Transaction Listing.
-
Right-click on the invoice that is to be batched.
-
Select the option for Create New Batch (This Invoice Only).
-
The Batch Billing History window will open to show the new batch. This will be in the In Progress status.
-
Highlight the batch, then choose the Send to Fund button to reflect that the batch is being sent manually for processing.
-
The batch will move to the Sent to Fund status.
Finalising Online Batches
Once a batch has been processed, there are two reports that are received in HealthTrack:
-
Processing Report – this report lists all items submitted within the batch, along with the what amount was claimed for services and what has been paid for the services.
-
Remittance Advice Report – this report outlines the total amount that has been paid. This payment may relate to more than one batch. If a batch has been rejected in full, this report is not often issued.
These reports are automatically downloaded periodically and made available within Accounts > Batch Billing. When a Processing Report is received, the batch will automatically move from the Online Sent status into the Online Received status.
The Remittance Advice can take up to four weeks to be received from the health funds and will be viewable in HealthTrack as soon as they are available.
The Receive Online Payments Window
The top section of this screen filters the batches displayed. By default, the location will be the same as the location selected in the Batch Billing History screen and will show all payments that haven’t been processed. By using the filters Include Processed ☑ and Limit to date range ☑ (either by run date or printed date), you can find previous batches that have been processed.
There are two workflows for viewing the reports:
-
Right-click a batch to select Goto Receive Online Payments
-
Select the Receive Online Payments button
Goto Receive Online Payments
This workflow is used to view the reports for one specific batch.
-
Navigate to Accounts > Batch Billing.
-
Locate the batch that you would like to view reports for. This is typically batches in the Online Received status.
-
Right-click the batch and select the Goto Receive Online Payments option.
-
The Receive Online Payments window will open to display the batch.
Receive Online Payments
This workflow is used to view the reports for multiple batches at once.
-
Navigate to Accounts > Batch Billing.
-
Select the Receive Online Payments button towards the bottom right.
-
The Receive Online Payments window will open to display all batches that haven’t been processed by a user.
If a batch is not listed in the Receive Online Payments window, this may indicate the reports have already been viewed by a user, and the batch has been marked as Processed. You may be able to view the batch by ticking the Include Processed ☑ option towards the top left of the Receive Online Payments window.
Viewing & Printing Reports
The reports can be viewed and printed from the Receive Online Payments window. In the bottom left corner, tick the options for Print Processing Report ☑ and/or Print Remittance Advice ☑ as required.
-
Click the Print Selected Batch button to view the reports for the highlighted batch.
-
Click the Print ALL Batches button to view the reports for all batches displayed in the Receive Online Payments window.

If the Print Remittance Advice option was ticked, then the Remittance / Payment Report will open on-screen for viewing. You may proceed to print or save the report as needed. This will be followed by the Processing Report being opened on-screen, which can also be printed or saved as needed.
Example A: Paid in Full Batches
If a batch has been paid in full, the Receive Online Payments window will have matching values in the Claimed column and the Paid column.
If the Total Payment column reflects a different amount, this indicates that a larger payment has been issued which encompasses numerous batches. All batches encompassed in this payment can be finalised simultaneously.
-
In the Receive Online Payments window, select the Finalise button for the batch paid in full.
-
The Automatically Finalise Claim window will open to display all batches that are covered by the total payment.
-
Review that the Totals at the bottom of the screen match the Total Payment displayed in the Payment Run Details at the top of the screen.
- Any rows highlighted in orange indicate that the amount paid is different than the amount claimed.
-
If there are no concerns with the payment, choose the Automatically Finalise Claim button.
-
You will receive a confirmation prompt to advise that the claims have been successfully finalised; select the OK button.
Any batches that have finalised will be moved to the Finalised status in the Batch Billing History window.
Example B: Partially Paid Batches
If a batch is highlighted in orange in the Receive Online Payments window, this indicates that the amount paid differs to the amount claimed for these services. You should refer to the Processing Report to review the reason for this discrepancy, as advised by the organisation processing the batch.
If the difference in the paid and claimed amounts is acceptable, you can proceed with finalising the batch using the same steps for a batch that was Paid in Full (Example A above). HealthTrack will automatically make the required adjustments to any services that were not paid the amount that was claimed, which ensures that there is no balance outstanding.
If the difference in the paid and claims amounts needs to be pursued with the relevant organisation, the amount that has been paid can be received and allocated manually, which will allow a balance to remain.
Manually Receipting a Partially Paid Batch
By manually receipting a batch that has been partially paid, the user has more control over what happens with an outstanding balance, and whether an item will be resubmitted.
Before manually receipting, make sure you have the Processing Report and Remittance Advice Report available.
-
In the Receive Online Payments window, select the Finalise button for the batch.
-
The Automatically Finalise Claim window will open to display all batches that are covered by the total payment.
-
Review that the Totals at the bottom of the screen match the Total Payment displayed in the Payment Run Details at the top of the screen; rows highlighted in orange indicate that the amount paid is different than the amount claimed.
-
At the bottom of the screen, select the Manually Finalise Claim button to open the Advanced Finalise Batch Billing window.
-
Ensure that the correct HealthFund, Location, and MO are selected.
- The HealthFund can be changed by selecting the **…** button and searching for a company.
-
Select the Receive New Payment button to enter the details of the total payment received.
-
In the Receive Payment window, make any necessary changes to best reflect the Date of Payment and/or Location.
-
The Date of Payment should reflect the date of the payment per the Remittance Advice Report.
-
The Location will reflect the location the user is currently logged in to HealthTrack at and may be different to the location the services were provided at.
-
-
Select the button matching the payment method.
-
Cheque – enter the total amount for the value of the cheque. You may also wish to record some optional information, such as the Cheque Number. Select the Save button.
-
EFTPOS – enter the total amount that was received as an EFTPOS payment. Select the Save button.
-
Direct Deposit – enter the total amount that was deposited to the bank account. Select the Save button.
-
-
You may optionally enter a Payment Memo at the bottom of the screen, which can be used for any notes that may be relevant about the payment.
-
Select the Receive Payment button. This will return you to the Advanced Finalise Batch Billing window, and the payment that has been created will be visible in the top half of the window.
-
In the bottom half of the Advanced Finalise Batch Billing window are the outstanding batches. As the payment received is more/less than what has been claimed (i.e. the batch has been underpaid or overpaid), double-click on a batch or click the + button on the left-hand side of the batch row to expand the batch, making all items within the batch visible.
-
For each item that was paid in full on the batch, click the + button on the right-hand side of the item row to allocate the remaining claimed amount in full.
-
Double-click on an item row or click the **…** button on the right-hand side of the item row to open the Input Value window. Enter the amount that has actually been paid for this item.
-
For items that have been overpaid, only the action of entering an adjustment will be available. Specify a reason for the overpayment (e.g. the fee schedule has changed). Select the OK button.
-
For items that have been underpaid by Medicare or DVA, you can choose to adjust the balance so that nothing remains outstanding, or leave the outstanding balance for further actions. Enter a reason for the underpayment (e.g. Multiple Service Rules). Select the OK button.
-
For items that have been underpaid by a health fund, you can choose to adjust the balance so that nothing remains outstanding, or leave the outstanding balance for further actions, or move the outstanding balance to the patient for payment. Enter a reason for the underpayment (e.g. Out of Pocket/Gap Payment). Select the OK button.
-
-
Repeat Step 10 to allocate the funds received to any batches/items the payment relates to.
-
Select the Save Allocations & Reload button to save payments recorded.
-
If an item has been underpaid and will be resubmitted, untick the box on the left-hand side of the item row. Choose the option Release for Rebatching, then select the OK button. This item can now be included in a new batch.
-
Select the Save Allocations & Close button.
For any items that have retained an outstanding balance or items that have been released from the batch, further actions may be required in the patient’s Transaction Listing window. In the Transaction Listing, you may wish to use the Credit / Adj / Bad Debt button to apply an adjustment, which removes the outstanding balance for the invoice.
In some cases, you may need to create a new invoice, and this may need to be submitted manually.
For more information, please see the Transaction Listing section.
Example C: Unpaid Batches
If a batch has been rejected and no payment made, you will need to review the Processing Report to learn why all services have been rejected, and decide how to proceed.
Batch will be corrected and resubmitted:
-
Ensure you have a list of all patients on the batch, as the accounts may need to be reviewed prior to resubmission.
-
Right-click on the batch in the Batch Billing History window and choose Batch Patients to Worklist to list all patients on the batch; or
-
Print the Processing Report for a list of patients included in the original batch.
-
-
In the Batch Billing History screen, highlight the batch that has been rejected.
-
At the bottom of the screen, select the Void button.
-
You will receive a confirmation message to confirm you wish to proceed with voiding the batch; select the Yes button to proceed.
All items will now be removed from the batch. Using the list of patients from Step 1, you can review and correct the invoices as needed.
Once any corrections have been made, the items can be submitted using your normal batching workflow.
Batch will not be resubmitted:
-
Ensure you have a list of all patients on the batch, as the accounts will need to be adjusted or reversed to prevent resubmission.
-
Right-click on the batch in the Batch Billing History window and choose Batch Patients to Worklist to list all patients on the batch; or
-
Print the Processing Report for a list of patients included in the original batch.
-
-
In the Batch Billing History screen, highlight the batch that has been rejected.
-
At the bottom of the screen, select the Void button.
-
You will receive a confirmation message to confirm you wish to proceed with voiding the batch; select the Yes button to proceed.
All items will now be removed from the batch. Using the list of patients from Step 1, you can navigate to the Transaction Listing window for each patient. In the Transaction Listing, you may wish to use the Reverse Invoice button to remove the invoice, or the Credit / Adj / Bad Debt button to apply an adjustment, which removes the outstanding balance for the invoice.
In some cases, you may need to create a new invoice, which can be submitted as normal.
For more information, please see the Transaction Listing section.
Manually Finalising Batches – Sent to Fund
There are no reports returned within HealthTrack for batches that have been submitted manually. If you have received reports external to HealthTrack and wish to finalise a batch, this can be done using the steps below.
If you have a batch containing numerous items, there will be two scroll bars on the right-hand side of the screen. You will need to use the inner/left scroll bar to scroll through the items on the batch.
Example D: Manually Finalising Paid in Full Batches
-
In the Batch Billing History window, select the Finalise button at the bottom of the screen to open the Advanced Finalise Batch Billing window.
-
Ensure that the correct HealthFund, Location, and MO are selected.
- The HealthFund can be changed by selecting the **…** button and searching for a company.
-
Select the Receive New Payment button to enter the details of the total payment received.
-
In the Receive Payment window, make any necessary changes to best reflect the Date of Payment and/or Location.
-
The Date of Payment should reflect the date of the payment per the Remittance Advice Report.
-
The Location will reflect the location the user is currently logged in to HealthTrack at and may be different to the location the services were provided at.
-
-
Select the button matching the payment method.
-
Cheque – enter the total amount for the value of the cheque. You may also wish to record some optional information, such as the Cheque Number. Select the Save button.
-
EFTPOS – enter the total amount that was received as an EFTPOS payment. Select the Save button.
-
Direct Deposit – enter the total amount that was deposited to the bank account. Select the Save button.
-
-
You may optionally enter a Payment Memo at the bottom of the screen, which can be used for any notes that may be relevant about the payment.
-
Select the Receive Payment button. This will return you to the Advanced Finalise Batch Billing window, and the payment that has been created will be visible in the top half of the window.
-
In the bottom half of the Advanced Finalise Batch Billing window are the outstanding batches. If the payment received will cover the full amount of what has been claimed (i.e. the batch has been paid in full), click the + button on the right-hand side of the batch row.
- You can optionally double-click on a batch or select the + button on the left-hand side of the batch row to expand the batch, making all items within the batch visible. The payment received can then be allocated to each item individually by clicking the + button on the right-hand side of the item row.
-
Repeat Step 8 to allocate the funds received to any batches/items the payment relates to.
-
Select the Save Allocations & Close button.
Example E: Manually Finalising When Paid & Claimed Values Differ
-
In the Batch Billing History window, select the Finalise button at the bottom of the screen to open the Advanced Finalise Batch Billing window.
-
Ensure that the correct HealthFund, Location, and MO are selected.
- The HealthFund can be changed by selecting the **…** button and searching for a company.
-
Select the Receive New Payment button to enter the details of the total payment received.
-
In the Receive Payment window, make any necessary changes to best reflect the Date of Payment and/or Location.
-
The Date of Payment should reflect the date of the payment per the Remittance Advice Report.
-
The Location will reflect the location the user is currently logged in to HealthTrack at and may be different to the location the services were provided at.
-
-
Select the button matching the payment method.
-
Cheque – enter the total amount for the value of the cheque. You may also wish to record some optional information, such as the Cheque Number. Select the Save button.
-
EFTPOS – enter the total amount that was received as an EFTPOS payment. Select the Save button.
-
Direct Deposit – enter the total amount that was deposited to the bank account. Select the Save button.
-
-
You may optionally enter a Payment Memo at the bottom of the screen, which can be used for any notes that may be relevant about the payment.
-
Select the Receive Payment button. This will return you to the Advanced Finalise Batch Billing window, and the payment that has been created will be visible in the top half of the window.
-
In the bottom half of the Advanced Finalise Batch Billing window are the outstanding batches. As the payment received is more/less than what has been claimed (i.e. the batch has been underpaid or overpaid), double-click on a batch or click the + button on the left-hand side of the batch row to expand the batch, making all items within the batch visible.
-
For each item that was paid in full on the batch, click the + button on the right-hand side of the item row to allocate the remaining claimed amount in full.
-
Double-click on an item row or click the **…** button on the right-hand side of the item row to open the Input Value window. Enter the amount that has actually been paid for this item.
-
For items that have been overpaid, only the action of entering an adjustment will be available. Specify a reason for the overpayment (e.g. the fee schedule has changed). Select the OK button.
-
For items that have been underpaid by Medicare or DVA, you can choose to adjust the balance so that nothing remains outstanding, or leave the outstanding balance for further actions. Enter a reason for the underpayment (e.g. Multiple Service Rules). Select the OK button.
-
For items that have been underpaid by a health fund or other organisation, you can choose to adjust the balance so that nothing remains outstanding, or leave the outstanding balance for further actions, or move the outstanding balance to the patient for payment. Enter a reason for the underpayment (e.g. Out of Pocket/Gap Payment). Select the OK button.
-
-
Repeat Step 10 to allocate the funds received to any batches/items the payment relates to.
-
Select the Save Allocations & Reload button to save payments recorded.
-
If an item has been underpaid and will be resubmitted, untick the box on the left-hand side of the item row. Choose the option Release for Rebatching, then select the OK button. This item can now be included in a new batch.
-
Select the Save Allocations & Close button.
For any items that have retained an outstanding balance or items that have been released from the batch, further actions may be required in the patient’s Transaction Listing window. In the Transaction Listing, you may wish to use the Credit / Adj / Bad Debt button to apply an adjustment, which removes the outstanding balance for the invoice.
In some cases, you may need to create a new invoice, and this may need to be submitted manually.
For more information, please see the Transaction Listing section.
Example F: Manually Finalising Batch with Rejected Item/s
-
In the Batch Billing History window, select the Finalise button at the bottom of the screen to open the Advanced Finalise Batch Billing window.
-
Ensure that the correct HealthFund, Location, and MO are selected.
- The HealthFund can be changed by selecting the **…** button and searching for a company.
-
Select the Receive New Payment button to enter the details of the total payment received.
-
In the Receive Payment window, make any necessary changes to best reflect the Date of Payment and/or Location.
-
The Date of Payment should reflect the date of the payment per the Remittance Advice Report.
-
The Location will reflect the location the user is currently logged in to HealthTrack at and may be different to the location the services were provided at.
-
-
Select the button matching the payment method.
-
Cheque – enter the total amount for the value of the cheque. You may also wish to record some optional information, such as the Cheque Number. Select the Save button.
-
EFTPOS – enter the total amount that was received as an EFTPOS payment. Select the Save button.
-
Direct Deposit – enter the total amount that was deposited to the bank account. Select the Save button.
-
-
You may optionally enter a Payment Memo at the bottom of the screen, which can be used for any notes that may be relevant about the payment.
-
Select the Receive Payment button. This will return you to the Advanced Finalise Batch Billing window, and the payment that has been created will be visible in the top half of the window.
-
In the bottom half of the Advanced Finalise Batch Billing window are the outstanding batches. As there are items that have received no payment (i.e. rejected in full), double-click on a batch or click the + button on the left-hand side of the batch row to expand the batch, making all items within the batch visible.
-
For an item that has not been paid, untick the box on the left-hand side of the item row. This will prompt you with two choices:
-
Repeat Step 9 for any items that have not been paid within the batch.
-
Select the Save Allocations & Reload button to save the items removed.
-
For each item that was paid in full on the batch, click the + button on the right-hand side of the item row to allocate the remaining claimed amount in full.
-
Select the Save Allocations & Close button.
Whether an item has been released for rebatching or removed from batching, these should be reviewed in the patient’s Transaction Listing to make the appropriate corrections or adjustments.
For any items that have retained an outstanding balance or items that have been taken off of the batch, further actions may be required in the patient’s Transaction Listing window. In the Transaction Listing, you may wish to use the Credit / Adj / Bad Debt button to apply an adjustment, which removes the outstanding balance for the invoice. If an invoice has received no payment, you could optionally use the Reverse Invoice button to remove the invoice.
In some cases, you may need to create a new invoice.
For more information, please see the Transaction Listing section.
Managing Payment Allocations
In the Advanced Finalise Batch Billing screen, each payment has a Manage button which provides the following options:
Open for Viewing – this button will open the Receive Payment window, where the user may find additional information about the payment (if recorded). A payment receipt can also be reprinted from this window.
Reverse Entire Payment – this button will reverse the full payment, which may result in invoices becoming outstanding. This may be useful in the case of a payment being entered multiple times in error.
Delete Allocations – this button will remove payment allocations against any invoices associated with the batch.
Retain Funds – this button can be used to settle minor balances on payments that may have been missed when originally allocating funds to a batch.
There are times when you may need to delete a batch payment allocation for an invoice.
Deleting a batch payment allocation for a single invoice:
-
From the patient’s record, navigate to Accounts > Transaction Listing.
-
Expand the Allocations section towards the bottom of the screen.
-
In the Transactions section, highlight the relevant invoice to display the associated payments in the Allocations section.
-
Highlight the payment from the Allocations section.
-
Choose the Delete Allocation button.
-
You will receive a prompt confirming that you would like to delete this allocation; choose the Yes option to proceed.
After deleting this payment allocation, the status of the batch may change in Accounts > Batch Billing. There may also be funds that now need to be allocated to the appropriate invoices.