Patient Connect
Patient Connect is an automated system used to connect with patients. It currently has 5 Program Types as follows:
-
General
-
Recall
-
Program
-
Booking
-
Referral
The program type is set when a program is first created and once it is set cannot be changed.
The following summaries the characteristics of each type:
| General | Recall | Program | Booking | Referral | |
|---|---|---|---|---|---|
| ‘Reference Date’ is the date the patient connect is added | Y | ||||
| ‘Reference Date’ is the proposed future booking date | Y | ||||
| ‘Reference Date’ is the ‘Program Start Date’ | Y | ||||
| ‘Reference Date’ is the booking date | Y | ||||
| ‘Reference Date’ is the Date the Referral is added | Y | ||||
| Program can have more than one cycle | Y | Y | Y | ||
| The program will ‘Complete’ at the end of the last cycle. | Y | Y | y | Y | Y |
| The program can ‘‘Complete’ base on any or selected booking types | Y | Y | y | y | Y |
| Patient can be actively on one or more occurrences of this program | Y | Y | Y | Y | Y |
| When a booking is created, then the program will roll over to the next cycle | Y |
Patient Connect Program Types
Each Program Type has functionality based on the purpose of the program. Before configuring programs via Patient Connect Management it is important to understand each program’s features and select the program type based on these.
General:
The ‘General’ patient connect type is used to automatically connect with the patient for a series of one or more actions.
‘Reference Date’ for this program type is the date the patient connect is added.
-
This program type may have more than one cycles configured.
-
The program will Complete at the end of the last cycle.
-
The program can be completed by any booking or any selected booking type. It can also be configured to Ignore bookings; however, this will result in the cycle completing on the last step of the cycle. If this is a pause step, then user action will be required to complete the cycle, as it will not complete automatically.
-
A patient can be actively on one or more occurrences of this program at a time.
Recall:
The ‘Recall’ patient connect type is used to automatically connect with the patient to have them arrange a booking.
‘Reference Date’ for this program type is the proposed future booking date. This will default to the ‘Enrolment Date’ plus the ‘Frequency’ duration.
-
The program can run for one or more cycles at a set frequency.
-
This program Type requires a cycle frequency to be configured.
-
Once a booking is created, then at the next action due date the program will roll over to the next cycle.
-
The program will *Complete *at the end of the last cycle.
-
The program can be completed by any booking or any selected booking type. It can also be configured to Ignore bookings; however, this will result in the cycle completing on the last step of the cycle. If this is a pause step, then user action will be required to complete the cycle, as it will not complete automatically.
-
A patient can be actively on one or more occurrences of this program at a time.
Program:
The ‘Program’ patient connect type is used to automatically connect with the patient, generally many times over a period, to send the patient information and possibly receiving information back from the patient.
‘Reference Date’ for this program Type is the ‘Program Start Date’.
-
The program can run for one or more cycles at a set frequency.
-
This program Type requires a cycle frequency to be configured.
-
The program will complete at the end of the last cycle.
-
This program Type would generally be configured to Ignore bookings, however can be configured to complete a cycle on a booking (although this would make little sense based on the purpose on the program).
-
A patient can be actively on one or more occurrences of this program at a time.
Booking:
The ‘Booking’ patient connect type is used to automatically connect to the patient after a booking has been made to send information related to the booking, before or after the booking.
‘Reference Date‘ for this program Type is the booking date.
-
The program will run for a single cycle.
-
This program type does not require a cycle frequency to be configured.
-
The program will complete after the last step is run.
-
The program can be configured for a single booking type or multiple booking types.
-
When any booking is created for a patient and a program type for that booking type exists, the patient may be automatically placed on that program.
-
When the booking date is adjusted for a patient on this type of program the action dates for the patient’s program will be adjusted in line with the booking date change.
-
A patient can be actively on one or more occurrences of this program at a time.
Referral:
The ‘Referral’ patient connect type is used to automatically connect with the patient after a referral has been created, probably with the intent of notifying the patient that a referral has been received, or notifying booking staff to create a booking, or contact the referrer.
‘Reference Date’ for this program Type is the Date the Referral was added.
-
The program will run for a single cycle.
-
This program type does not require a cycle frequency to be configured.
-
Once a booking is created the program will complete.
-
The program will complete after the last step is run.
-
Programs for referrals can be created for any booking type or a selected booking type.
-
When any referral is created for a patient and a program type for referral exists, the patient may be automatically placed on that program.
-
If a ‘Referral’ Patient Connect programs exist for different booking types the user will be able to select which referral Patient Connect program the patient will be added too.
-
A patient can be actively on one or more occurrences of this program at a time.
Patient Connect Manager
The Patient Connect Manager is where program types are created and/or edited before being assigned to patients. There is no limit to the number of programs that may be created and no limit to the number of programs a patient may be assigned. However, depending on the program type there is a limit to the number of the same program that can be assigned to a patient.
The Patient Connect Manager configuration screen is located at Admin>Patient Connect Management, which when selected opens the ‘Patient Connect: Actions & Properties Editor’.
In the Patient Connect Manager, you can add New Programs and Edit or Delete existing programs. The left-hand column displays the Program Names. By selecting one of the programs, you can view the program actions in the ‘Details’ and ‘Actions’ section on the right of the screen. The ‘Details’ section heading and fields displayed are dynamic depending on the program type.
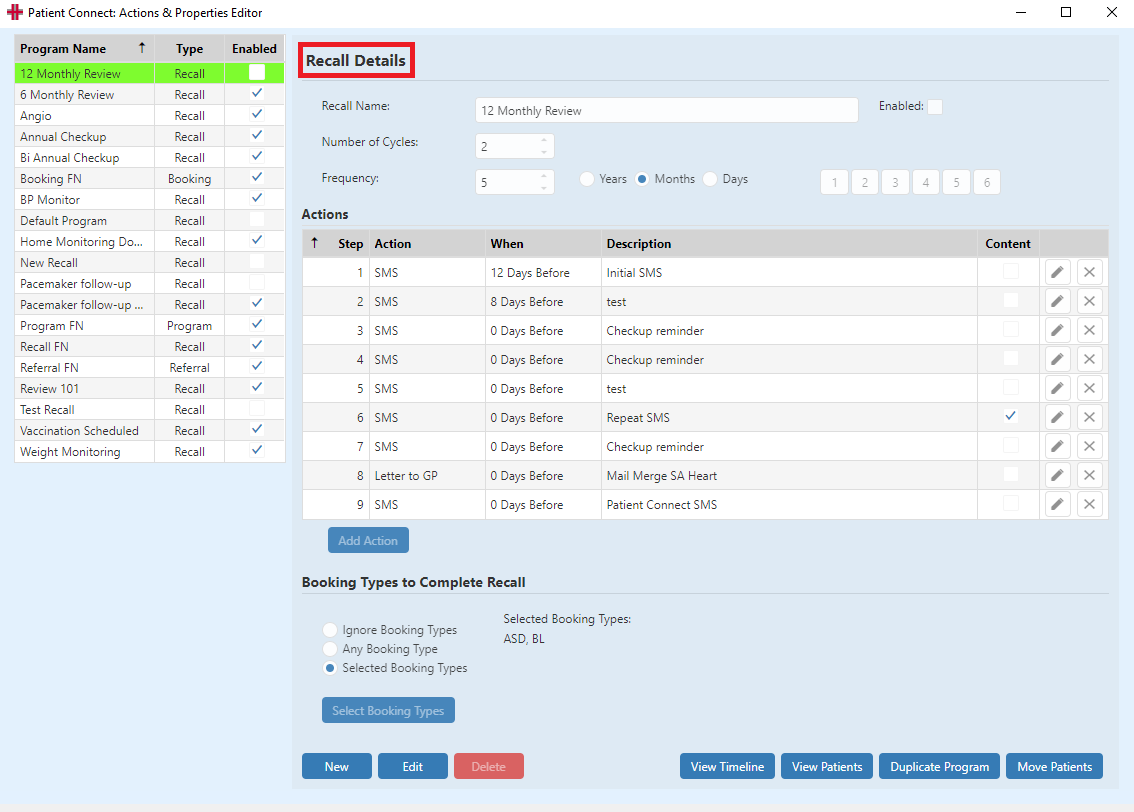
Program Type - Recall
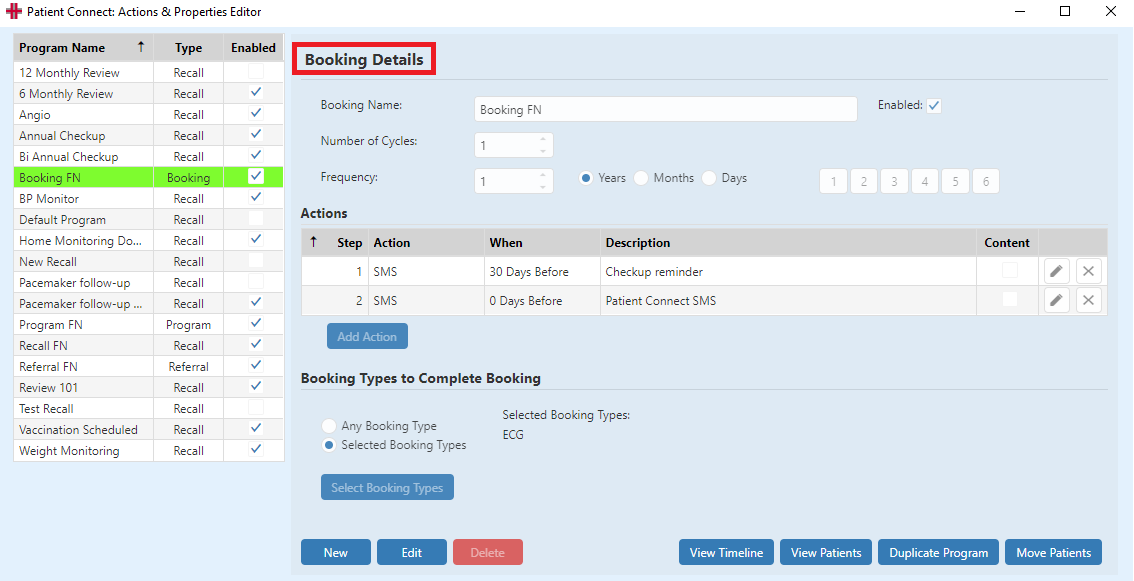
Program Type - Booking
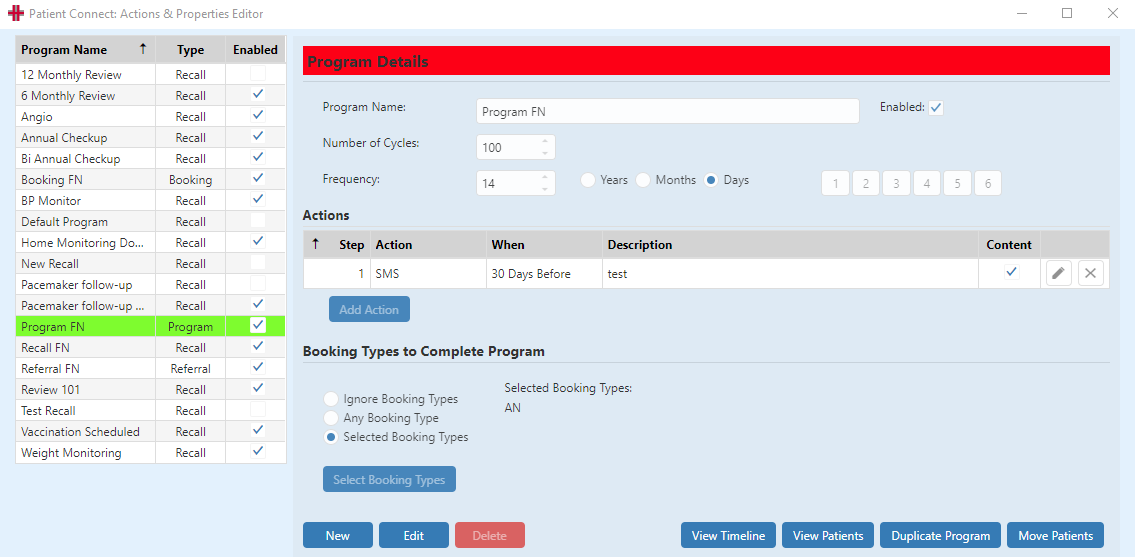
Program Type – Program
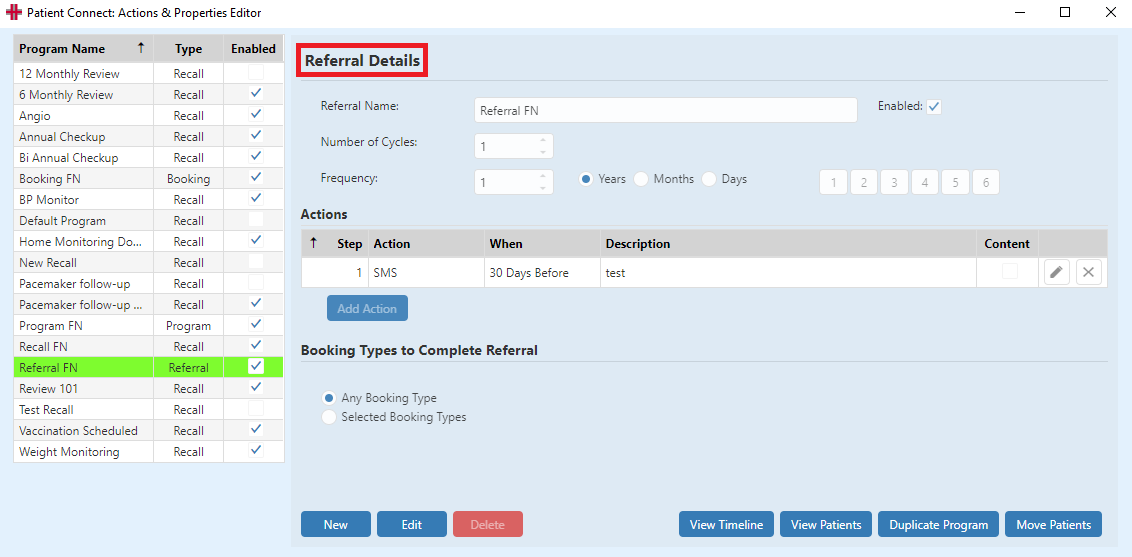
Program Type – Referral
Adding a New Program
New programs can be created by either:
-
Creating an entirely new program with no initial steps and actions. The steps and actions will then need to be added before the program can be enabled for use. The program is not able to be saved until steps and actions have been added.
-
Duplicating an existing program, which will set the steps and actions to be taken by the program.
When duplicating an existing program, the new program will be created with the same program type and the same format of steps and actions. Variations can then be applied to the different settings of frequency, number of cycles and/or booking types to complete the program setup.
A Default Program Template is setup in HealthTrack. The Default Program Template can be edited at any time either before or after setting up programs. Following changes to the Default Program Template the changes will be used for creating the next duplicate program where Default Program Template is used. If you are creating several programs that are going to have the same steps and actions, then duplicating from the Default Program Template or another existing similar program is the best method to use.
Creating a new program (when not duplicating an existing program)
To add a new Patient Connect Program select the New button and the Create a New Program screen will open.
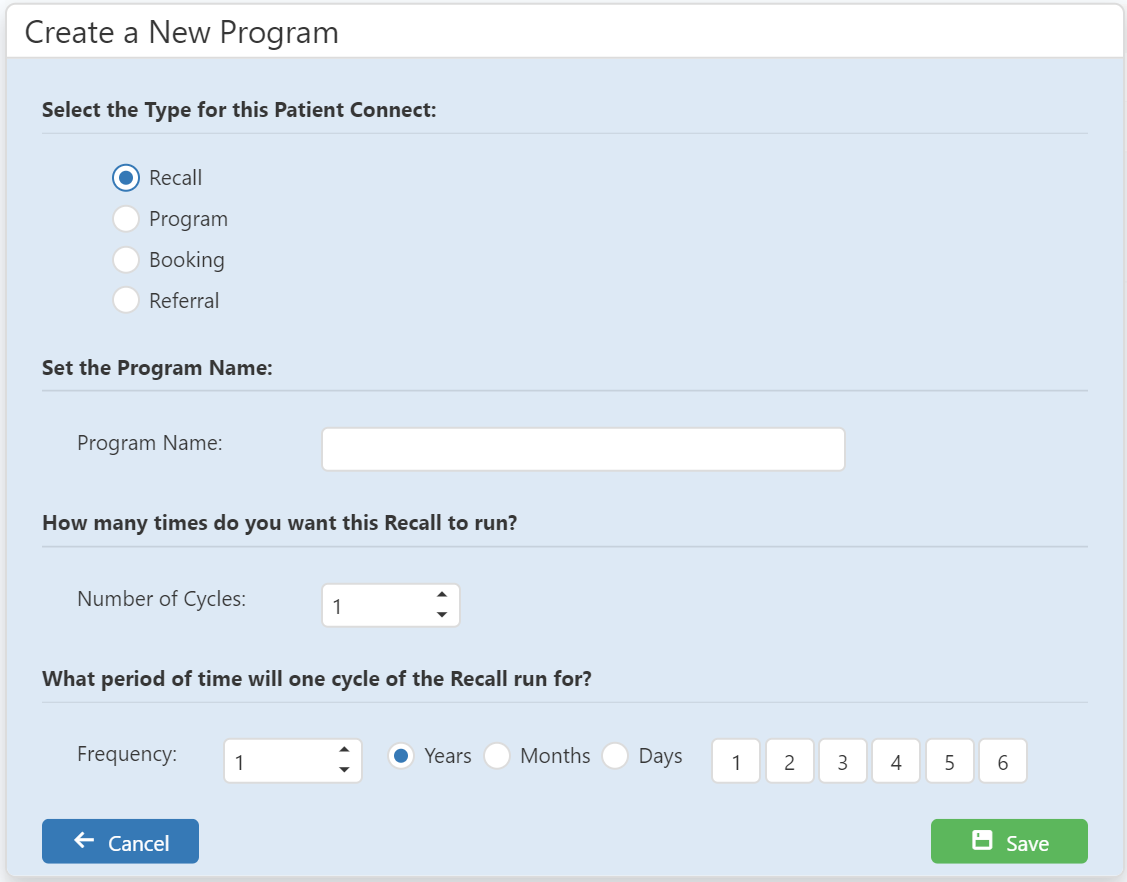
Then complete the following fields in the Program Details section:
-
Program Type – choose the program type by selecting the applicable radio button next to the program.
Refer to Patient Connect (PC) Program Types for more information about program type selection.
-
Program Name – a short description to distinguish the program. Note that the Program Name may be used in the content of SMS messages or letters sent to patients, so it is important to choose a name that is appropriate to be used for this purpose.
-
Cycles – the number of times the program will run when assigned to a patient. This can be any number from 1 to as many repeats as required. E.g. If you wanted the program to run weekly for 52 weeks, then the cycles would be 52. Note: this is only for those program types where more than one cycle is applicable.
-
Frequency – This can be selected by inserting a number into the Frequency field and then selecting the applicable time period from Years; Months and Days or selected via the numbered buttons, where applicable.
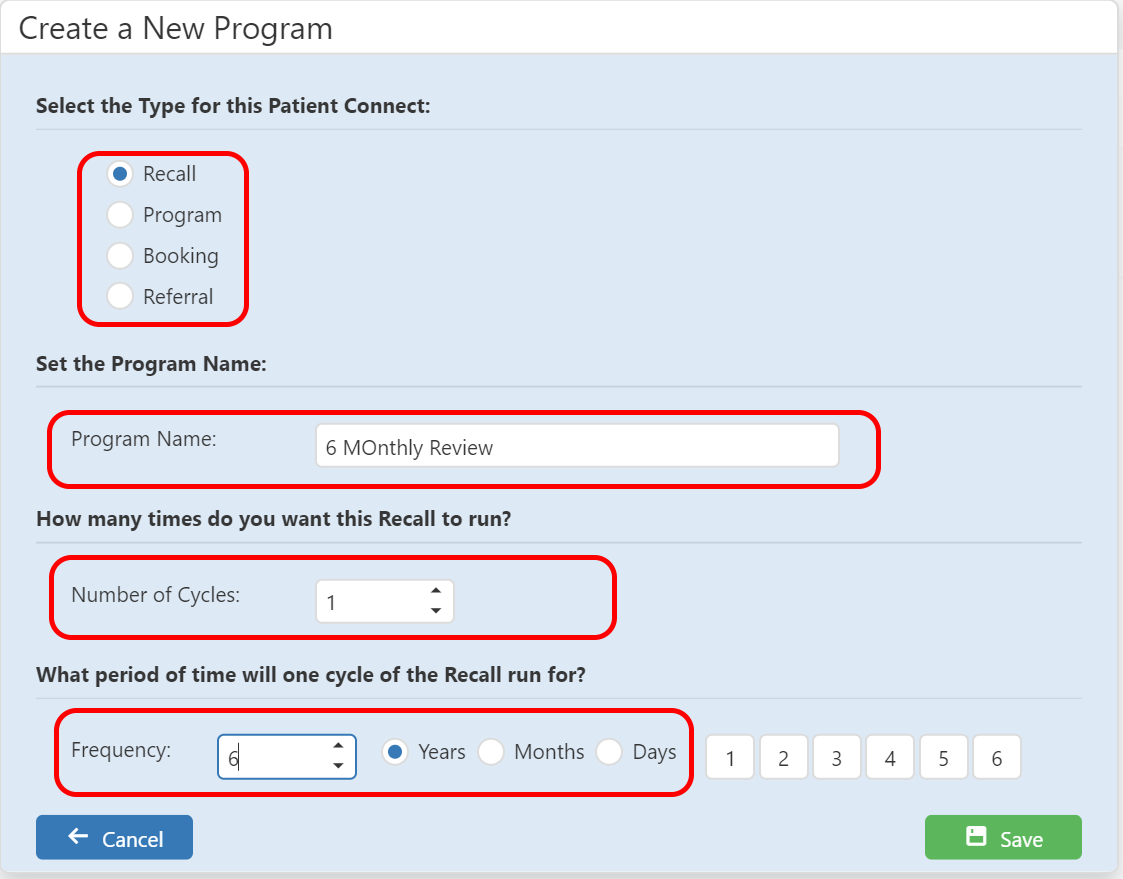
Once all the above data has been entered select Save to proceed with setting up the program or Cancel if you do not wish to proceed with creating the program.
This will create the program and return to the ‘Patient Connect: Actions & Properties Editor’ for input of the Actions and Booking Types to complete the program setup.
Creating a duplicate program
To create a duplicate Patient Connect Program, first select the program to be duplicated from the Program List on the left of the screen. This will display that program under the Program Details on the right side of the screen.
Then select the Duplicate Program button and the screen will display the duplicated program details with a blank Program Name field.
Add a Program Name and then edit the remaining configuration, as applicable before saving.
Adding Patient Connect Actions
When creating a new Patient Connect Program the steps or Actions for the program will need to be added.
-
A minimum of one Action is required before the program can be Enabled and saved.
-
There is no limit to the number of Actions that can be added.
-
Actions are processed in sequential order.
-
The same Action type can be used more than once.
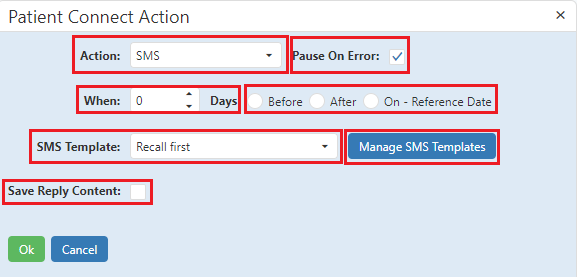
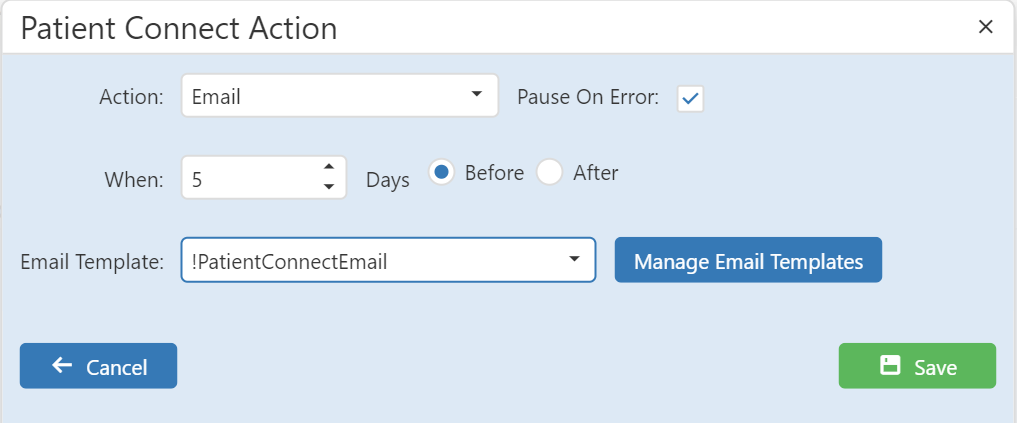
To add a new Patient Connect Action click on the Add Action button. This launches the Patient Connect Action screen.
- *Select the type of Action from the dropdown box. *
-
SMS – a SMS text message is sent to the patient’s mobile phone. Selecting this option requires a ‘SMS Template’ to be selected from the SMS Template field list of values. If a new SMS Template is required then select the Manage SMS Templates button and this will take you to the Notification Manager screen to create the new SMS template message.
Refer Notification Manager in the Usability Guide for setup of SMS Messages.
-
Email – a email message is sent to the patient’s email address. Selecting this option requires a ‘Email Template’ to be selected from the ‘Email Template’ field list of values. If a new ‘Email Template’ is required then select the Manage Email Templates button and this will take you to the Notification Manager screen to create the new Email template message. The Email template will allow you to send multiple letter templates and these may include letter template tags.
Refer Notification Manager in the Usability Guide for setup of Email Messages.
-
Letter to Patient – a letter is generated for sending to the patient. Selecting this option requires a Letter Template to be selected from the Letter Template dropdown box. The Letter Templates available will be all Letter Templates that have “Patient Connect Enabled” selected.
-
Letter to GP - a letter is generated for sending to a GP. Selecting this option requires a Letter Template to be selected from the Letter Template dropdown box. The Letter Templates available will be all Letter Templates that have “Patient Connect Enabled” selected.
-
Pause (User Action) – this results in the program being paused for user actioning e.g. follow up phone call to patient.
- Decide whether to tick the ‘Pause On Error’ tick box:
-
‘Pause on Error’ tick box– when selected, if an action is unable to be completed e.g. a SMS cannot be sent because the patient has no mobile number recorded, then the item will move to status Pause (User Action) until the error has been rectified.
Refer Patient Connect: Actions for patient connect status and actions.
-
‘Pause on Error’ tick box - when this is not selected and an action is unable to be completed e.g. an SMS cannot be sent because the patient has no mobile number recorded, then the item will not pause the program and the next action will occur when due e.g. No SMS will be sent but a letter will generate when due if it is the next action.
- Insert a number of days value in the ‘When’ field and the application from the radio buttons:
(A Reference Date is the target date for the program. This could be the future booking date or the date of a booking depending on the program type)
-
Before – The number of days before the Reference Date the action is to occur.
-
After – The number of days after the Reference Date the action is to occur.
-
On – Reference Date – The action is to occur on the program Reference Date.
The remainder of the screen selections are dynamic based on the action type selected.
SMS
-
Decide whether to tick the ‘Save Reply Content’ tick box. When ‘Save Reply Content’ is selected this will allow access to configure the action to capture and store the SMS reply data from the patient. This can be used for tracking and recording information examples include:
-
Patient weight can be requested and tracked.
-
studies and trials where regular SMS messages are sent requesting information.
Email
-
-
Choose from a predefine email template or create a new email template.
-
Select the before or after period compared to the ‘Reference date’
Letter to Patient
-
Select Print Options
-
Mail - Letters will automatically generate and be added to the Distribution List to be manually distributed.
-
ePost – Letters will automatically generate and be added to the Distribution List and will be distributed via the ePost facility.
-
Save File - The letter is saved as a pdf file to a directory for manually printing and mailing to the patient .
Letter to GP
-
-
Select Print Options
-
Mail - Letters will automatically generate and be added to the Distribution List to be manually distributed.
-
ePost – Letters will automatically generate and be added to the Distribution List and will be distributed via the ePost facility.
-
Save File - The letter is saved as a pdf file to a directory for manually printing and mailing to the patient.

Pause (User Action)
-
-
No further selections required.

Once the data fields for each Action has been completed, click OK to continue.
When all Action/s have been added to the Patient Connect Program then the program is saved by selecting the *Save* button.
If the Default Program Template has been used to create the program, it will have existing actions. These can be left as configured and/or edited and/or deleted, as required.
Adding Booking Types
Booking types selected in the Patient Connect program will complete the cycle when a booking of that type is made and the booking has a status of: Booked; Arrived; In Session; Out Session or Closed. The cycle completion will occur when the next action is due to occur and the system checks for bookings before completing the scheduled action. (Bookings with a status of Cancelled or No Show will not be recognised as a booking to complete a cycle).
Booking Types selections are as follows:
-
Ignore Booking Types – program cycle completion will not be triggered by a booking.
-
Any Booking Type – any booking type will complete the program cycle.
-
Selected Booking Types – single or multiple booking types can be selected to complete the program cycle.
The Booking Type list will only be available for user selection for the ‘Selected Booking Types’ option.
Completed Patient Connect Program Configuration

Editing a Program
A program can be edited at any time, by selecting the Program Name on the left of the Patient Connect: Actions & Properties Editor and then selecting the Edit button at the bottom left of the screen.
Once required changes have been made select the Save button at the bottom left of the screen to complete.
By deselecting the Enabled tick box, the program can be removed from being selected and added to patients, but will remain configured in the module and can be enabled again at any time.
By selecting Delete the program will be removed from the module and not available for enabling again at any time.
View Timeline
The View Timeline button opens the Patient Connect Program Time Line screen to show the life cycle of a program’s actions. Listing all actions that will occur throughout each cycle of the program.
In the below example of the 6 Month Review Program there is only 1 cycle, with the actions based on an Enrolment Date of 01/05/2019 and a Reference Date in 6 months of 01/11/2019. Each action then shows an Action Date based on the Delay for the first action from the Enrolment Date and then from the previous action date.
Step 1 – SMS: 01/05/2019 + 156 Days = 04/10/2019
Step 2 – SMS: 04/10/2019 + 7 Days = 11/10/2019
Step 3 – Letter to Patient: 11/10/2019 + 7 Days = 18/10/2019
Step 4 – Pause (User Action): 18/10/2019 + 7 Days = 25/10/2019
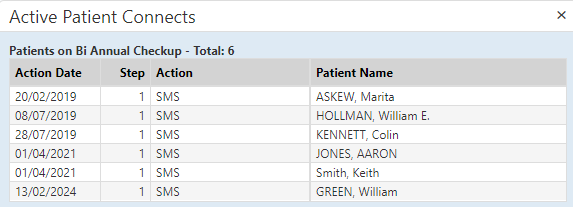
View Patients
The View Patients button when selected will open the Active Patient Connects screen and display the list of patients currently on the program, including their next action date and the Step and Action type.
In the below example, there is one patient on the Review program and their next action is Step 1 – SMS due on the 16/01/2020.
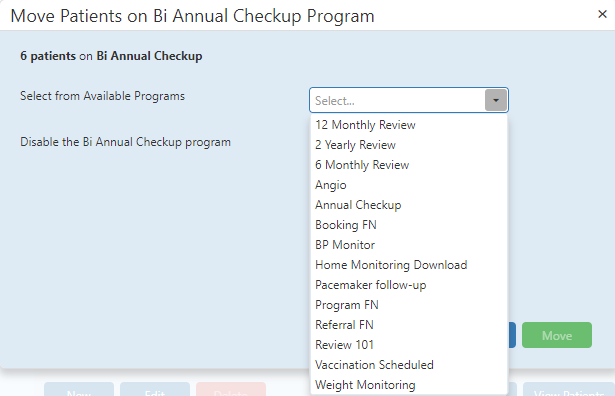
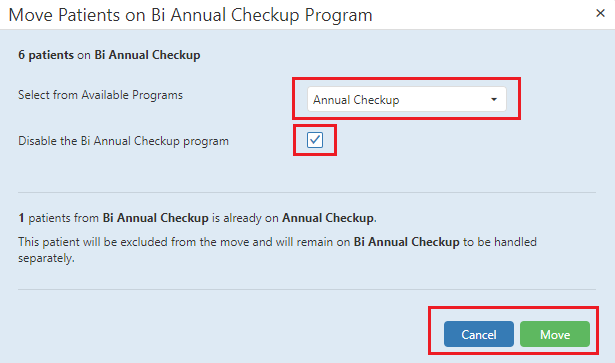
Move Patients
There may be cases where Patients need to be moved from one program to another. E.g. A new program is created to replace the old program that is to be deleted or disabled.
- To Move Patients between programs, select the applicable program in the Program List on the left of the page. This will display the program in the Recall/Program/Booking/Referral Details panel on the right hand of the page. It is recommended to View Patients before performing the move action, as a reference point for how many patients you are moving between programs.
-
Select Move Patients and the Move Patients screen will open.
-
Select the program where you want to move the patients from the ‘Select from Available Programs’ list of values.
-
Decide whether or not to tick the ‘Disable the XX program’ tick box
-
Select Move to confirm the move OR
-
If you do not want to proceed with the move select Cancel .*
Once Move has been selected the ‘Select Next Steps for Moving Patients’ screen will open. This screen displays the next action steps for patients on the program and allows steps to be changed for the patient groups, as required.
The ‘Currently On’ and ‘New Step’ fields on this screen will vary per program and will need to be considered on a case by case basis if the New Step is to be changed.
In the below example, the step action would be the same for both programs, so the New Step selected will be Step 1 – SMS.

To confirm the New Step selection select the Move button or the Cancel button if you do not want to proceed.
On returning to the Patient Connect: Actions & Properties Editor screen a popup message will be received confirming the number of patients that have been moved.
Deleting a Patient Connect Action
To delete an Action step in a program, as in the case of Move Patients, it will be necessary to decide the Action the Patients on the action step to be Deleted should be moved to.
To delete an action, select the Program Name from which the Action is to be deleted.
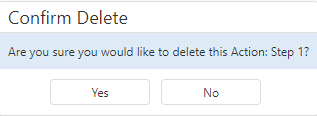
Select Edit ,* highlight the Action to be deleted and select the cross in the ‘right-hand column of the Action.

A Confirm Delete popup will display to confirm the deletion is to proceed.
Select Yes to delete and No to not proceed with the deletion.
The Action step will be removed from the Actions list and then select Save to complete.
If there were any patients queued for Step 1 then the New Step these patients are to be moved to needs to be selected. This is done via the Patient Connect Program Actions Changed’ screen that will pop up.
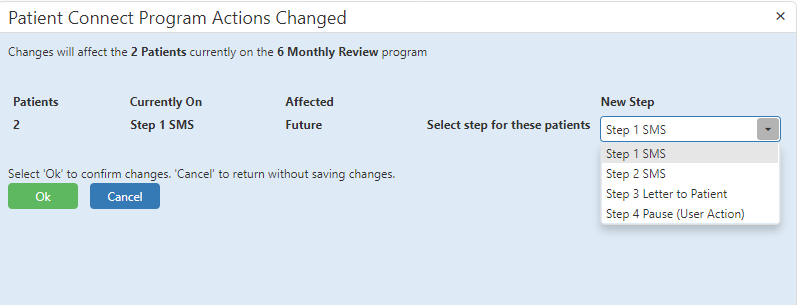
Follow the screen instructions, select the applicable New Step and then Ok to confirm the changes or Cancel to return without saving changes.
In the above example when Step 1 was removed, Step 2 was renamed as Step 1, so the New Step selection would be Step 1.
Manage a Patient’s Patient Connect Programs
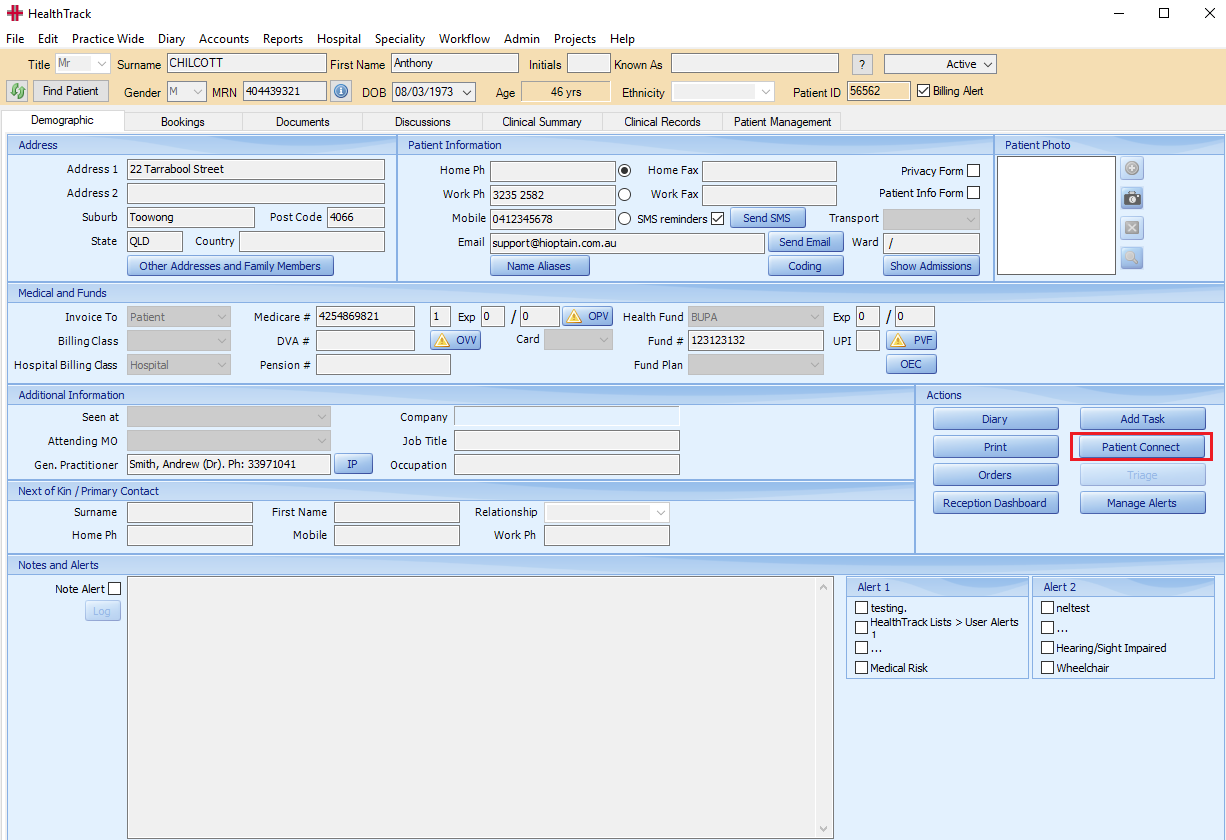
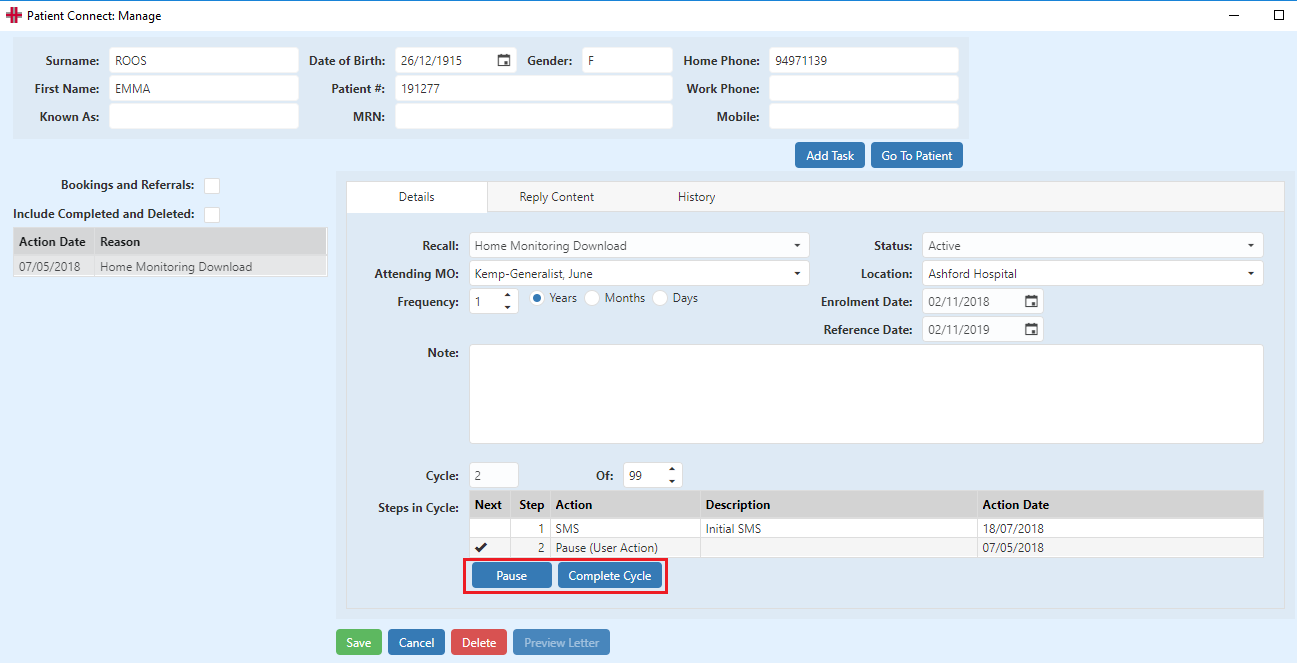
From the Demographic tab select the Patient Connect button in the Actions area to open the Patient Connect: Manage screen.
This screen is used for adding new Patient Connect programs, editing existing programs and viewing current and past program actions and history. It is also where Reply Content information can be viewed and edited.
Viewing Existing Patient Connect programs
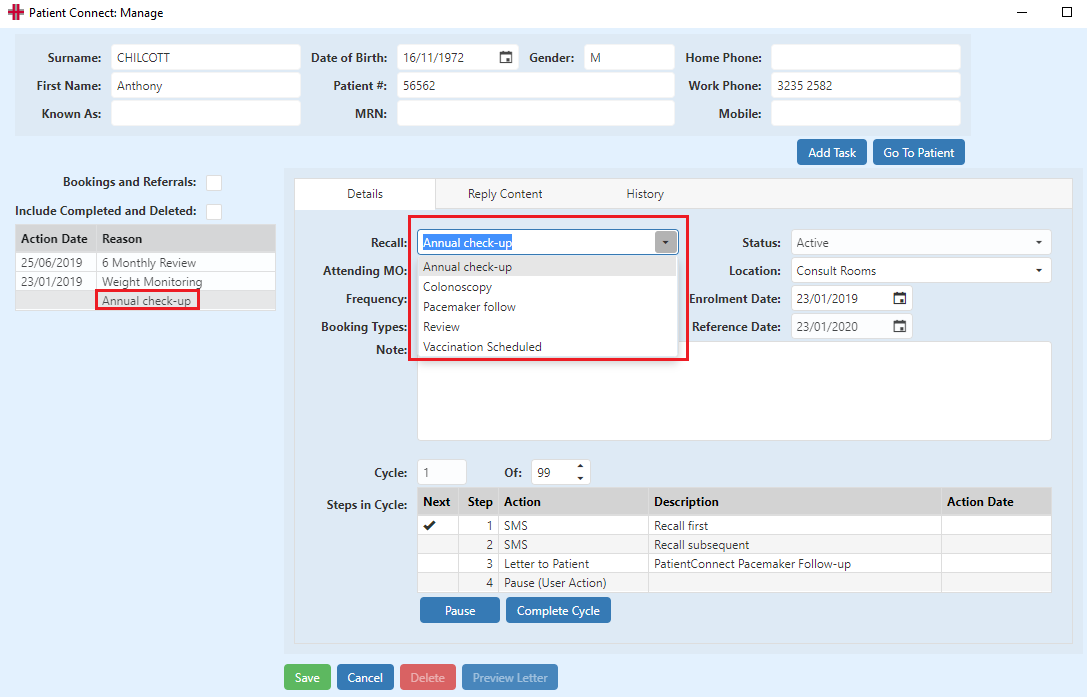
Details tab
Existing Patient Connect programs of Program Type Recall and Program, will display by default in the left-hand panel of the screen on the Details tab.
By selecting a program in this panel, the details will display in the Details panel on the right of the screen, as per below:
| Recall/Program: | Name of program |
|---|---|
| Status: | Current status of program |
| Attending MO: | Patient’s doctor for program |
| Location: | Location for program booking |
| Frequency: | The program frequency for a cycle |
| Enrolment Date: | The date the program was setup for the patient |
| Booking Types | Booking Types that will complete a program cycle |
| Next 4 are dynamic according to program type: | |
| Next Recall Date: | Recall – Proposed future Booking Date |
| Program Starts: | Program – Enrolment Date |
| Reference Date: | Booking – Existing Booking Date Referral – Enrolment Date |
| Cycle: Of: | Displays the current cycle of how many cycles are set for the program |
| Steps in Cycle: | Cycle steps in program and Action Date of any completed steps and next step |
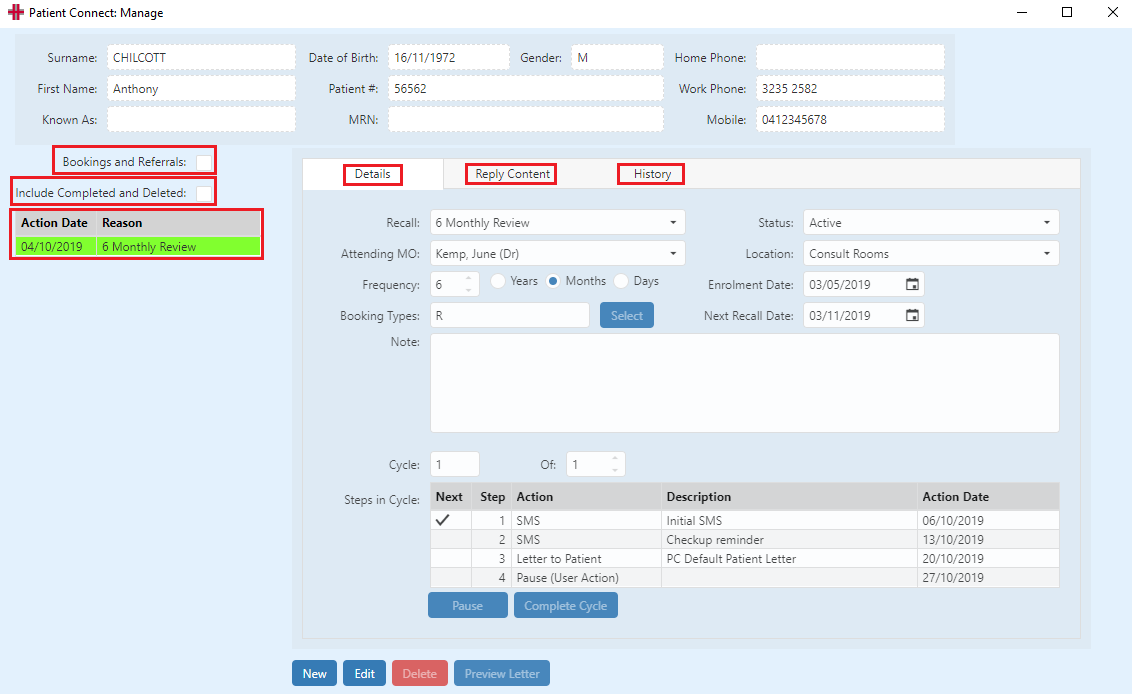
By default only active status Recall and Program patient connect programs will display.
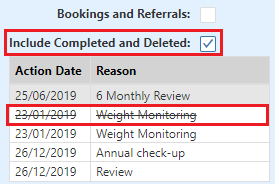
To also view Booking and Referral programs the ‘Bookings and Referrals’ tick box needs to be selected.
To view completed and deleted programs the ‘Include Completed and Deleted’ tick box needs to be selected.
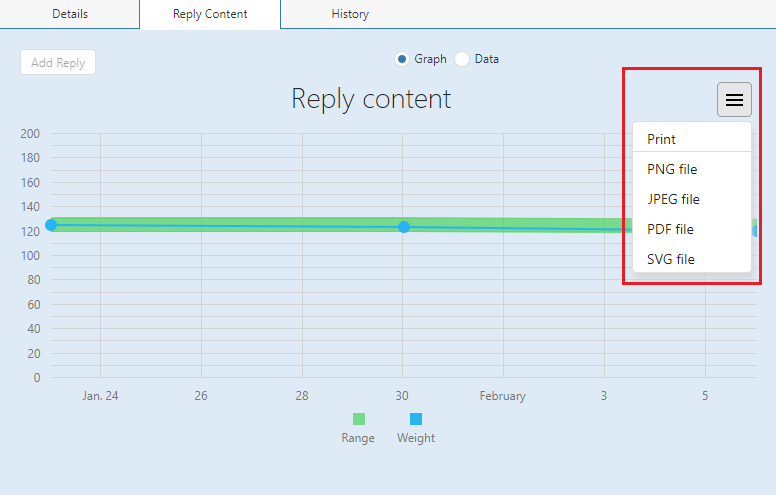
Reply Content tab
The Patient Connect Program type ‘Program’ will typically be set up to receive replies from patients, as a connection monitoring tool, via SMS.
The replies will display in the Reply Content tab and are viewable as a Data table or Graph.
The table columns displayed contain the following data:
Received – the date the reply was received
Value – the value sent by the patient
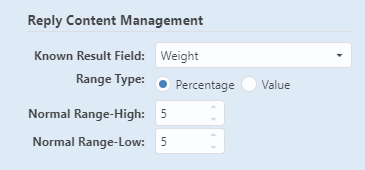
Low Range Value – the parameters set in the Reply Content Management configuration for the program i.e. in this case 5% (refer Reply Parameters below)
High Range Value - the parameters set in the Reply Content Management configuration for the program i.e. in this case 5% (refer Reply Parameters below)
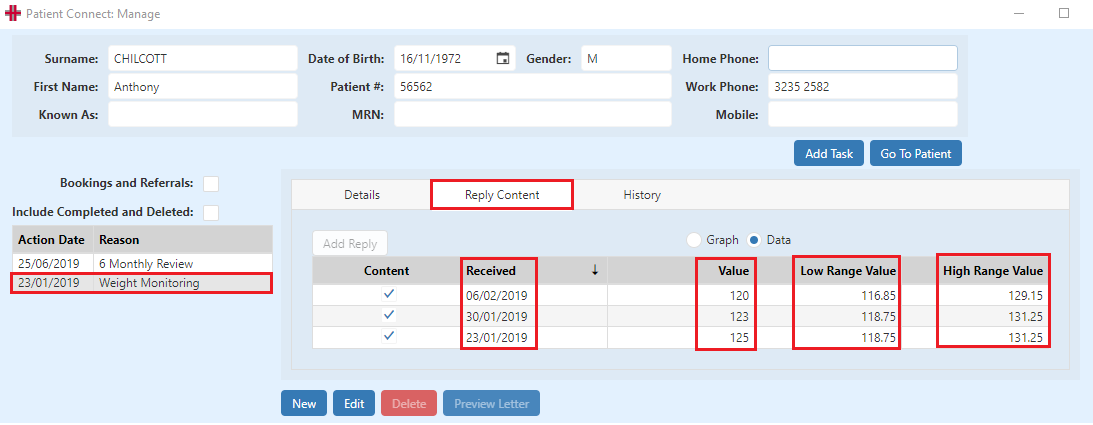
Reply Parameters
The Graph view also contains print functionality.
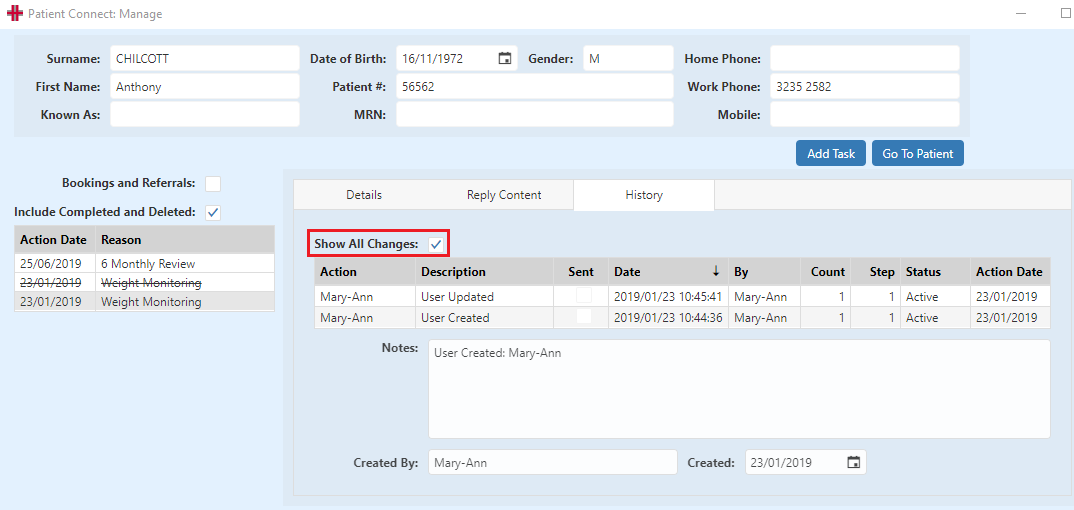
History tab
Displays the Program history Actions, the view defaults to the automated actions of the program.
To view all Actions, including User actions select the ‘Show All Changes’ tick box.
Adding a new Patient Connect program to a patient
A patient can have one or more different patient connect programs scheduled but only a single episode of each program type for Recall and Program Type programs.
e.g. They can have a program for Annual Check Up and another for Holter Monitoring but not 2 for Holter Monitoring.
Booking and Referral Type programs can have multiple instances added by the system.
To add a new program to a Patient, select the Patient Connect button from the Actions panel on the Patient’s Demographic screen.
Select New and from the Recall list select the program to be added. The program details will auto complete such as Status, Frequency, Location and Steps in Cycle with Attending MO to be selected. All fields are editable with the exception of Cycle and Steps in Cycle as these are part of the program configurations.
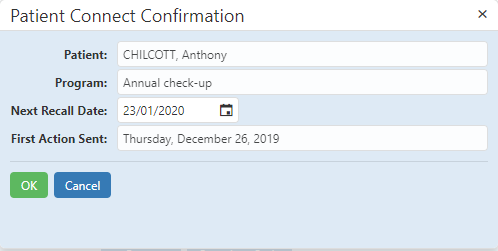
Before Saving Program
When the Save button is selected, the Patient Connect Confirmation window will open. This will show the reference date as the Next Recall Date and the First Action Sent date that will occur for the program. Select OK to proceed with adding the patient to the program or Cancel not to proceed.
After Saving Program
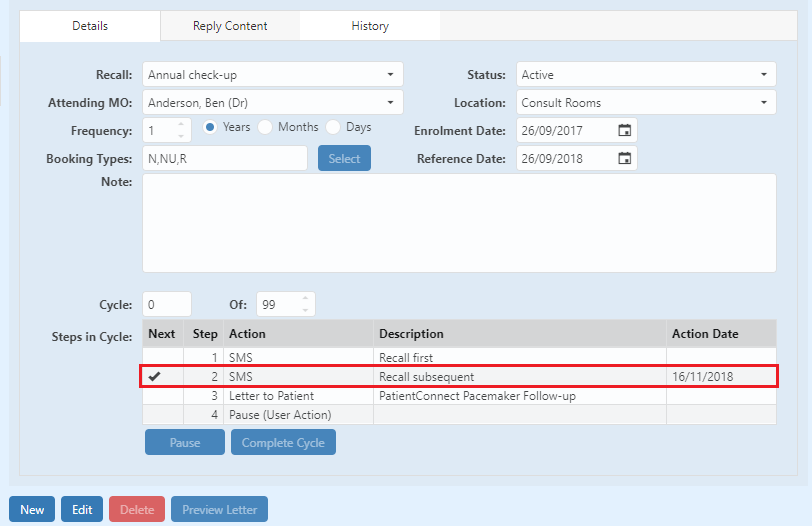
Once the program is saved the Action Date column will display the date the first program action is due for this cycle.
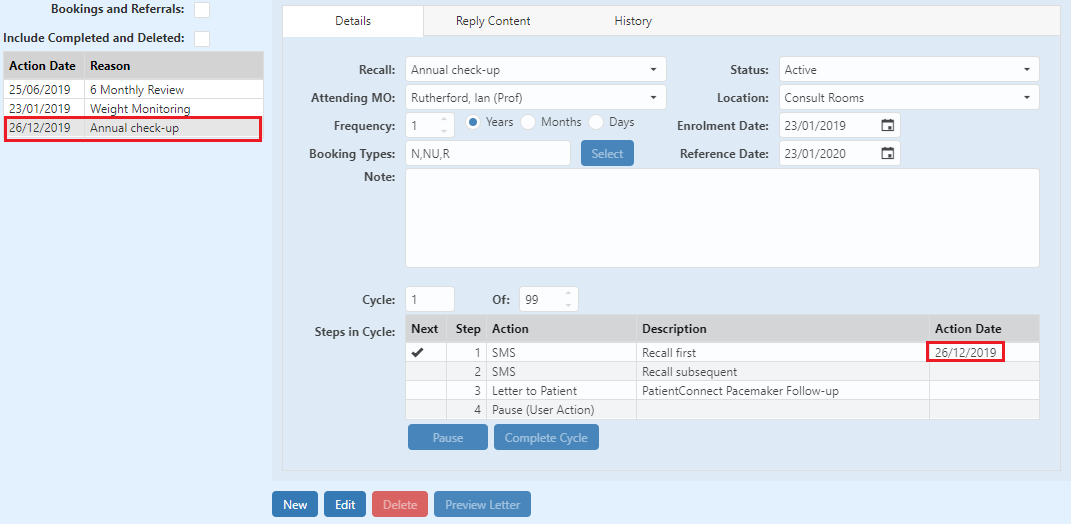
Once a program is in progress and actions have occurred the |Action Date| column will display the date when an action occurred and the |Action Date| the date next action will occur. The Next action to occur is marked with a √ in the |Next| column of the Steps in Cycle table.
Each patient on a program will be progressed through the program cycle until the program outcome is achieved. A typical program outcome is that a booking is created for the patient. If a booking is detected for a patient then the patient will be moved on to the next cycle of the program. At this point the patients program cycle will be reset to the first action and the Action Date will be set to the next future date that the patient will be sent a reminder.
If the program is for a single cycle only, the program will be marked as completed.
Viewing a Completed or Deleted Patient Connect Program
To view programs that are completed or those that have been deleted select the ‘Include Completed and Deleted’ tick box above the program panel and these will display.
Overview of a Patient on a Patient Connect Program
Once a patient has been put onto a Patient Connect Program the process will automatically handle communications to the patient and an “Action Date” will be set. The following workflows will occur depending on the objective of each program, as follows:
OBJECTIVE: To create a booking - Recall
-
When the “Action Date” is reached the process will determine if the patient has a future or recently completed booking of the required type.
-
If the patient has a booking then the cycle of the program will be completed with no actions completed. If this is the last cycle in the program or the program only has 1 cycle that program will be completed for the patient.
-
If the patient does not have a booking the current action will be taken. If this is an SMS or letter the item will be sent and the next “Action Date” will be set. The next “Action Date” is determined by the next step in the program.
-
The process will determine if the patient has a future or recently completed booking of the required type for every subsequent “Action Date” when due.
OBJECTIVE: To contact the patient - Program
-
When the “Action Date” is reached the process will automatically take the required action and moved on to the next step on the program.
-
This will continue until the program cycle is completed.
-
If there are multiple cycles the program will repeat until all cycles are completed.
OBJECTIVE: To send information related to a booking - Booking
-
When the booking is made the process will check if there is a related Patient Connect program to that booking type. If there is a related program it will be added to the booking.
-
When the “Action Date” is reached the process will automatically take the required action and moved on to the next step on the program.
-
In the case where the booking is made within the “Action Date” period i.e. the Booking Date is the 10th June and the actions are set for 14 days before and 7 days before and the booking is made on the 1st June. The 14-day action will occur straight away and the subsequent action will occur soon after, when 7 days before occurs. In this scenario if the booking is made less than 7 days before the booking date, then Action 1 and Action 2 will be simultaneously triggered when the next patient connect actions are processed.
OBJECTIVE: To create a booking - Referral
-
When a referral is added to the system the option will be available to select adding the Referral Patient Connect program to the patient.
-
When the initial Action is triggered the process will determine if the patient has a future or recently completed booking of the required type.
-
If the patient does not have a booking the current action will be taken. If this is an SMS or letter the item will be sent and the next “Action Date” will be set. The next “Action Date” is determined by the next step in the program.
-
The process will determine if the patient has a future or recently completed booking of the required type for every subsequent “Action Date” when due.
If there is a “Pause (User Action)” step in the program, when the patient’s program reaches this step in the cycle they will remain on this step and their “Action Date” will not change until one of the following occurs:
-
If the objective of the program is to create a booking and a booking is made for the patient then the process will automatically move the patient on to the next step of the program or complete the cycle or program if the pause step was the last step of the cycle.
-
A user manually moves the patient on to the next step of the program or completes the cycle/program if the pause step was the last step of the cycle.
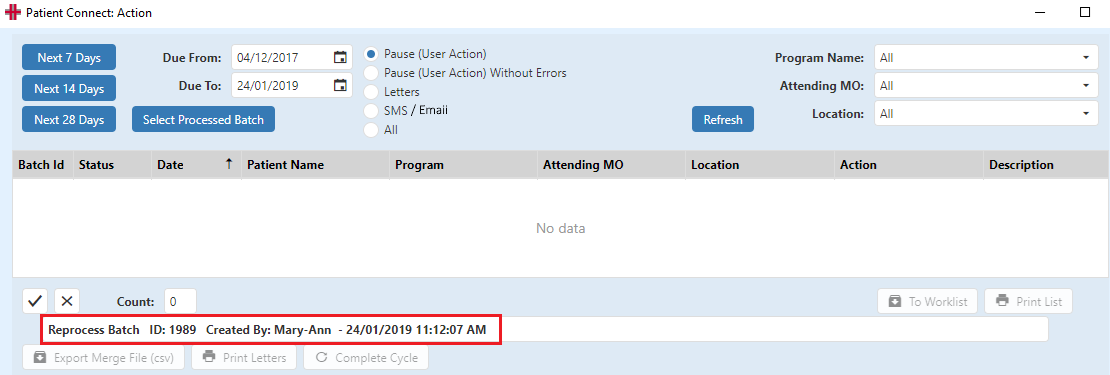
Patient Connect: Actions
The “Patient Connect: Action” screen gives a practice wide overview of patients on all the currently active (enabled) Patient Connect Programs. The screen is the user management screen for viewing actions to be completed on Patient Connect programs. These include future automated actions as well as manual user actions. e.g. Pause (User Action).
To view and action Patient Connect program actions for a period open the Patient Connect: Action screen via the Practice Wide> Patient Connect menu option.
When first opened the screen will populate with current outstanding Pause (User Action) actions for the default ‘Due From:’ and ‘Due To:’ period, including items paused due to errors.
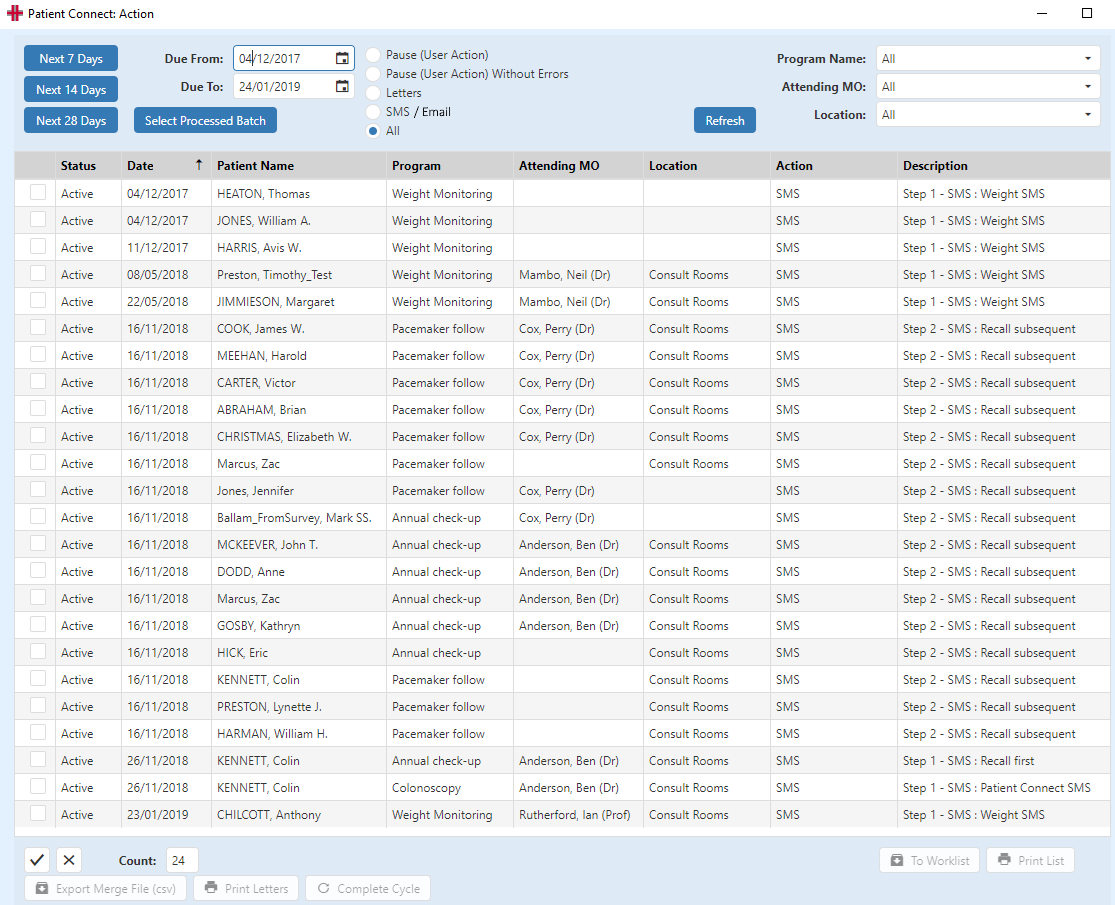
The top section of this screen provides you with filters to specify the actions to be viewed.

Next 7 Days ; Next 14 Days ; Next 28 Days buttons – auto select those date ranges to display Actions due throughout those time frames.
‘Due From:’ and ‘Due To:’ date selector- allows selection of a custom date range.
‘Pause (User Action)’; ‘Pause (User Action) Without Errors’; ‘Letters’; ‘SMS’; ‘All’ radio buttons – filter the Actions view to the specified type or All to view all outstanding Actions for the date range.
When opening the screen, the ‘Due To’ field defaults to today’s date and the ‘Due From’ field to the date of the earliest Action item remaining outstanding.
By default, all programs for all doctors, for all locations for the selected action will load. Filtering can be refined further by selecting one or a combination of the Program Name, Attending MO and Location options.
e.g. No entry in the Program Name, Attending MO or Location fields will display All program actions of the type selected for the date range or you could further reduce the list to Program Name= Annual Check-up and/or Attending MO = Dr Smith etc.
Select the Refresh button to load the patient connect data.
By selecting the tick boxes to the left of the Status column Action items are selected and can be actioned using any of the buttons at the bottom of the screen or alternatively if all items are to be actioned then select the all √ button at the bottom of the list of items:
To Worklist –*** Places all selected items into a worklist. Items remain on screen for user actioning.
Print List -*** Creates a printed Patient Connect List report. Items remain on screen for user actioning
Performing one of the following actions will create a batch and complete the cycle for the selected items.
Export Merge File(csv) –*** Saves a csv file to an external location for manual follow-up with all patients on the list.
Print Letters -*** Generates selected letters. The letters will be placed in the Distribution List (or Saved to a file). This can be used if creating letters in advance or if manually printing letters.
Complete Cycle – Completes the cycle for each selected patient.
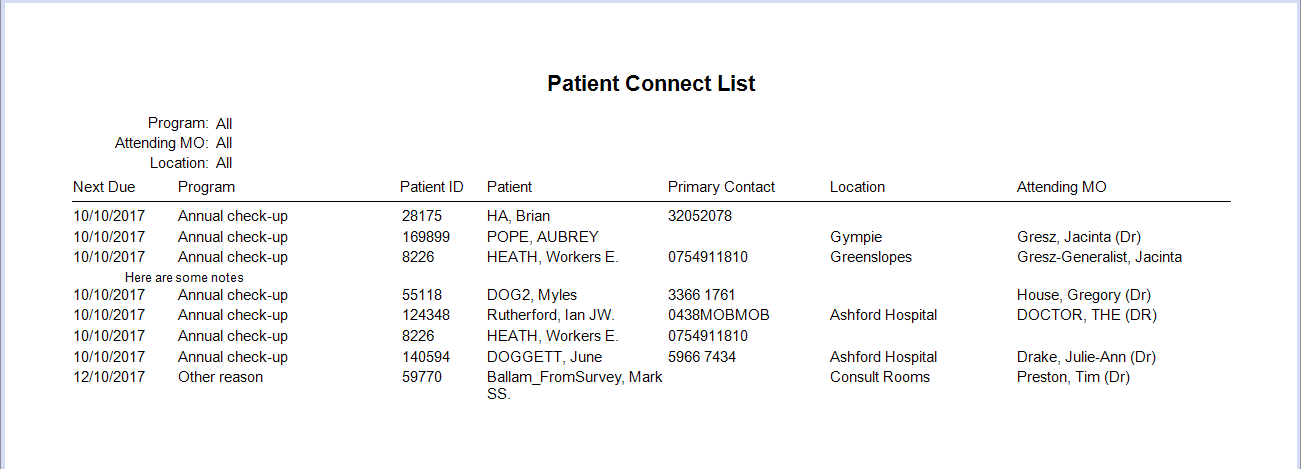
Print List Report
Performing Right Click Actions
Individual items in the Patient Connect: Action list can be actioned by selecting an option from the right click menu.
Go To Patient – Opens the patient’s demographic screen.
Open Patient Connect – Open the patient’s Patient Connect: Manage screen.
Complete This Cycle – Completes the current cycle of the Patient Connect program and moves the patient to the next cycle, if applicable.
Pause Program – Suspends any further Patient Connect actions for patient. Program will be set to Completed.
Delete from Program – Deletes this patient from the Patient Connect program.
Send to Worklist- Appends this patient to a worklist.
All to Worklist – Appends all patients on this list to a worklist.
Completing a Cycle
To complete the cycle, either select and complete actions one line at a time or multiple at a time. This is done by either right clicking and selecting ‘Complete this cycle’ from the displayed menu options or by ticking the left-hand tick box of one or multiple items and selecting the Complete Cycle button at the bottom of the screen in the Perform Action section.
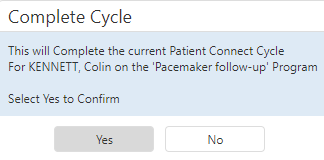
Both of these completion options will pop up a confirmation screen where Yes is selected to confirm the completion of the cycle or No to cease the action.
The Pause and Complete Cycle button functionality is also available on the patient’s Patient Connect: Manage screen, where a cycle is able to be paused or completed from a patient’s record.
Cycle Auto Completion
Cycle actions will auto complete when they fall due based on the following criteria:
-
A Booking has been made for the booking type configured in the Patient Connect program. This booking will have a booking status of any of the following: Booked; Arrived; In Session; Out Session; Closed. Bookings with a status of Cancelled or No Show will not be recognised as a booking to complete a cycle.
-
The booking date is within ½ the frequency period in the past and any future date for a Step 1 action.
-
The booking date is within the wait period between the last and current step and any future date for all step actions other than Step 1.
-
Where ‘Any Future Booking Type Completes Recall’ has been selected, then any booking meeting the above criteria will complete the cycle.
-
Where ‘Ignore Future Booking Types’ has been selected, no bookings will auto complete a cycle.
Select Processed Batch
The Select Processed Batch button opens the Patient Connect Batches screen and shows a list of batches that have been processed and can be opened to check on records contained in each batch.

This list can be filtered by date range and user.
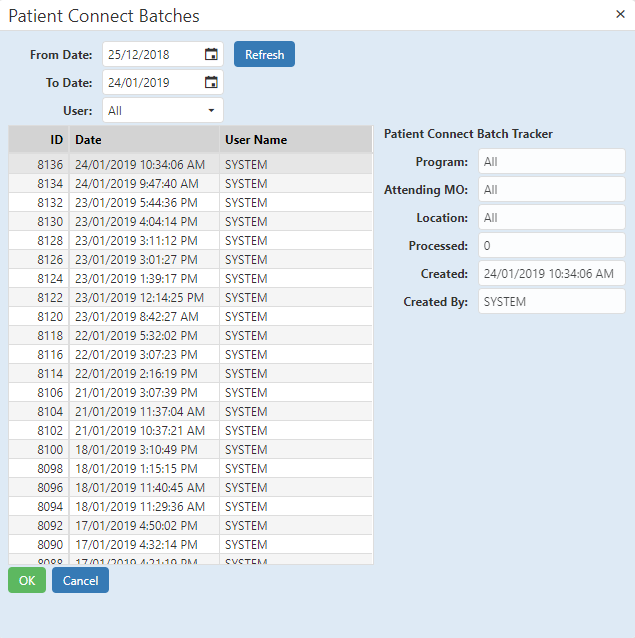
Batches are opened for viewing by selecting the applicable batch and then the OK button, which will reopen the batch in the Patient Connect: Action screen.
The Batch Details are displayed under the data table to alert the user that an existing batch is being viewed.
To return to the current action items on the screen, the batch details are cleared from the screen by selecting the Refresh button.