Invoicing
How to quick bill (Especially for Doctors)
Quick Bill is a feature to help automate the billing and invoicing process. It is designed for a user to add billable items to a patient’s account for addition to the invoice at a later time.
Quick Bill can be accessed from the Diary by right clicking on the booking and selecting Quick Bill, or through the Accounts menu >> Quick Bill from the main HealthTrack screen. There is also a Quick Bill button on the Clinical Summary screen.
When Quick Bill is selected the Create Pending Items screen will open:

Figure 1 - Quick Bill, Create Pending Items
The Create Pending Items screen will display the patient for which the items are going to be added, the bill class, the MO who provided the service, the Location where the service was performed and the date the service was performed.
If any of these details need to be changed, select the drop down menu next to the field. If you change any details and these details are to be the patient’s new default details click Update For Patient and the patient’s Demographics page will be updated with these changes.
To add an item number click in the Item Number field. This will display a list of all items number used by the Practice.
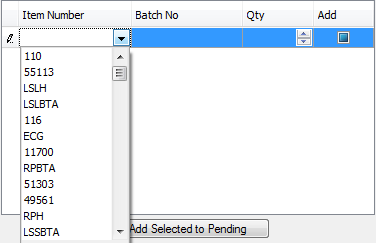
Figure 2 - Adding a quick bill item
Select the item number by clicking once on it, the quantity will default to 1. This can be adjusted by entering the quantity into the cell or by clicking the arrow up button until the required number is showing. To add a new item, press enter or click below the last item and a new line will appear.
When the user has entered all item numbers required for billing click Add Selected to Pending, the items will be added to the list of pending items. At the bottom of the Create Pending Items screen displayed will be a statement stating “Patient has 2 items pending”. This will stay here until the pending items are added to an invoice or unselected from pending items.
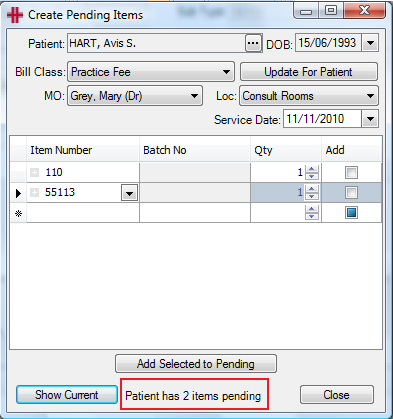
Figure 3 - Number of pending Items
To unselect or delete items off the pending list click the Show Current button, an additional section of the Create Pending Items screen will now be visible, listing all pending items for the patient.
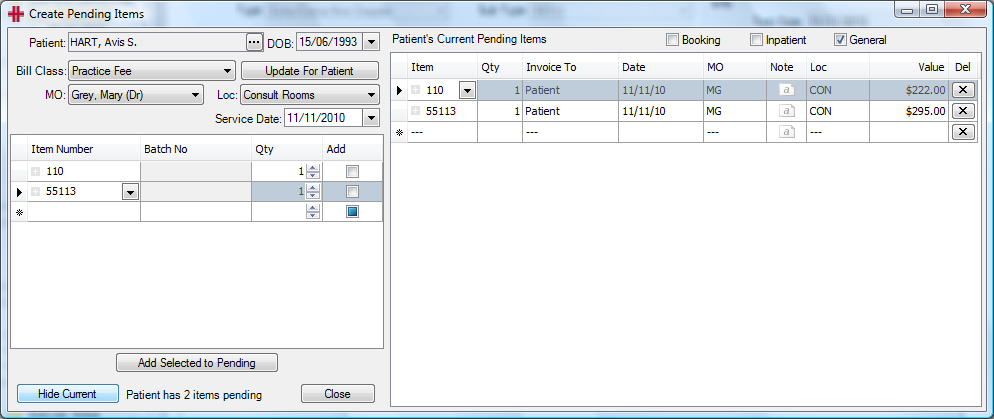
Figure 4 - Show current pending items
In the list of all pending items the last column contains a button with an X. To remove an item from the pending items list, click on this button. Once all required pending items have been added and removed click Close.
How to create an invoice
Invoicing can be invoked from a number of areas within HealthTrack:
-
Accounts menu >> Create Invoice,
-
Transaction listing - Create Invoice or
-
As a result of ‘Closing’ a booking.
The recommended process is to create the invoice from the Diary by right-clicking on a current booking and choosing ‘Close Booking’. Creating the invoice from the booking brings the booking, referral and attending Doctor information (as long as this data is entered in the booking) into the invoice. Another benefit of using the booking is that booking types can be set up to auto-add items to the invoice to save staff entering the item each time. For example for a review appointment item 116 can be automatically added to the invoice.
3 ways to create an invoice:
-
Right click on the booking in the Diary and select ‘Closed’
-
Open the menu Accounts >> Create Invoice
-
Open the patient’s Transaction Listing click Create Invoice
Understanding the invoice screen: The invoice screen can be broken into a number of sections.
Patient Details
The first step in invoice creation is to make sure the correct patient is selected. When invoicing from the diary the booking’s patient is selected, if invoicing from the Accounts Menu then the patient selected on the Demographics page is selected or if via the Transaction Listing the patient selected on the Transaction Listing screen is selected. To choose a different patient, click the Find Patient button.

Booking and Referral Details

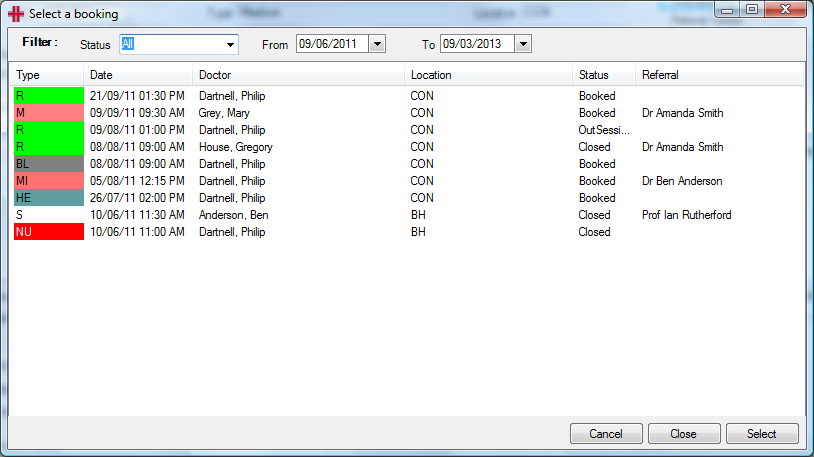
If invoicing has been invoked from the diary, the booking’s details will have been automatically filled in. Otherwise, a booking may be selected for the patient by clicking the Find Booking button. The ‘Select a booking’ screen will appear.
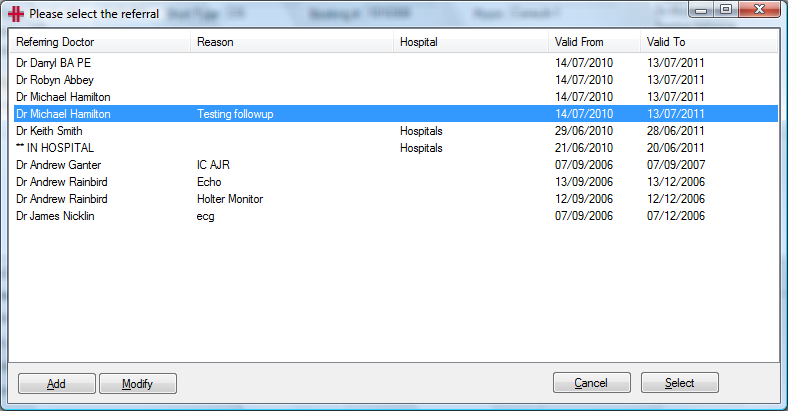
The current referral will also be automatically recorded from the booking provided it was specified; otherwise the user can select the relevant referral for the invoice, or create a new referral by clicking the Find Referral button. The ‘Please select the referral’ screen will appear. If the referral is not listed, click the Add button to create a new referral.
Invoice To

‘Invoice To’ identifies to whom the invoice is addressed, e.g. the patient, Medicare, DVA, Workcover, 3rd Party or a Health Fund. The ‘Invoice To’ by default will be set as per the ‘Invoice To’ field on the patient’s Demographic tab. This can be changed if necessary.
If billing to a 3rd Party, the user must use the Change button to select the company. If ‘Invoice To’ is set to Health Fund, then the patient’s Health Fund is automatically selected from the patient’s demographic tab.
Details
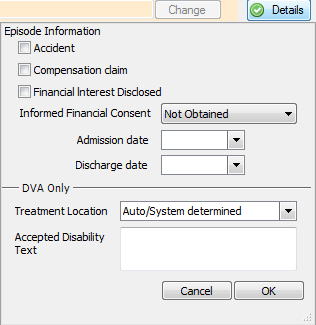
The Details button is used to capture additional information required for Inpatient billing. Please see the ‘billing health funds online’ section of this Usability Guide for more details.
Invoice Items
The ‘Invoice Items’ section identifies the services that have been provided to the current patient. The operator should check and update if necessary the following information before adding Invoice Items:
-
Invoice Date – the date you are creating the invoice (will default to today’s date)
-
Invoice Location – location where the invoice is issued from (will default to your logged on location)
-
In-Patient (will be checked by default if Health Fund is selected as the Invoice To)
-
Batch Billing (will be checked by default if Medicare, DVA, WorkCover, Third Party or Health Fund is selected as the Invoice To)
-
Service Location – where the service was performed (defaulted if invoicing from the diary)
-
Attending MO – who performed the service (defaulted if invoicing from the diary)
-
Provider number (defaulted based on booking and Attending MO)
Adding items to the Invoice:
Once you have checked all the details above are correct you are ready to start entering the item numbers. There are a five ways to do this:
-
Enter the number directly into the Item Number text box
-
Using the lists at the bottom of the screen (e.g. Frequently Used Item Numbers tab), double click on the item and it will now be added into the Item Number box.
-
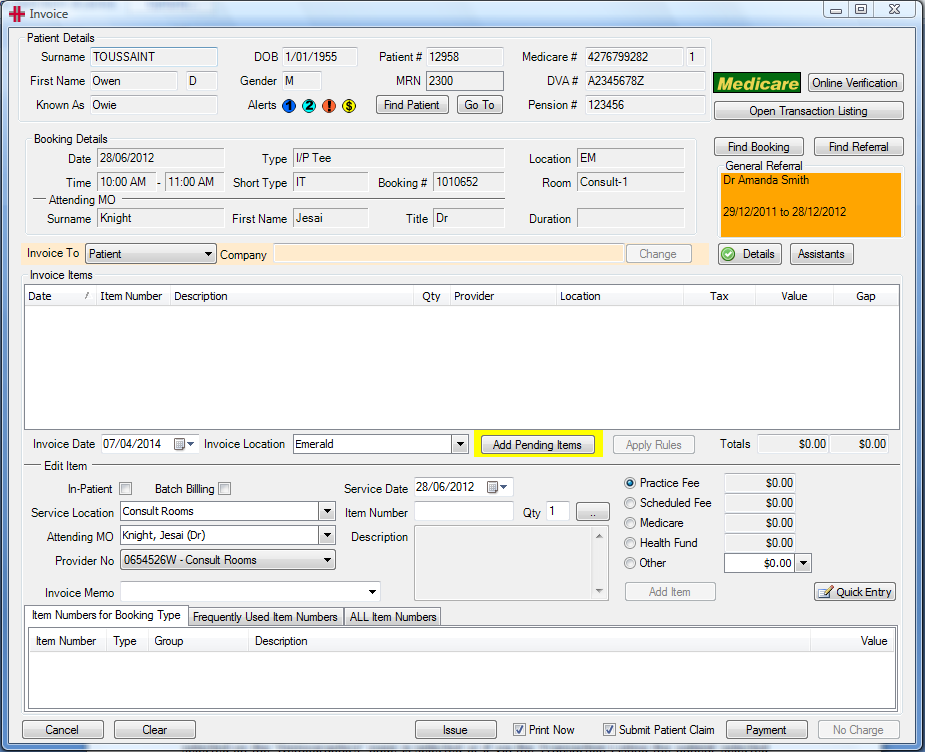
Quick Bill – if items have been added via Quick Bill the Add Pending Items button will be yellow. Click this button to open the Invoice Pending Items screen.
-
Auto add items
-
Quick Entry window - for adding multiple items
For options 1 and 2 once the item number is entered into the Item Number field you need to specify the number of times to invoice for this item. Update the Qty field with the correct amount.
Additional information can be recorded for the item number by clicking on the button with two dots .. . The Additional Item Details screen will open:
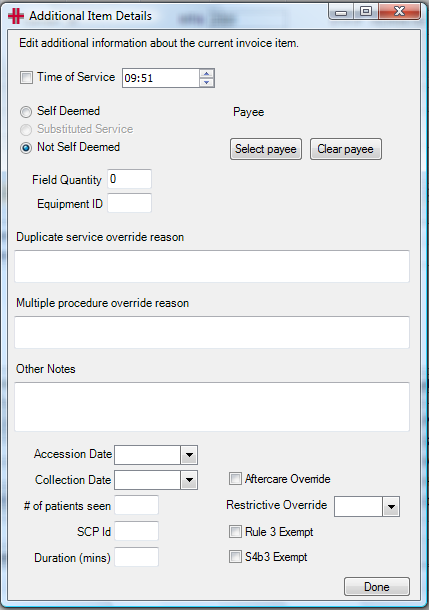
Figure 5 - Additional Item Details
When a service has been performed that requires a self deemed referral, a referral is not added to the booking/invoice in the usual way, as the self deemed referral is captured on the invoice per item. This can be set in the Additional Item Details window. Please remember that this is item based so if more than one item is self deemed, this needs to be completed for each item number.
Once any additional information has been entered click Done.
This additional information will be displayed on the invoice below the item number it refers to.
If no additional information is needed or after adding the additional information, add the item to the invoice by clicking Add Item. The item will be added to the Invoice Items table above.

Continuing adding all required item numbers.
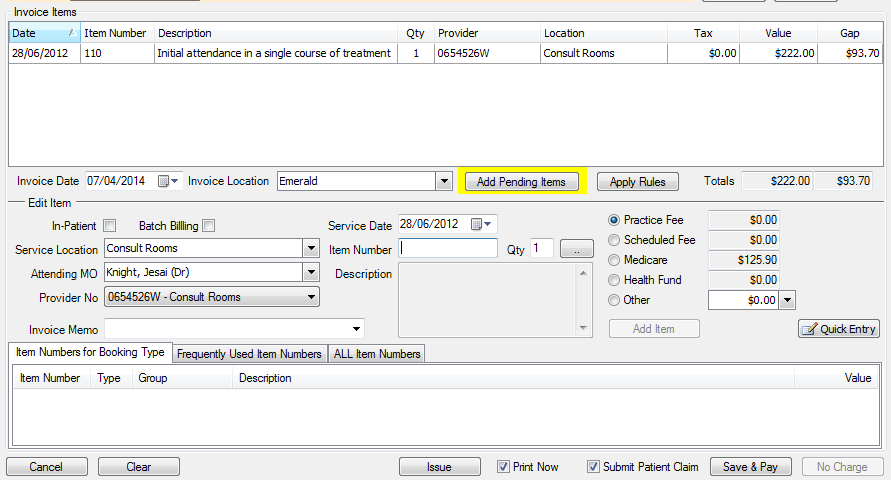
Option 3) Quick Bill: if Quick Bill has been used for this patient below the Invoice Items the Add Pending Items button will be enabled and highlighted in yellow. This identifies that there are pending items waiting to be invoiced for this patient.
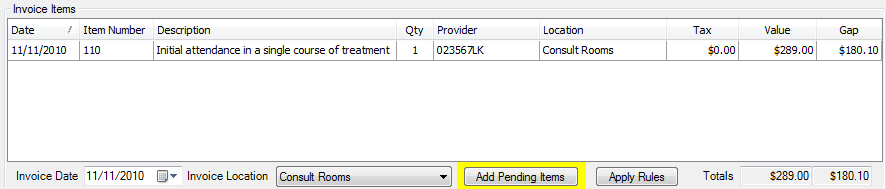
To view and add these items click the Add Pending Items button. The Invoice Pending Items screen will open:
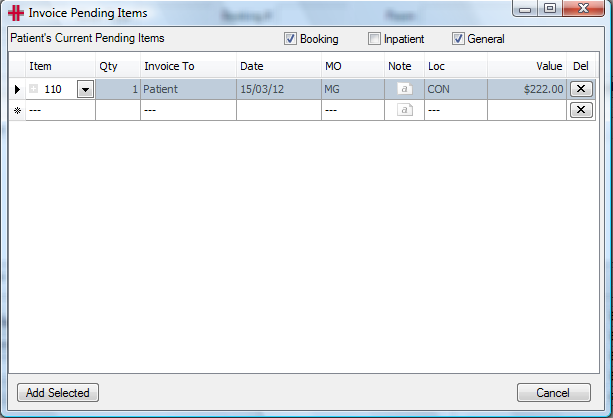
All items by default will be selected (ticked in the last column). If not invoicing all items unselect the items you aren’t invoicing and then click Add Selected. The selected items will be added to the invoice.
Option 4) Auto add items. For each booking type an item number or a group of item numbers can be set to be either automatically added to the invoice when it is created or to auto-invoice so that the users don’t have to create the invoice. If the booking type you are closing has item numbers for auto-add when you close the booking these items will automatically be added to the invoice items section. From here you can add more item numbers or issue the invoice.
Option 5) The Quick Entry window provides a fast method for adding multiple item numbers to an invoice, which is particularly useful when billing long hospital stays for inpatients. First create a new invoice and select the Service Location, Attending MO and Provider No. Then click the Quick Entry button which is located next to the fee amounts.
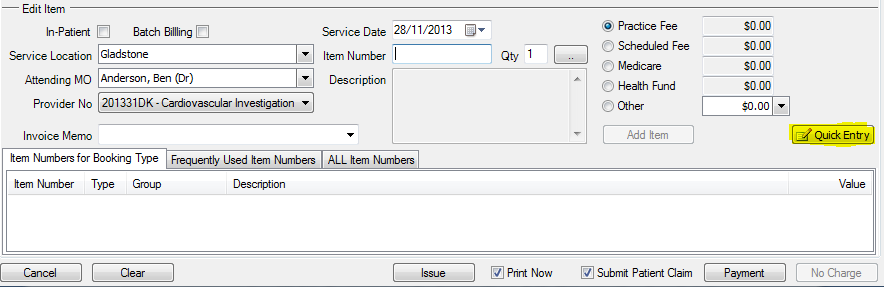
The Multiple Items Editor will open.
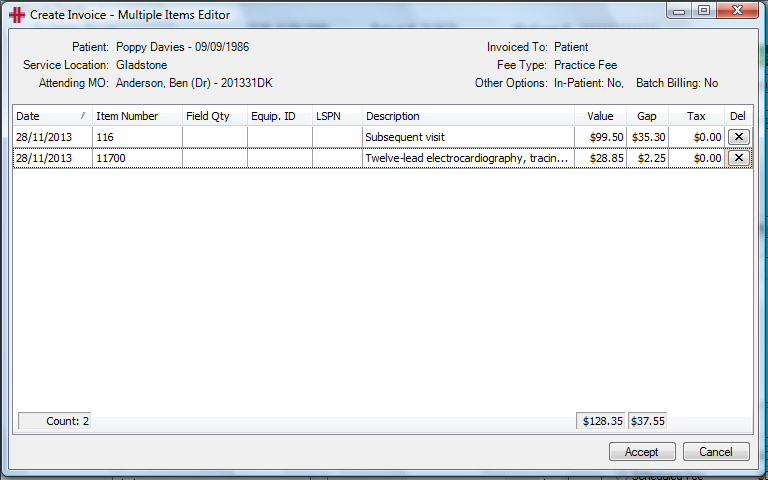
To add an item, enter the service date and the item number. Complete the other fields as required. To add another item number press the Enter key on your keyboard and a new row will appear below. When a new row is created it will retain the date and item number from the row above.
To delete any items from the Quick Entry screen, click the X button at the end of the row. Once an item has been deleted it cannot be recovered and will need to be re-added.
Once all items have been added, click the Accept button to add these to the invoice.
Editing the items:
To remove an item from the invoice or amend an item prior to issuing the invoice, double click on the item in the ‘Invoice Items’ list. This will bring the item back into the Edit Item section.
Edit – make any necessary changes required and then click the Add Item button to return the item to the ‘Invoice Items’ list.
Delete – now that it is in the Edit Item section it is no longer included in the invoice. Therefore you could simply click on either Issue or Save and Pay alternatively you can then delete the item from the Item Number box and continue with creating your invoice.
Invoice Memo:
An invoice memo can be added to the invoice via the Invoice Memo field. This can either be selected from the drop down list or you can type free text into this field. The memo list is maintained by the site administrator and can be modified in the List Manager.
*Multiple Service Rules *
HealthTrack has developed an advanced Multiple Service Rules (MSR) engine that is incorporated into the invoicing screen. The MSR engine is a sophisticated tool that calculates the Medicare/Health Fund rules including the diagnostic imaging and operation rules. The MSR is a property that can be turned on or off in your HealthTrack system. If it isn’t on please call HealthTrack and they will assist you in setting up this feature.
Using the MSR
HealthTrack will automatically work out for you when the rules will need to be calculated, therefore you can create your invoice using the normal process. As you are entering the items into the invoice HealthTrack will be checking the items to see if there are any rules to be applied. If there are rules that need to be applied then the Apply Rules button will be highlighted yellow as shown below in the red box.
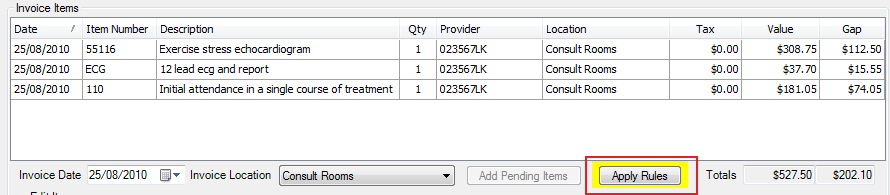
Figure 6 - Apply Rules to Invoice
The user has two choices, they can click the Apply Rules button to review and accept the rule changes or alternatively they can just click on the Issue or Save & Pay button as per normal and the rules screen will be displayed for them automatically.
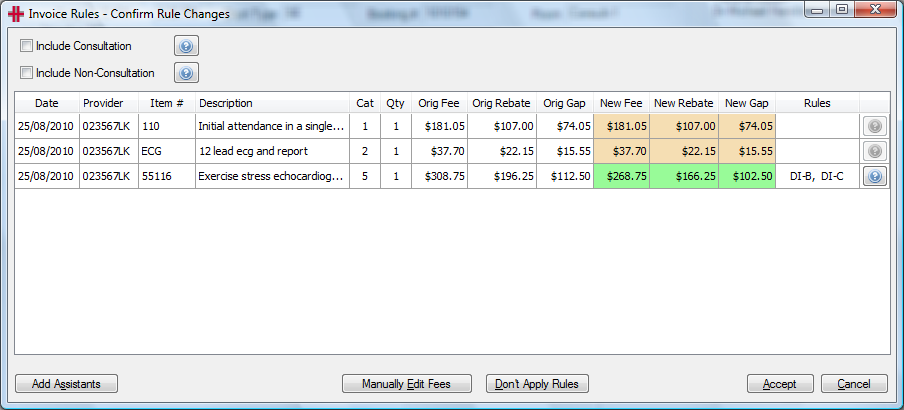
Figure 7 - Multiple Service Rules Engine
The fees highlighted in green are the fees that have been adjusted based on the rules. The Rules displayed in the Rules column are what rules have been applied to that item number. Clicking the Information icon next to the rules provides an explanation of the rules.

Figure 8 - MSR Rule Info
Accept button will accept the changes and update the invoice with the new prices.
Cancel will ignore close the Rules screen. If you use the cancel button when issuing or save and paying the invoice the rules will be ignored.
Don’t Apply Rules will not apply the rules and the fees will be the original fees entered into the invoice.
Manually Edit Fees allows for you to manually change the fee being charged. When you click on this button the New Fee column will now be editable to change to the fee you want to charge.
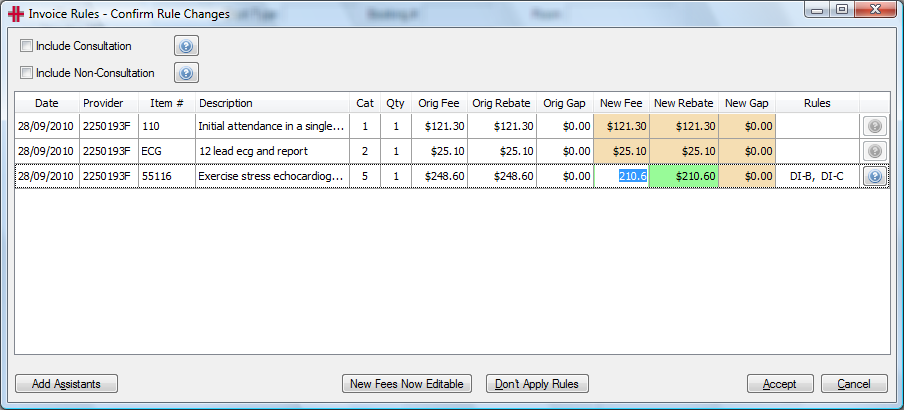
Figure 9 - MSR Manual Fee Change
Issuing the Invoice:
Now that all items have been added to the invoice you need to issue the invoice. There are two options for issuing the invoice:
-
Issue
-
Save and Pay
1) Issue is used when the patient is not paying the invoice on the day. This is mainly used for invoicing to Medicare, DVA, Health Funds, Workers Compensation and Third Parties. When issuing you can chose to print the invoice or not, next to the Issue button is a check box Print Now. If this is ticked a print preview of the invoice will be displayed on the screen and you can the print the required number of copies.
Medicare DB4: The invoice printed is a certified version of the Medicare DB4 form. It is required that the patient signs the DB4 when bulk billing. When the Issue button is clicked an additional pop up screen will appear to specify the copies that you need printed. By default the Practice copy is selected as this is the one to be signed by the patient. There is also the option of printing a Patient and or a Medicare copy.
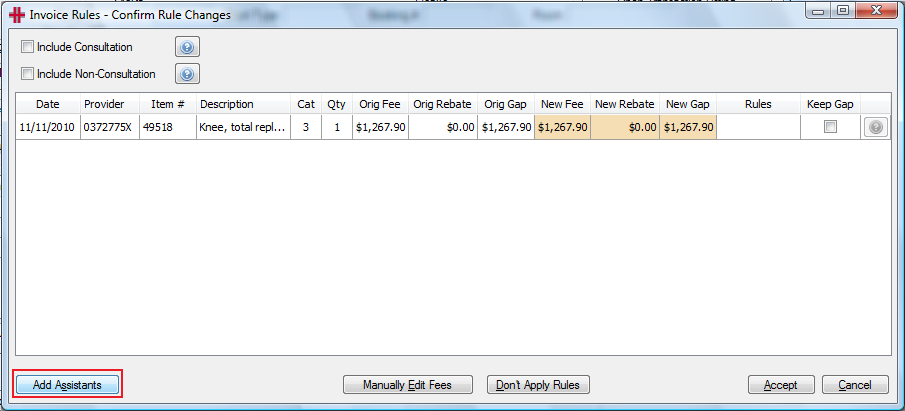
Figure 12 - Medicare DB4 Invoice Selection
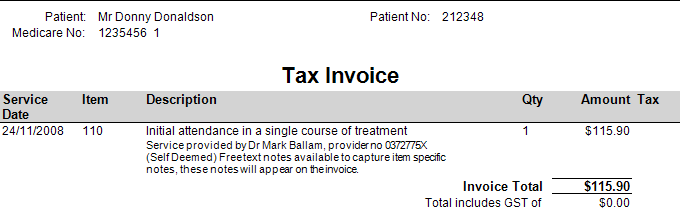
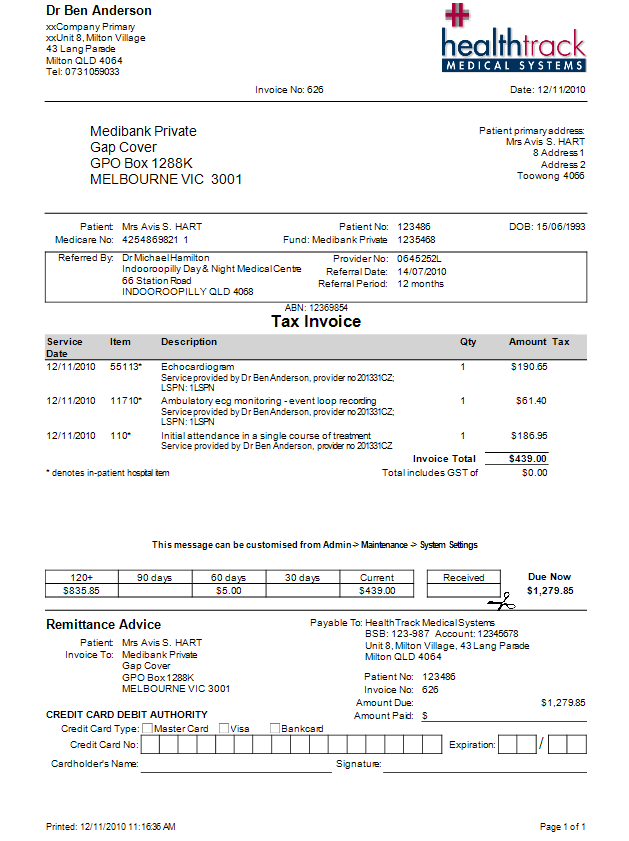
The invoice can be customised by the site to have the logo and specific details displayed. Depending on whom the invoice is made out to and the location where the service was performed, some of the details or logo on the invoice may differ.
Figure 13 - Invoice Example
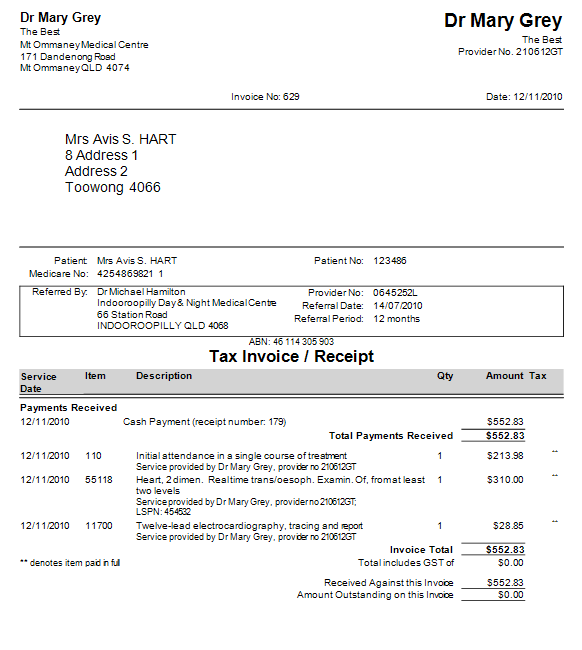
2) Save and Pay is to be used when the services are being paid for immediately. Generally all invoices to the Patient are paid at time of invoicing therefore instead of clicking the Issue button, click on the Save & Pay button. The save and pay option is for capturing the payment and HealthTrack will then automatically allocate the payment to the invoice. Once the payment is captured you can then print and Invoice and Receipt all in one for the patient. They can then take this to Medicare to claim their Medicare rebate. Please see the Receive Payment section of this Usability Guide for more details.
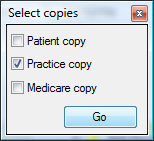
Figure 14 - Tax invoice and Receipt
On Hold Invoices
An invoice can be raised and placed On Hold if it is not to be issued straight away. This could be waiting for additional information e.g. a referral or more billing items to be added before issuing. ‘In patient’ billing would be one example of creating an invoice and placing on hold, where the invoice is being prepared throughout a patient’s hospital admission.
An invoice is placed on hold by selecting the On-Hold button at the bottom right of the Invoice screen. The invoice is created in the same way as How to create an invoice but then rather than selecting Issue or Save and Pay when required billing items have been added, the On-Hold button is selected. This will close the screen and place the invoice containing the added billing items on-hold.
When an On-Hold invoice is current for a patient and an invoice is invoked from any of the available options of
-
Accounts menu >> Create Invoice
-
Transaction listing - Create Invoice or
-
As a result of ‘Closing’ a booking
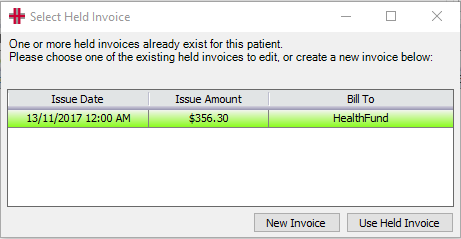
The user will be presented with a popup screen “Select Held Invoice’’ to select whether to use the Held Invoice or create a New Invoice.
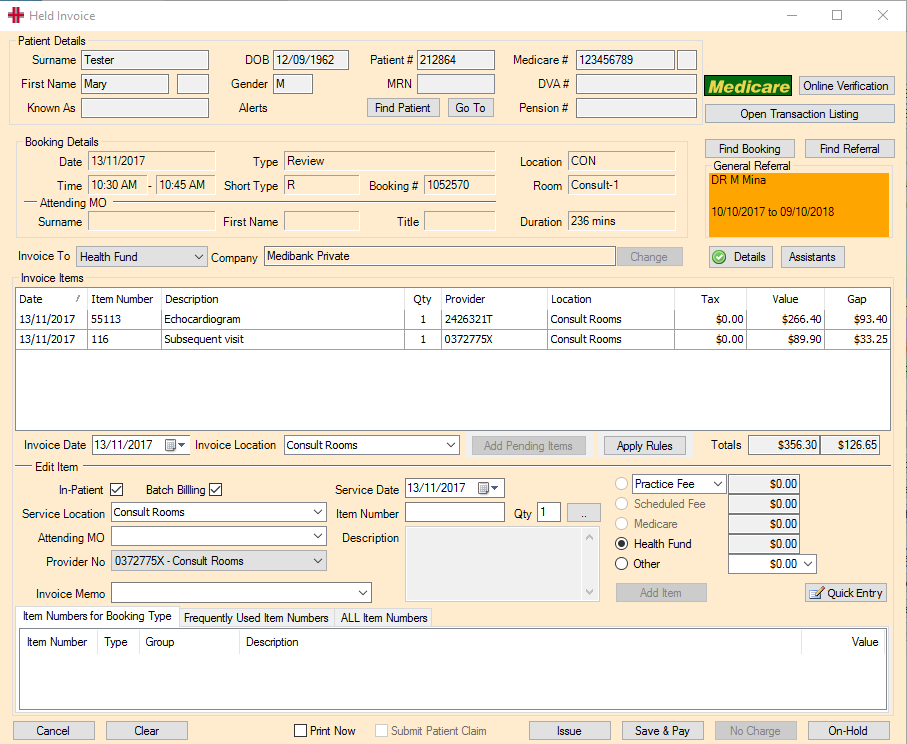
When Use Held Invoice is selected the Held Invoice will open for editing. It is wheat in colour to differentiate it from a new invoice.
Once editing is complete the Held Invoice can either be issued via the same process as any other invoice or again placed On-Hold for future further editing before issuing.
There is no limit to the number of times an invoice can be placed on hold.
To view any current On-Hold invoices, open the Transaction Listing screen and the invoices will be listed in the ‘Quotes & On-Hold Invoices’ panel of the screen.
These can be opened by double-clicking on the item or right-clicking and selecting Open.
Patient Claims
Setup Patient Claim Environment
HealthTrack enables Patient Claiming when Medicare Online Billing is enabled.
There after you are able to set if you would like to have the default ‘on’ or ‘off’ for submitting claims.
The property is called “PatientClaimsOnByDefault”. This decides if HealthTrack defaults to submitting a patient claim or not when invoicing a patient.
To change this default go to Admin >> Maintenance >> System Settings then type “claim” in the ‘Find Property’ box. Click the Edit button to charge the setting. This will set the default.
However the user is always in control, as they can select or de-select the option as they invoice each patient.
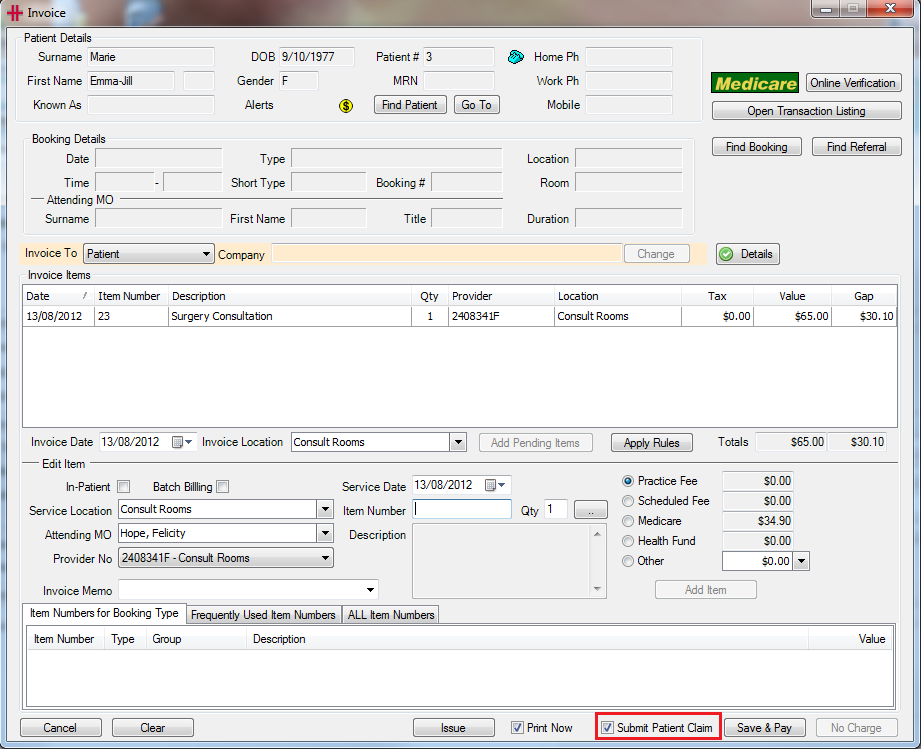
To submit a Patient Claim
Create an invoice to a patient, if the patient would like for you to submit their claim to Medicare then ensure that the ‘Submit Patient Claim’ check box is selected.
If the Patient is paying up front for the service click the Save & Pay button and receive the payment as per normal processes.
| Once you have received the payment click the Receive Payment button. |  |
|---|---|
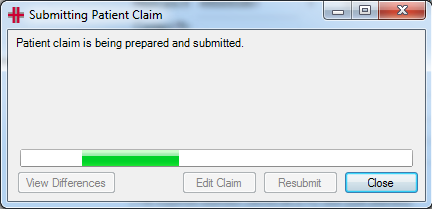
Now the Submit Patient Claim screen will be appear. Transmit this Claim: The claims will be submitted at the current point in time therefore ‘Now’ will always be selected for this. |
 |
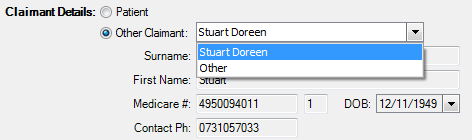
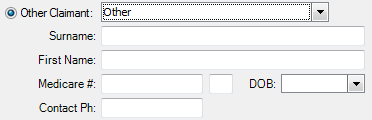
Claimant Details: This is the person who is claiming the payment, not necessarily the patient e.g. it might be the parent of the patient. If it is the patient then ensure that “Patient” is selected otherwise click on the “Other Claimant” option. After clicking “Other Claimant” the drop down list will provide options of all associated family members along with an Other option. If a family member is selected then their details will be automatically entered.
If ‘Other’ is selected you will need to complete all fields, otherwise this claim will not be able to be submitted to Medicare.
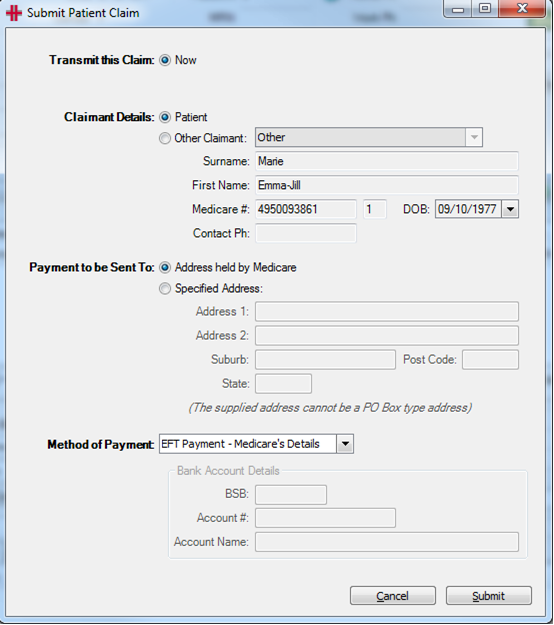
Payment to be Sent to: If a cheque is being sent to the patient this is the address that the cheque will be sent to. By default it will go to the address that is registered with Medicare however you can specify a different address if required. Please note that this cannot be a PO Box and must be a street address.
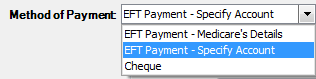
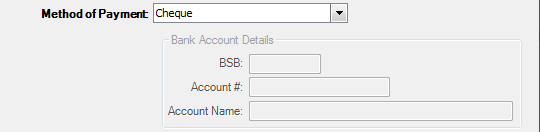
Method of Payment:
EFT Payment – Medicare’s Details (default selection); this means that if the patient has registered their bank account details with Medicare then the money will be transferred into this account. If they haven’t registered their bank details then a cheque will be sent to the claimant.
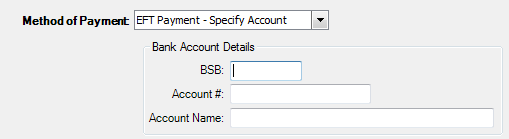
EFT Payment – Specify Account; if the patient requires the payment to go into a specific bank account then you can enter in the bank details and Medicare will transfer the money to this account. The bank account details will not be saved.
Cheque – the cheque will be sent to claimant.
| Once all required information has been entered click Submit. |
|
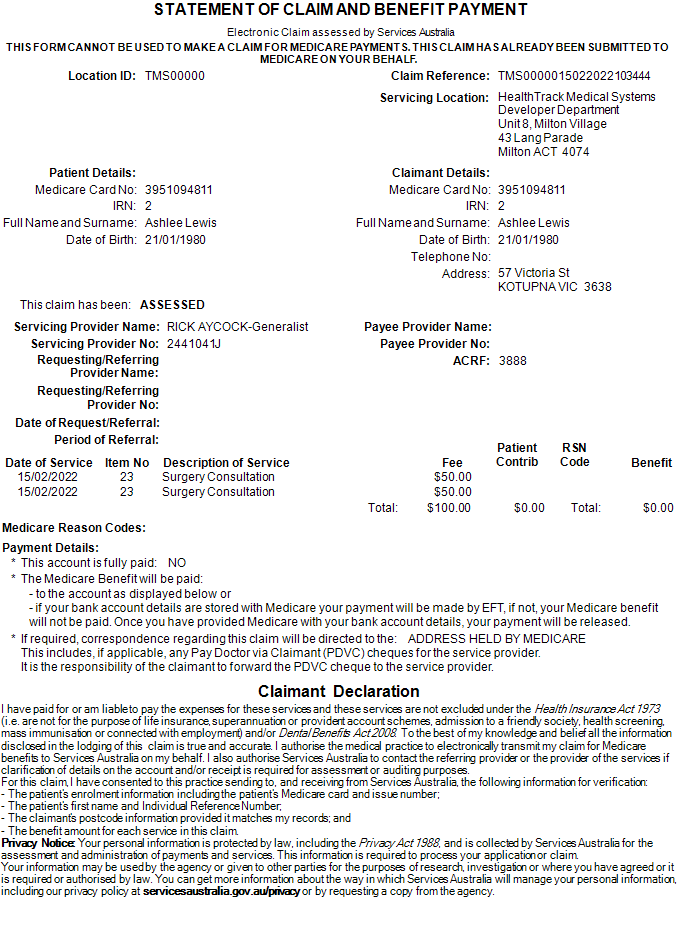
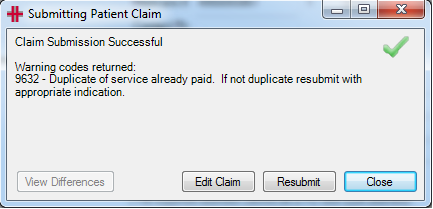
A Statement of Claim and Benefit is provided to the claimant when a patient claim has been lodged in real time, processed by the agency and a benefit amount returned to the claimant. Print this for the patient.
The Benefit column on the report shows the money that the patient will be receiving from Medicare.
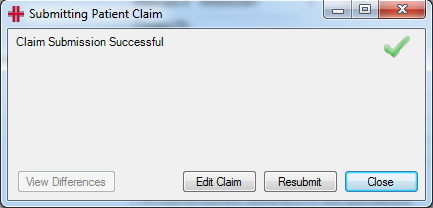
| Once this report is printed for the patient a message appears advising that the claim was successful. |
|
Lodgement Advice / Unsuccessful Claims
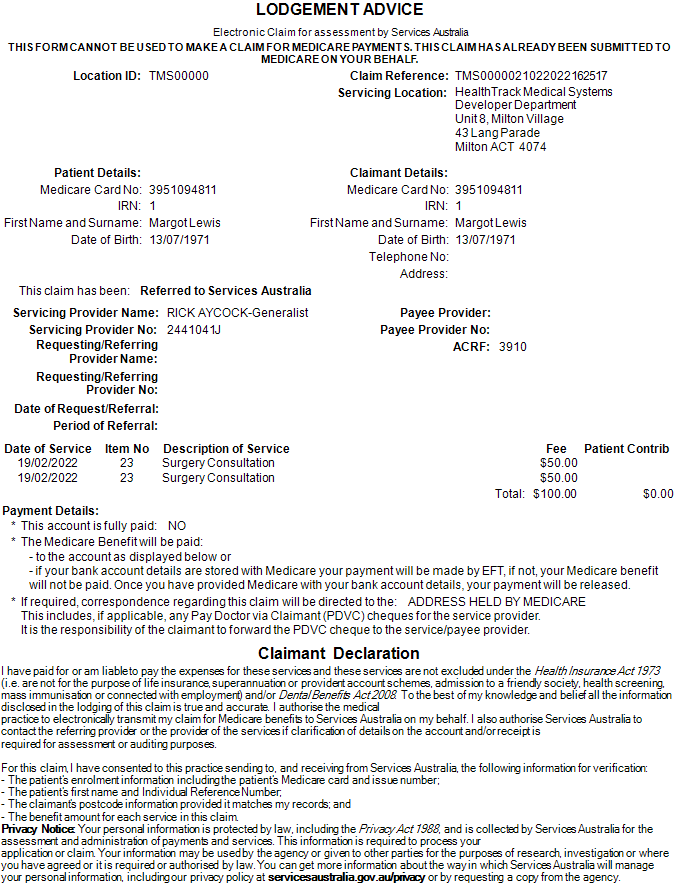
A Lodgement Advice is provided to the claimant when a patient claim has been lodged in real time and referred to an agency operator for action. Please print this for the patient.
You will notice that the ‘This claim has been: Referred to Services Australia’ opposed to ‘Assessed’ and that the ‘RSN Code’ and ‘Benefit’ has been removed.
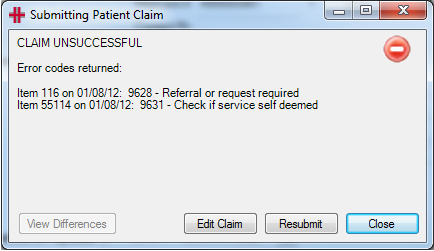
| Once this report is printed for the patient a message appears telling you why the claim needs to be assessed further by Medicare or why it failed. Based on the reason you will need to either Edit Claim details, Resubmit or Close and then reverse and reload the invoice and try again. |
|
|---|---|
| A sample unsuccessful claim: |
|
Patient Claim when patient has partly paid
If the patient has only partly paid, the process for lodging a claim is the same as outlined above. Once the invoice has been created click the Save and Pay button and receive the part payment.
When the ‘Submit Patient Claim’ form becomes available you will noticed that the ‘Method of Payment’ only has the option for Cheque.
Patient Claim when patient hasn’t paid
If the patient hasn’t paid for this service, the process for lodging a claim is the same as outlined above. Once the invoice has been created click the Issue button as opposed to Save and Pay. The next screen will now be the ‘Submit Patient Claim’ form. As with the part payment above, the ‘Method of Payment’ will only allow the user to select Cheque.
Same Day Delete
To delete a Patient Claim it must be done on the day that the claim was made. To do so go to the patients Transaction listing and right click on the invoice that you submitted the claim for and select Show Details.
Click the Reverse Claim button. A reason dropdown list will appear. Select the appropriate reason. These reasons are the only reasons that Medicare will allow for a reversal.

Click the REVERSE button. A message will appear to advise if the patient claim has been reversed.
Pendable Patient Claim
A status of Medicare Pendable indicates that some items on the claim require attention. The reasons for the claim requiring attention will be displayed to the user, who has the option to confirm the details and submit the claim without alteration, or to amend the claim and resubmit as a new claim.
! Graphical user interface, text, application Description automatically generated (image48.png)
Users can select to Edit Claim to go back to the invoice and change any necessary details.
Using Pendable Submit will confirm the details and submit the patient claim to Services Australia. The user will then receive a Statement of Claim and Benefit (if a benefit has been paid) or Lodgement Advice.
! Graphical user interface, text, application, chat or text message Description automatically generated (image49.png)
Workcover Billing
HealthTrack will set up and configure Workcover as an “Invoice To” option for your site as a part of the New Site Installation Process. Workcover is specific to state.
Invoicing to “Workcover” is the same as invoicing to a Health Fund, except you need to select “Workcover” in the “Invoice To” dropdown. Your invoice should look similar to the example below. This example is for Workcover South Australia.
! Graphical user interface, text, application Description automatically generated (image50.png)
Most Workcover don’t allow online claims through Medicare’s Eclipse online billing. Thus invoices will have to be sent off manually. HealthTrack recommends that sites call Workcover direct if they would like more information on the invoicing process!
Important – please check that the workcover fees schedule uploaded into your HealthTrack is the correct one for your state?
How to receive a payment
Payments are received to pay for outstanding invoices in the system. There are a number of ways to invoke the Receive payment screen:
-
Accounts Menu
-
Transaction listing
-
Save & Pay (when creating invoice)
-
Payment (on invoice after it has been created).
Regardless of the method you use to invoke the Receive Payment screen the process is the same.
The recommended method for receiving payments is as follows:
-
Account is paid at time of invoicing: use the Save & Pay option on the invoice screen.
-
Account is paid after the time of invoicing: Transaction Listing – double click on the invoice being paid and then use the payment option on the invoice by clicking on the Payment button.
Both of these methods will automatically allocate the payment to the invoice and save you from manually having to allocate the payment.
If you use the Receive Payment option from the Accounts Menu or Transaction Listing screen then you will need to manually allocate the payment, for more detail on how to do this please see the Allocate Payment section of this Usability Guide.
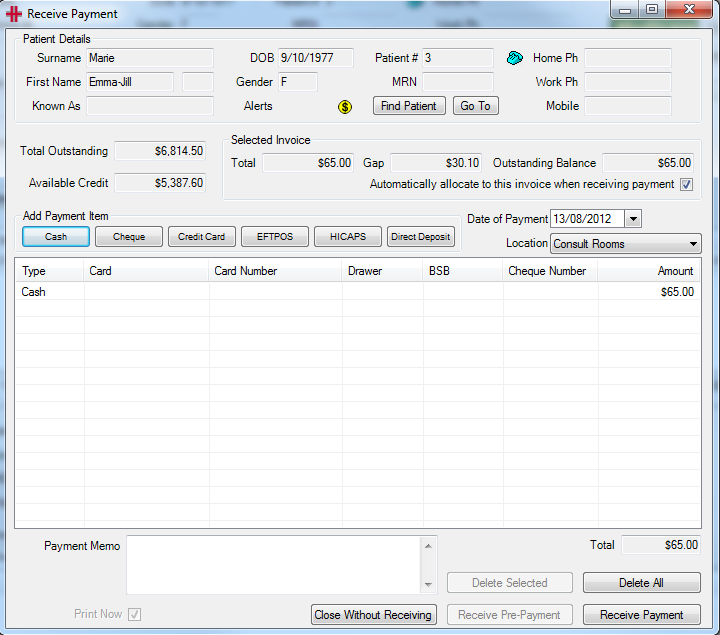
When Receive Payment is clicked, the following screen will open:
! Graphical user interface, application, table Description automatically generated (image51.png)
Figure 15 - Receive Payment
**Patient Details **
The patient details are automatically populated from either the current invoice or the currently selected patient on the Demographics screen or Transaction Listing. To change the patient details press the Find Patient button. This will bring up a warning indicating that the current unsaved payment data will be discarded for the current patient.
! Graphical user interface, text, application, email Description automatically generated (image52.png)
Figure 16 - Discard Changes
Pressing the Yes button will open the Find Patient screen where another patient can be selected from the database. Pressing No will take you back to the Receive Payment screen.
The patient’s Total Outstanding balance and Available Credit amount are presented along with the current invoice amounts if available.

When a payment is entered and it exceeds the total outstanding amount, then a warning box will appear to ensure a payment is not received larger than what the patient owes.
Add Payment Item
The Add Payment Item section is used to add a payment in the form of either cash, cheque, credit card, EFTPOS, HICAPS or Direct Deposit payment.

Cash Payment
If a client is paying with cash, press the Cash button in the add payment item. A dialogue box will appear asking you to enter the cash payment amount. It will default to the amount owing.

Cheque Payment
If a client pays by cheque, press the Cheque button to bring up the cheque payment dialogue box. The drawer’s name will automatically populate the Drawer field and the amount. When entering the Drawer name, there are three buttons available for quickly adding the patient’s name, Medicare’s name or the patient’s health fund’s name to the Drawer field. The Bank field is the name of the banking institution the cheque originated from. The Branch / BSB field is the six digit number indicating the location of the banking institution. The Account number is the account from where the money will be drawn from at the banking institution. The Cheque number is the unique number written on the cheque.

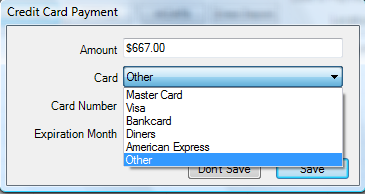
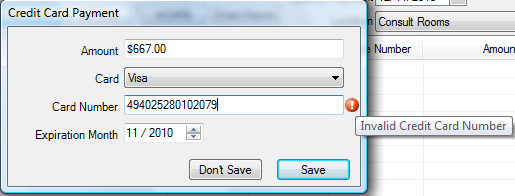
Credit Card Payment
When the client pays by credit card press the Credit Card button to bring up the credit card payment window.

The amount will default to the amount owing. The card field will allow you to choose the credit card type from a drop down list.

Credit card numbers are verified when entered. If an invalid credit card number is entered, an error message will appear to advise you of the mistake and you will be unable to save the payment.
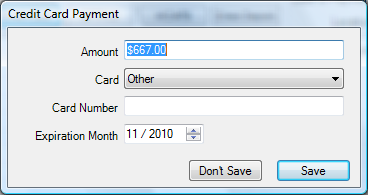
When a correct credit card number is entered, the payment can be saved to proceed. The credit card number does not need to be entered to record a credit card payment.
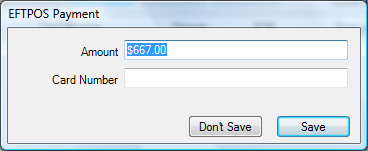
EFTPOS Payment
Click the EFTPOS button to capture the patient’s payment by EFTPOS. The Amount field will default to the amount owing and the Card Number is the number of the bank card to be used in the EFTPOS transaction. The card number does not need to be recorded to process the payment.
HICAPS
Click the HICPAS button to capture the amount being paid by the health fund. The Amount field will automatically default to the amount owing. The card number can be recorded if required, this does not need to be recorded to process the payment.
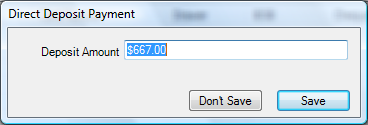
*Direct Deposit *
If a direct bank account deposit takes place, then click Direct Deposit and change the amount if the full payment is not being made.
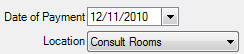
Payment Date and Location
The date of payment will default to today’s date and the location will default to your current logged on location. If the payment was not made on today’s date or at your logged on location modify these fields as required.

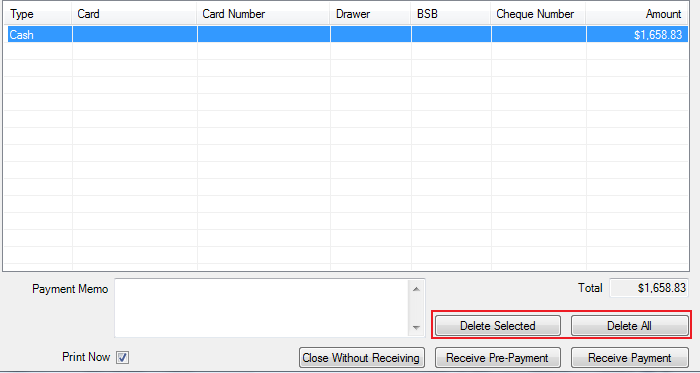
Payment Items
The payment can be made up of one of many payment types. All payment types entered will appear in the table. Commonly, a payment will comprise of one or two payment types. The example below shows all payment methods adding up to the total owing.
Payment Memo
The ‘Payment Memo’ field provides a way to add notes about a payment if required. This will print on the receipt for the patient
Remove Payment or All Payments
When a payment item is selected from the receive payment item table, it can be deleted with the Delete Selected button. To clear the entire list click Delete All.

Receive Payment
To finalise and receive the payment, click the Receive Payment button*.* A payment receipt will automatically print unless the ‘Print Now’ tick box has been un-ticked. To cancel out without receiving any amount click the Close Without Receiving button.
How to allocate a payment
If a payment has been received that wasn’t attached to an invoice then the payment will be attached to the patient’s account in HealthTrack but not allocated to an invoice. In this situation you will need to allocate the payment to the invoice.
To do this open the menu Accounts >> Allocate Payment or alternatively via the transaction listing. The Payment Allocation screen allows the user to allocate payments to one or many invoices for the one patient. Or alternatively many payments can pay off a single invoice.
The payment allocation screen is filtered by location. If you can’t see the payment or invoice to allocate to change the selected location.

Figure 17 - Payment Allocation
There are two tables in this screen the top table is the Payments table and lists all payments on the patients account with a balance greater than $0. The Payment Details button displays the details (who and when it was created, the type of payment e.g. cash). Total Unallocated displays the amount of money that hasn’t been allocated.
The second table is the Invoices table and this lists all invoices that have a balance greater than $0. To view the items within the invoice click the + in the Inv ID column and the invoice will expand to show the items and dates.
Expand All will expand all invoices to show the items.
Collapse All will close the invoices so that you can no longer see the individual items
Switch to Detail Mode will remove the invoice level and only display the items. When in detail mode the button will change to Switch to Invoice Mode this will return you to the original view.
Receive Payment will open the payment screen to capture any additional payments for the patient.
The Total Unallocated amount is the patient’s current invoice balance outstanding.
To allocate a payment to an invoice or invoice item, select the payment from the Payments list up the top and select the invoice or invoice item from the Invoices list at the bottom, then click the Allocate button. To let the system automatically allocate outstanding invoices to payments click the Allocate All button instead. Oldest invoices will be allocated first and all non-batched items will be paid first.
The Save Current Allocations button will save all allocations you have currently made, alternatively if you didn’t want to save these allocations then click the Clear Current Allocations button. Clearing current allocations only clears the unsaved allocations - it will not remove allocations that have already been saved into the system.
When you have finished allocating the payments click the Save and Close button. This will save the allocations and close the screen.
One Cheque, Multiple Patients
If you have received a cheque that covers 2 of more patient’s accounts (not in batch billing) then the following process will need to be followed.
Please note if the patients are linked as family members then go to the account holder’s transaction listing and click on Switch to Family and you will be able to receipt and allocate as normal.
Receive the Payment
The cheque needs to be received into one of the patient’s accounts. To ensure that the receipt of the cheque matches the cheque you need to only receive the cheque for the full amount into one patient’s account.
Scenario: Mr and Mrs Donaldson both had an appointment with Dr Smith. Their invoices were sent to Medicare and they were required to pay the gap. They sent in one cheque ($162.20) to cover the gap for both invoices. Receive the full cheque onto Mr Donaldson’s account (via Accounts >> Receive Payment or Transaction Listing – Receive Payment)
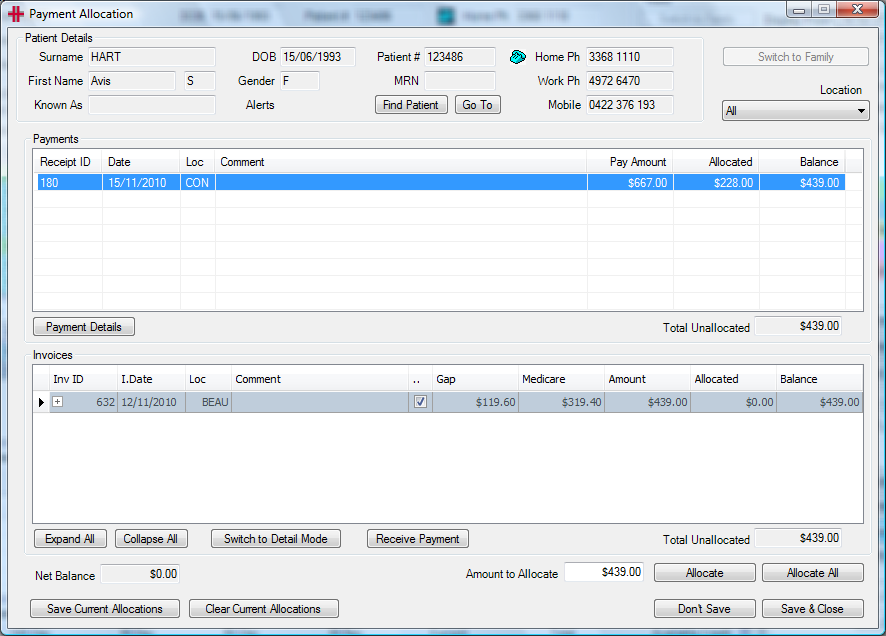
Figure 18 - Receiving Cheque
Receive the payment by clicking Cheque and entering the details of the cheque, ensuring that the Cheque Amount matches the amount written on the cheque. Then press Save. The payment will now be displayed in the payment grid. Check the details and click Receive Payment.
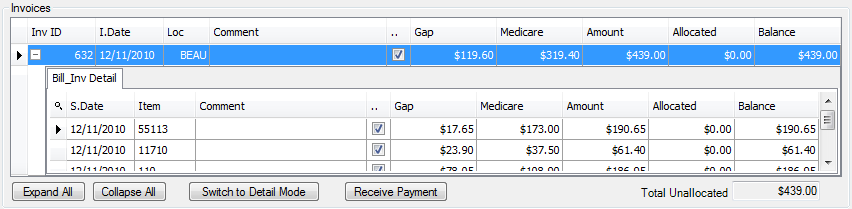
Figure 19 - Receive Payment
Payment Allocation
Once Receive Payment is clicked HealthTrack will automatically open the Payment Allocation screen for you. The payment which has just been received will be in the Payments grid (green box) and the outstanding invoices will be in the invoices grid (red box) Figure 20 - Payment Allocation.

Figure 20 - Payment Allocation
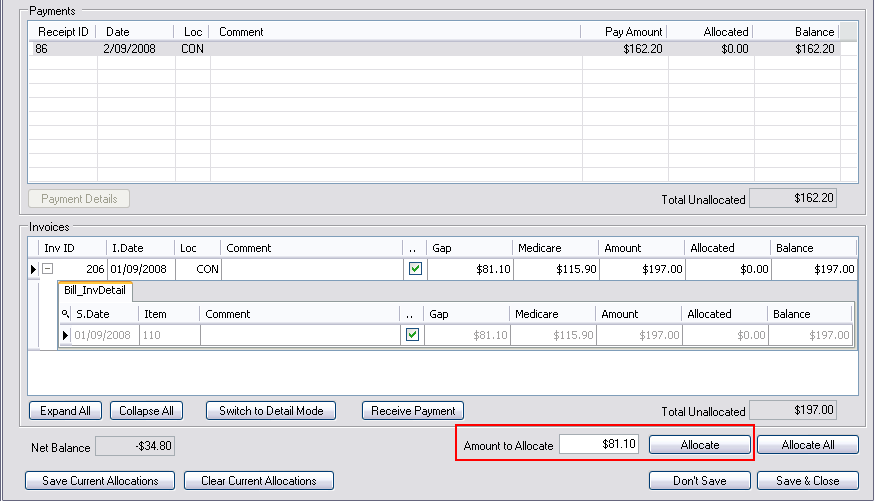
Select the payment by clicking on it, and then select the invoice which the payment is for. By clicking on the + next to the invoice this will expand the invoice to display the items included. In the ‘Amount to Allocate’ field enter the amount of money that the patient is paying, then click the Allocate button (Figure 21 - Allocating Amount Due).
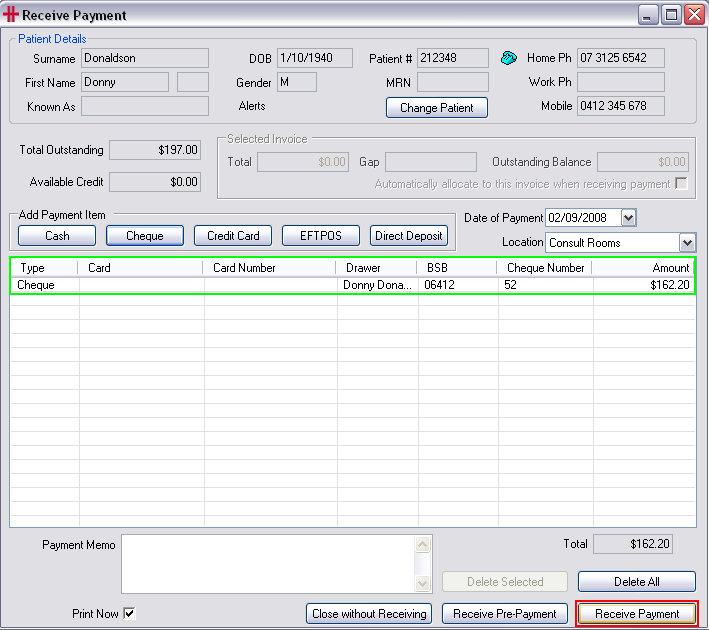
Figure 21 - Allocating Amount Due
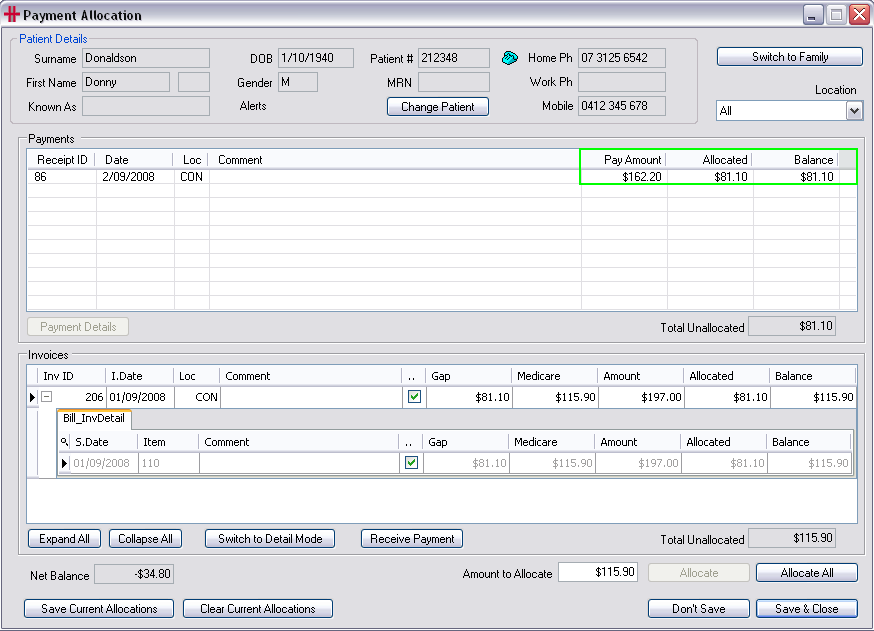
The Payment will now show the amount allocated and the balance remaining for that payment (Figure 22 - Payment Allocation remaining balance). Click Save & Close.
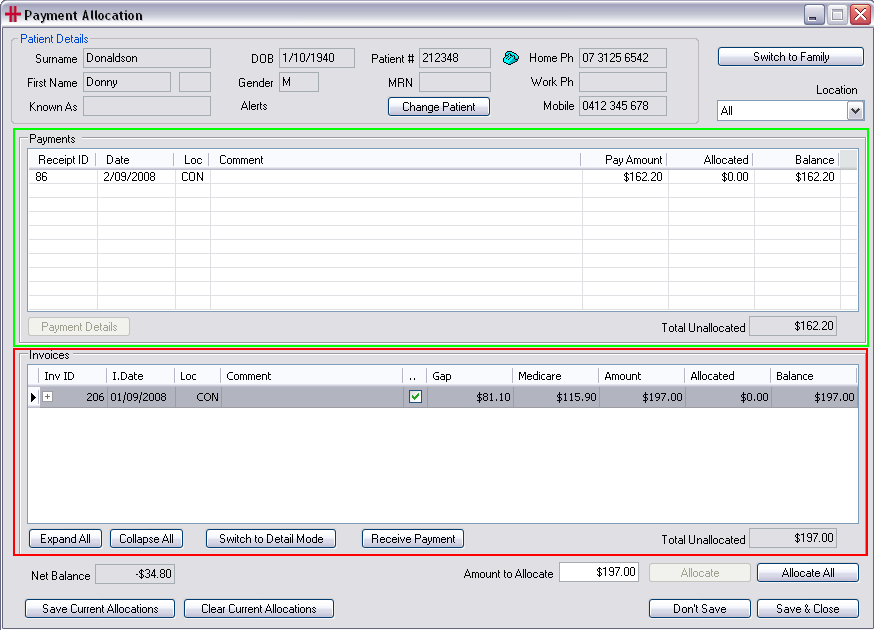
Figure 22 - Payment Allocation remaining balance
Mr Donaldson now has a credit of $81.10 that needs to be removed from his account and allocated to Mrs Donaldson’s account. To do this, process a refund to Mr Donaldson and a Credit for Mrs Donaldson.
Refund Remaining Cheque Amount
In the transaction listing click the Refund button.
-
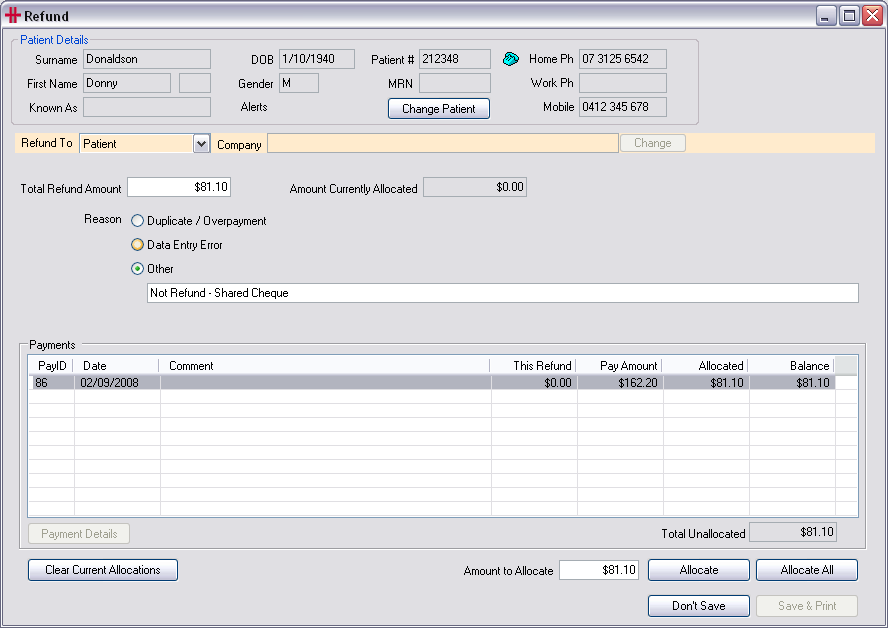
Enter the amount to Refund in the Total Refund Amount
-
Reason – the reason should be flagged as Other and a reason would need to be entered e.g. Not Refund – Shared Cheque.
-
Select the payment that is being refunded
-
Check all details are correct then click Allocate. The balance for this payment will now be $0
-
Click Save & Print (the patient does not need a copy of this refund as they are not actually getting a refund)
Mr Donaldson’s account is now completed and we need to pay Mrs Donaldson’s account. In the Transaction Listing screen click Find Patient and find Mrs Donaldson.
Allocating Credit to an Account
Click the Credit / Adj / Bad Debt button
To add a credit to the account:
-
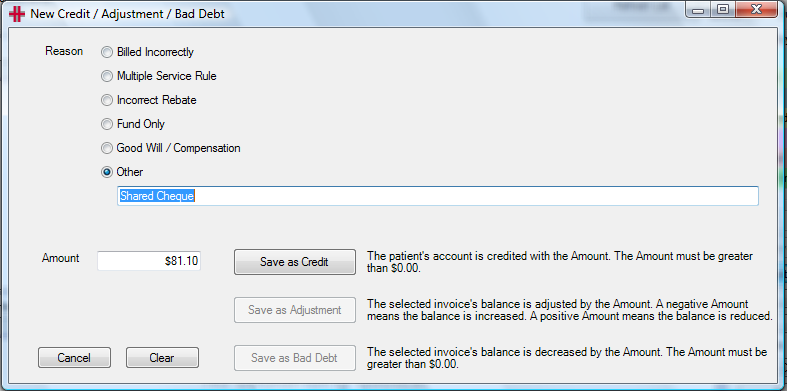
Reason – the reason should be flagged as Other and a reason would need to be entered e.g. Shared Cheque
-
Amount – enter the amount of the cheque that is for this patient. (In this scenario the cheque was only for two patients so the total amount that was refunded from Mr Donaldson goes onto Mrs Donaldson’s account. If the cheque is for more than two patients allocate the amount relating to this patient and repeat this process for the other patients).
-
Once you have entered the amount click Save as Credit.
The patient’s account has now been credited with this amount and you will need to allocate this payment by clicking the Allocate Payment button.
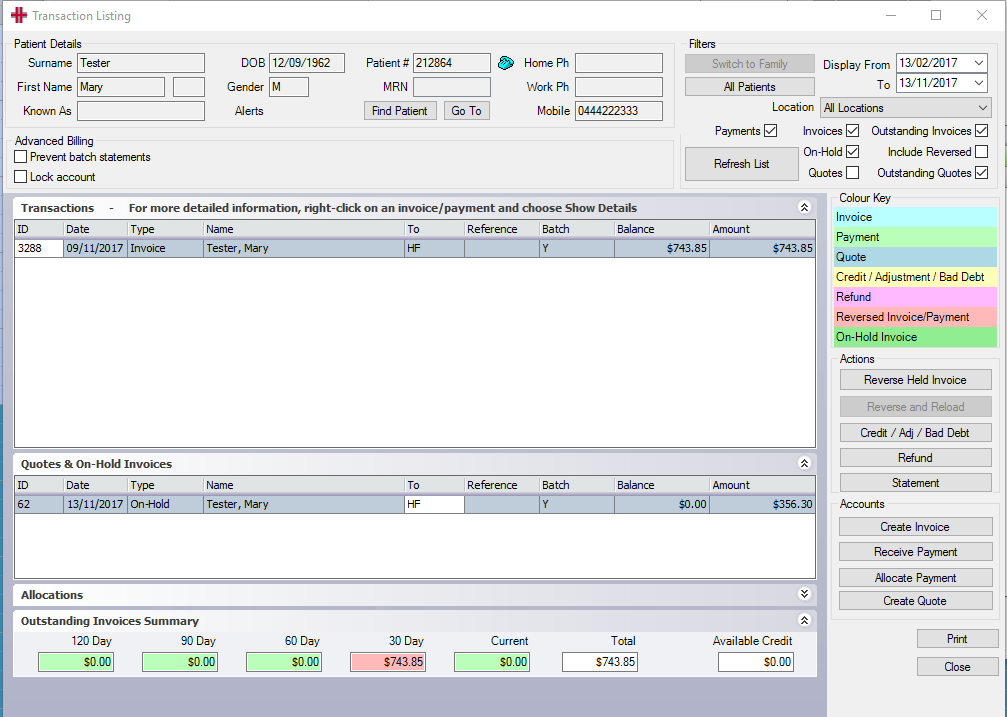
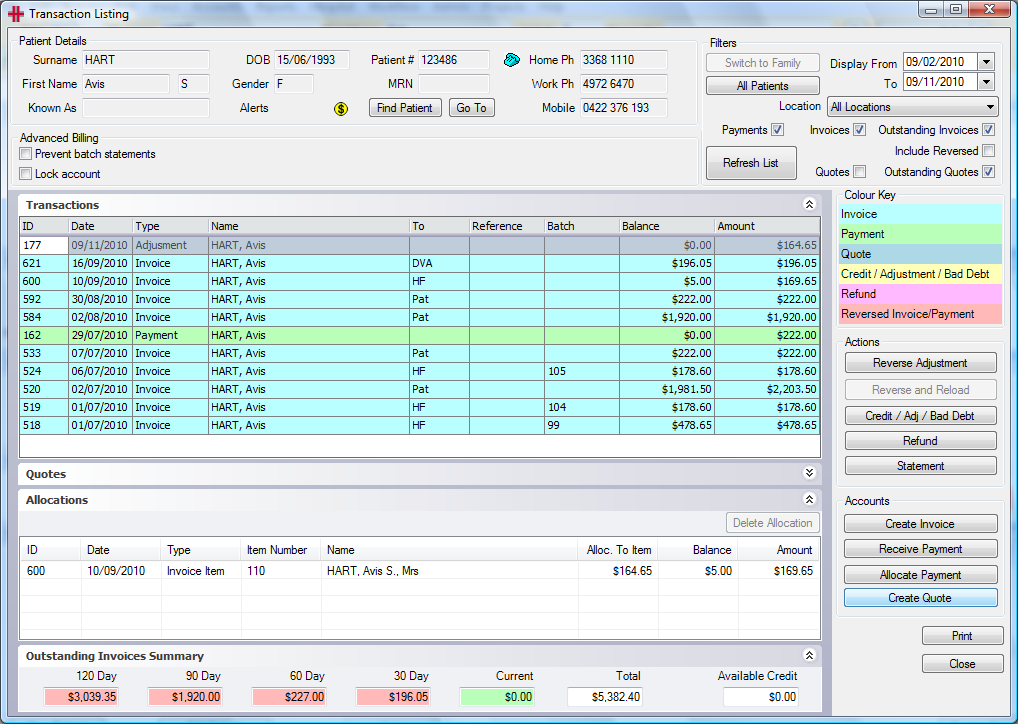
Explanation of Transaction Listing
The Transaction Listing screen lists all of the transactions for the selected patient. By default for the selected location, the last 8 months of transactions will be displayed including any outstanding accounts regardless of their date. The transaction listing screen is for reviewing all financial transactions that have occurred for the patient and for making any corrections and adjustments to their accounts.
The transaction listing screen is accessed from the Accounts Menu >> Transaction Listing.
Figure 23 - Transaction Listing
The Transaction Listing screen displays the patient’s details at the top of the screen. When you first open the Transaction Listing screen it will be for the patient selected in the Demographic screen. The patient can be changed by clicking the Find Patient button. This will bring up the Find Patient screen. Once you have changed patients in the Transaction Listing screen, please note that the main HealthTrack session will still be on the original patient. If you have changed patient and want to go to this patient click the Go To button and the HealthTrack main session will open to that patient.
The Filters section at the top right of the Transaction Listing screen is to choose what type of transactions are displayed in the table. The results are displayed by date range and location. The display can include; Invoices, Payments, Reversed (invoices and payments), Quotes, Outstanding Quotes and Future Invoices. After changing any of the filters, click the Refresh List button to update the table.
The transaction listing screen is divided into 4 sections.
-
Transactions; including Invoices, Payments, Credit, Adjustments, Bad Debts and Refunds. Along with any transactions that have be reversed.
-
Quotes; Any quotes that have been issued to the patient.
-
Allocations; identifies the allocations for the selected line item in the transaction section. The Allocations can be set by each user to either be expanded or closed by default. This is set in the User Preferences screen.
-
Outstanding Invoices Summary; provides a summary of the patient’s account, highlighting any outstanding amounts in day brackets of current, 30 days, 60 days, 90 days and 120 days as well as the total amount outstanding and the total available credit. The available credit is money that has been received onto the patient’s account but not yet allocated to an invoice, or overpayments made by the patient.
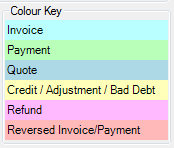
The table has a colour key which is displayed on the right of the table. The colour key helps distinguish between invoices, payments, adjustments etc. Please note this is only a key, to perform any of these actions use the buttons below the key.
The Actions section allows the user to apply the actions listed in this section on any of the transactions in the table. These actions include Reverse Invoice or Payment, Reverse and Reload an invoice, ability to apply adjustments, credits or bad debts to transactions, perform refunds and print statements.
Reverse Invoice and Reverse Payment removes the selected invoice or payment from the patient’s account. This doesn’t delete the invoice/payment, it is marked as reversed and will remain on the patient’s account (not affecting the totals). The Reverse Invoice button will be disabled if the invoice is in a batch. To reverse an invoice that is in a batch, first remove it from the batch. The Reverse Payment button will be disabled if the payment is part of a bank deposit.
When reversing an invoice or payment you will need to enter a reason for why it is being reversed:
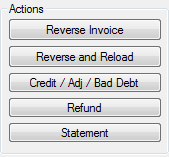
Figure 24 - Reason Entry
One of the preset reasons can be chosen or enter your own reason in the ‘Other’ field. The user’s name and date of the reverse will automatically be recorded for audit purposes. If you reversed a payment that had been allocated to an invoice, then the invoice will now show an outstanding balance.
Reverse and Reload can be used for both invoices and payments. This allows the user to fix mistakes when creating the invoice or payment. Reverse and Reload will open the Reason Entry screen, requiring a reason why it is being reversed and reloaded.
Once the reversal reason has been entered, the invoice or payment will open to make the required changes. The updated invoice or payment will now be available in the transaction listing screen.
When reversing an invoice or payment, it is only marked as reversed, it is not deleted from the patient’s transaction listing screen. At any time you can see the reversed invoices or payments by ticking the Reversed check box in the filter section. For each reversed invoice or payment there will be a row in the table. This invoice or payment will be a negative amount balancing out the amount invoiced or receipted.
If the payment or invoice was allocated prior to reversing and reloading you will need to reallocate the payment to the invoice. If the payment is not allocated, the patient will have a credit amount along with an outstanding amount.
Credit / Adj /Bad Debt is for modifying the balances of invoices or payments.
‘Credit’ adjustment will apply to the patient’s account generally for future services. If a patient has a credit, when it is applied to an invoice the amount is allocated at the same time, reducing the outstanding balance of the Invoice.
An ‘Adjustment’ must be applied to an invoice. The adjustment will effectively change the amount the practice is expecting for the service. The adjustment can increase or decrease the value of the invoice. An adjustment can be used to fix small errors in billing without the need for reversing an invoice.
A ‘Bad Debt’ must be applied to an Invoice. The Bad Debt will effectively clear the outstanding balance of the invoice or a part of it, and is essentially a special form of payment. It should be used when the practice does not expect to recover the invoice amount from the patient.
The following window will appear when the Credit / Adj / Bad Debt button is pressed.
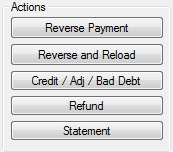
Figure 25 - New Credit / Adjustment / Bad Debt
The user can enter the reason for the action by selecting one of the preset reasons or enter their own reason in the ‘Other’ field. The user name and date of the action is automatically recorded for audit purposes.
The outstanding amount on the invoice is defaulted into the Amount field, if this is not the amount to be credited, adjusted or recorded as bad debt then adjust this amount first. Next click the action button Save as Credit, Save as Adjustment or Save as Bad Debt. The screen will close and the credit, adjustment or bad debt will be recorded in the transaction listing.
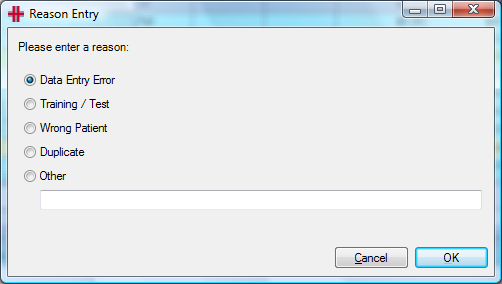
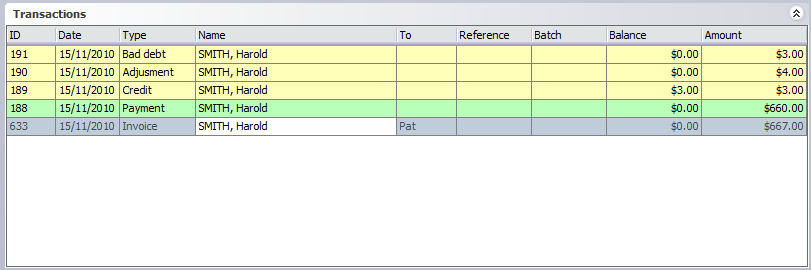
Figure 26 - Credit / Adj / Bad Debt Transaction
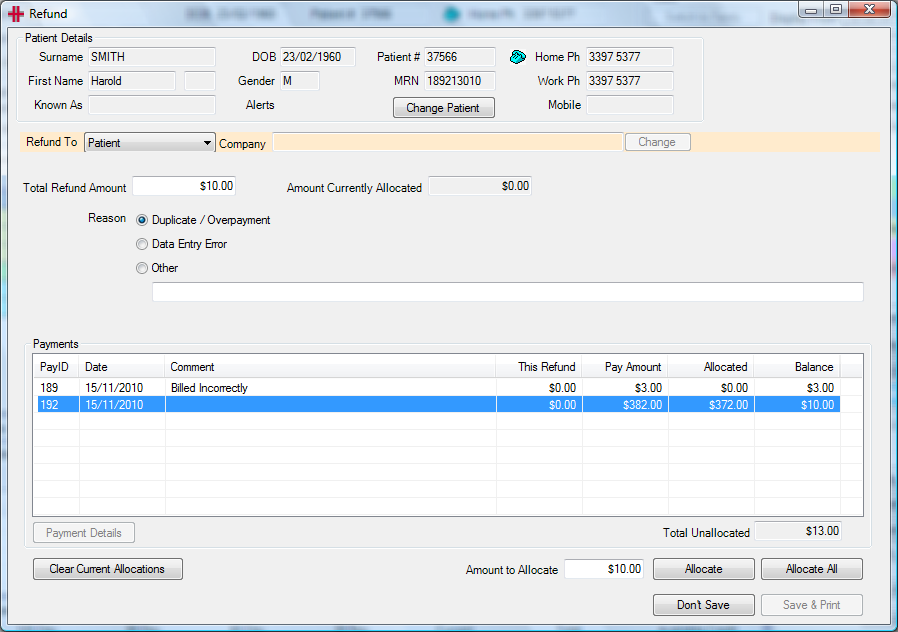
Refund allows an amount to be returned to the patient. It must be applied to an existing payment. This is commonly used when a payment has been overcharged and already paid. HealthTrack records the transaction of the refund, but will not adjust any cash or cheque balances. It will issue a Refund Voucher to allow the general accounting system to issue a cash or cheque refund to the patient.
Pressing Refund will bring up the Refund screen. Enter who the refund is to (same options as invoice to), the amount of money to be refunded and the reason why the amount is being refunded. To allocate the refund to the payment select the payment in the Payments list and click the Allocate button. Once finished click Save & Print. This will print a Refund Voucher and save the refund.
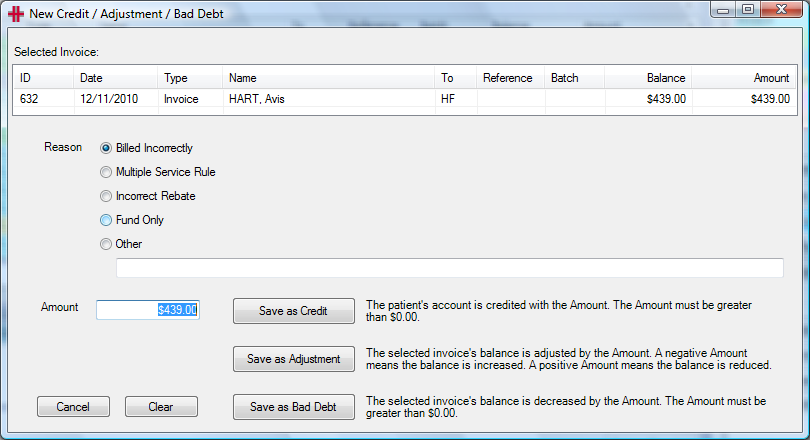
Figure 27 - Refund
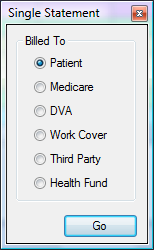
Statement - In HealthTrack there are 2 types of Statements. Pressing the Statement button from the Transaction Listing allows the user to create a Single Statement. This Statement summarises the patient’s outstanding invoices and invoiced items. When the Statement button is pressed in the Transaction Listing it will bring up the following window:
Select what invoices are to be included in the Statement by selecting who the invoice was billed to. This will then show all outstanding invoices and invoice items billed to the selected option.
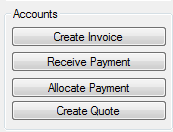
The Accounts section situated blow the Actions section on the Transaction Listing allows the user to create an invoice, receive a payment or allocate a payment without closing the Transaction Listing.

Create Invoice opens the invoice screen to create a new invoice for the patient. Creating an invoice from the Transaction Listing will not have any booking details or referral details included. These will need to be entered by the user. Please see how to create an invoice for more details.
Receive Payment opens the Receive Payment screen. This payment will need to be allocated either in the Receive Payment screen or by pressing Allocate Payment.
Allocate Payment - if you have any payments that are not allocated to an invoice click on this button to open the Payment Allocation screen. This will show any unallocated payments to allocate the payments to invoices.
Create Quote opens the quoting screen ready for a new quote to be created. Please see the Quoting section of this Usability Guide for more information.
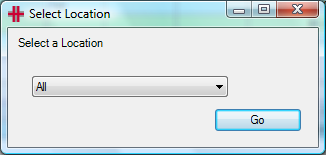
Below the Accounts section is a Print button. This button is for printing the details displayed in the transaction listing. This can be for the specified patient or all patients. As with many HealthTrack reports there are a series of filtering screens to identify what is required on the report. Starting with the date range:
Then the Location:
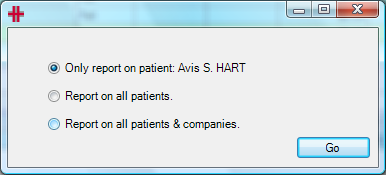
Then who to report on:
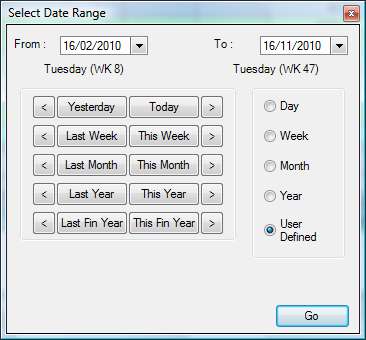
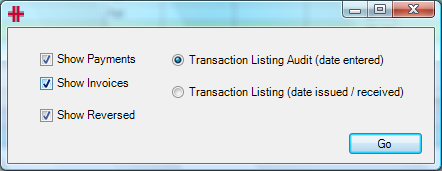
What is to be included in the report and whether it is on the date entered or the date issued/received:
The report will now be displayed on the screen and can be printed if required. The last page of this report contains a summary which is very useful for end of financial year reporting (BAS).
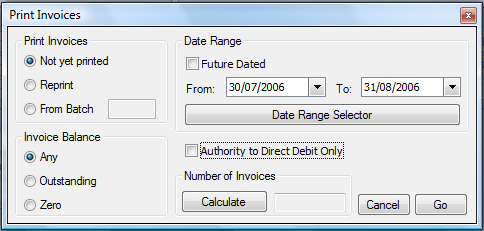
Printing Invoices
The Print Invoices screen allows the user to reprint invoices matching various criteria. The Print Invoices screen can be accessed from the Accounts menu >> Print Invoices.
Invoices that haven’t been printed yet can be fetched by selecting the ‘Not yet printed’ option whereas to reprint invoices that have already been printed and issued to patients, select the ‘Reprint’ option. The ‘From Batch’ option requires a single batch number to be entered to print invoices from the batch.
Future Dated invoices have at least one invoice item number that has its service date set in the future. The Date Range is to specify From and To dates based on invoices’ created dates.
The Invoice Balance can also be set to print invoices with any balance, an outstanding or a zero dollar balance.
To find out how many invoices will be printed, click the Calculate button and the number of invoices will appear in the field beside. When ready to print invoices, click the Go button and the invoices will commence printing.
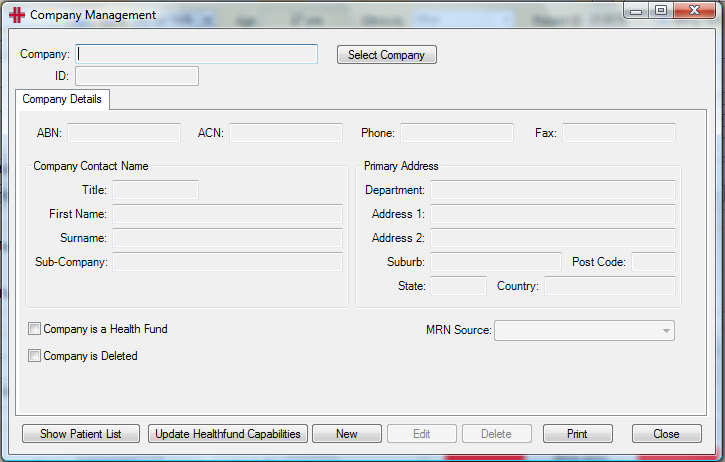
Adding Companies / Third Parties
To create an invoice to a company / third party, the company will need to be added in HealthTrack.
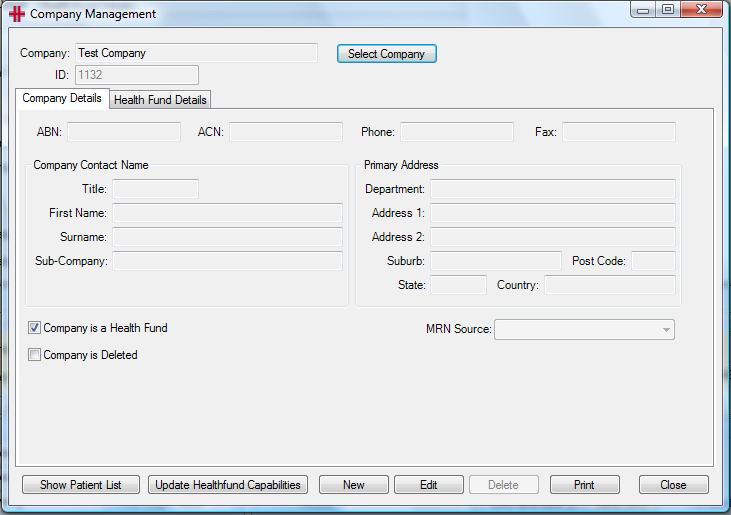
Companies are managed in the Company Management screen which can be accessed by opening the menu Practice Wide >> Companies:
To add a new company click the New button (or from the Select/Add Companies screen click the Add a new company button). Enter the name of the new company, and HealthTrack will search the existing companies in your system to check if there is an existing entry with the same name.
A Proceed confirmation window will appear. Click Yes to add a new company and the company record will be created ready to add contact, business and address details. When finished click the Save button. HealthTrack will need to be restarted before the new company can be selected when billing.
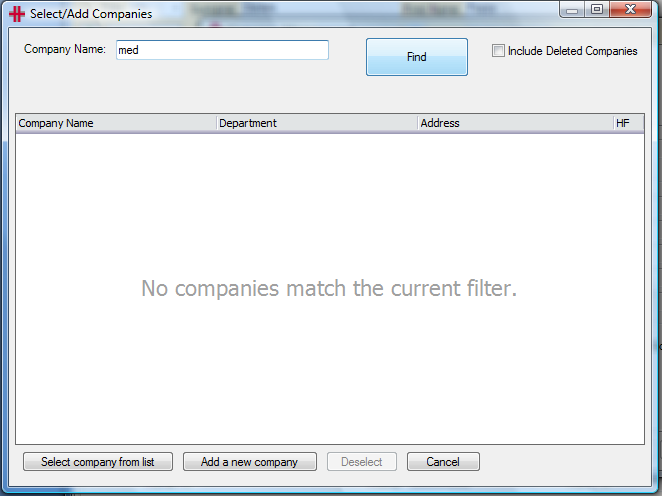
To search for a company, after opening the Company window from the Practice Wide menu, click the Select Company button. The Select/Add Companies screen will appear:
Type part of the company name into the search field and either click the Find button or press the Enter key. A list of companies will be displayed. If the company is a health fund there will be a tick in the checkbox in the HF column.
To open the company record either double click on the company row or select it and click the Select company from list button.
To update or add any details first click the Edit button and then click Save once finished. HealthTrack will need to be restarted before any changes take affect.
Add/Modify a Health Fund
Health funds are managed in HealthTrack in the same way as companies. Open the Company Management screen from the menu Practice Wide >> Companies:
Type part of the health fund name into the search field and either click the Find button or press the Enter key. A list of companies will appear. Health funds have a tick in the checkbox in the HF column.
To open the health fund record either double click on the row, or select it and click the Select company from list button.
To add a new health fund click the New button (or from the Select/Add Companies screen click the Add a new company button). Enter the name of the new health fund, and HealthTrack will search the existing companies and health funds in your system to check if there is an existing entry with the same name.
A Proceed confirmation window will appear. Click Yes to add a new health fund and the health fund record will be created ready to add contact, business and address details. To update or add any details first click the Edit button and then click Save once finished.
The “Company is a Health Fund” checkbox must be ticked for HealthTrack to add the new company to the health funds list. HealthTrack will need to be restarted before any changes take affect.
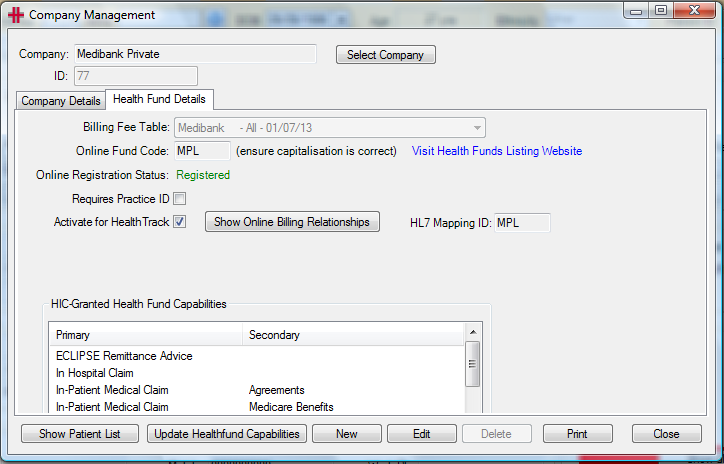
Health funds have an extra ‘Health Fund Details’ tab that Companies / Third Parties do not have:

This tab is used to set the fee schedule and capture details for online billing.
“Billing Fee Table”: The table of fees that the health fund uses which can be state specific. A new fee table is added automatically each time there is a fee update. A billing fee table must be selected when first creating a company, so that the health fund’s prices display when billing. If you invoice across multiple States (e.g. Vic and NSW), then this is setting the default state based fee table. See “State Based Billing” in the next section below.
“Billing Date”: The fee schedule used will always be based on the Service Date of the invoice item. For example, if a health fund releases new fees on the 01/06, if invoicing after the 01/06 if the service date of the item is 31/05 then the fee schedule effective as at the Service Date of the invoice item will be used.
“Online Fund Code”: The code that identifies the health fund when sending batches online.
“Online Registration Status”: This is either Registered or Not Registered. When the “Online Fund Code” is correct the status will show as Registered.
“Requires Practice ID”: In some cases a heath fund requires a separate practice ID to be submitted when billing online. Please refer to the ‘Add/Modify Bill Practice Number’ section of this Usability Guide for more details.
“Activate for HealthTrack”: When ticked the Show Online Billing Relationships button becomes active, to add the Doctor relationships for online billing.
Show Online Billing Relationships button – Please refer to the ‘Setup Online Billing’ section of this Usability Guide to enter Doctor relationships for your health funds.
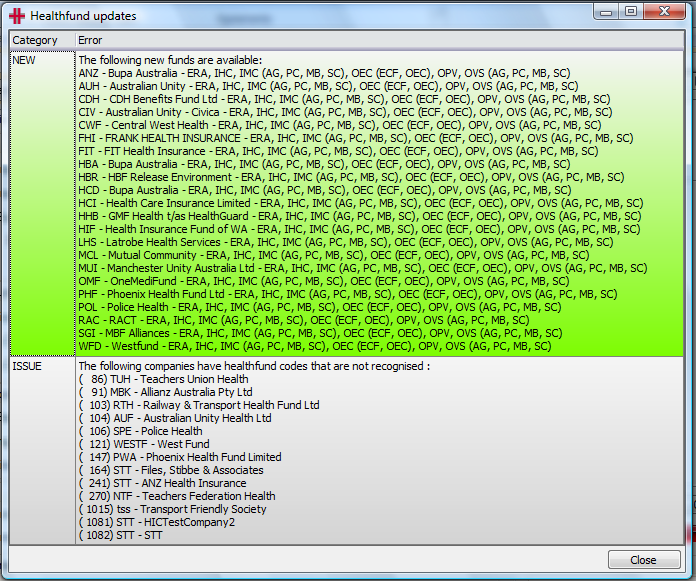
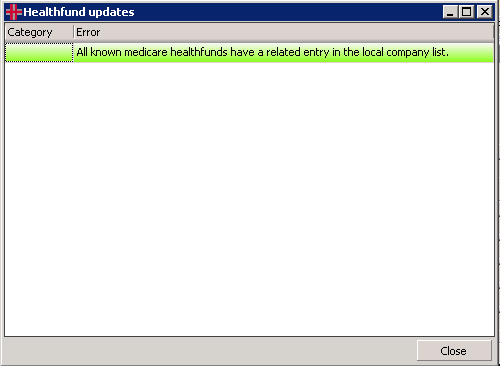
It is important to periodically click the Update Healthfund Capabilities button. This checks if any of the funds have changed names or merged and whether there has been any change to the “Online Fund Code”. If there have been any changes these will appear on screen.
The funds in green are new health funds. Any funds that are not correctly setup in HealthTrack will appear in the gray ISSUE section.
To confirm the “Online Fund Code” it is best to contact the health fund. Once a new code has been entered in the “Online Fund Code” field, the Update Healthfund Capabilities button can be used to check that it is correct, as the health fund will no longer be listed in the ISSUE section.
If there are no issues found with the health funds in your HealthTrack system, the following message will appear:
State Based Billing
Health Fund billing within HealthTrack is automatically aware of the State/Territory of Australia where the service was performed and will use the Health Fund fee schedule that is appropriate for that State/Territory. The system uses the ‘Service Location’ for the invoiced item. The state based fee table to use is based on State specified in the ‘Primary Address’ of that location. If the Service Location’s address is not completed properly (ie: there is no State specified) then the health fund’s default fee schedule will be used instead.
For example: if your BUPA Agreement health fund is configured to use a BUPA Agreement fee schedule for QLD, but you instead write out an invoice for a service performed at a Location that is in NSW, the fee schedule used will be NSW instead of QLD. This system does not affect health funds where a single fee schedule is used for all States and Territories.
Online Patient Verification (OPV)
To validate patients’ Medicare card numbers an online patient verification (OPV) can be completed. An OPV must be completed before invoices for the patient can be sent online when batch billing.
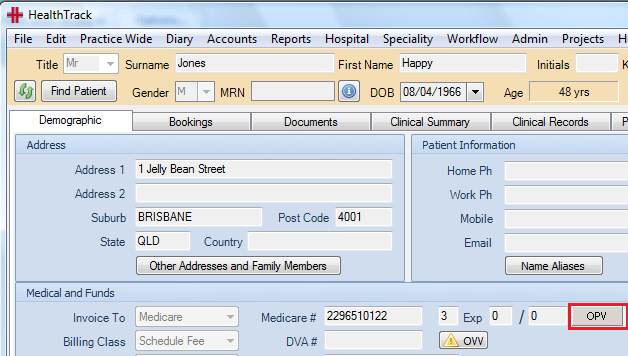
To complete an OPV from the patient’s Demographic tab, once the Medicare card number has been entered click the OPV button next to the Medicare Card Expiry Date fields:
Please Note: If the OPV button contains a yellow error symbol
 an OPV cannot be completed. This
symbol may appear when:
an OPV cannot be completed. This
symbol may appear when:
-
No Medicare number has been entered for the patient
-
The Medicare number is invalid e.g. contains too many or too few numbers
-
Your HealthTrack system has not been setup to transmit to Medicare Online
To complete an OPV when creating an invoice, at the top right of the Invoice screen click the Online Verification button, and click Medicare.
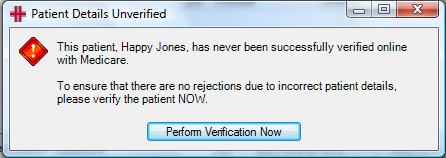
There is also a system setting that can check when an OPV has never been completed, or has not been completed recently for a patient. When this system setting is active the following message will appear when creating an invoice. Click the Perform Verification Now button to complete an OPV.

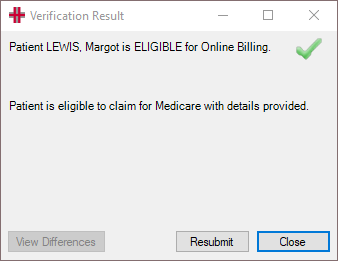
To complete an OPV, HealthTrack sends the patient’s details and Medicare card number to Medicare and a Verification Result is returned from Medicare.
When the patient’s details match the details Medicare has on file, a green tick will be displayed with the message “patient is Eligible for Online Billing”:

The OPV has been successful, click the Close button to return to the patient’s Demographic tab or the invoice.
Unsuccessful Online Patient Verification (OPV)
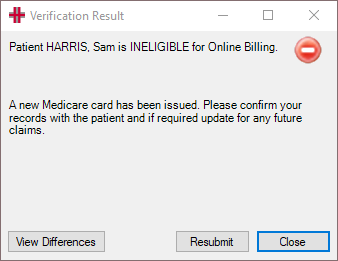
When completing an OPV, if the patient’s details are not the same as the details Medicare has on file, a red circle will be displayed with the message “patient is Ineligible for Online Billing”:
When Medicare is able to Match the Patient
Medicare supplies information as to what is different in the patient’s
details. Click the
 button to
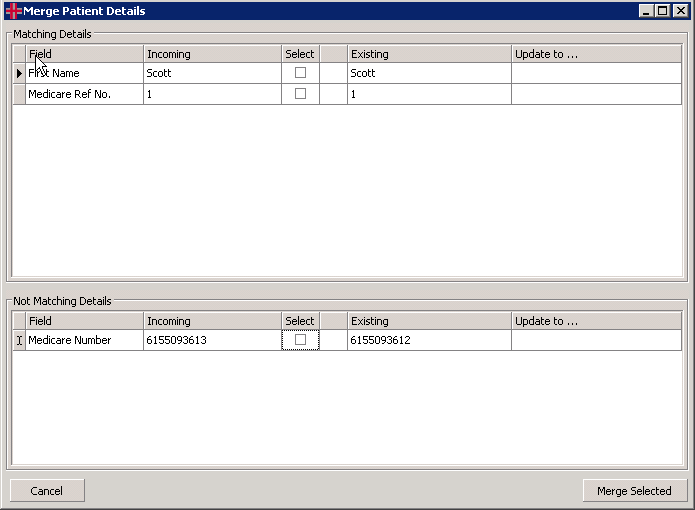
review the differences. The Merge Patient Details screen will appear,
for example:
button to
review the differences. The Merge Patient Details screen will appear,
for example:
The Incoming data has been supplied by Medicare and the Existing data is from your HealthTrack system.
The Not Matching Details section lists data that does not match what Medicare has on file. The patient’s Medicare Card can be checked to confirm the differences. To close the screen, press the Cancel button.
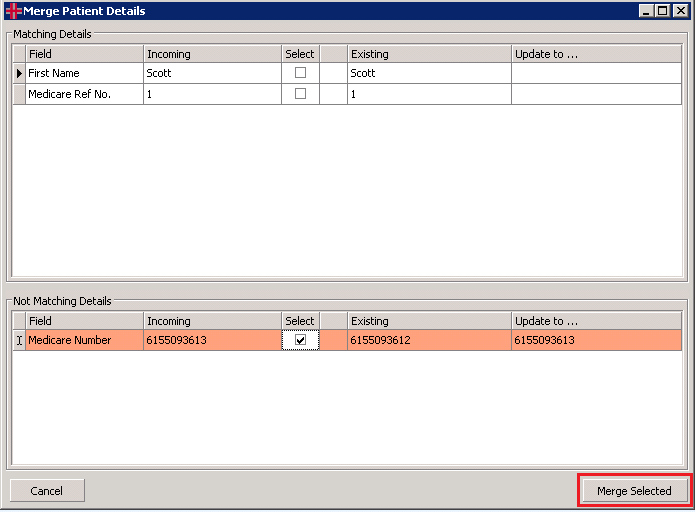
Alternatively to update the patient’s details in HealthTrack with the data provided by Medicare, select the rows to update by ticking each row and click the Merge Selected button.

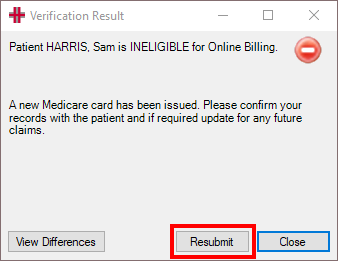
You will be returned to the Verification Result screen, click the Resubmit button to complete an OPV with the patient’s updated details.
When Medicare is Unable to Match the Patient
This occurs when there are too many differences between the patient’s details and what Medicare has on file.
When this occurs the View Differences button will be greyed out, as Medicare has not been able to match the patient and supply details of differences in the data.
In this case, check the patient’s Medicare card number to confirm that the name and number match what is in HealthTrack. If there are differences, update the patient’s details in HealthTrack, Save the patient record, and complete another OPV.
If you are not able to update the patient’s details and successfully complete an OPV, please contact Medicare.
Days Since Last Successful Online Patient Verification (OPV)
To check how many days have elapsed since the patient’s last successful OPV, from the patient’s Demographics tab, hover with your mouse over the OPV button until the following message appears:
How to deal with dishonoured cheques
Usually by the time it is discovered that a cheque is dishonoured it has already been banked. The suggested approach to deal with this situation is as follows:
Prerequisites:
- An item number has been created in your HealthTrack system for the
Dishonoured Cheque Fee.
Include the practice charge for this item in the “practice fee” field.
Process
Step 1: Select the dishonoured cheque payment in the transaction listing. Click the Mark as Dishonoured button. This will reverse the payment marking it as dishonoured and removing the allocations from the invoice (creating a debt on the patient’s account). |
 |
|---|---|
Step 2: Enter a reason for the Dishonoured Payment |
 |
| Step 3: | If charging the patient a Dishonoured Cheque Fee, create a new invoice with the Dishonoured Cheque Fee, entering either the practice’s charge, or the actual amount charged by the bank. The “Item Note” can be used to list the invoice numbers that have been affected. |
| Step 4: | Issue a statement for the client. Alternatively each of the invoices that were affected can be reprinted. |