Questionnaire Management
In HealthTrack Dolomites v4.4.2, a Questionnaire functionality was introduced. Questionnaires can be designed by users within HealthTrack, which can be sent to patients to complete and results are received directly in HealthTrack.
This guide outlines the process for creating a new Questionnaire.
Creating a New Questionnaire Template
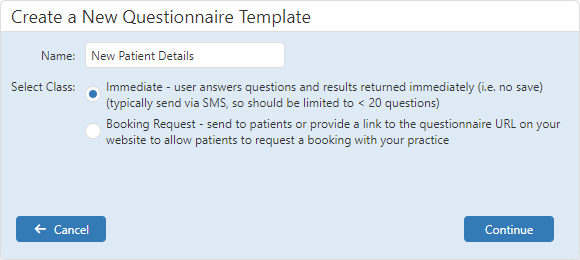
There are two “classes” of Questionnaire that can be created.
Immediate – this Questionnaire can be sent to the patient and would generally be completed right away. An Immediate Questionnaire does not include an option for the patient to save their progress, so we recommend keeping the number of questions low.
Booking Request – this is a Questionnaire with a single website URL that can be used by anyone to request a booking. This website URL can be included in places such as your website or recalls, enabling patients to request a booking.
To create a new Questionnaire template:
-
Navigate to Admin > Questionnaire Management.
-
Select the New Template button.
-
Specify a name for the questionnaire template.
-
Select the questionnaire class (Immediate or Booking Request).
-
Select the Continue button.
In the screenshot below, we can see that the window for the newly created Immediate Questionnaire has a number of sections: on the left-hand side is the Toolbox for choosing the type of question, and on the right-hand side are Properties for configuring each question. Both of these sections can be resized or collapsed. At the top of the screen are a number settings for the Questionnaire, which may differ depending on the class selected. The centre of the screen will display each question that has been added to the Questionnaire.
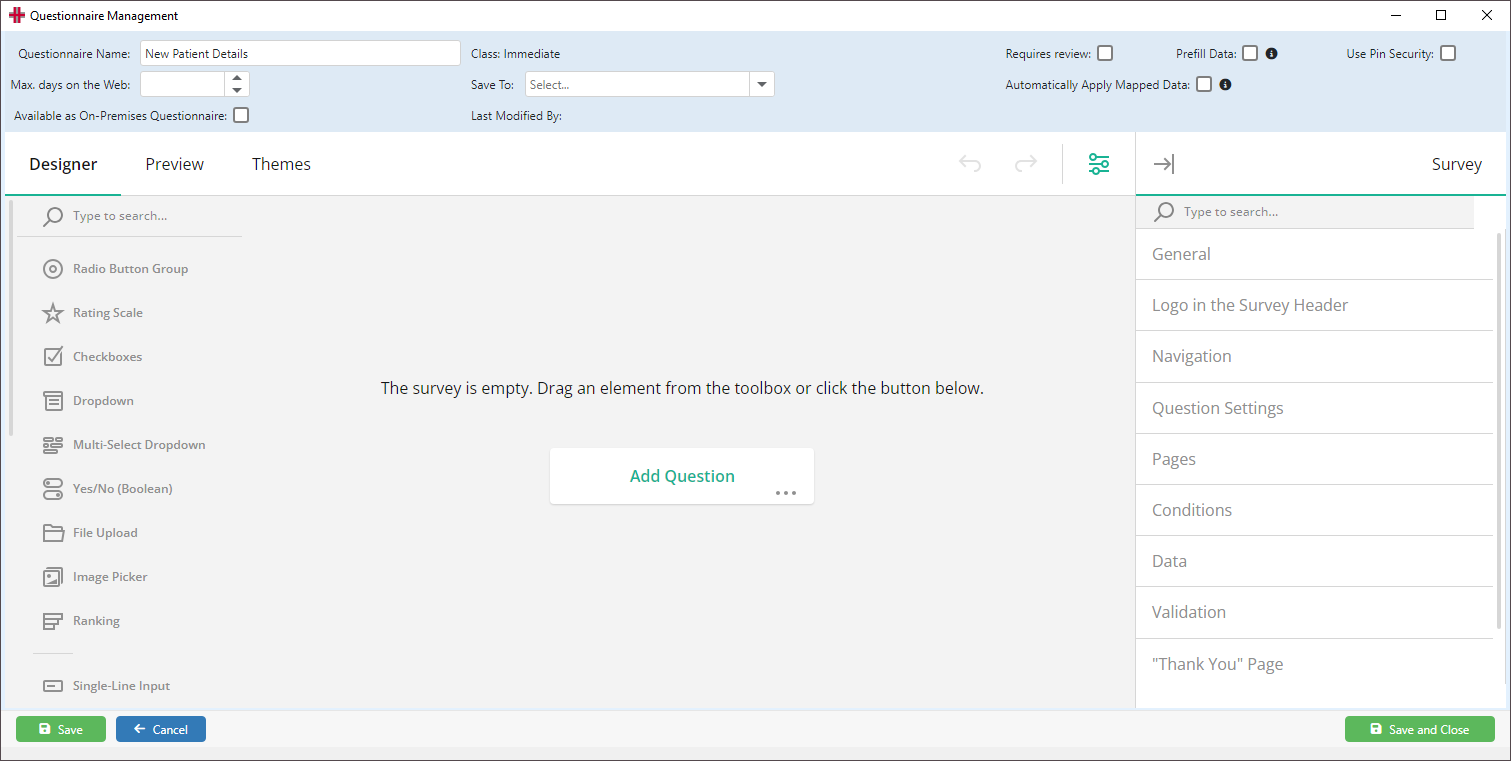
‘Immediate’ Questionnaire

| Questionnaire Name | The name of the Questionnaire. This can be edited as needed. |
|---|---|
| Class | The type of Questionnaire, which is selected during creation. This cannot be changed. |
| Requires Review | When enabled, the completed questionnaire results will go into the questionnaire review system instead of directly to patient documents (not applicable to Booking Requests). |
| Prefill Data | When enabled, any questions with a Reference ID will display the existing information recorded in the Demographic screen for the patient, allowing the patient to verify their details or update as required. |
| Use Pin Security | When enabled, a random 4 digit pin will be required to access the questionnaires on the web. The pin will be automatically included in the message to the patient. |
| Max. days on the Web | Sets how many days a questionnaire link for the template will be available to complete before it expires (not applicable to Booking Requests). |
| Save To | Sets the HMS Document category the questionnaire PDF will be saved to. Any file questions that do not set a different category will also use this value. |
| Automatically Apply Mapped Data | When enabled, any data entered by the patient that has a Reference ID will be updated in the patient’s Demographic screen without review. |
| Available as On-Premises Questionnaire | This option allows the Questionnaire to be used on a device while the patient is at the practice. |
‘Booking Request’ Questionnaire

| Questionnaire Name | The name of the Questionnaire. This can be edited as needed. |
|---|---|
| Class | The type of Questionnaire, which is selected during creation. This cannot be changed. |
| Save To | Sets the HMS Document category the questionnaire PDF will be saved to. Any file questions that do not set a different category will also use this value. |
| Bypass SMS/Email Verification | When a patient isn’t able to be matched in HealthTrack, the patient will receive an SMS/email to confirm they submitted a Booking Request before a Triage entry is created. Ticking this setting will disable the SMS/email verification. |
| Available as On-Premises Questionnaire | This option allows the Questionnaire to be used on a device while the patient is at the practice. |
Designer Tab
The Designer tab allows you to configure your Questionnaire. A single click on a Toolbox item will add it to the bottom of your Questionnaire. You can also drag and drop items from the Toolbox onto the Questionnaire.
Toolbox
The table below outlines the different items available in the Toolbox, which can be added to your Questionnaire as needed.
| Single Input | Patients can respond with a single line of text. This question would be suitable for recording a patient’s name or contact details. |
|---|---|
| Checkbox | Patients can tick multiple checkboxes for their response. This question may be useful for a patient to tick various consent options. |
| Radiogroup | Patients can use radio buttons to select a single answer. This question may be suitable to record the patient’s sex or DVA card type. |
| Dropdown | Patients can select a single answer from a drop-down list. This question may be suitable to select a patient’s health fund. |
| Comment | Patients can enter a larger amount of text than the Single Input question. This may be suitable for patients to enter clinical information such as allergies. |
| Rating | Patients can select one option within a range to enter a rating. This question could be used to rate the severity of a condition. |
| Ranking | Patients can drag and drop items from a list to rearrange them. Use the Ranking type for questions in which respondents must set the order of items. |
| Image Picker | Patients can select an image/video for their response. This question may be used to select a clinic location with an image of the location. |
| Boolean | Patients can use a switch to answer between two options, e.g. Yes/No, True/False, Agree/Disagree. This question may be suitable for questions like “have you attended this clinic previously?” |
| Image | This can be used to place an image or video in the survey and is not used for patients to provide a response. |
| Html | This can be used to place text within the survey, and is not used for patients to provide a response. You will need to use HTML tags if you wish to format any content in this section. |
| Signature pad | Patients are able to draw their signature in the allocated space. |
| Expression (read-only) | This question can calculate a value based on responses of other questions. For example, you can sum up the scores of previous responses, display current date and time, or find an average value. |
| File | The File question allows the patient to upload files, such as a referral. IMPORTANT: You should always restrict the allowed file types to prevent possible security vulnerabilities. |
| Matrix (single choice) | This matrix displays radio buttons in rows and columns, allowing the patient to make one selection per row. This type of question could be used for clinical scoring systems. |
| Matrix (multiple choice) | This matrix type displays rows and columns, and allows a response at all intersections. This could be used to answer details (as the column) about a list of conditions (as the row). |
| Matrix (dynamic rows) | This matrix is similar to the Matrix (multiple choice), but allows patients to add and remove matrix rows. |
| Multiple Text | Patients can enter responses into multiple Single Input style questions. This question could be used for open ended questions for patients to elaborate on conditions or medical history. |
| Panel | A Panel can be used as a container that groups other questions together. Use this type to group several questions or panels and control them all together. |
| Panel (dynamic panels) | The Dynamic Panel is a template panel that contains a set of questions. Patients can add another instance of the same questions to provide another set of answers. This type of question could be used to enter a set of medication details, as the patient can add another set to fill in details about another medication. |
| Tag box | The Tag Box question type can be used in a similar way to the Dropdown question, however this allows the patient to select multiple options from the options listed. |
Properties
Depending on the type of question selected from the Toolbox, various groups of Properties will be available to customise the way a question operates.
General
Name is used as the property name internally, and is replaced by the Title (if a value is entered).
Title is the title of the question.
Description can be used to record additional information or instructions about the question.
Input Type can be used to validate the type of response a patient enters, such as an email address.
Is required? can be enabled to ensure the patient enters a response in order to proceed.
Label true/Label false can be used for the Boolean question to add text labels, e.g. True/False or Yes/No.
Multi select/Allow Multiple can be used to allow the patient to choose more than one option for the response.
Accepted types should be used for the File question to limit what files are able to be uploaded. You can enter multiple types, separated by a comma.
-
To allow image uploads, enter image/*
-
To allow video uploads, enter video/*
-
To allow audio uploads, enter audio/*
-
To allow other files, a file type can be specified, e.g. .pdf
Html
When using the Html item from the Toolbox, you can manually enter formatting by placing the following tags at the start and end of the section to be formatted. You can use a combination of tags to achieve a particular style.
| Style | HTML Tags | Example | Outcome |
|---|---|---|---|
| To create paragraphs… | <p> and </p> | <p>Lorem ipsum dolor sit amet, consectetur adipiscing elit.</p> | Lorem ipsum dolor sit amet, consectetur adipiscing elit. |
| To create a numbered list… | <ol> to start a list, and </ol> to end a list. Use <li> and </li> for individual items on the list. | <ol><li>Lorem ipsum dolor sit amet, consectetur adipiscing elit.</li> <li>Donec a quam iaculis felis pharetra rutrum eget a nibh.</li> <li>Ut imperdiet nisl mattis ante tristique ultricies.</li> <li>Donec et arcu nibh. </li></ol> |
|
| To add bullet points… | <ul> to start a list, and </ul> to end a list. Use <li> and </li> for individual items on the list. | <ul><li>Lorem ipsum dolor sit amet, consectetur adipiscing elit.</li> <li>Donec a quam iaculis felis pharetra rutrum eget a nibh.</li> <li>Ut imperdiet nisl mattis ante tristique ultricies.</li> <li>Donec et arcu nibh. </li></ul> |
|
| To add bold text… | <strong> and </strong> | <p>Lorem ipsum <strong>dolor sit amet</strong>, consectetur adipiscing elit.</p> | Lorem ipsum dolor sit amet, consectetur adipiscing elit. |
| To add italics text… | <em> and </em> | <p>Lorem ipsum <em>dolor sit amet</em>, consectetur adipiscing elit.</p> | Lorem ipsum dolor sit amet, consectetur adipiscing elit. |
| To add underlined text… | <u> and </u> | <p>Lorem ipsum <u>dolor sit amet</u>, consectetur adipiscing elit.</p> | Lorem ipsum dolor sit amet, consectetur adipiscing elit. |
Choices
Form Entry can be used to add additional options to the list
Select choices order can be used to set choices in a particular order, e.g. ascending for alphabetical from A-Z.
Has other item can be used to add an option for “Other”, which allows the patient to fill out an option that is not included.
Has none item can be used to add an option for “None”, which allows the patient to select “None” as their response.
Choices from question can be used to repeat the options from an existing question in another format. This can be used with Choices from question mode to only populate the options that have been answered.
Logic
Visible if can be used to make this question visible only when a particular choice has been selected in a previous question, e.g. making a DVA card type question visible if the patient enters their DVA number.
Required if can be used to make this question required when a particular choice has been selected in a previous question, e.g. making the DVA card type question require a response if the patient enters their DVA number.
Layout
Is start with new line? will place the question on a new line, rather than on the same line as the previous question.
Others
Reference ID can be used to map the patient’s response to a field on the Demographic screen.
HMS Document can be used to select which folder in the Documents tab the uploaded files will be saved to.
Page Configuration
When you create your Questionnaire, it will have one page, to which items from the Toolbox are added, however you are able to add additional pages as needed. New pages can be created at the bottom of the previous page by entering the title of the page or by adding an item from the Toolbox to the page.
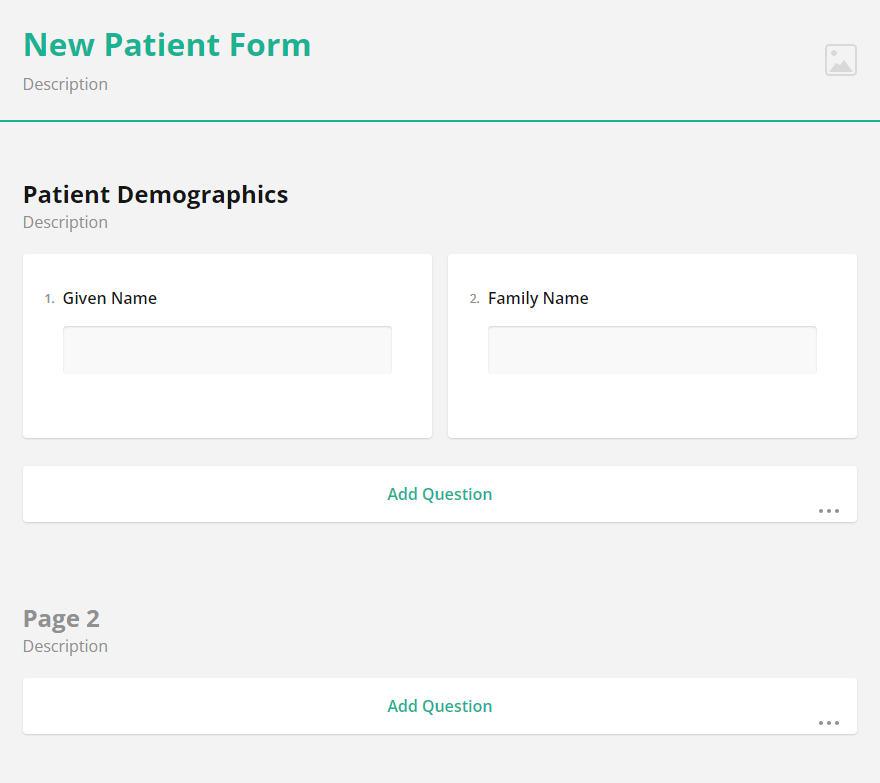
To the left of the Properties panel will be a vertical series of circles that can be used to move between pages. When hovering over these circles, the names of the pages will be visible to assist in making your selection. Each page will also have its own set of Properties, where you can nominate a name for the page, and you can also specify a Title and Description for the page, which will be seen by patients. The Title and Description can also be entered directly on the page.
In the centre of the screen, you can click onto the page name to access the page’s properties. This will also display options to Duplicate or Delete the page, should this be required.
Managing Questions
Each individual question can be dragged above/below surrounding questions to adjust the order they will appear.
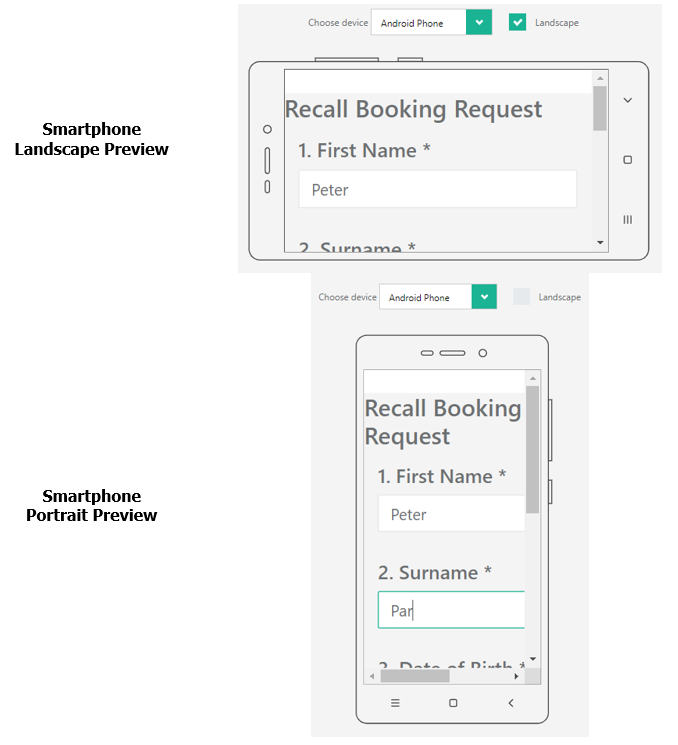
Preview Tab
The Preview tab allows you to view and take the Questionnaire as a respondent. This tab allows you to preview the Questionnaire on different types of devices, e.g. different types of computers, smartphones, tablets, etc. When you preview the Questionnaire with a device tab such as a smartphone, you can further tick/untick the Landscape box to change the orientation of the phone.
Deleting a Questionnaire Template
To delete an existing Questionnaire template, you can open the template from the Questionnaire Management screen.
-
Navigate to Admin > Questionnaire Management.
-
Select the Edit button for the Questionnaire to be deleted.
-
In the bottom left, choose the Delete button.
-
You will be prompted to confirm the template should be deleted; select the Yes button to proceed.
Any Immediate Questionnaires that have been sent will still be available for the patient to complete. Deleting the Questionnaire Template will prevent any further instances of the Questionnaire being sent to patients.
If you have deleted a Questionnaire, you may wish to review any places that a URL may have been previously displayed, including:
-
SMS and Email templates
-
Letter templates
-
Practice website
Configuring On-Premise Questionnaires
On-Premises Questionnaires can be completed by patients using a practice-owned device (e.g. a tablet/iPad) while they are in the practice for their booking. The following information relates to the setup and configuration of the On-Premises Questionnaire system. Please see the Using On-Premises Questionnaire section for instructions on day-to-day usage of this functionality.
Setup & Requirements
Should you wish to begin using the On-Premises Questionnaire system, please contact HealthTrack Support for this functionality to be enabled.
The On-Premises Questionnaire system is intended to be used on specific devices owned by the practice, such as a tablet or iPad. Patients will require access to the chosen device/s to complete the Questionnaire.
-
Any device/s used will need to be connected to the same network as HealthTrack.
-
The On-Premises Questionnaire system can be accessed through web browsers including Chrome, Edge, Firefox, and Safari.
Once enabled, HealthTrack Support will provide a URL that can be used to access the On-Premises Questionnaire system. For convenience, we would recommend this be bookmarked on the practice-owned devices, or saved to the device’s home screen as a shortcut.
Each Questionnaire Template should also be enabled for On-Premises use.
-
Navigate to Admin > Questionnaire Management.
-
Select the Edit button against the relevant Questionnaire Template.
-
At the top of the screen, tick the option for Available as On-Premises Questionnaire.
-
Select the Save & Close button.
Manage On-Premises Questionnaire Devices
The Manage On-Premise Questionnaire Device Sessions screen allows the practice-owned devices to be paired, establishing an authenticated connection between the device and HealthTrack. Device pairing increases security by limiting which devices can access Questionnaires via the On-Premises Questionnaire system. If device pairing is not a requirement in your HealthTrack system, any devices with network access to the HealthTrack server will be able to access the On-Premises Questionnaire system, though they would still be required to enter the PIN code for a valid Questionnaire. For example, if your practice provides a guest Wi-Fi network that is not isolated from the internal network where HealthTrack is running, device pairing is recommended.
This step is required for HealthTrack Cloud systems, but is not a requirement for other HealthTrack systems. Pairing can be enabled as a requirement if requested. All network traffic is encrypted regardless of the device pairing requirements.
Devices can be paired and revoked in the Manage On-Premise Questionnaire Device Sessions screen. Additionally, details regarding when the device was paired and last used, as well as when it was revoked can be viewed in this screen.
The practice-owned devices can be paired using the steps below.
-
Within HealthTrack, navigate to Admin > Questionnaire Management > Manage On-Premises Questionnaire Devices.
-
Select the Pair New Device button; this will display a QR Code.
-
On the device, navigate to the On-Premises Questionnaire URL provided by HealthTrack Support.
-
Select the option to pair a new device.
-
Select the Scan QR Code button.
-
Using the device, scan the QR Code within HealthTrack. On the device, the Pairing Code should become populated after scanning the QR Code.
-
Select the Pair button.
-
Within HealthTrack, the QR Code will close automatically and a message will be displayed to confirm pairing was successful.