Diary
Booking Sets
‘Booking Sets’ are a concept introduced in Cascades to allow the definition of a sequence or group of booking to be made from the diary. A booking set has properties such as ‘Specific Order’, ‘Same Day’, ‘Same Room’.
Accessing Booking Sets
By default ‘Booking Sets’ are hidden, so you need to press the Toggle button that is in the ‘Booking Sets’ area (see below)
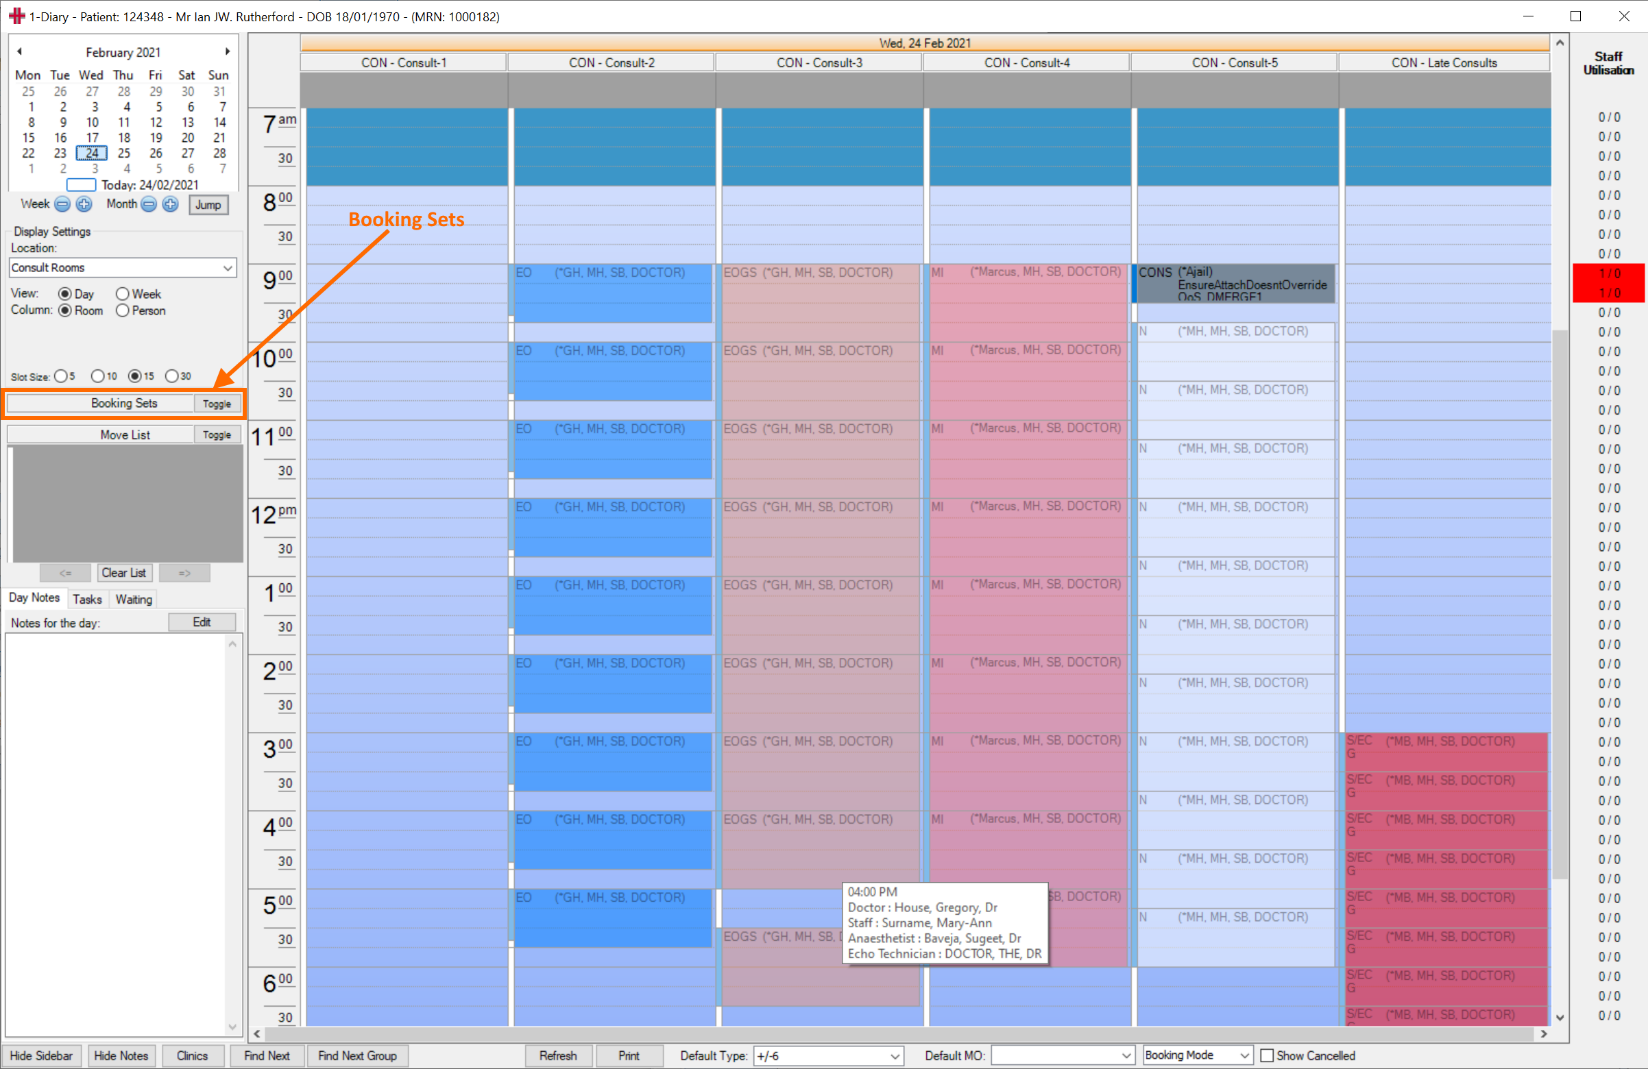
Using Booking Sets
| Once open (toggled), the first thing to do is select the ‘Booking Set’ you need to use. | 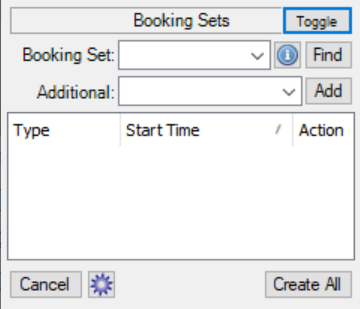 |
|---|---|
Press the Find button for HealthTrack to find the relevant bookings for you, per the specification. If you are satisfied with the found booking, click Create All and HealthTrack will create all the booking for the current patient. To find the next available booking for a specific booking, click the down arrow ↓ . You could also click the x to remove a specific booking form the set. |
 |
Displaying Booking Set Bookings
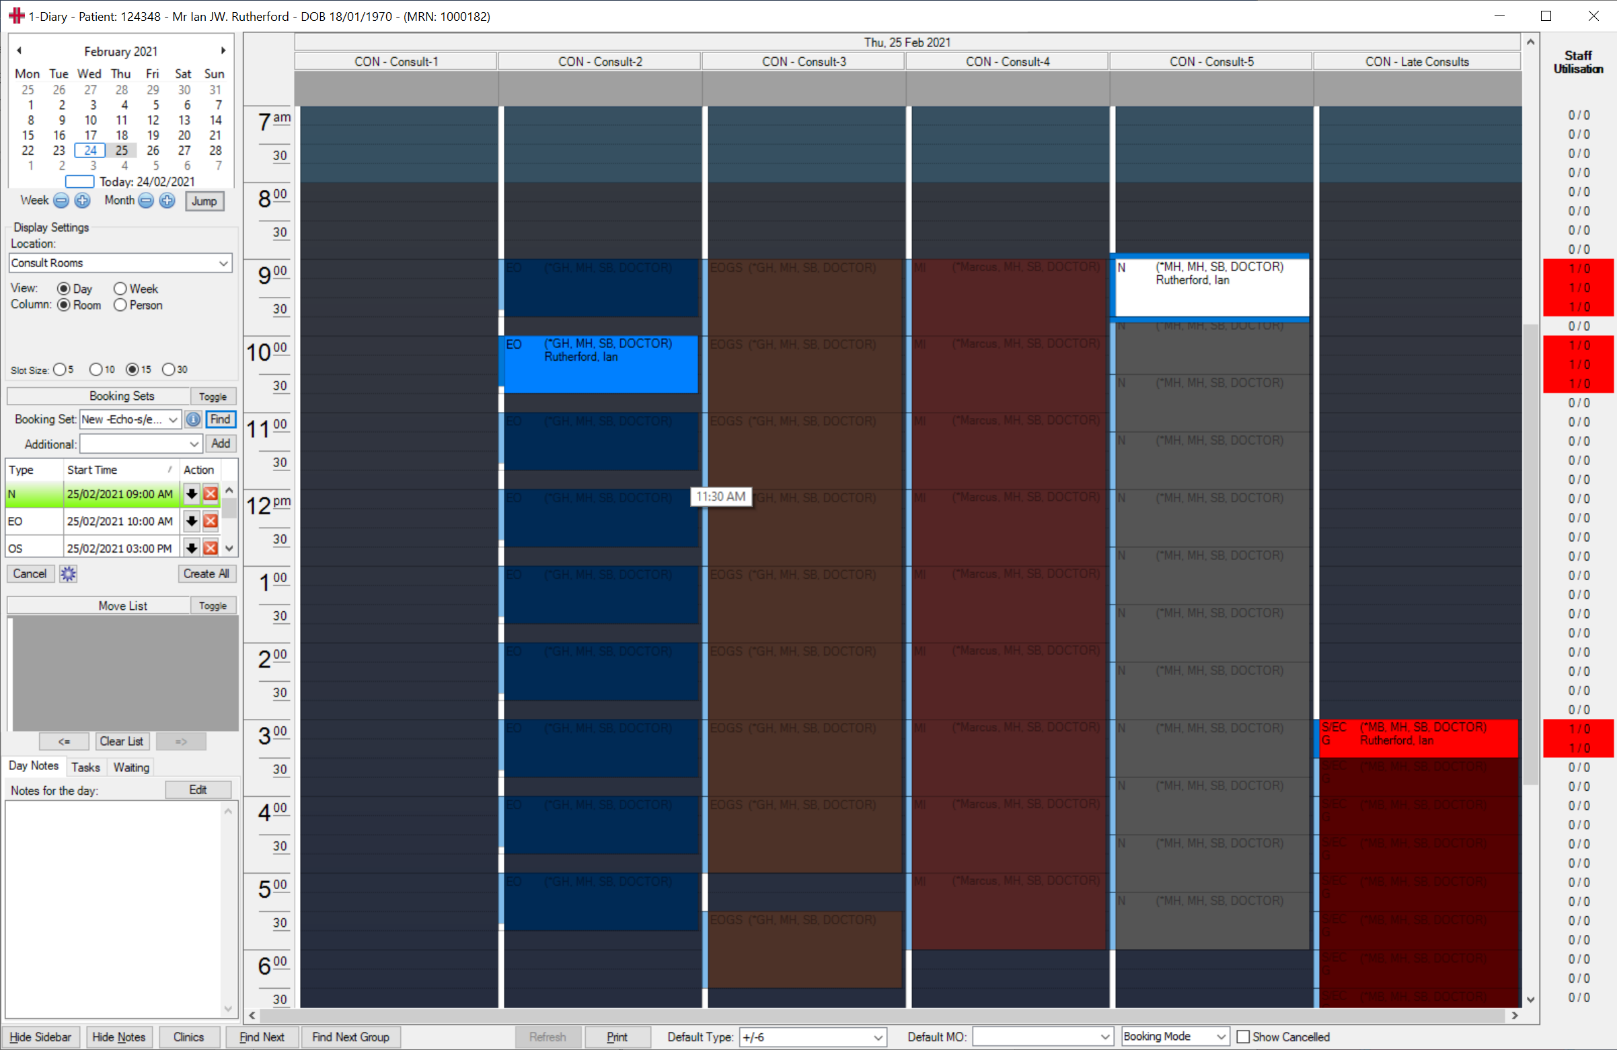
It is easy to see the proposed booking, as HealthTrack will shade the diary and highlight the proposed bookings.
Configuring a Booking Set
You access the configuration screen by clicking the cog icon.
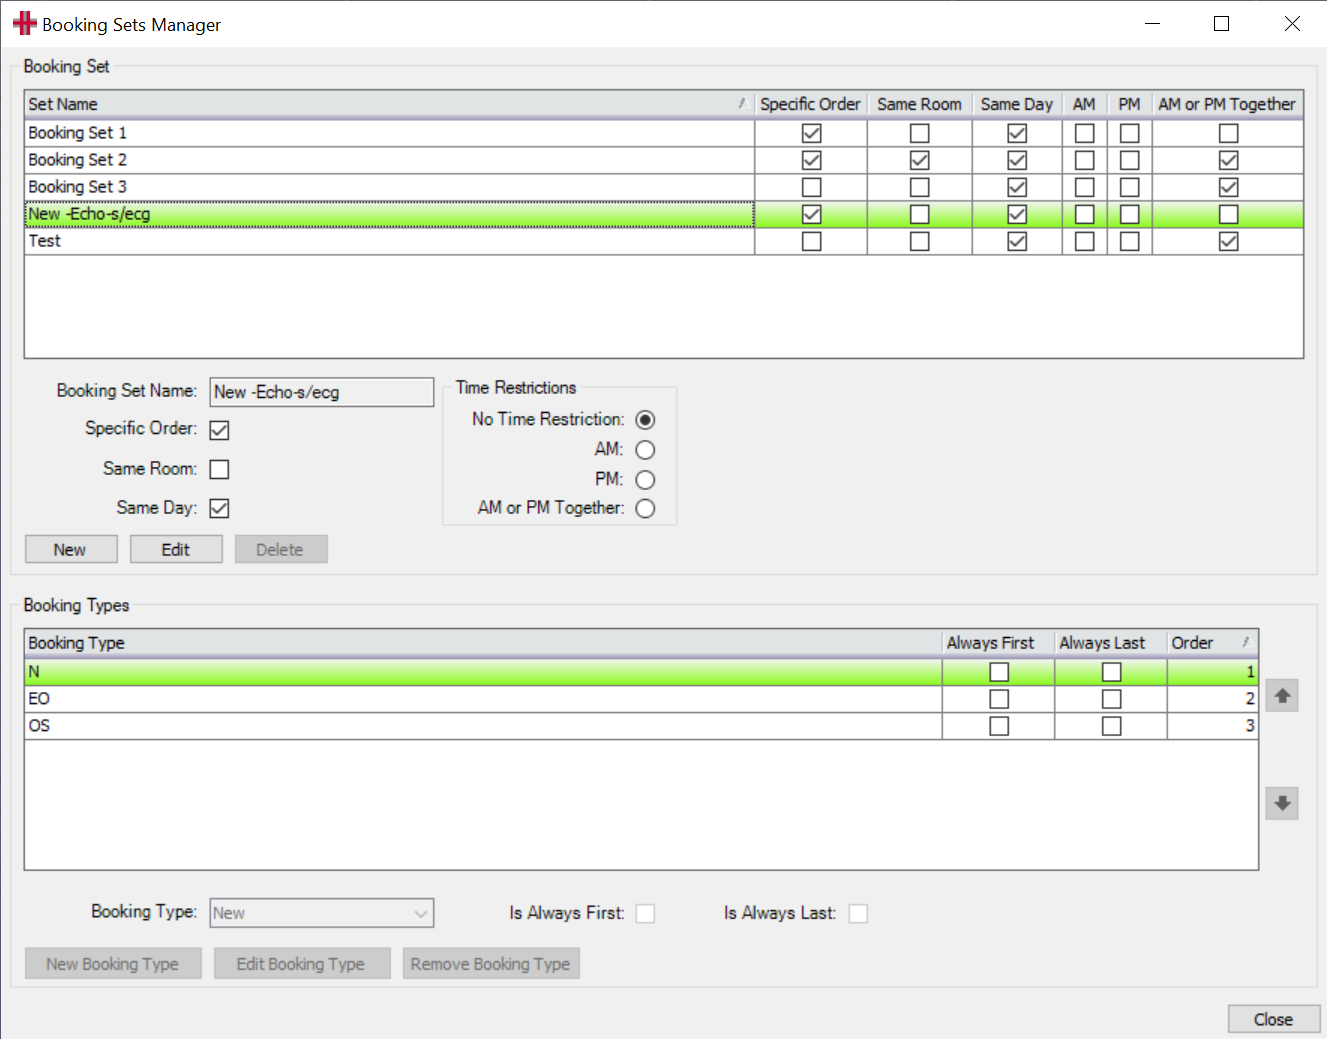
In the middle of the screen you can create New sets, Edit an existing set, or Delete a set (must be in edit mode).
Per above the “New Echo s/esg” booking set has been selected. The bookings are:
-
N – New
-
EO – echo outpatient
-
OS – s/ecg
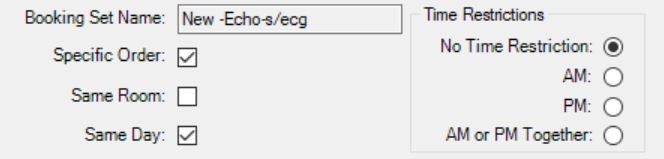
The related properties are that these booking must be:
-
Made in the specific order
-
Can be in any room
-
Must all be on the same day.
Additionally there are no time restrictions.
Staff Utilisation
Cascades and later releases include a ‘Staff Utilisation‘ feature, that works in conjunction with the “Rostering System”.
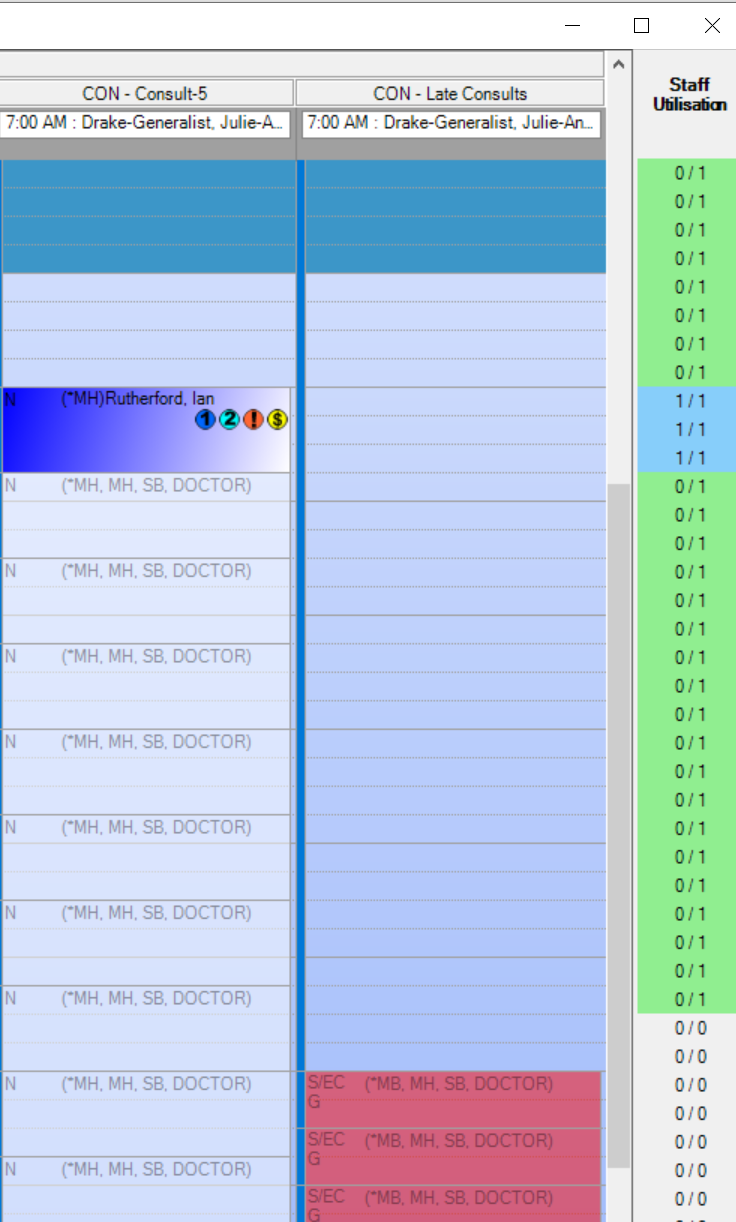 |
The ‘Staff Utilisation’ vertical bar on the right of the Diary now show you an analysis of time slots with number of bookings, verse number of staff rostered. In the example on the left,
|
Rostering System
HealthTrack’s rostering system has been designed as a tool to roster individuals for certain days and times, at a location without the need to have a Reporting MO included in a booking.
This means that when a clinical record is created, and associated with an ‘Occasion of Service’ and/or a booking, then the “Owner/Approver” of the clinical record will be assigned based on the following ‘order of precedence’:
-
If the booking has a booked “Doctor” then this will be used
-
If the booking does NOT have a booked “Doctor” then, the Roster Doctor will be used.
This same ‘order of precedence’ will be used when a Booking is ‘Closed’ for billing.
Rostering will allow users to change multiple bookings at a time, easily adjust a day for unexpected absentees and roster a doctor without requiring them to see the appointments in their diary (e.g. Echo bookings).
Managing Roster Mode
Staff rostering can be managed by selecting ‘Roster Mode’ in the diary mode selector at the bottom right of the diary.
Alternative, you may have the “Roster Template Manager” feature for easy mass management of staff rosters.
This is accessed from Admin > Diary > Roster Template Manager.
The ‘Roster Template Manager’ behaves in a similar manner as the diary template manager, except staff are scheduled.

Managing Roster Templates
Roster templates are created, edited and deleted in the Roster Template Manager accessed via Admin>Diary & Bookings> Roster Template Manager menu selection.
In the Roster Template Manager, existing template sets are stored and displayed alphabetically. When opening the screen the template that is displayed is automatically in Edit Mode.
Creating a New Roster Template
From the configuration menu on the left of the screen, select the cog symbol at the top of the column.
This will open the Manage Template Sets editor, where the +New button is selected to create a new roster template set.
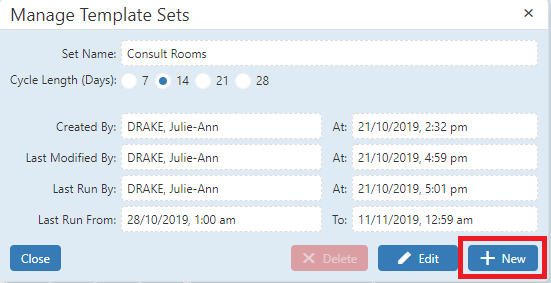
Insert a Template Set Name and Cycle Length and select the Save button to continue.
A blank template will then display on the screen.
The screen view and template configuration are determined by the configuration column on the left.
The days of the week will display as a number of lines according to the cycle length chosen. E.g. For a 7 Day Cycle - I line of 7 days will display The slot size varies the display in the chosen increments, with 30 minutes being the default. The template can be changed between Day; Week; Cycle and Location/Room or Doctor/Staff views. Location/Room allows for an All Rooms view for a Location or a single room view for a location. The Add Template section is where the staff rostering is set, with the entry of at least one staff member mandatory Session times are configured in System Settings and allow for up to 4 set time sessions and there is an optional Custom Session setting for when creating Roster Templates |
The template is then created by configuring the above fields and then clicking into the applicable slot on the roster template to insert the roster selections.
Once all Roster entries have been entered select the Save button to finalise the template.
To then apply the template to the diary select the Diary Actions button. Then select the action to apply:
Apply Templates – Applies the template for the selected period and overrides any previous versions of the current template being applied.
Delete Templates – Deletes templates for the current template set for the selected period.
Power Delete – Deletes all roster templates in the Diary for the selected period.
Once applied to the Diary the following message will display and the roster template will be visible in the diary.

Editing a Roster Template
As mentioned above, when opening a template in the Roster Template Management screen it is automatically in edit mode. To edit, apply any changes required and select the Save button to finalise the template changes.
Then apply the updated template via the Diary Actions button.
Add / Modify Roster in the Diary
The rostering system is accessed through the Diary for any given location. From the diary, the bottom toolbar has a “Mode Selector”. In this selector is three options:
-
Booking Mode: Normal diary function, double click to create and edit bookings.
-
Template Mode: Instead of creating bookings, double clicking will both create new, or edit existing templates.
-
Roster Mode: Will enable the Rostering feature in order to change multiple bookings for a set of rostered attending MO’s, Technicians etc.
! Graphical user interface Description automatically generated with medium confidence (image12.png)
When “Roster Mode” is selected, you will now be able to roster an individual doctor, technician, nurse etc. for a specific Location and Room. This will update all of the bookings in the time period selected.
! Graphical user interface Description automatically generated (image13.png)
-
Rostered Time and Location: This section of the window is used to set the date, start, finish and location of the roster. This can be used to set a rostered set of people for a morning, afternoon, full day or set of days as required.
-
Rostered Staff: The rostered staff are the staff that are to override the existing bookings for the rostered period (if any). This can be used to set just a Doctor, or additional technicians, nurses etc.
-
Available Session Presets: Instead of manually configuring the time range, you are able click a preset slots to configure the times.
Apply Roster
Once all of the necessary information has been set for the rostering period, you can select Save and Close .
Note: Any bookings with a status of Cancelled, No show and Closed will not be affected.
Once a roster has been “Saved and Closed” it will be applied to the diary. This will then display on the top of the diary, in the Location/Rooms that it was applied.
! Graphical user interface, application Description automatically generated (image14.png)
System Settings
Four user defined sessions can be configured. Found in the standard system settings screen:
Admin menu >> Maintenance >> System Settings.
The setting for rostering will be listed under the “Diary” group
! Graphical user interface, application, table Description automatically generated (image15.png)
Security & Permissions
In order for a user to be able to select “Roster Mode” from the menu in the Diary, they will be required to be assigned the ‘DiaryEditRosters‘ permission. By default, this will be assigned to the “HMS-DiaryAdmin” security group.
! Graphical user interface, application Description automatically generated (image16.png)