Patient demographics
How to Find a Patient
A patient can be found anywhere in Health Track when the Find Patient or Change Patient buttons appear. Pressing either of these buttons will open the Find Patient window. This will also open by pressing (control key) ctrl + F or opening the Edit menu >> Find Patient.
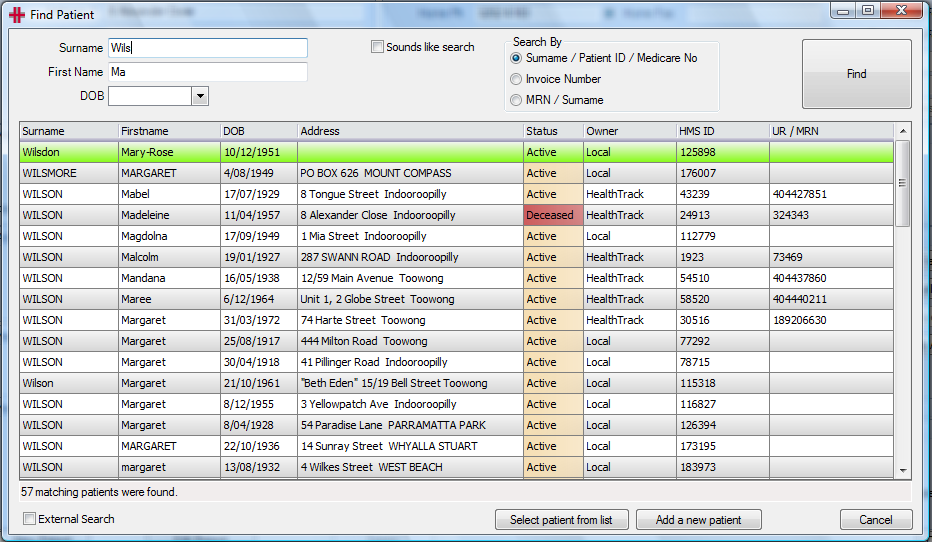
Figure 1 - Find Patient
There are many patient search options available: Patient Surname, Patient ID, Invoice Number and Medical Record Number. Additionally a surname search can be completed using the ‘sounds like search’ option. This option is beneficial for surnames for example beginning with Mac as it will also display patients with surnames beginning with Mc.
The most effective way to search by surname is to enter the first three letters of the surname and the first letter of the first name. If the required patient is listed click once on the patient name and click the Select patient from list button*.* This opens the selected patient’s demographics screen. A short cut is to double click on the required patient to open the patient’s demographics screen.
A date of birth search can also be performed. To do this ensure that the Surname / Patient ID bullet is checked in the Search By section, and then only enter the date of birth into the DOB field and click the Find button. This displays any patients that match the entered date of birth.
Adding a New Patient
When adding a new patient, HealthTrack will enforce a search of existing patients, to minimise the risk of duplicate patient records.
Please note, for some sites patients are not entered directly into HealthTrack, instead patient records are fed into HealthTrack from the hospital’s Patient Administration System. If this applies for your site, please ensure staff do not create patient records directly in HealthTrack.
You can add a new patient from the Demographics screen using the New Patient button or from the ‘Find Patient’ screen. This will open the ‘Add a New Patient’ screen. This screen is nearly identical to the ‘Find Patient’ screen.
-
Enter the patient’s Surname and First Name and click the Add button
-
If the new patient to be entered exists (Name, DOB & Address match), then click on the patient’s name and click Select patient from list to retrieve the patient’s details.
-
If the new patient to be entered does not exist, the following screen will appear for additional patient data to be entered for the new patient.
-
Enter additional patient data and click Add . The new patient record will be created and will open in the Demographic screen.
-
Enter as much patient information as you have, such as:
-
Addresses
-
Phone Numbers & Email
-
Medicare, Health Fund and DVA Numbers
-
General Practitioner
-
Next of Kin
-
Notes
-
-
Click Save Patient to save the record.
Patient Demographic Page
The patient Demographic tab is where all the basic demographic details for a patient are captured and stored. When adding a patient into HealthTrack enter the fields required and click the Save Patient button once all data is entered.
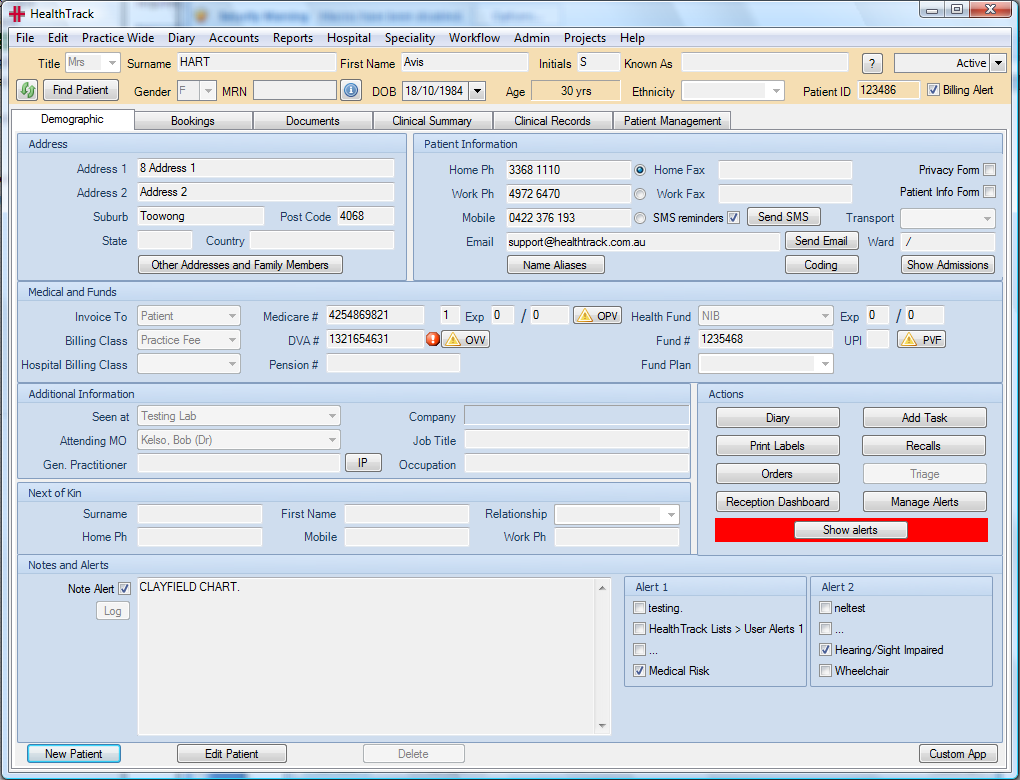
Figure 3 - Patient Demographic Page
The Demographic tab is divided into 8 key areas (Address, Patient Information, Medical and Funds, Additional Information, Next of Kin, Notes and Alerts, Actions and Alert 1 & 2). While most areas are self explanatory, the following are key fields that are used by other modules in the system:
| Area | Field | Usage |
|---|---|---|
‘Medical and Funds’ Fields used by the billing module |
Invoice To | Defines the default party to send invoices to e.g. Patient, Medicare, DVA |
| Billing Class | Used to specify the default charge for billing items e.g. Practice Fee. Additional entries may be created by the site to manage site specific pricing. Examples include “Pensioner” and/or “Concession” |
|
| Medicare # | Required for the patient to claim refunds from Medicare and for online processing of invoices | |
| Health Fund and Fund # | Used for in-patient billing | |
| Additional Information | Attending MO and Gen. Practitioner |
Used in the Document Management System |
| IP button | The IP button opens the patient’s Interested Parties window to record the parties who require a copy of correspondence about the patient. Used in the Distribution System |
Quick Tips:
-
The blue circle next to a phone number indicates the patient’s preferred number to call.
-
The ‘Privacy Form’ and ‘Patient Info Form’ check boxes can be used to flag that one or both of these forms have been received.
-
The ‘Seen At’ and ‘Attending MO’ fields can be used to capture the main location and Doctor for the patient.
-
To enter the patient’s GP double click in the field to activate the Referring MO database. Once the record is saved if you need additional details on the referring MO double click in this field and a window with their contact details (address, phone, fax etc.) and provider number appears.
-
The buttons in the Action section are shortcuts to routine tasks that can be completed for the patient.
-
If your HealthTrack system is set up for online billing, once the patient’s details have been saved an online verification can be performed of the patient’s Medicare, DVA or Health Fund details by clicking the OPV , OVV or PVF buttons.
-
When the checkboxes in the Alert 1 and Alert 2 sections are ticked, a 1 or 2 symbol will appear for the patient in the HealthTrack Diary and invoicing screens, to notify users that they need to go to the patient’s demographics to check the alert. These alerts can be configured for your site through the HealthTrack List Manager.
Addresses
The patient primary address should be entered on the front screen. As the address is being entered the suburb, postcode and State are compared to Australia Post records and if they do not match a pop-up message box appears to allow the correct selection of the Suburb, Postcode and State.
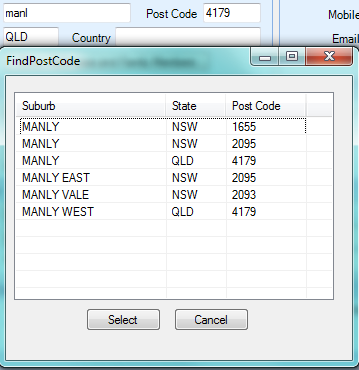
A patient can however have up to 6 addresses recorded. To add any additional addresses (such as postal and invoicing addresses) click the Other Addresses Family Members button. Please note if you want to make any adjustments to these addresses you will need to be in Edit mode.
Additional Addresses
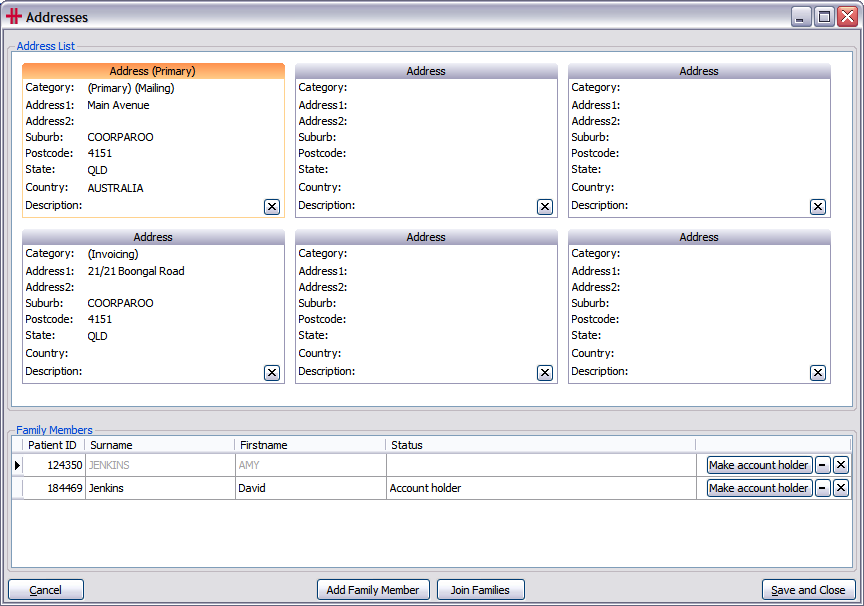
Figure 4 – Addresses
Family members: HealthTrack has the ability to link multiple patients as a family. When patients are added into a family one patient is selected as the account holder. This means that all invoices raised for any member of the family are addressed to the account holder. To add a family member click the Other Addresses Family Members and find the patient to be added. Select the patient from the list and they will be added into the family.
To join two families together click the Join Families button and find one member of the family. When this patient is selected all of their family members will be added to the current family.
Name aliases: The patient can have multiple aliases recorded, to add an alias click the Name Aliases button and record the surname and first name. The comment field should be used to capture what the name is for example maiden name, name change by depol, former married name, alias, etc.

Figure 5 - Patient Aliases
When searching for a patient any name aliases are highlighted blue to indicate that this is an alias. Using the example below if you select Walker, Kristy the Fennell, Kristy patient file opens.
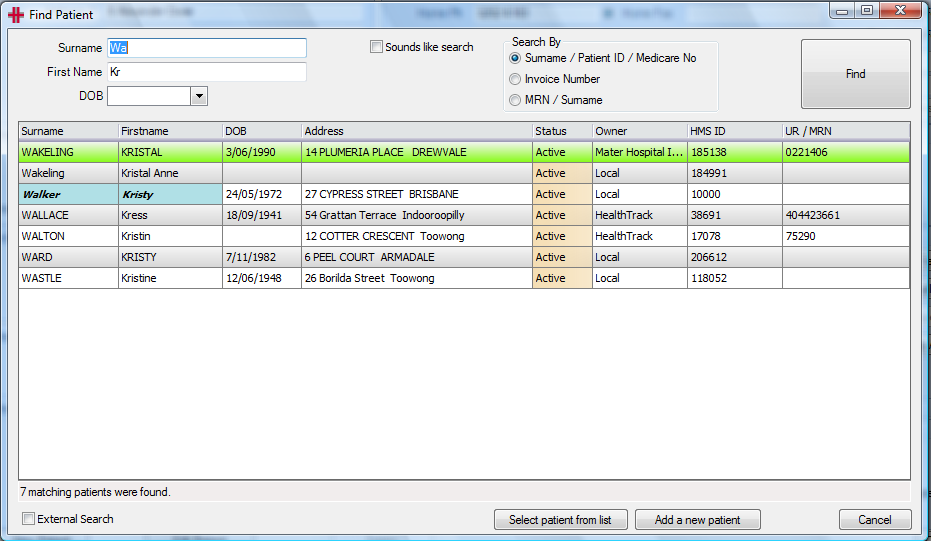
Figure 6 - Patient search with alias
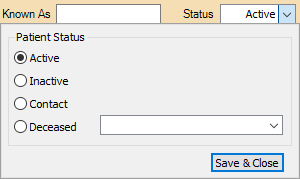
Patient Status
By default, patients will have an Active status when created. This can be changed to Inactive, Contact, or Deceased if applicable. The status is located in the banner along the top of the patient’s record, and the banner will change color depending on the status.
-
From the Demographic tab, select the Edit Patient button at the bottom left.
-
From the banner along the top of the patient’s record, choose the Status drop-down and select the appropriate Patient Status.
- If selecting Deceased, you can additionally enter a date.
-
Select the Save & Close button.
-
If no further changes are required on the Demographic screen, select the Save Patient button from the bottom left.
The Patient Status is only intended for reference purposes. This means that marking a patient as Inactive or Deceased will not perform any actions in HealthTrack; you may wish to review the patient’s Bookings and Patient Connect to determine if any further actions are required.
Audit: The ? button next to the Patient Status field displays details of the HealthTrack user who created the patient record, last modified it and if online transmissions are setup when the last checks were completed for the patient’s Medicare, DVA and health fund cards.
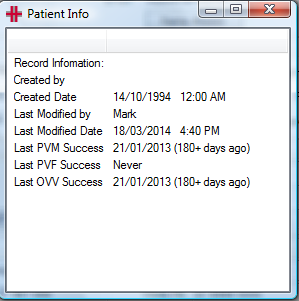
Figure 8 - Patient Info
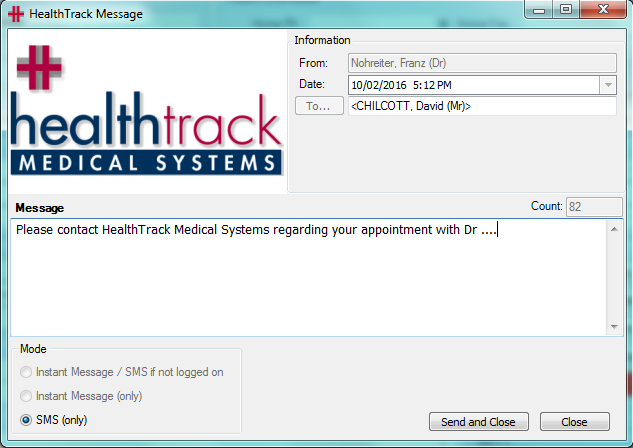
Sending an SMS
To send a patient an SMS click the Send SMS button. The following screen will appear:
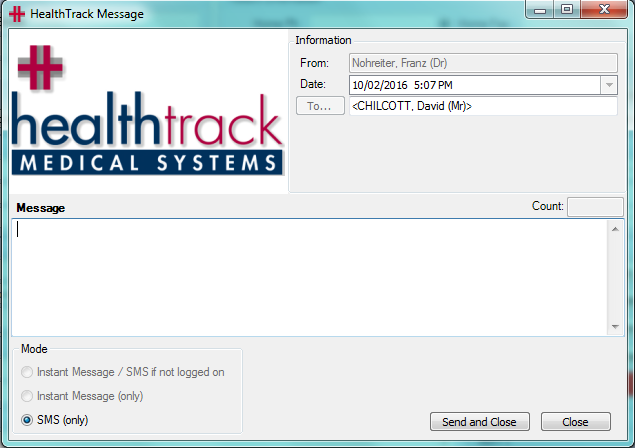
Type your message in the message box and click Send and Close .
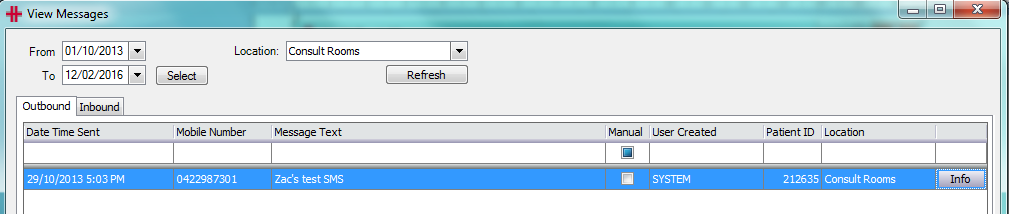
Once you have closed and sent the message, the message is saved in the “View Messages” screen which can be accessed from the Admin Menu>>Notifications>>View Messages.
Messages sent can be viewed on the Outbound tab, while messages received can be viewed on the Inbound tab.
Use the filter options to narrow your search.
How to Merge Duplicate Patients
HealthTrack enables users to merge patients that may have been entered more than once into the system. Merging patients means that the New Patient’s details (any clinical records, documents, billing information, bookings etc.) are combined with the original patient’s record and the New Patient is deleted in HealthTrack. This is irreversible – please take care when merging patients.
There are two areas in HealthTrack for managing duplicate patients – Merge Patients by ID (for merging 2 records) and the Patient Merge Manager (for managing the practice’s duplicate records). First we will merge 2 records.
Go to the Admin menu >> Merge Patients by ID. This opens the following window:
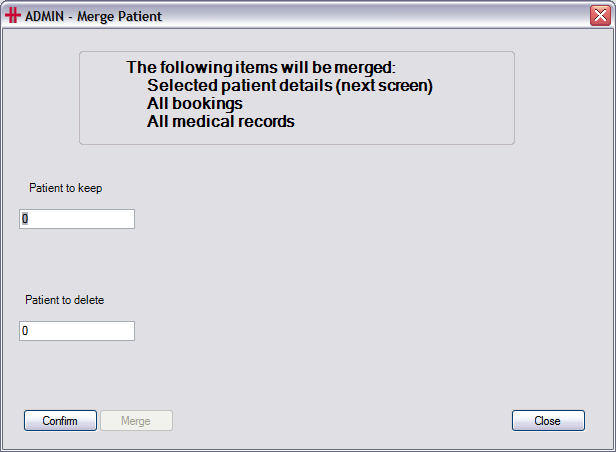
Figure 9 - Merge Patient (Step 1)
This is the start of several steps to merge patients. The ID numbers of the patient records will need to be entered (these are found on the Demographic screen in the top right-hand corner). It is recommended that these ID numbers are written down first as the original record should be kept and the newest record should be deleted. Please note that if your facility also has paper records these will need to be merged.
Enter the Patient ID number into the ‘Patient to keep’ field, and the Patient ID number of the patient to delete/merge into the ‘Patient to delete’ field. Then press Confirm . This displays a summary of the two patients’ details to confirm that these are the patients to be merged.
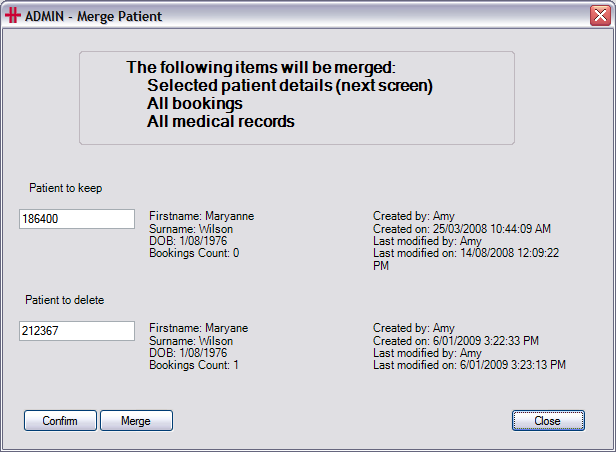
Figure 10 - Merge Patient (Step 2)
If the details of the patients are correct click Merge .
Once the Merge button is clicked a window appears asking the user to check which details, if any, they would like to retain from the patient being deleted. Any matching details are checked by default and the user can uncheck these or select other details by clicking in the checkbox at the end of each field. Check All selects all of the patient’s details, just as Check None un-checks any checked fields. Once the user confirms all the details being merged are correct, click the Merge Checked button.
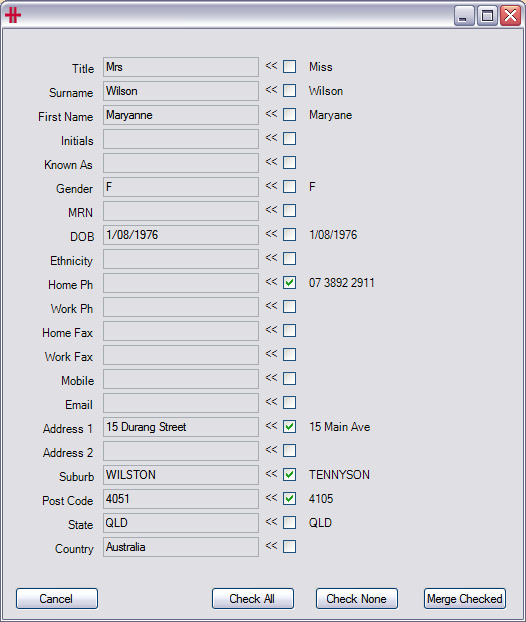
Figure 11 - Merge Patient (Step 3)
Once the Merge Checked button is clicked, a dialogue box appears with the Patient names being merged. This requests confirmation of the merge.
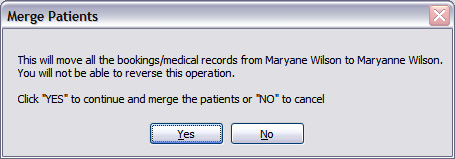
Once the Yes button is pressed a confirmation message will appear.
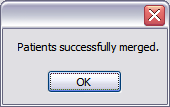
Pressing OK closes the Merge Patients menu, returning the user to the Merged Patient’s Demographic screen.
Managing Duplicate Records Practice-Wide
HealthTrack has the ability to analyse all of your patient records and flag any that are likely to be duplicates. This process is completed in the Patient Merge Manager.
To open this window go to the menu Admin >> Merge Patients >> Patient Merge Manager.
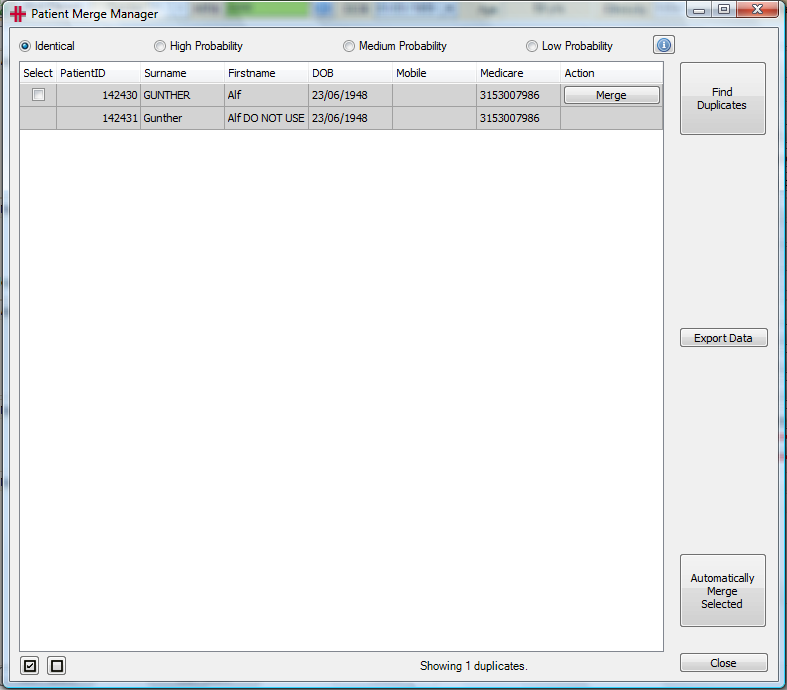
Figure 12 - Patient Merge Manager
There are 4 options for analysing your patient records:
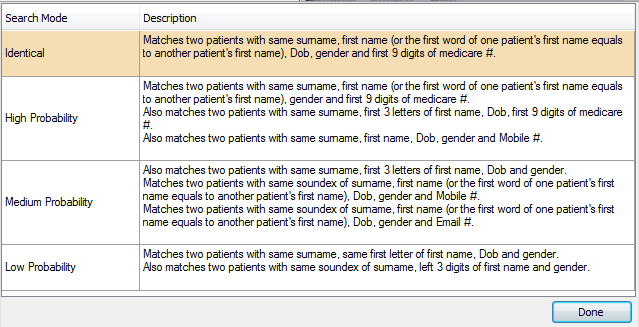
Figure 13 - Patient Merge Manager - Info button
To view the above criteria at any time, in the Patient Merge Manager click the blue i button.
To display patient records, select the criteria to search on e.g. Identical and click Find Duplicates . The search may take a few minutes to run and then matching patient records will appear in the table. If there are more than 100 records, only the first 100 will show. The message Showing 100 of 100+ duplicates will appear at the bottom of the table. After some of these records have been merged, clicking the Find Duplicates button will bring up new records.
To view the patient’s file in HealthTrack, right click on the row in the table and select ‘Go to Patient’:

For records that are found when performing the ‘Identical’ search, there is the option to Automatically Merge Selected . This option is not available when conducting the other searches as there is likely to be differences in the patient data so the user must determine what data needs to be kept.
Alternatively clicking the Merge button next to 2 records opens the selection screen to choose what data is to be merged (see Figure 10). After the merge has been completed, the records will disappear from the table in the Patient Merge Manager.
There is also an Export Data button to generate a spreadsheet of the duplicate records.