Doctor Portal
The Doctor Portal is a HealthTrack smartphone application that provides numerous features for doctors.
The Doctor Portal currently offers the following apps:
Getting Started
User Preferences
Login & Register
Each doctor will need to register for Doctor Portal.
-
Navigate to File > User Preferences.
-
Select the Cloud Details tab.
-
Select the Login/Register button.
-
If you already have a HealthTrack Cloud login, you can use the same login for the Doctor Portal.
-
If you don’t have a HealthTrack Cloud login, you can use the Sign up now option to create an account.
-
-
After logging in, the User Preferences screen will display your Cloud Details.
-
Select the Register button.
- You should receive a prompt confirming your registration was successful. For Internal MOs, you will also be prompted that a Diary Sync Configuration has been selected for you.
-
Select the Save & Close button.
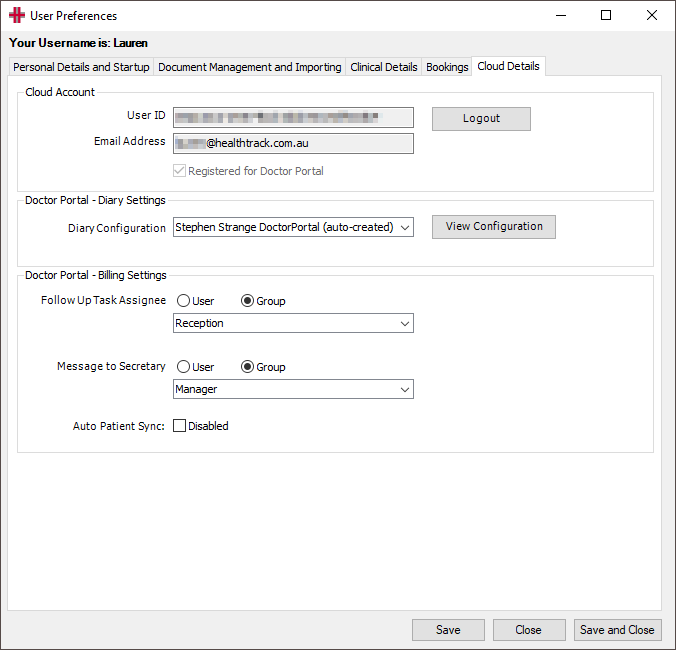
User Preferences: Billing Settings
There are several Billing Settings that are used for discharging patients and to determine which patients are available in the Patient Billing app.
| Follow Up Task Assignee | This setting determines which User or Group is assigned the Follow-up Task when a patient is discharged. |
|---|---|
| Message to Secretary | This setting determines which User or Group is assigned the Message to Secretary task when a patient is discharged. |
| Auto Patient Sync | When the Disabled box is ticked, patients will no longer be synced to the Patient Billing app based on the bookings in HealthTrack’s Diary – existing patients will remain in the Patient Billing app unless discharged or deleted. All patients will need to be manually entered, rather than having a pre-loaded list for selection. |
User Preferences: Diary Settings
When a doctor completes their first sign-in, a Diary Sync Configuration is created automatically. This configuration is used to determine which bookings are visible in the Diary and Dictation apps in the Doctor Portal.
-
Navigate to File > User Preferences > Cloud Details.
-
Select a configuration from the Diary Configuration drop-down. Only enabled configurations will be available for selection.
-
Select the Save & Close button.
Select the View Configuration button to open your Diary Sync Configuration. For more details, please see the Diary Sync Configuration section below.
Installation
To install the Doctor Portal on your smart phone, use your preferred browser to go the DoctorPortal website and proceed with logging in using your HealthTrack Cloud credentials.
Android
After logging in, you should see a banner at the top of the page to Install Doctor Portal. Tapping this banner will open an Install app prompt, and you can proceed with the installation by clicking the Install button.
If you don’t install the app when prompted, you can select the vertical ellipsis ⋮ icon in the top right corner and choose Install App, and proceed with the installation when prompted.
By installing the app, you can launch the Doctor Portal using the HealthTrack icon in the future.
iPhone
After logging in, you can add the Doctor Portal to your home screen:
-
In Safari, select the Share option at the bottom of browser, then choose the option for Add to Home Screen > Add.
-
In Chrome, select the Share option at the top right of the browser, then choose the option for Add to Home Screen > Add.
This will create a shortcut app on your phone for the Doctor Portal.
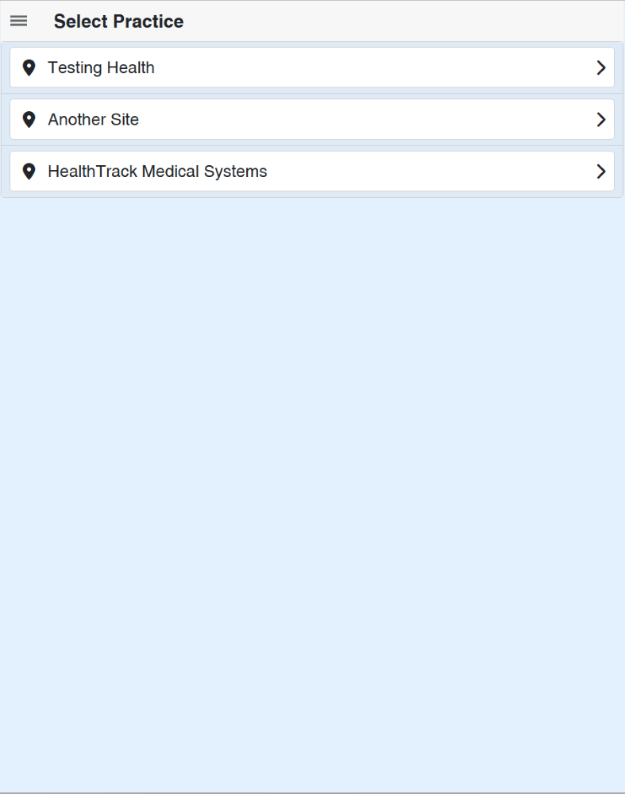
Select Practice
If the doctor has registered their Cloud Details in more than one HealthTrack system for billing, then the following screen will open to select which practice the billing relates to. If the doctor is not registered at numerous practices, this screen will be skipped automatically.
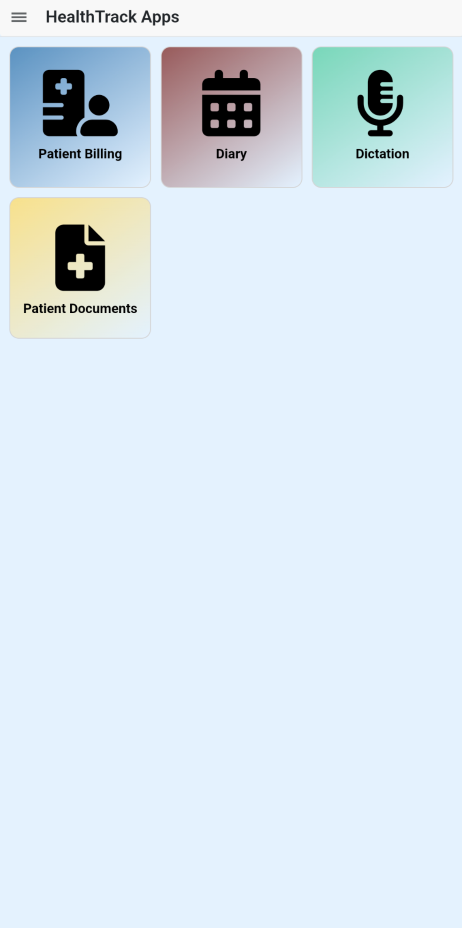
HealthTrack Apps
The Doctor Portal current features a Patient Billing app, Diary app for viewing bookings, Dictation, and Patient Documents for viewing existing records in HealthTrack. The doctor can select which app they want to use.
Patient Billing
The Patient Billing app allows a doctor to enter item numbers and notes for a patient seen in hospital. This is intended to keep track of each visit, and provides a billing user with the information required for billing these visits once the patient is discharged from hospital.
Each day the following data is loaded to the ‘Doctor Portal’ for each registered doctor:
-
The Site/Practice’s locations
-
The Site/Practice’s billing codes
-
The doctor’s patient list (last 7 days, next 1 day)
- For doctors that prefer to manually add their patients, the patient option can be disabled in the User Preferences: Billing Settings.
Select Location
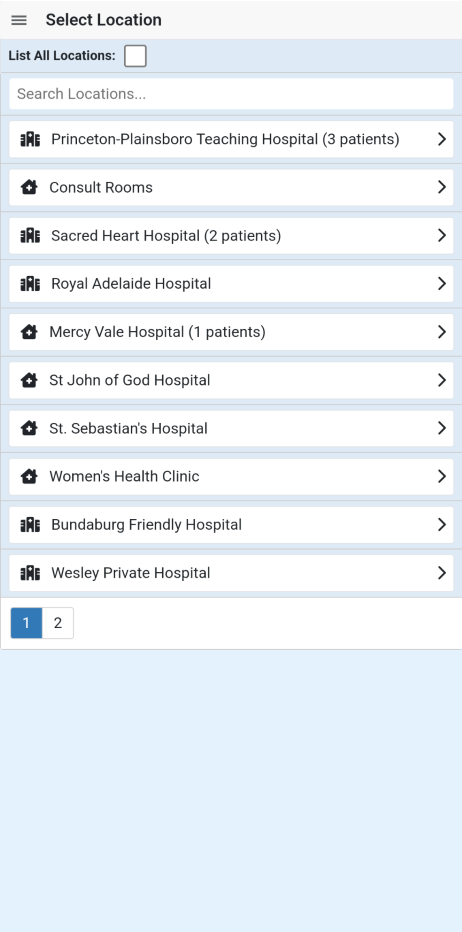 |
In the Patient Billing app, the locations listed will be filtered to display only the doctor’s locations based on the Location & Health Fund Specific Provider Numbers that are recorded in Admin > Internal MO > Manage Internal MOs. Additional locations can be accessed by ticking the List All Locations box at the top of the screen. Each of the doctor’s locations will be listed, followed by the number of patients for the logged-in provider. Select the location for the billing. Should you need to change locations later, you can select the ☰ menu button in the top left and select Change Location. |
Patient List
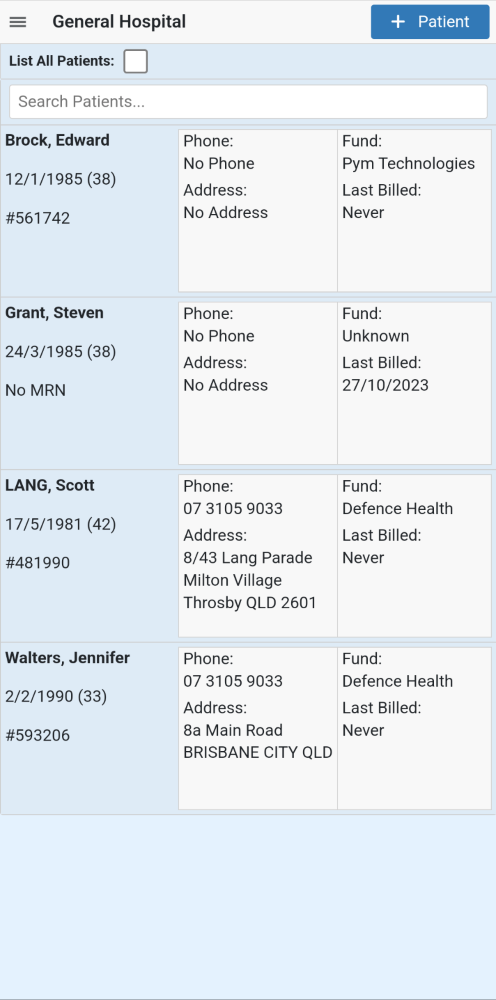 |
After choosing a location, all of your patients that are booked in the HealthTrack Diary at this location will be listed. By default, this will include patients with a booking in the last 7 days, as well as patients with a booking today and tomorrow. Any patient with billing items that has not yet been discharged will continue to appear in the Patient List beyond this date range. Tap on a patient to proceed with entering the billing details. If you do not wish to see this list of patients, it can be disabled in your HealthTrack User Preferences: Billing Settings. When disabled, all patients will need to be manually added to the Patient Billing app. If you are acting as a Locum for another doctor in your practice, you can tick the List All Patients box to list all patients at the location, including those for other doctors. Then you can select the patient from another doctors’ list. If your patient is not listed, you can use the + Patient button to enter the patient’s details. When discharged, the billing user will be able to match the entry to an existing patient, or create a new patient using the information provided. ‘Click’ a Patient to manage that patient’s details and billing |
Adding Billing Items
Notes: Use the Notes button to add any clinical notes for the patient’s record. Edit Detail: Use the Edit Detail to edit the patient details. |
|
|---|---|
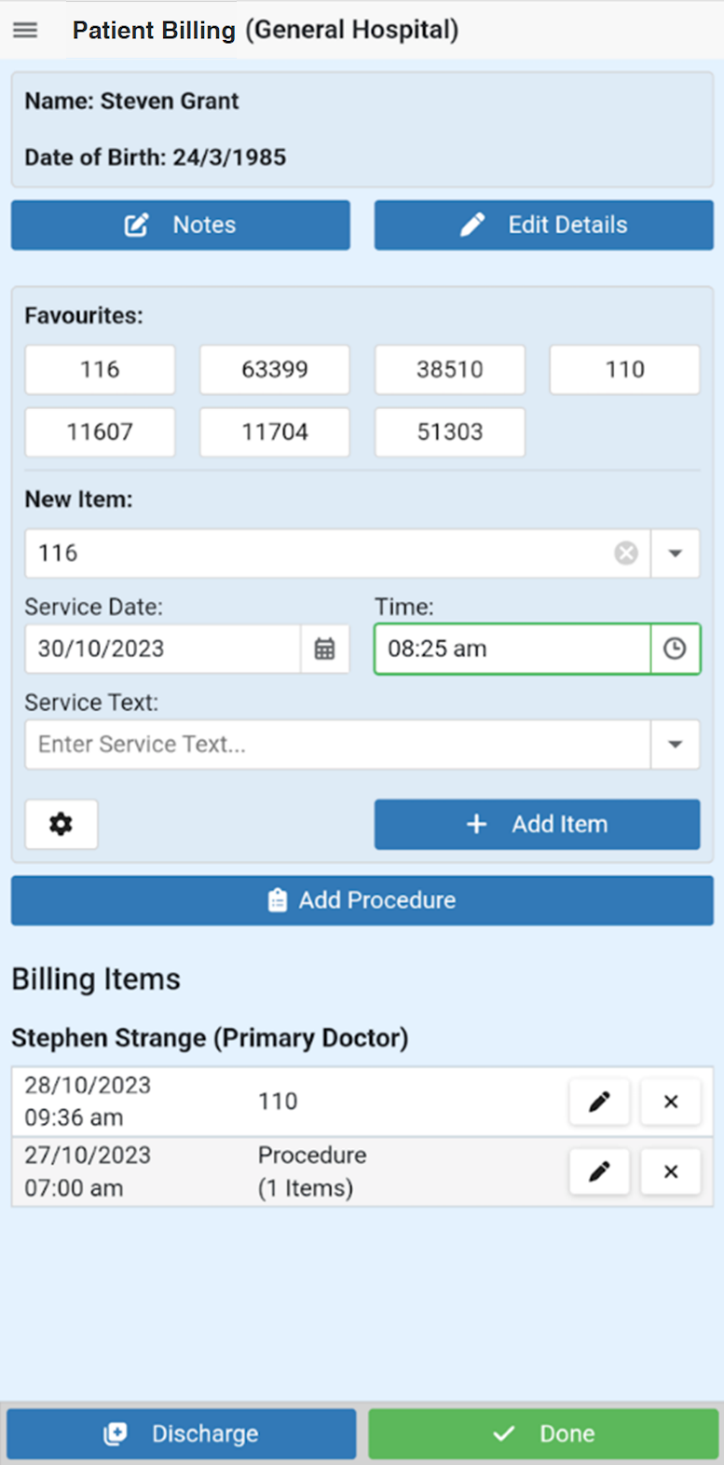 |
You can add billing items using the Favourites or from the New Item section. Favourites: This section will show your 10 most frequently billed item numbers, and may change over time based on the frequency of particular items being billed. You can tap an item code, then proceed with adjusting the date and time as needed. Tap the + Add Item button to add to the list of Billing Items. New Item: If the item you intend to bill is not listed in your Favourites, you can use the New Item drop-down to select an item, or you can type the item number. After choosing an item, you can proceed with adjusting the date and time as needed, and tap the + Add Item button to add to the list of Billing Items. Service Text: You can use the Service Text field to include information such as the location of a patient’s body the service relates to (e.g. left or right), self-deemed status for diagnostic services, or reasons for not normal aftercare, duplicate service, multiple procedures, etc. Any information previously entered as Service Text will be available for selection, or you can free-type into the Service Text notes. Cog button: This button will open the Search All Items box, and can be used to search for item numbers to view the item’s description. If the item is on the MBS and not active in your HealthTrack system, you can further use the + Item button to add the item for use in the Patient Billing app. This will not activate the item in HealthTrack, but will allow billing staff to activate the item within HealthTrack if needed. You can further choose the + Custom button to enter a custom item code and description. Add Procedure: In addition to standard billing items, users can also use the Add Procedure button to group together item numbers used for a procedure. This button opens a new window, where the user can select from Procedure Favourites. Selecting the + Procedure button will add a row to the Billing Items grouped as a procedure. Billing Items: This section is a list of all items that are expected to be billed once the patient is discharged. You can tap the pencil icon to make changes to this item, or the cross icon to remove the item from the list billing. |
Done: When you have finished adding billing items, you can select the Done button to save your changes and return to the Patient List. Discharge: If all billing is complete, click the Discharge button. For more information on discharging a patient, see the Discharge section below. |
Edit Patient Details
After selecting a patient from the Patient List, you can use the Edit Details button to update the patient’s information as needed. If the patient was populated based on a booking in HealthTrack, a message will be displayed to indicate they are a HealthTrack Managed Patient, and the patient’s details will be read-only.
 |
From this screen, you can upload up to 3 existing photos, or take a new photo to capture:
You can attach up to three referral items, which will be combined as a multiple-page PDF document when received in HealthTrack. We suggest you capture the Referring Doctor name and note where the referral is located. Changes made to the patient’s information will not update the patient record in HealthTrack. This information is only used to match to an existing patient in HealthTrack when discharged. |
Patient Notes
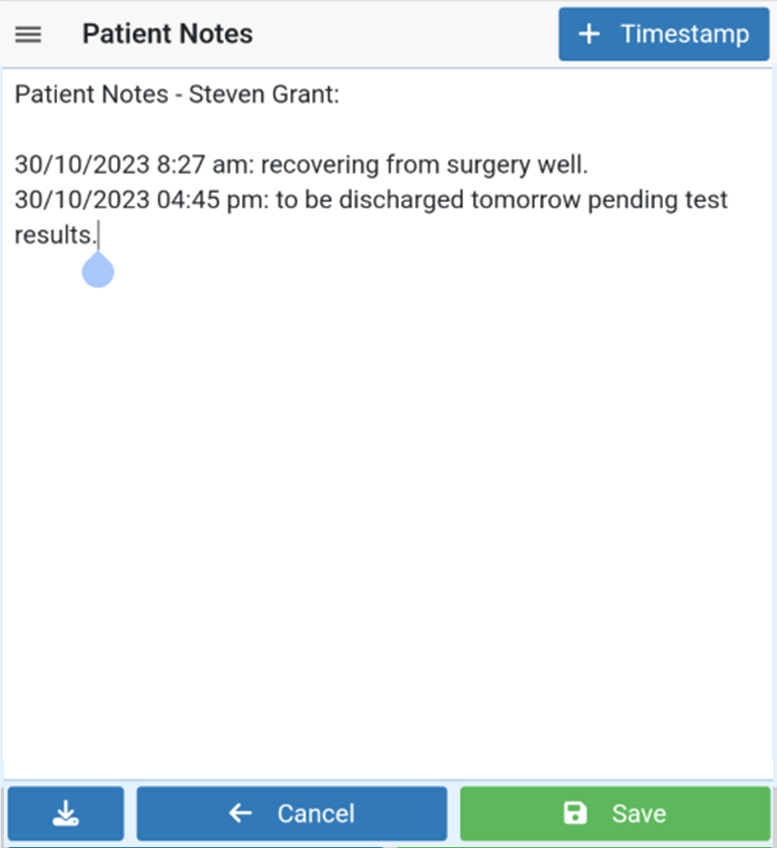 |
You can record a series of progress notes in the Patient Notes section. This area is free-text, meaning you can type as much information as is necessary. Each entry can be timestamped by choosing the + Timestamp button. When you have finished entering notes, use the Save button to return to the Edit Patient screen. The Patient Notes will be available in HealthTrack in Practice Wide > Incoming Billing where it can be copied to the relevant area/s within the patient’s record. Users can also download the notes as a .txt file from the Patient Billing app. |
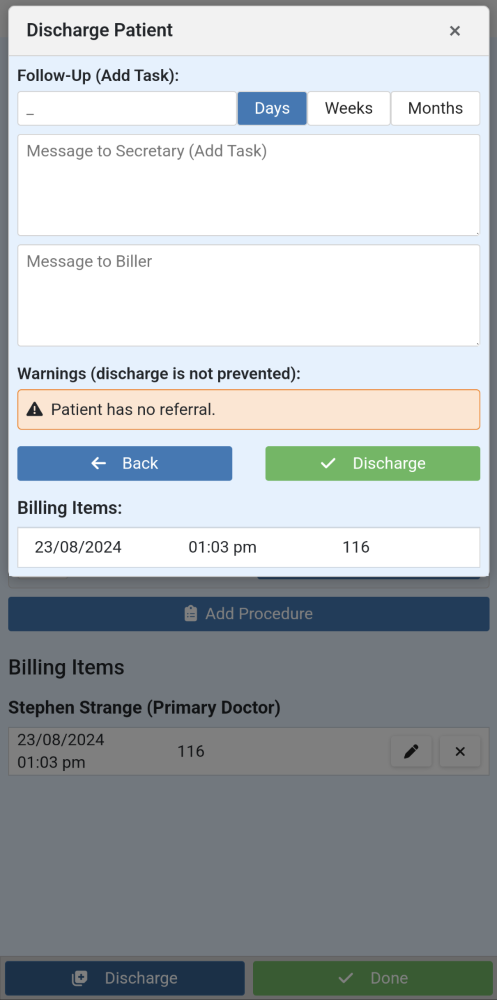
Discharge Patient
Discharging the patient will send the patient billing and other information to HealthTrack.
Follow-up (Add Task): This will add a Task that will begin in the nominated number of days/weeks/months. The Task will simply state that a follow-up is required, and it can be assigned to a User or Group, as nominated in the User Preferences: Billing Settings.
Message to Secretary (Add Task): This will add Task to be started upon the patient’s discharge. The Task allows you to enter a message with any relevant information, and it will be assigned to a User or Group, as nominated in the User Preferences: Billing Settings.
Message to Biller: This message will be displayed to the user processing the incoming billing.
After reviewing the billing, select the Discharge button to send to HealthTrack, or use the Back button to return to the patient.
HealthTrack: Mobile Billing
After a patient is discharged using the Patient Billing app, a user can raise an invoice in Practice Wide > Incoming Billing. Please see the Mobile Billing Transmissions section for more information.
Diary
The Diary app allows a doctor to view bookings within the configuration of their Diary Sync Configuration. Please see the Getting Started section for further information.
The Diary is synchronised overnight, as well as each time a booking is created or changed, ensuring that the view remains up to date.
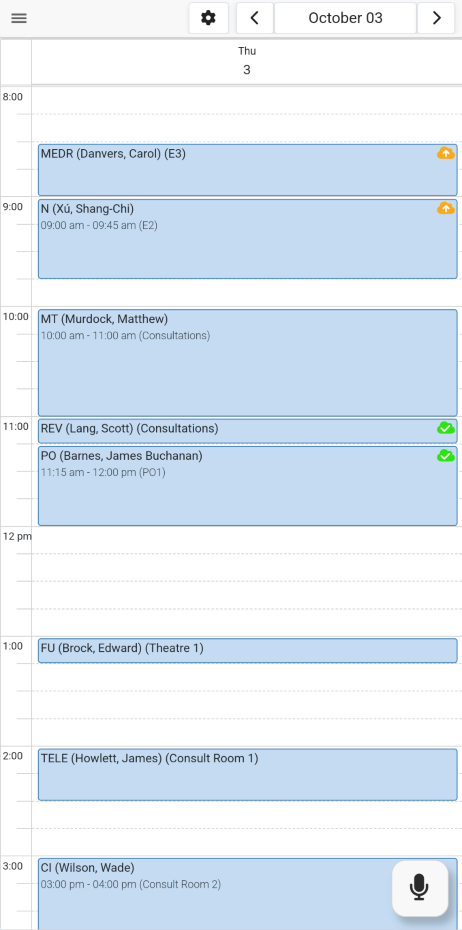
Diary App
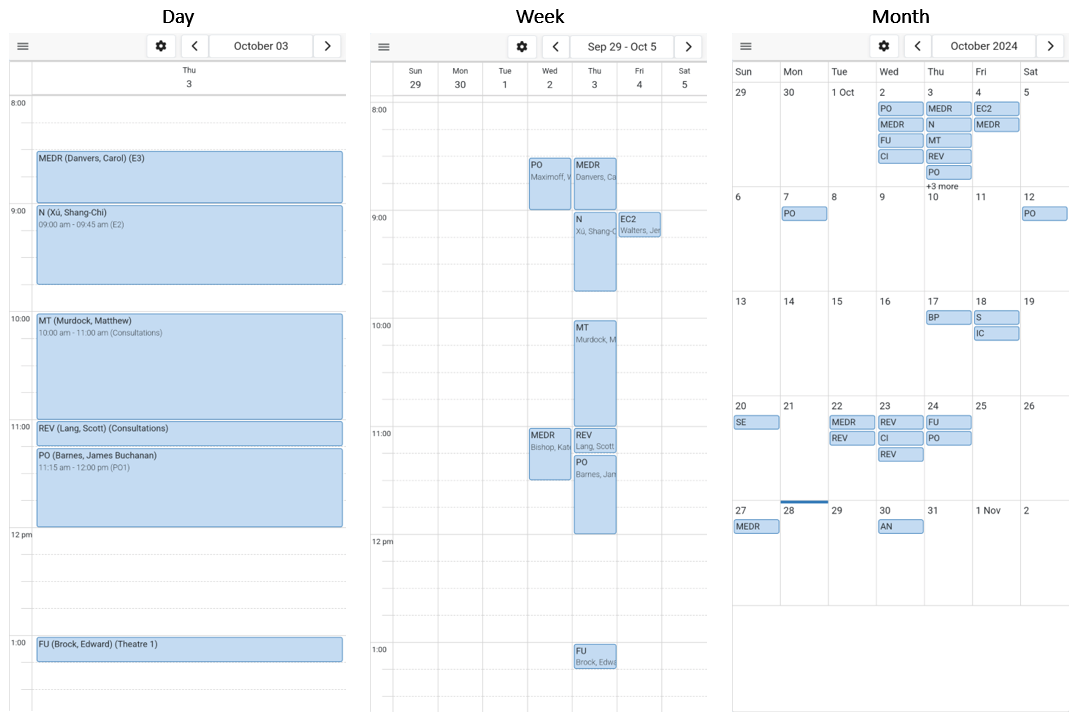
The Diary is intended for users to have visibility of what is booked in their schedule, but does not allow for bookings to be added or changed.
From the Doctor Portal app, you can select the Diary app to view your Diary. This will default to “Day” view, but can be changed between Day, Week, and Month views using the ☰ menu in the top left.
Next to the date, there is a cog button that can be used to adjust the Diary Settings, including the Slot Size and Size Mode. These settings can be used by each user to adjust the Day and Week views in the Diary.

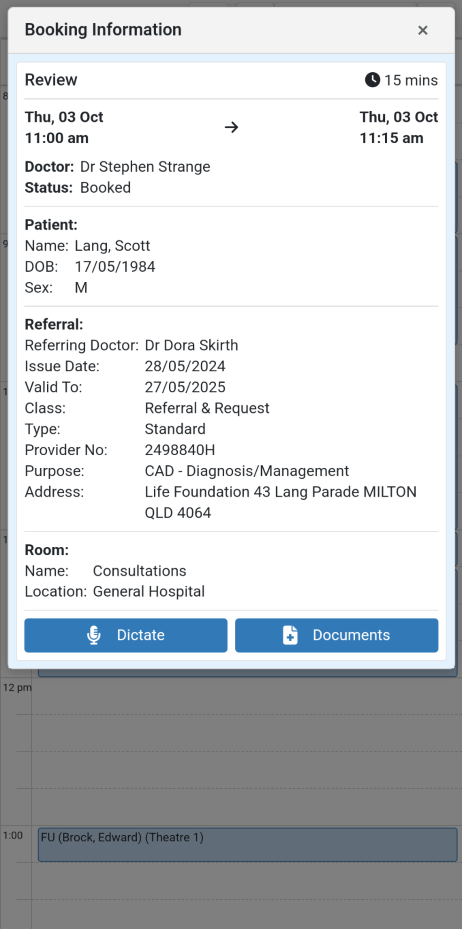
In Day and Week views, you can tap on any individual booking entry to view the details of the patient and their booking. This view can also populate details of the referral selected for the booking, and includes shortcuts to the Dictation or Patient Documents apps for this patient.
In Month view, you can tap on a specific day, which changes to the Day view for the selected date, where you can tap on the individual bookings to view details.
Other Navigation
To return to the HealthTrack Apps screen, select the ☰ icon, then select the Back option.
To return to the current date in the Diary, select the date displayed in the top right of the screen, then select the Today button
At the top of the Diary, the date period in view will be shown. Use the < and > icons to move back or forward a day, month, or week (dependent on the Diary View selected). You can also tap on the date to open a calendar, where you can manually select a date.
When selecting a date manually, you can only navigate to dates within the parameters set in your Diary Sync Configuration (Days Forward and Days Behind). Dates outside of this range will not be selectable.
Diary Sync Configuration
Numerous Diary Sync Configurations can be set up for different purposes. These are commonly configured on a per-doctor basis, allowing each doctor to view the bookings specific to them.
Doctors can also access their Diary Sync Configuration via File > User Preferences > Cloud Details by selecting the View Configuration button.
-
Navigate to Admin > Maintenance > Diary Sync Configuration.
-
Select an existing configuration from the list on the left-hand side of the screen.
-
Select the Edit button.
-
Make the relevant selections for the Location/Room, Booking Type, Doctor, and Booking Status.
-
Tick the Enabled box.
-
Select the Save button.

| Description | This is the name of the configuration, which can be used to identify the purpose of the configuration, e.g. based on a doctor, a location, or a type of booking. |
|---|---|
| Enabled | Ticking this option allows the configuration to be selected in File > User Preferences > Cloud Details. When unticked, all data will be removed from the Doctor Portal. |
| Export Bookings | This option is not relevant for the Doctor Portal. |
| Export Templates | This option is not relevant for the Doctor Portal. |
| Use UTC | This option is not relevant for the Doctor Portal. |
| Export Period: Days Forward | The Days Forward setting determines how far into the future bookings will be available in the Doctor Portal. |
| Export Period: Days Behind | The Days Behind setting determines how far into the past bookings will be available in the Doctor Portal. |
| Calendar Server URL | This option is not relevant for the Doctor Portal. |
| Cloud Calendar | This option is not relevant for the Doctor Portal. |
| Calendar Access URL | This option is not relevant for the Doctor Portal. |
| Calendar Username | This option is not relevant for the Doctor Portal. |
| Calendar Password | This option is not relevant for the Doctor Portal. |
| Calendar Last Exported | This option is not relevant for the Doctor Portal. |
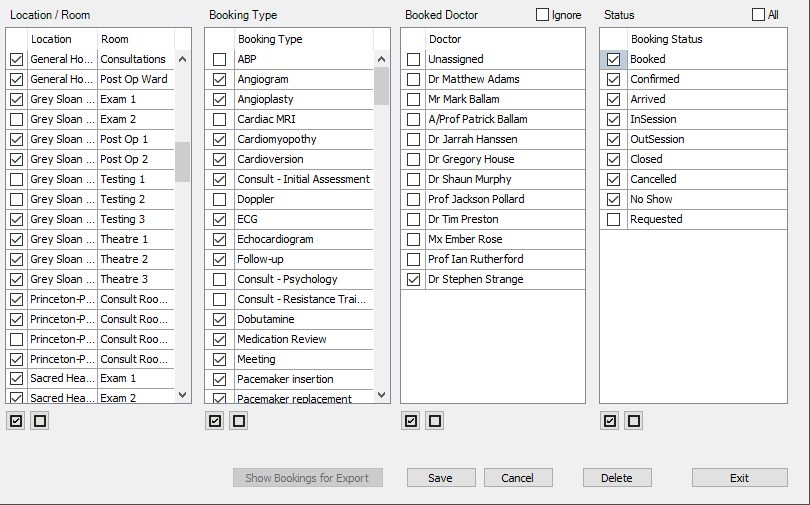
| Location / Room | Tick all Location & Room combinations that may be required for this configuration. Only the bookings that take place in the selected Location & Room will be visible in the Doctor Portal. |
|---|---|
| Booking Type | Tick all Booking Types that are required for this configuration. Only bookings of the selected Booking Types will be visible in the Doctor Portal. |
| Booked Doctor | Tick the Doctors whose bookings should be visible for this configuration. You can also select the Unassigned option to include bookings without a doctor, or choose the Ignore option to make all bookings visible in the Doctor Portal, regardless of the Booked Doctor. |
| Status | Tick the Booking Status options that should be visible for this configuration. Depending on what status options have been selected, doctors may find that bookings appear and disappear from the Doctor Portal as the Booking Status is changed in HealthTrack. |
| Show Bookings for Export | This button will open a Booking Filter Test screen that shows the bookings that would be visible in the Doctor Portal with the current selections. |
| New | Creates a new Diary Sync Configuration. |
| Edit | Edits the selected Diary Sync Configuration. |
| Save | Saves any changes made to the Diary Sync Configuration being created or edited. |
| Cancel | Cancels the changes made to the Diary Sync Configuration being created or edited. |
| Delete | Deletes the selected Diary Sync Configuration. Users will be prompted to confirm that the configuration is to be deleted. |
| Exit | Closes the Diary Sync Configuration screen. |
Dictation
The Dictation app can be used to create a letter that is associated with a patient’s booking in the Diary, or associated with an existing patient in HealthTrack that may not already have a booking.
Once the recordings have been uploaded, HealthTrack uses voice-to-text AI to create the report on the patient’s record.
This feature requires HealthTrack version Dolomites 4.4.6+.
Booking Configuration
The patients available within the Dictation app are based on the Diary Sync Configuration. This means that the same bookings used for the Diary app are also available in the Dictation app. Please see the Diary Sync Configuration section above for details on how to choose booking and location visibility.
Dictation App
 The Dictation app will display a
list of bookings, including the booking date and time, booking type,
patient name, and room. The bookings cannot be added or changed from the
Dictation app.
The Dictation app will display a
list of bookings, including the booking date and time, booking type,
patient name, and room. The bookings cannot be added or changed from the
Dictation app.
From the Doctor Portal app, you can select the Dictation app, which will open to a view much like your Diary app. This will default to “Day” view, but can be changed between Day, Week, and Month views using the ☰ menu in the top left. Please see the Diary App section for more navigation options.
If a dictation is associated with a booking, the booking will display an icon on the right-hand side. For bookings that have an uploaded dictation, a green icon with a tick on the right-hand side of the booking. If the dictation has been recorded, but not yet uploaded, the booking will display an orange icon with an arrow on the right-hand side of the booking. The icons are only visible in Day and Week view. Dictations that are not associated with a booking do not appear in the Diary layout.
Microphone Permissions
In order for the Doctor Portal app to record dictations, you will need to accept permission for the microphone to be used.
Android
The first time you record a dictation on an Android phone, you will be prompted to allow access to your microphone. This access will need to be allowed to proceed with recording. If the microphone permission is declined, you will see a red message indicating you cannot record a dictation until the permissions have been updated. Please see the Google Chrome Help page for Change site settings permissions for instructions on resetting the permissions.
iPhone
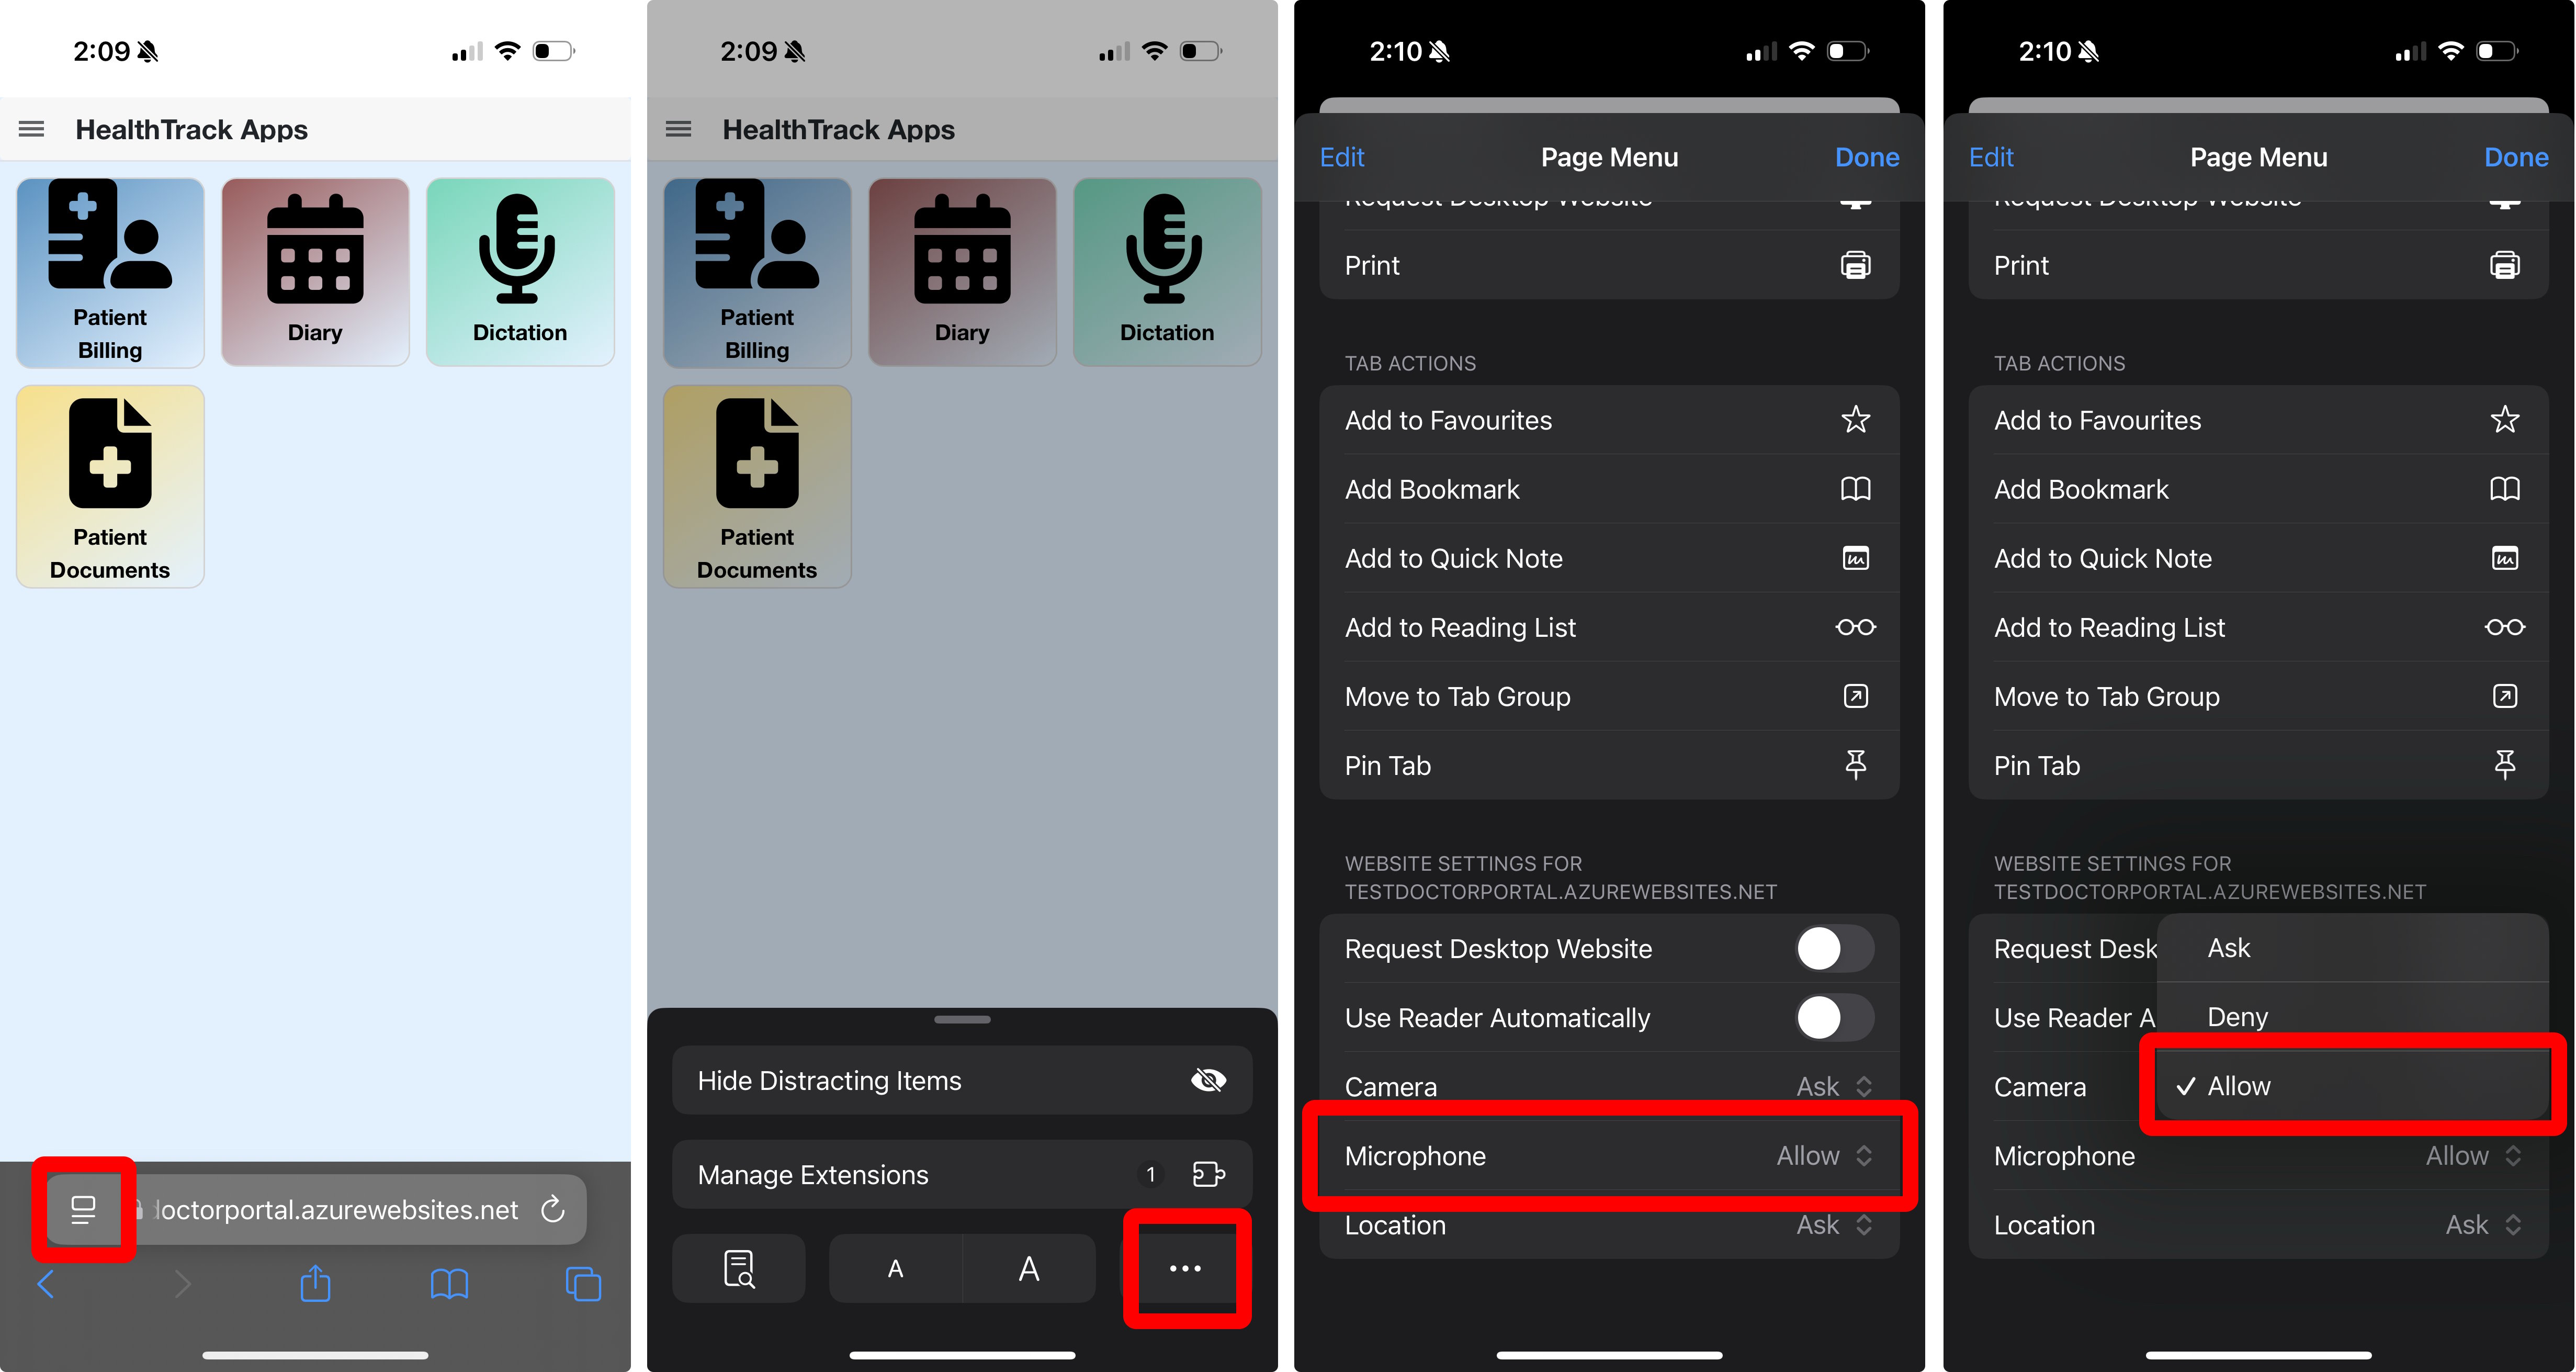
The microphone access permission must be granted to the Doctor Portal app in each session where you record a dictation. If this permission is declined, the Doctor Portal app will not be able to record. If the Doctor Portal app is reloaded you will be prompted to allow microphone access again. You can also configure the site settings in Safari to always allow microphone access to the Doctor Portal app.
-
Open the Doctor Portal in Safari.
-
Tap the Page Settings icon to the left of the URL.
-
Tap the … options button on the bottom right.
-
Locate the Microphone permission setting and change the selection from Ask to Allow.
Computer
If your computer has a microphone, it can be used for dictations by going to the DoctorPortal website.
Recording and Managing Dictations
Numerous recordings can be made for a patient/booking, which are consolidated into a single recording file to create the letter when uploaded to HealthTrack.
To make a recording for a patient with a booking, you can tap on the booking within the Dictation app.
For patients that do not have a booking, you can tap the microphone icon at the bottom right of the screen and select Dictate for Patient to perform a Patient Search. This functionality is available in D4.4.7.
In D4.4.11, you can further specify the Type of letter that should be created at the time of recording your dictation, such as a letter to the patient’s GP or Referring MO, consult or procedure notes, and referrals.
To record a dictation:
-
Select a patient from an existing booking or use the Dictate for Patient option to search for and select an existing patient.
-
Select the Type. The last used option will be selected automatically but can be changed as needed.
-
At the bottom of the screen, tap the red circle for the New button.
-
Begin dictating.
-
Tap the black Pause button to pause dictating.
After selecting the Done button, there are a number of actions you can take.
Listen to a dictation: You can listen to a dictation by tapping on the recording, then selecting the play icon.
| Play | Tap the play button to begin listening to the recording. |
|---|---|
| Start | This button moves the start of the recording. This is useful if you want to play the recording from the start. |
| End | The button moves to the end of the recording. This is useful if you want to continue your dictation from the end of the current recording. |
| - 10 | This button rewinds the recording 10 seconds. |
| + 10 | This button forwards the recording 10 seconds. |
You can use your finger to slide to an appropriate timestamp within the recording.
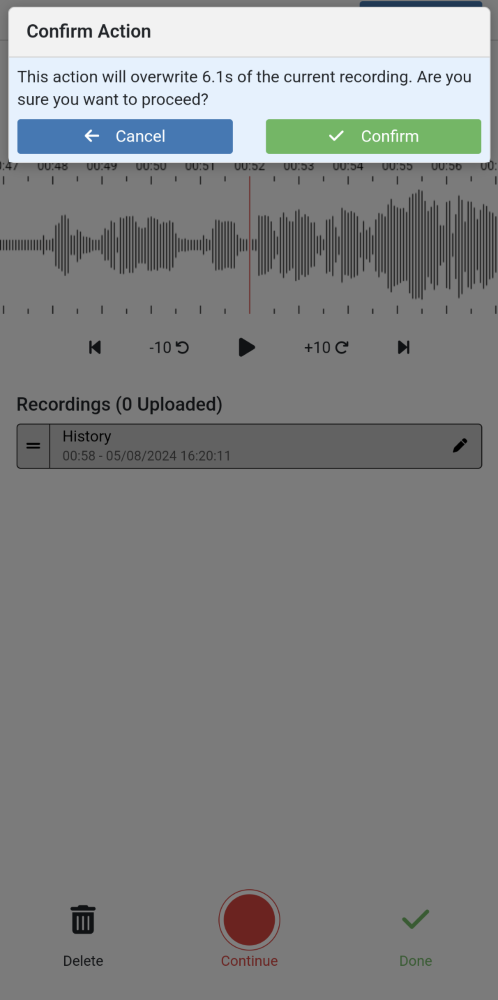
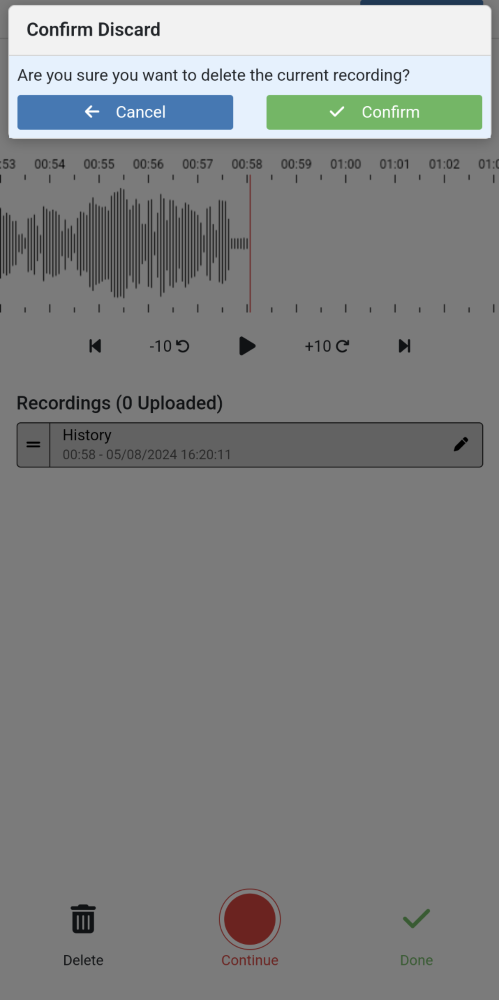
Overwrite a recording: Using the navigation options above, you can navigate to a timestamp within your recording, then select the Continue button to start dictating from that timestamp. You will receive a prompt confirming that you wish to overwrite the recording from the selected timestamp onward.
Record an additional dictation: After selecting the Done button, you can use the New button to record an additional dictation as required.
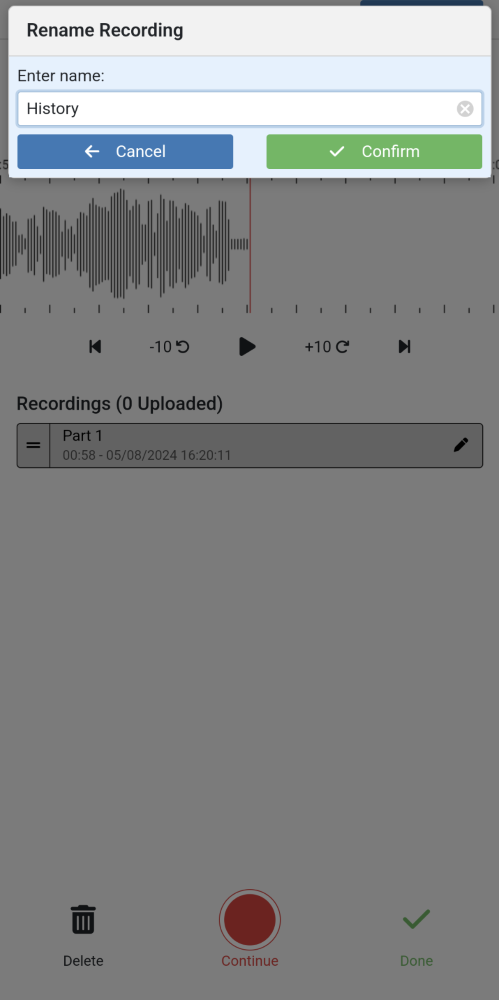
Rename a dictation: By default, each dictation recorded for a single booking are named as Part 1, Part 2, Part 3, and so on, followed by the date and time of the recording. You can rename any recording by tapping the pencil icon against the recording and entering a new name when prompted.
Reorder dictation: If you have recorded numerous dictations for a booking, these recordings can be re-ordered. To change the order, tap and hold on the recording, and drag it up or down to reposition it. Upon uploading to HealthTrack, the recorded parts will be consolidated as a single .mp3 file in the nominated order.
Delete a dictation: To delete a section of a dictation recording, tap on the recording, then select the Delete button in the bottom left of the screen. You will receive a prompt to confirm the deletion of this dictation recording.
Upload your dictation: When you are finished recording your dictation, you can select the Create Letter button from the top right corner. This will upload a single .mp3 file into HealthTrack, where it will be transcribed and a Clinical Record letter created.
Transcriptions
After selecting the Create Letter button in the Dictation app, the recordings associated with the booking are combined into a single .mp3 file and is transcribed in HealthTrack.
Clinical Record Creation
The transcribed dictations will be added to a Clinical Record in HealthTrack. If a Clinical Record already exists for the booking, the transcription will be added to the existing record. If the Clinical Record has not been created for the booking, a new Clinical Record will be created automatically.
If no Clinical Record has been specific for a booking type, the Medical OUT folder will be used by default.
Please contact HealthTrack Support to nominate a specific Clinical Record for each Booking Type.
Audio Player & Attachments
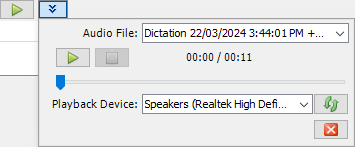
The .mp3 dictation recording will also be available against the Clinical Record, allowing users to play the recording from their computer. When a dictation recording is available, there will be two buttons available at the top right of the Clinical Record.
Play: The play icon can be used to begin playing the dictation recording to the computer’s default speakers. After clicking this icon, the icon will change to display a pause icon, which can be used to stop playing the audio.
Down arrows: The arrows will open/close the drop-down menu, which allows you to choose between different audio file recording and playback devices.
The .mp3 file can also be found in the Attachments tab of the Clinical Record. These dictation recordings will always be added to the Recordings folder as locked files; this means they cannot be moved to another folder. The dictation can be played external to HealthTrack by selecting the Open button. This will open the recording in the default media player on your computer.
Smart Text & Templates
When a Clinical Record is created, a draft report can be generated to include the transcribed dictation by using the Smart Text Tag [[EXT_Transcription Text]]. This tag can be also be configured to populate additional dictation that are uploaded after the original.
Each Type for Clinical Record can have a “public” default template. This default template is used if a provider does not have their own “private” default template configured. Please see the Smart Text and Smart Templates section for configuration.
To update an existing template:
-
Create a new Clinical Record against a test patient.
-
In the Clinical Details tab, choose the relevant “Type” from the drop-down.
-
Select the Report tab.
-
From the top right of the Report tab, select the v next to the Hide Smart Text or Show Smart Text button.
-
Choose the Edit Templates option.
-
In the Smart Text Template Manager, choose your existing template.
-
Select the Edit button.
-
In the location you would like your transcribed dictation to appear, enter the tag [[EXT_Transcription Text]].
-
If this is to be used as a default template, tick the Default box. This will replace any previously nominated default template.
-
If this template is to be the default for a single provider, ensure the Visible To: drop-down has the provider’s name selected.
-
After making all necessary changes, choose the Save button.
-
Select the Close button.
In HealthTrack D4.4.11, the ability to select different letter types when recording a dictation was added. By default, the following configuration will be implemented. Please contact HealthTrack Support if you would like additional configurations.
| Type | HealthTrack Folder | Owner/Approver | Assignee | Status | Distribution Included |
|---|---|---|---|---|---|
| Letter to GP | Medical OUT | Dictating doctor | DM-Typist | Approval Waiting | Yes – Addressed to GP on Demographic screen |
| Letter to Referring MO | Medical OUT | Dictating doctor | DM-Typist | Approval Waiting | Yes – Addressed to Referring MO on selected booking |
| Procedure Notes | Procedures | Dictating doctor | Dictating doctor | Final | No |
Patient Documents
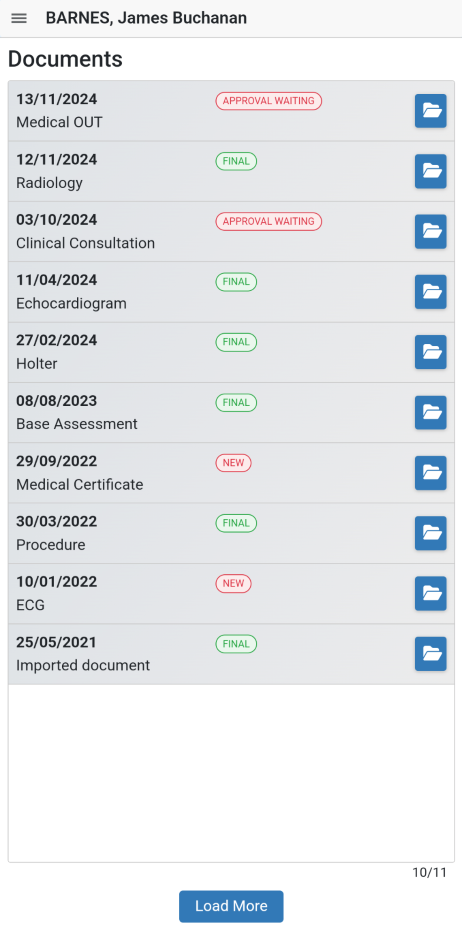
The Patient Documents app allows doctors to view a copy of the records displayed in the patient’s Clinical Records tab. After searching for a patient using the Patient Search, a list of 10 documents will be displayed, with the most recent documents appearing first. If more than 10 documents exist for the patient, a Load More button will be displayed at the bottom of the screen to make another 10 documents available.
From the list of documents, you can select the blue folder icon on the right-hand side of each row to open the record.
After selecting the folder icon to open a document, the document will open in a new window for viewing. In some cases, you may be prompted to allow pop-ups, or need to select the View Document button to open the document. This may differ depending on the type of device or browser in use, as well as the type of document being opened.
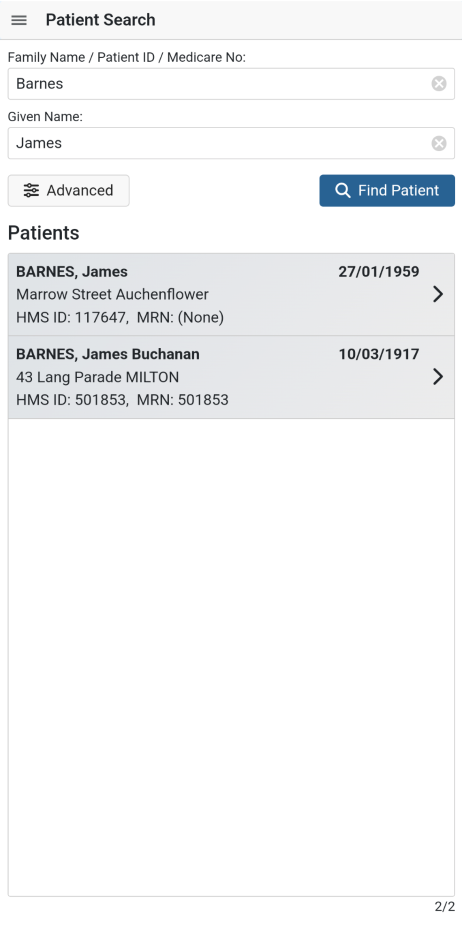
Patient Search
The Dictation and Patient Documents apps include a search feature to locate patients that may not be visible in the Diary. The Patient Search is offered automatically when selecting the Patient Documents app. From the Dictation app, the Patient Search can be accessed by tapping the microphone icon in the bottom right of the Dictation app and selecting Dictate for Patient.
-
In the Patient Search screen, you can search using a patient’s Family Name, Given Name, Patient ID, and/or Medicare Number.
- You can also select the Advanced option to include the patient’s Date of Birth in your search, or to enable the Sounds Like search option.
-
Select the Find Patient button.
-
Tap on the patient you would like to dictate/view documents for.