ePrescribing and Health Identifier Service Setup
ePrescribing
ePrescribing via eRx is available in HealthTrack release Dolomites 4.4.2. This feature is only available to sites that have agreed to transaction services costs (also required for SMS, Fax, ePost and other functionality).
For information on using ePrescribing in HealthTrack, please see the ePrescribing and Health Identifiers Usage page.
Requirements
You will need to obtain all of the details below before you are able to configure ePrescribing in HealthTrack.
-
eRx Entity ID: one required per provider.
-
HealthTrack version 4.4.2: please contact HealthTrack Support if you require a software update.
-
Active MIMS Subscription: please contact HealthTrack Support.
-
NASH Certificate & Personal Identification Code (PIC): one certificate required per HPI-O number used.
-
HPI-I number: one required per provider.
-
HPI-O number: HealthTrack supports a number per location or a single HPI-O number could be used for all locations.
Requirements 4 – 6 may require access to PRODA and HPOS.
Provider Digital Access (PRODA) is an online identity verification and authentication system operated by Services Australia. This system is used to secure the transactions submitted to Services Australia. We recommend sites register with PRODA to link both organisation and providers to connect to the Health Identifiers Service via the Health Professional Online Services (HPOS) application.
Health Professional Online Services (HPOS) is a simple and secure way for eligible providers or organisations to do business with Services Australia online. You can access HPOS using your PRODA account (recommended), or with your PKI site certificate if you already have one.
Useful Links
Services Australia: How to register an organisation for a HPI-O
Services Australia: Register a provider for a HPI-I
Services Australia: Linking individual healthcare providers to your organisation
1. eRx Sign Up & Entity ID
Each provider must be registered with eRx to be able to prescribe electronically in HealthTrack.
eRx will verify each registration with us before providing you with the eRx Entity ID for each provider via email. Please allow 1-3 business days for eRx to process each registration.
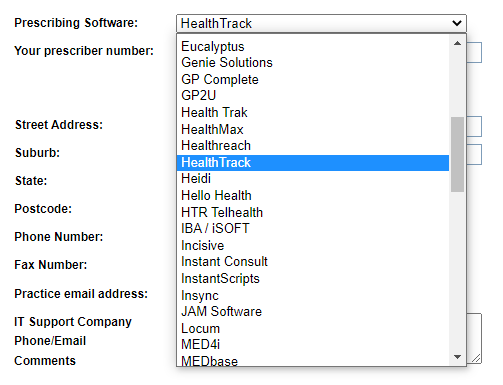
When completing the eRx registration, you will need to nominate a Prescribing Software. You should select “HealthTrack” for this option.
2. HealthTrack Dolomites 4.4.2
You can check your HealthTrack version by navigating to Help > About within HealthTrack. The minimum version required to use ePrescribing is Version 4.4.2.
If you require a HealthTrack update for ePrescribing, please contact HealthTrack Support.
3. MIMS Subscription
Please contact HealthTrack Support to confirm that you have an active MIMS subscription on record.
4. Request a NASH Certificate
HPOS can be used to link an existing certificate to your HPI-O, or to request a new certificate.
Please do not attempt to open/run the downloaded certificate files.
Services Australia: Request a NASH or PKI certificate
This certificate will require a password issued by Services Australia, which may be referred to as a Personal Identification Code (PIC).
5. HPI-I for Providers
Each provider that wishes to use ePrescribing will need to have Healthcare Provider Identifier – Individual (HPI-I).
Services Australia: Register a provider for a HPI-I
6. HPI-O for Organisation
You may need to register your organisation to obtain a Healthcare Provider Identifier – Organisation (HPI-O). Each provider from Section 5 above will need to be linked to the organisation.
Services Australia: How to register an organisation for a HPI-O
Services Australia: Linking individual healthcare providers to your organisation
HealthTrack Configuration
Once you have obtained all of the above requirements, you can proceed to configure ePrescribing in HealthTrack.
1. Location Configuration – Requires NASH Certificate & HPI-O
Before beginning this section, please ensure you have your digital NASH certificate available, as well as the PIC for the certificate (issued by Services Australia). You will also require the HPI-O number.
Steps 4 – 10 are only required for each new certificate you wish to import. If you only have one certificate, these steps are only required for the first location you configure and can be skipped for any additional locations.
-
Navigate to Admin > Locations and Rooms > Locations and Rooms Manager.
-
Select a location from the drop-down menu in the top left corner.
-
Select the Manage HPI-O button in the bottom right corner.
-
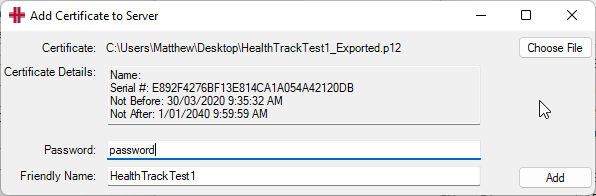
Choose the Add Cert button.
-
 Select the
Choose File
button.
Select the
Choose File
button. -
In the Windows Open screen, locate your NASH certificate and select the Open button.
-
Enter the PIC in the Password field.
- When the correct PIC has been entered, the Certificate Details section will update with Serial # and some dates. You should note the Serial # for Step 11.
-
Nominate a Friendly Name to distinguish this certificate from others (e.g. the location name).
-
Select the Add button.
A message regarding Medicare Root and/or Organisation certificates may appear. This will occur if the current Medicare certificate chain could not be found on the HealthTrack server. These certificates are required for your location certificate to be used for Health Identifiers. Clicking OK will continue with the process and attempt to automatically install the following:
-
Medicare Australia Organisation Certification Authority (Thumbprint 84cf2c51494982a6545c8a24691886aa9cdbfa2d) to Machine Intermediate Certification Authorities
-
Medicare Australia Root Certification Authority (Thumbprint 987736e7cd6f8d876ebd58969d38b37fd32c2270) to Machine Trusted Root Certification Authorities
-
You should receive a prompt advising that the certificate was added successfully. Select the OK button.
-
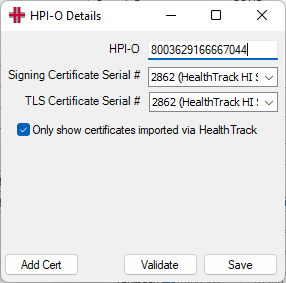
Enter the HPI-O.
-
Select the location’s NASH certificate for both Signing Certificate Serial # and TLS Certificate Serial #.
- If you do not see the location’s certificate, untick the ☑ Only show certificates imported via HealthTrack box. If the certificate is still not listed, it has not been installed on the server.
-
Select the Save button.
- The Validate button will only work once the Certificate Serial # fields have been saved.
-
A message will appear to confirm the details have saved successfully. Select the OK button.
-
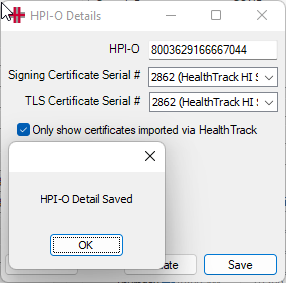 You can now close the HPI-O
Details window. The location has now been configured for the Health
Identifiers service.
You can now close the HPI-O
Details window. The location has now been configured for the Health
Identifiers service.
You can repeat the above steps for any additional locations which you would like to use ePrescribing at. Steps 4 – 10 are only required if you have more than one certificate.
2. Provider Configuration – Requires eRx Entity ID & HPI-I
Before beginning this section, please ensure you have the eRx Entity ID and the HPI-I details for each provider you wish to configure. All users with access to electronically prescribe will require a sufficiently strong password set. This password is used both to access HealthTrack, and again when prescribing Schedule 8 medications. If a password needs to be set, please see Section 3 below.
This section cannot be completed until the Location/s have been configured in the section above.
-
Navigate to Admin > Internal MO > Manage Internal MOs.
-
Select a provider from the dropdown menu in the top left corner.
-
Ensure the provider’s Prescriber No has been entered in the upper right corner.
-
Ensure the Work Ph and Work Fax have been entered (if a contact number should populate on prescriptions).
-
Ensure the provider’s Qualifications have been entered towards the top left.
-
Select the Edit HPI-I Details button in the upper right corner.
-
Enter the provider’s HPI-I.
-
If this is not known, but the provider does have an HPI-I, you can enter the provider’s Date of Birth, and their AHPRA number in the AHPRA Registration No. field. Selecting the Validate button will attempt to identify the provider’s HPI-I, and you will receive a message to advise if the HPI-I was validated successfully or could not be found.
-
If the HPI-I is not able to be found or validated, please ensure the provider’s Given Name and Family Name is complete and corresponds with their PRODA and/or AHPRA registration. You may need to modify the Internal MO record to adjust these details before re-attempting the HPI-I.
-

-
Select the Save button.
- Only the HPI-I will be saved. The Date of Birth and AHPRA Registration No. are only provided to aid in searching for an HPI-I.
-
After saving the HPI-I, you can close this screen.
-
Select the eRx button in the upper right corner.
-
Enter the provider’s eRx Entity ID (supplied by eRx) and choose a Prescriber Type from the drop-down menu. If enabling electronic prescribing for this provider, tick the ☑ Doctor can electronically prescribe box.
- The ☑ Doctor can electronically prescribe box cannot be saved until password requirements are met.
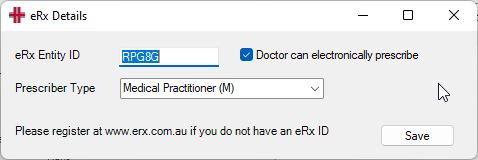
- Select the Save button.
In Western Australia, the current user must be designated an Electronic Prescribing Administrator to enable/disable electronic prescribing for a doctor. Please see the Electronic Prescribing > Administrators > section at the bottom of this page.
3. Password Requirements for Electronic Prescribing Users
Electronic prescribing requires all users with access to electronically prescribe have a sufficiently strong password set. This password is used both to access HealthTrack, and again when prescribing Schedule 8 medications.
This requirement cannot be disabled.
If you need to set or reset your password, this can be done via File > Set Password.
Users that already access HealthTrack with a username and password will need to ensure their password has been reset since February 2022.
Western Australia Only – Electronic Prescribing Administrators
In Western Australia, a user must be specifically designated the role of Electronic Prescribing Administrator to enable/disable electronic prescribing for a provider. This will automatically be enforced by the system when HealthTrack is operating in Western Australia.
To designate a user as an Electronic Prescribing Administrator:
-
Navigate to Admin > Security > Security and Permissions.
-
Find the user you wish to add/remove electronic prescribing access for, and right-click their User ID.
-
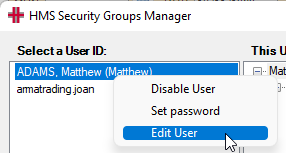 Select the Edit User option.
 -
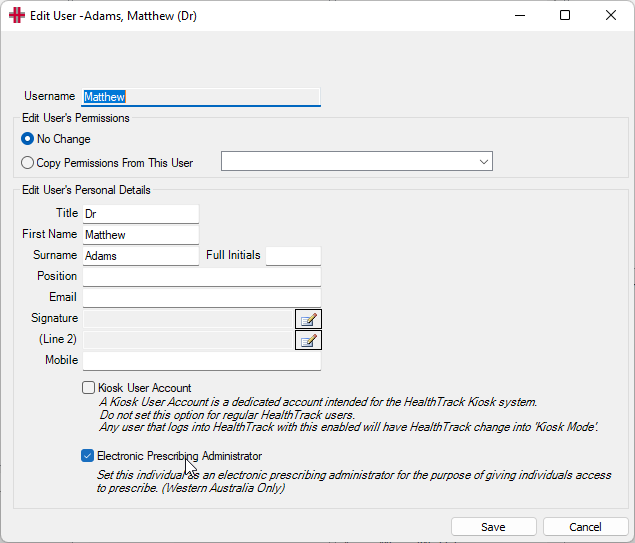
Tick the box for ☑ Electronic Prescribing Administrator.
-
Select the Save button.
This user will now be authorised to fulfil any ePrescribing configuration for providers.