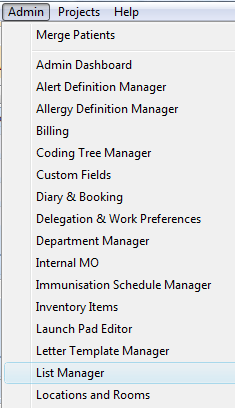
Admin menu
How to add locations and rooms
Health Track allows the user to create new locations and rooms or adjust current rooms and locations. You need to have Locations Modification Access permissions assigned to your user name. This can be done through HMS Security Groups Manager.
To access the Locations and Rooms Manager open the Admin menu and open the Locations and Rooms Manager.
The Locations and Rooms Manager screen is made up of 2 main screens. The left side of the screen is all details relating to the Location. The right of the screen is Room details.
1.0
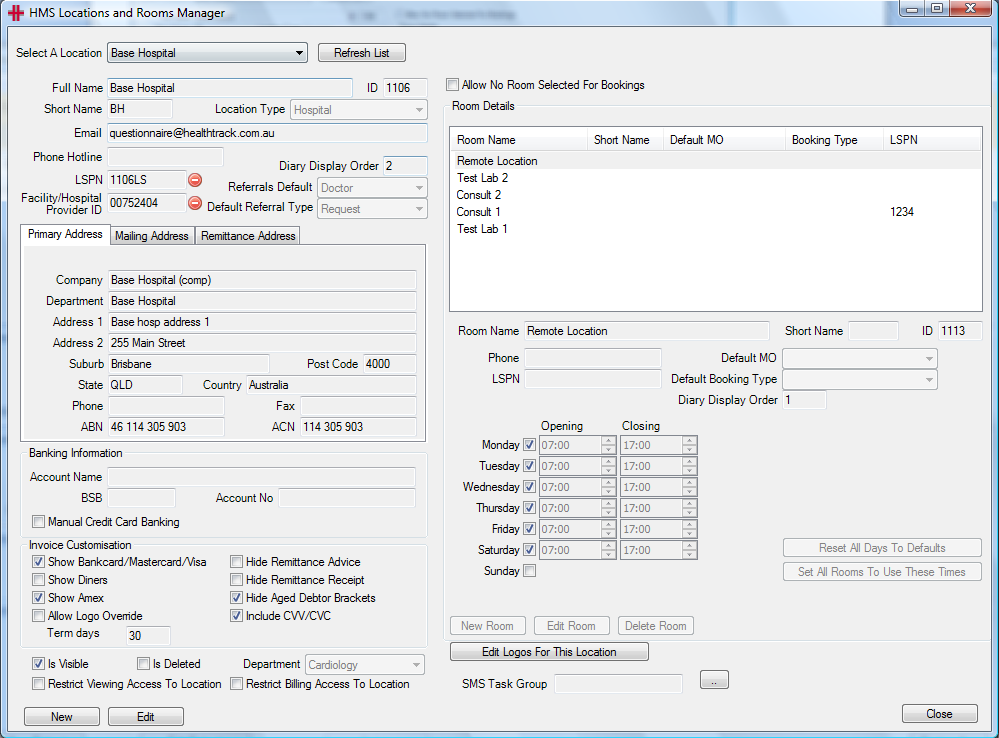
The Location details are broken up into 4 sections (as shown in picture 1.0). Each section can be modified or added by pressing the New or Edit button at the bottom left of the screen.
When adding a New Location the information entered in this screen will determine which address will be listed on documentation created at the location, which bank account to bank the accounts in and the information to appear on any invoices and receipts created at the location.
Once a location is selected it can now be edited. If a location needs to be added, click the Add button at the bottom left of the screen. The new location will appear in the ‘Select A Location’ drop down menu (as shown in picture 1.0) after saving the details.
Below the ‘Select a Location’ drop down menu are the main details of the selected location. Full name, this will be displayed in the Location box where appropriate in HealthTrack. ID number is given to a location by HealthTrack. This happens automatically when a new location is added. The Short Name of the location will appear in the diary.
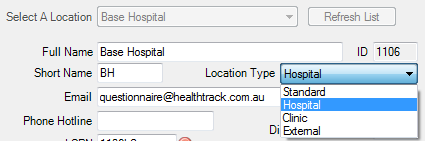
Location Type will drop down a menu asking for selection of the category of the location (as seen in picture 1.1). Location Types have the following characteristics:
| Diary | Billing | Clinics | Hospital lists | Clinical Records | |
|---|---|---|---|---|---|
| Standard | Yes | Yes | Yes | No | Yes |
| Hospital | Yes | Yes | Yes | Yes | Yes |
| Clinic | Yes | Yes | Yes | No | Yes |
| External | No | Yes | No | No | Yes |
1.1
The Diary Display Order is where the user would like the location to appear in the diary. For example if the location was the main location it should appear as number 1. This would mean it would appear first on the ‘Select A Location’ list and it would appear first in the diary when the diary was in ALL modes.
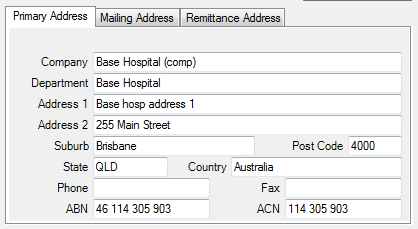
The next section records the address for the location. Primary Address must be entered. Mailing Address is optional. If Primary Address is the same as Mailing Address the Use Primary Address button must be ticked (as shown in picture 1.2).
1.2
The Banking Information section is for the banking details of the location and information displayed on invoices and receipts.
Invoice Customisation provides options to choose the details displayed on the Invoices and Receipts created at this location. To make selections, tick the checkbox next to the item.
Ticking the ‘Is Visible’ checkbox means that the location will be visible throughout HealthTrack.
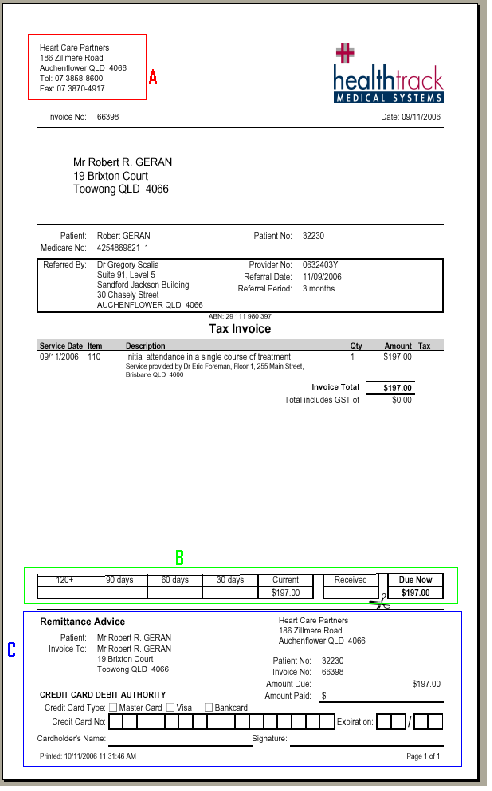
Picture 1.3 is an example of a standard invoice a Practice would use. Highlighted in box A in picture 1.3 is the Practice Address and telephone numbers as shown in picture 1.2.
Highlighted in box B in picture 1.3 is the Aged Debtors Brackets. This option shows the patient how old their debt is, it also shows the age of any other outstanding accounts they might have. This information can be removed from invoices by ticking the ‘Hide Aged Debtors Brackets’ checkbox in the Invoice Customisation section.
In picture 1.3 highlighted in box C is the Remittance Advice. This section is displayed on invoices for the purpose of payments made through the post. This box is made up of patient details, HealthTrack ID number, types of credit cards the practice accepts, credit card number and expiry date boxes and the cardholder’s name and signature line.
To remove this box from showing on Receipts tick the ‘Hide Remittance Receipt’ checkbox.
1.3
1.4

Once a Location has been created, rooms can be added. Click the Edit button and then click the Edit Room or New Room button.
To add a New room to a Location, press New Room (see picture 1.4 box B). Then enter the Room Name e.g. Consult Room, Echo Room (this will be displayed in the Diary and on appointment bookings), Phone number of the Room, Default MO (if applicable), LSPN (Location Specific Practice Number) and Default Booking (if applicable).
The working hours of the room can also be set. To do this tick the days the room will be open and adjust the hours. If the hours are the same everyday the room is open, press Set All Rooms To Use These Times. This will set all rooms to the same opening and closing time. Pressing Reset All Days To Default will change all the times and opening days to a default set in HealthTrack.
After the room details are complete press Save. Now another room can be added or this room can be edited by repeating the same process.
Please note HealthTrack will need to be restarted for the changes to take affect.
Create & Manage Location Sets
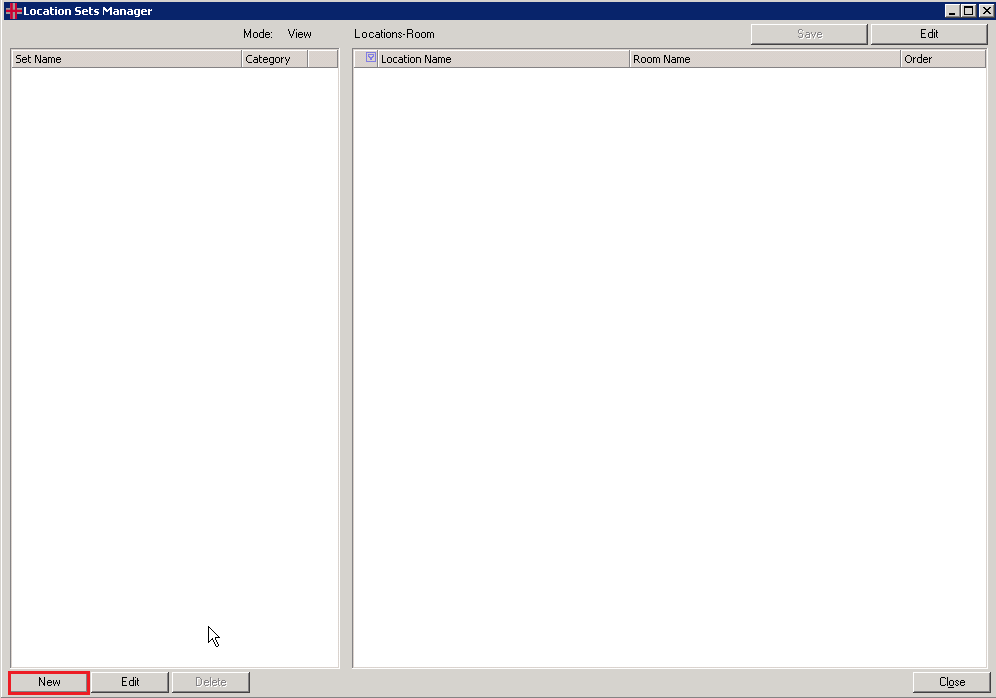
The Location Sets Manager is used to group rooms into a ‘virtual location’ called a location set, to provide a different Diary view of the rooms. This can be used for example to look at all Testing Rooms across multiple sites.
To open the Location Sets Manager, go to the Admin menu >> Locations and Rooms Manager >> Location Sets Manager.
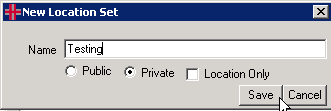
To create a new location set click the New button. Enter a name for the new Location Set and specify if it is Public (everyone can see) or Private (only visible to you). Leave ‘Location Only’ unselected and click the Save button.
The new Location Set will open in Edit mode. A list of the locations and rooms in your HealthTrack system will be displayed. Tick the rooms required in the location set.
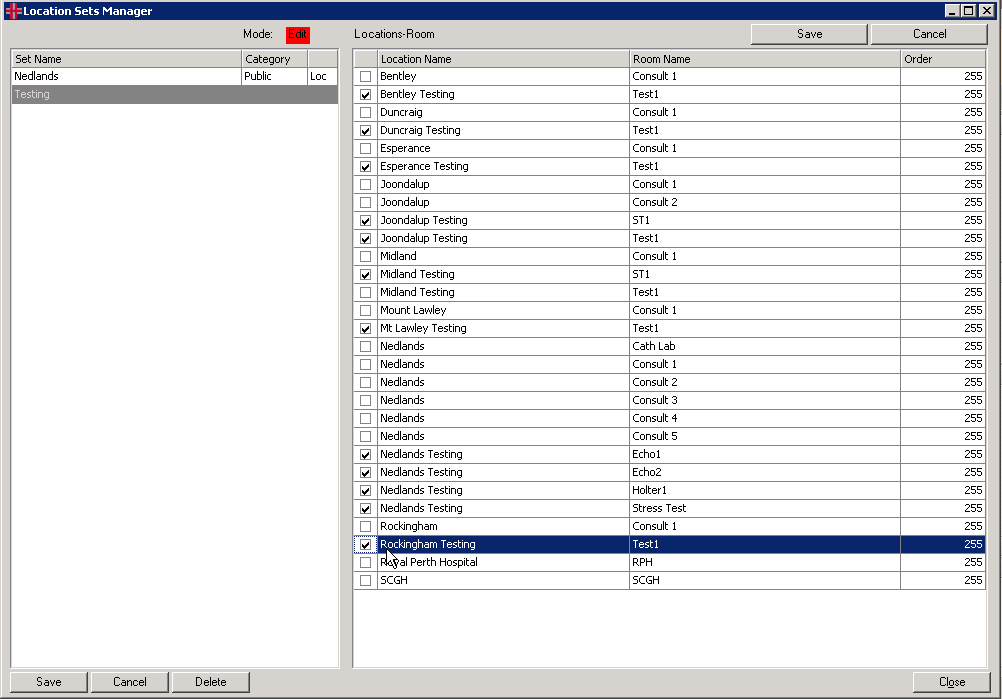
Once complete, click the Save button.
To add more rooms, select the location set from the list on the left and click the Edit button. All rooms will then be displayed on the right in the Locations-Room table, to select additional rooms.
To adjust the location set details e.g. to rename the location set or change the public/private setting, click the Edit button, double click on the location set name, make the required changes and click the Save button.
A HealthTrack restart will be required to view the new location set(s). Location sets can be accessed from the Location drop down box in the Diary.
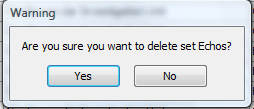
To delete a location set, select the location set from the list on the left and click the Edit button. The Delete button will be activated, click Delete and a confirmation message will appear. Click Yes to proceed.
How to Add Public Holidays
The Public Holidays Manager provides the ability to enter any public holidays in the diary. To open the Public Holidays Manager, open the Admin menu >> Diary & Booking >> Public Holidays.
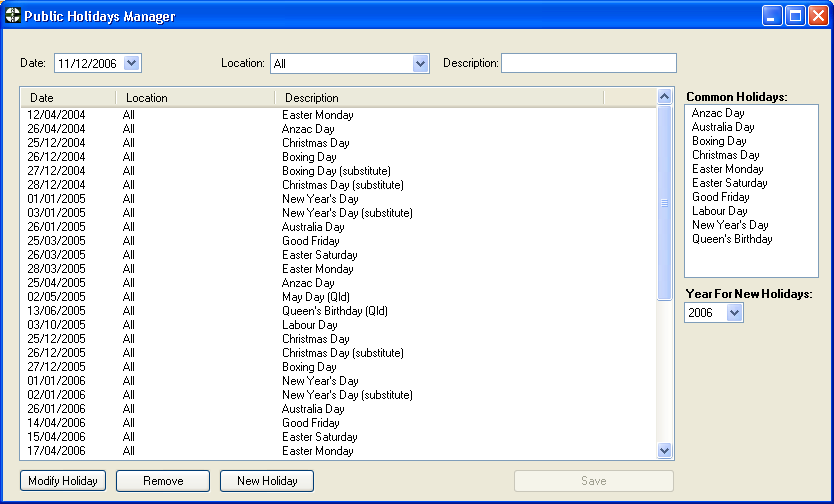
To add a new holiday to the Public Holiday Manager, press
 . Enter the date and the Location
if required, or this can be left as All (this is the default). A
Description of the holiday can be entered or a Common Holiday can be
selected by double clicking it in the Common Holidays table on the
right of the screen. To finish press
. Enter the date and the Location
if required, or this can be left as All (this is the default). A
Description of the holiday can be entered or a Common Holiday can be
selected by double clicking it in the Common Holidays table on the
right of the screen. To finish press
 . The new holiday will be added to
the list of holidays in the table.
. The new holiday will be added to
the list of holidays in the table.
To Remove a Holiday, select the holiday by clicking it. Now press
 and the selected holiday will be
removed from the table and the diary.
and the selected holiday will be
removed from the table and the diary.
To Modify a Holiday, select the holiday by clicking it and press
 . The details of the holiday will
appear in the Date, Location and Description fields at the top of the
screen. Change any or all of the details and when complete press
. The details of the holiday will
appear in the Date, Location and Description fields at the top of the
screen. Change any or all of the details and when complete press
 . This will save the changes.
Please note a HealthTrack restart will be required to view the new public holidays.
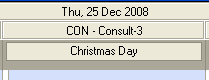
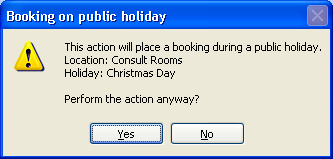
The holiday will appear in the diary with a heading at the top of the day with the name of the holiday. Also when a booking is created on the day a warning will appear to notify that this day is a holiday.
Holiday in the Diary:
Warning Message:
How to add a Booking Type:
Booking types are used to determine the type of appointment that the patient is attending; this may be a specific test such as an echocardiogram or a consult with the doctor. Booking types are used in all aspects of making a booking including templates, find next appointment, the booking form and also booking reports.
Booking types are maintained by individual sites. To add, modify and delete booking types go into the Admin menu >> Diary & Booking >> Booking Types

The top section of the screen contains three check boxes; these check boxes determine what booking types are displayed:
Visible As Booking Type - These booking types can be selected when making bookings.
Visible As Template – These booking types can be used to create booking templates only.
Show All – Shows all booking types.
Refresh List – Refreshes the list of booking types displayed.
The list of Booking Types shows the Short Name, Duration and the Long Name. When you select a booking type the details are displayed in the lower section of the screen.
Booking Type: the unique code for the booking type (this cannot be repeated for multiple booking types)
Short Name: will be displayed in the diary, and in various booking listings throughout HealthTrack
Long Name: will be in the drop down list when creating a booking and in some reports generated by HealthTrack.
Duration: is the default time for the booking (and template)
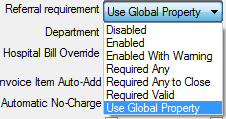
Referral Requirement: if a referral is required for the booking you can specify whether there is a warning or if it is mandatory on closing the booking. Here is the list of options to choose from:
Department: if you have multiple departments set up you can specify which department the booking type is for and then it will be only displayed for that department.
Visible As Booking Type: can be used as a booking type
Visible As Template: can be used as a booking template
Non-Reporting: Not included in booking type reports
Billing Options:
Automatic No Charge: This will close the booking without requiring an invoice to be raised. This could be used for example for a Holter Monitor Off appointment. If the Practice’s policy is that the patient pays when the Holter Monitor is put on then they don’t need to pay when they come to have it taken off, you can have an automatic no charge for the Holter Monitor Off appointment.
GST override: All accounts created for this booking type will have GST included when this check box is ticked.
Associated billing group/item: To specify a default item number or billing group to a booking type which is automatically added to the invoice for that booking.
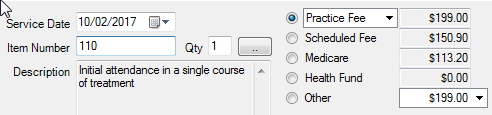
Invoice Item Auto-Add: If an item number has been recorded and this checkbox is ticked then the item number will automatically be added to the invoice. For example for a new patient consult the item number 110 (number entered into Invoice Number field above) is automatically added to the invoice.
Communications (cannot change):
This section cannot be edited on this form you will need to go to Admin – Notification manager to set or modify a email or text reminder for this booking type. Using the **View Notification Rules button you can review the message to send.
Notification Rules Exist: If SMS messages are sent for the booking type then this checkbox will be ticked.
Requires Email: If an email is to be sent out for this booking type then this checkbox will be ticked
Diary Appearance
Colours: You can choose the Text Colour, Background Colour and the Busy Colour for each booking type. When choosing the colours it is best to use the Standard Colour dropdown list. The Busy Colour is the little vertical bar on the left side of the booking. If no colour is selected, the default is navy.
Warning Message: Once a booking has been made this warning message will be displayed.
Once a booking type has been added or modified, you and all users will need to restart HealthTrack immediately to prevent errors occurring in your diary and booking modules. It is highly recommended that any modifications to booking types are completed outside of work hours when staff aren’t using HealthTrack.
Adding an Internal MO / Doctor:
To manage Internal MOs (Medical Officers / Doctors) open the Admin menu >> Internal MOs >> Manage Internal MOs.
From this screen, internal doctors can be added, edited and deleted from the internal doctors list. To view an existing internal doctor, select the Change MO drop down arrow and choose the doctor from the list. Information about the doctor will populate in the fields below.
The Add/Modify Internal Doctors screen is used to edit information for internal doctors in the practice. This information is used for all system features that relate to practicing doctors including the Diary, billing, letters, pathology and clinical records.
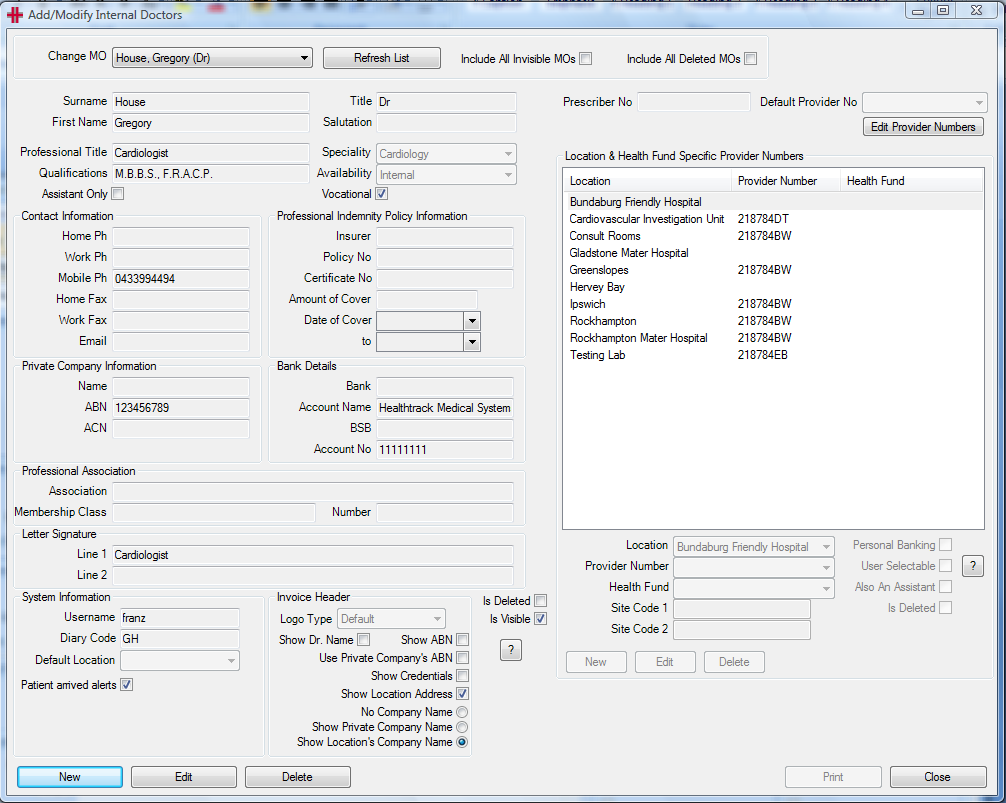
Figure 1 - Add/Modify Internal Doctors
To add a new internal MO, click the New button. This will make all fields available for entering information about the new Medical Officer, starting with Surname and First Name. Other details relating to the MO can be added including contact information, indemnity insurance information and their signature to appear on letters.
User Selectable:
The User Selectable option controls whether this particular location/provider number combination is available when invoicing.
When creating an invoice for a doctor / location, each location/provider number combination with User Selectable turned on will allow that provider number to show up in the invoice’s Provider No list. If User Selectable is switched off for that provider number, then that location must be selected as the Service Location before the provider number will appear.
Turning User Selectable on for provider numbers is usually done if a doctor can bill various different provider numbers when at one specific servicing location.
Personal Banking:
The Personal Banking check box allows the MO to have Personal Banking enabled. When this is ticked any money received for the MO will go into a Personal Account instead of the Practice Account.
When printing the Receipts Listing you’ll have the option of either showing all of your doctors, or only showing those with personal banking enabled.
Invoice Header:
The Invoice Header fields allows the user to determine the Internal Doctor details that will appear on Invoices.
Adding Provider Numbers:
The Edit Provider Numbers button is for capturing all provider numbers for the doctor. This brings ups the Add/Modify Doctor Provider Numbers screen. To add a new provider number click the Add button, type in the provider number and click Save. HealthTrack will validate the provider number and a tick will appear if valid.

Figure 2 - Add Modify Doctor Provider Number
After adding the provider numbers these can be assigned to the specific locations each provider number is for. To do this close the Add/Modify Doctor Provider Numbers screen. On the right hand side of the Internal MOs screen there is a table for the locations that the doctor works at (see Figure 89)
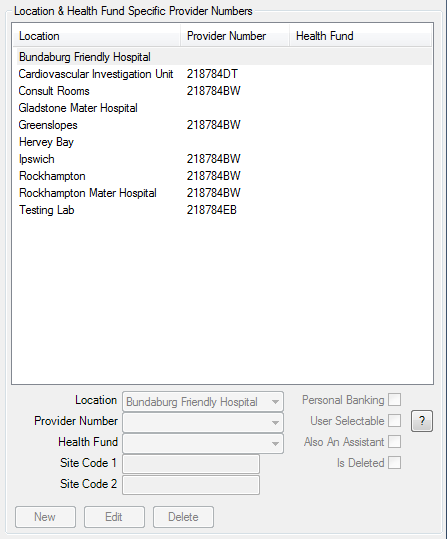
Figure 3 - Locations & Health Fund Specific Provider Numbers
Click the New button to add a new location, choose the Location from the drop down list and select the Provider Number for the location. If there is a specific Health Fund this Provider Number will be used for, select the Health Fund from the drop down list. When finished click Save and a row will appear in the table above.
Complete this for each location the doctor works at. This associates the provider number with the location so the provider number will appear when billing for this location. Once finished click the Save button in the bottom left corner. HealthTrack will need to be restarted for the changes to take affect.
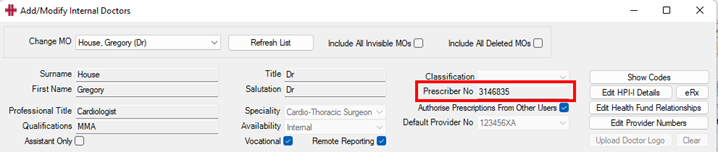
Adding Prescriber Number:
Doctors will require a Prescriber Number entered into their Internal MO profile in order to be able to prescribe through HealthTrack. This can be added by selecting the Edit button and entering the Prescriber Number:
How to add referring MOs (referring Doctors)
Adding or Modifying a Medical Officer’s details can be done a number of
ways in HealthTrack. The Add/Modify Referring MO Details screen can be
opened through the Admin menu >> Referring MO Details. This screen can
also be accessed when managing referrals from the booking form or the
Patient Management tab by clicking

1.0
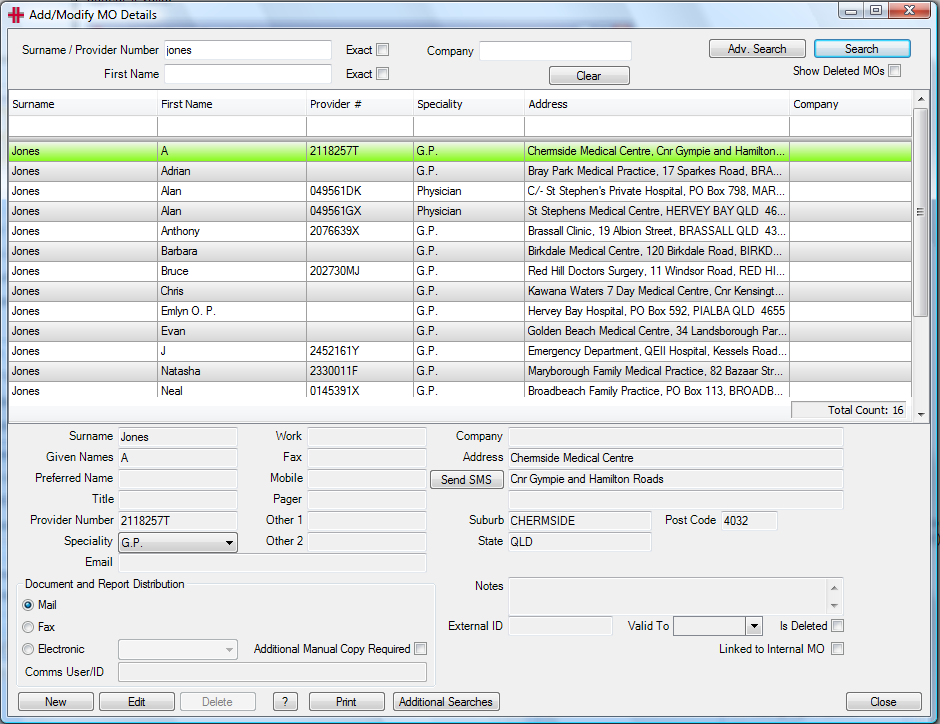
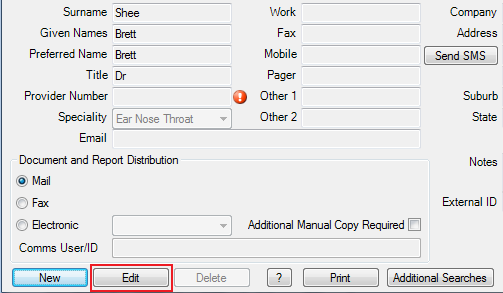
The Add/Modify MO Details window as shown in picture 1.0 can be divided up into 3 sections. The Search section, Results table and MO details.
To search for a MO’s details, type in the surname and firstname into the
fields and press
 . A search can be
performed on Provider Numbers by entering the number into the Surname /
Provider Number field, and also on a Company. The search results will
then be displayed in the table below.
. A search can be
performed on Provider Numbers by entering the number into the Surname /
Provider Number field, and also on a Company. The search results will
then be displayed in the table below.
At the bottom left of the table the Total Count is displayed to show the number of referring doctors that meet the search terms.
The search results can include any Deleted MOs when the Show Deleted MOs checkbox is ticked.
The results table lists MOs details that match the search terms. An MO can be selected by clicking once on the record, the MOs details will now appear below.
The details can be Added or Modified by pressing
 or
or
 . Pressing Edit enables the
fields within box C to change any of the details. If you would like the
MO’s Details not to show in the results table, for instance if this
person is not a practicing MO, tick the Is Deleted checkbox. Once
finished press
. Pressing Edit enables the
fields within box C to change any of the details. If you would like the
MO’s Details not to show in the results table, for instance if this
person is not a practicing MO, tick the Is Deleted checkbox. Once
finished press
 , this will update
the list displayed in the results table and save any modifications.
, this will update
the list displayed in the results table and save any modifications.
Pressing
enables the fields in box
C to enter the MOs details. Ensure a search is completed first to check
that the MO is not already listed. Once finished press
, this will update the list
displayed in the results table.
The
 button next to the doctor’s
mobile number enables you to send an SMS to the doctor (provided that a
valid mobile number is entered).
button next to the doctor’s
mobile number enables you to send an SMS to the doctor (provided that a
valid mobile number is entered).
At the bottom of the screen the
 button provides details of the user
who added and who last modified the referring doctor.
button provides details of the user
who added and who last modified the referring doctor.
The
 button brings up the Print
Labels screen to for example print an envelope label for the Doctor.
button brings up the Print
Labels screen to for example print an envelope label for the Doctor.
The
 button opens the following
window to conduct searches to cleanup any incorrect or missing data for
your referring doctors.
button opens the following
window to conduct searches to cleanup any incorrect or missing data for
your referring doctors.

Click the Display results button next to one of the queries to bring up a list of the referring doctors that meet the query criteria in the Add/Modify MO Details screen.
Distributing Documents to Referring Doctors:
The Document and Report Distribution section is for specifying how the Referring doctor wishes to receive correspondence. There are 3 options – Mail, Fax and Electronic. To send via fax a valid fax number must be entered. To send electronically select the system that the doctor uses from the drop down menu e.g. Medical Objects and enter their Medical Objects User ID into the field. There is also the option to send an additional paper copy if required.
When a document or report is marked as ‘Final’ for sending to the referring doctor, the HealthTrack Distribution system will use the method specified for the doctor and this method will show in the Distribution List.
How to remove duplicate referring MOs (referring Doctors)
To correctly remove a doctor’s details from the list the doctor’s details need to be marked as deleted.
Below is a step by step guide to Remove duplicate doctor’s details:
Step 1
Go to the Admin menu >> Referring MO Details

Step 2
Search for the duplicate Doctor, select the Doctor then press the Edit button. Ensure to choose the Doctor with no details.
**Step 3 **
Tick the ‘Is Deleted’ checkbox and press Save
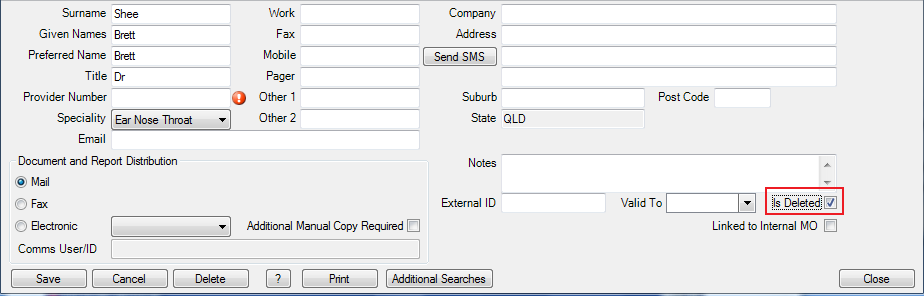
This will not delete the doctor, but remove the doctor from the list so the doctor cannot be selected in the future.
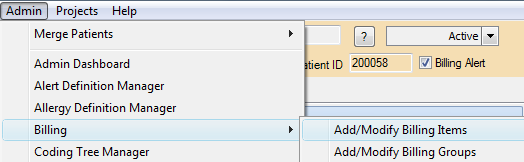
Billing
Add/Modify Billing Items
Add/Modify Billing Items is located in the Admin Menu under Billing. The Add/Modify Billing Items is used to:
-
Add new item numbers (both HIC or non-HIC)
-
Edit an item number
-
Change the practice fee assigned to an item number
-
Change the requirements of an item number e.g. GST, LSPN number required
-
Add an item number into a specific reporting group
-
Update Medicare and Health Fund fees.
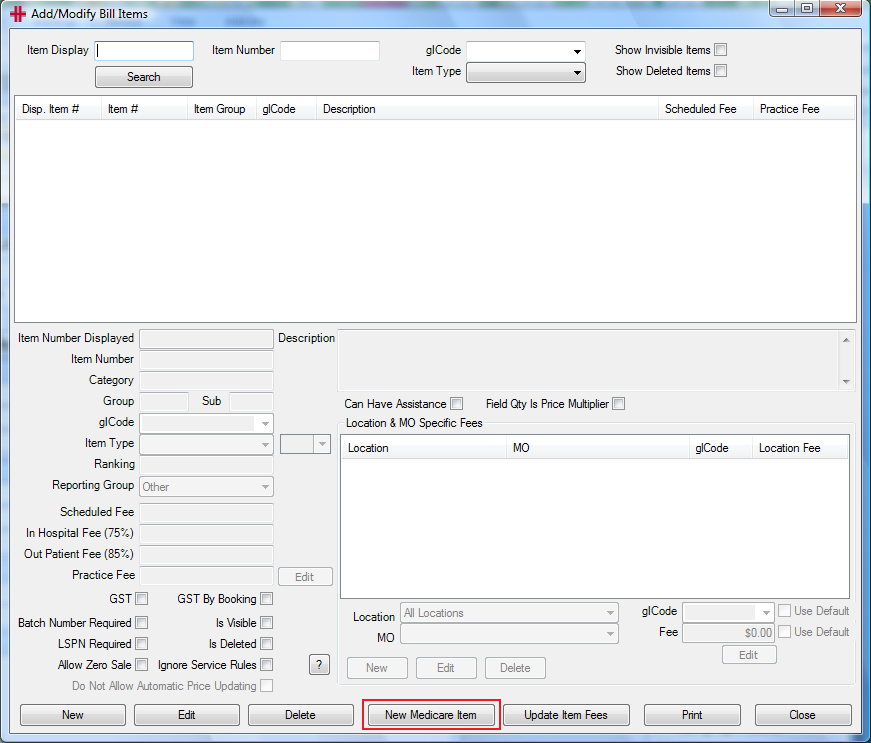
Adding new Item Numbers
Medicare Item
Click on the *New Medicare Item* button and the Add Medicare Item Numbers screen will open, where either a single or multiple Medicare item numbers can be added.
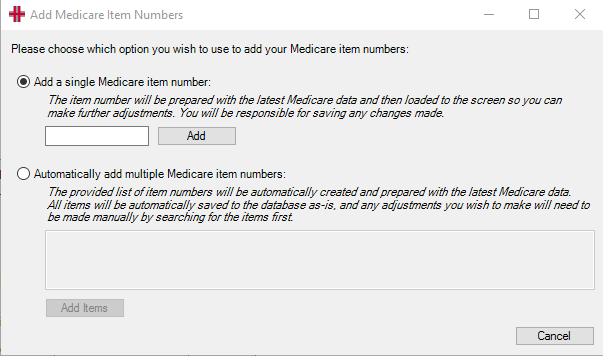
If adding a single item, then insert the item number and select the *Add* button.
The item number’s details from the Medicare schedule will now appear on screen.
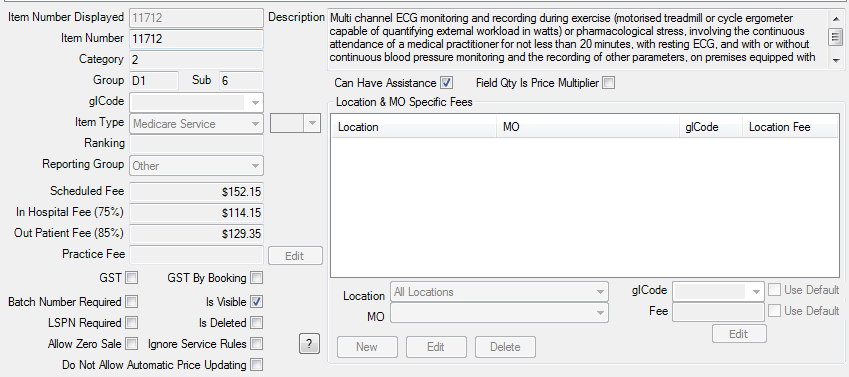
The text in the Description field is printed on the invoice, please review the description and modify if required, especially if the description is lengthy.
There are a number of fields populated from the Medicare Online feed including the Category, Group, Sub, Scheduled Fee, In Hospital Fee (75%) and Out Patient Fee (85%) are determined and populated from the Medicare website.
To reference that website for further information on the item i.e. whether it’s an In Patient only or Surgical item refer to the below link:
http://www.mbsonline.gov.au/internet/mbsonline/publishing.nsf/Content/Home
If adding Multiple item numbers, then select the Automatically add multiple Medicare item numbers radio button and then enter the numbers separated by commas (e.g. 110,116,132).
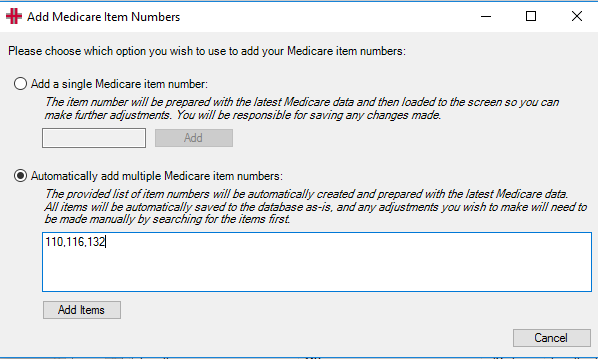
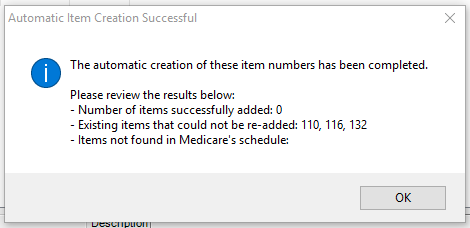
If items are added that are already in the system, then they will not be added and the completion message will advise this.
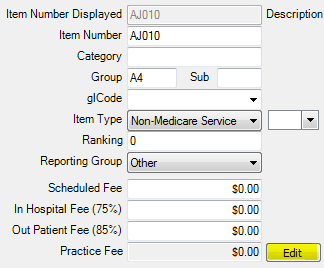
Non – Medicare Item
To add an item number that isn’t a Medicare Item click on the *New* button. When you click on this button the editing section of the screen will become blank ready to enter the new item number. You will need to enter all required information for this item number. When you enter the Item Number Display it will automatically enter this into the Item Number column for you. You can change this if necessary. It is important to select the Item Type: Non-Medicare Service.
Underneath the Practice fee are a number of check box items. Please review these options and check any relevant functions. If the item number requires a LSPN to be recorded for the Medicare rebate please check the tick box, this will ensure that a LSPN is recorded before staff can add it to the invoice.
Edit the Details of an Item Number
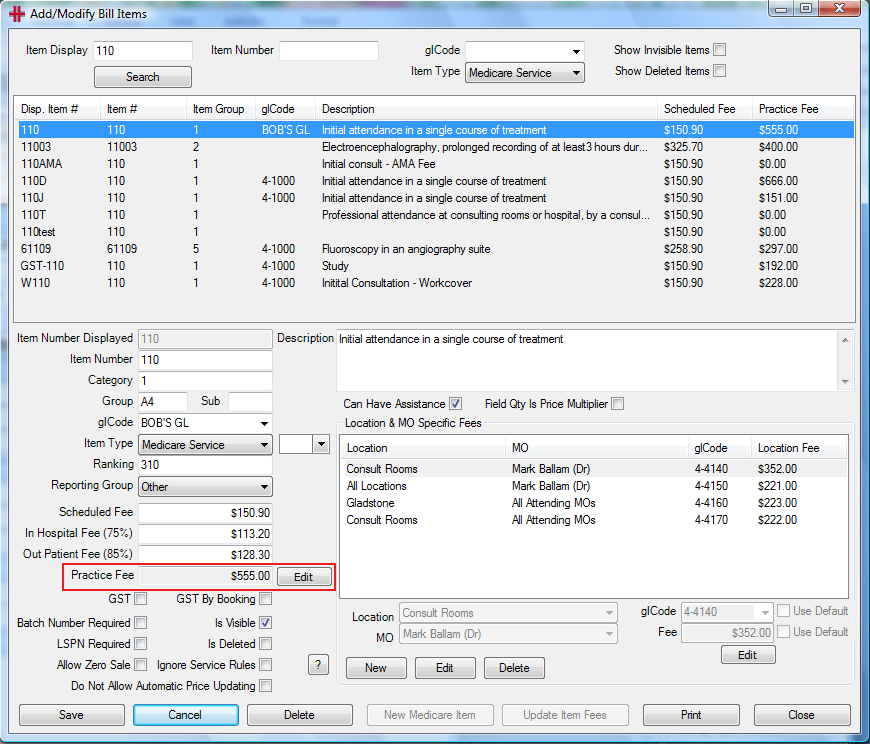
To edit an existing item number, press the Edit button at the bottom left. The Practice Fee field is typically the default price used when invoicing to a patient. This price can be used for all doctors at all locations, or you could add custom prices for different doctors/locations, as required.
To edit the Practice Fee field, press the Edit button next to it. It will open the Practice Fee Management screen:
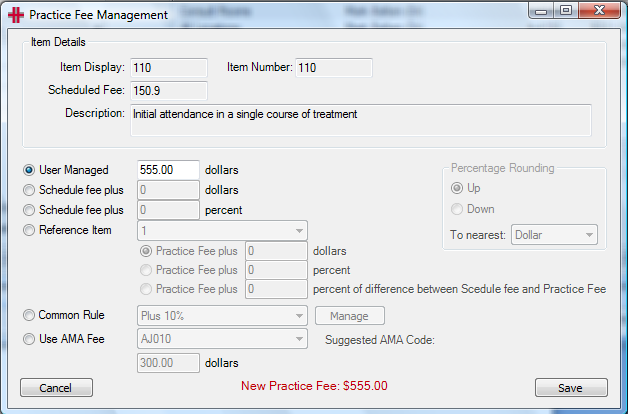
Practice fees can be managed in a number of ways. They could be a fixed fee, that never changes when Medicare’s Schedule Fee changes (User Managed), or they could be based on the Schedule Fee. The screen supports managing a practice fee as the Schedule Fee plus a fixed amount, or plus a percentage. Practice fees can also be derived using a Reference Item, and an additional amount/percent. Once changes have been made to the practice fee, click Save.
If you have Doctors or locations that have different prices to your default Practice Fee, these can be further customised in the “Location and MO Specific Fees” section. Add a new entry with the New button, or select and edit an existing one with the Edit button:
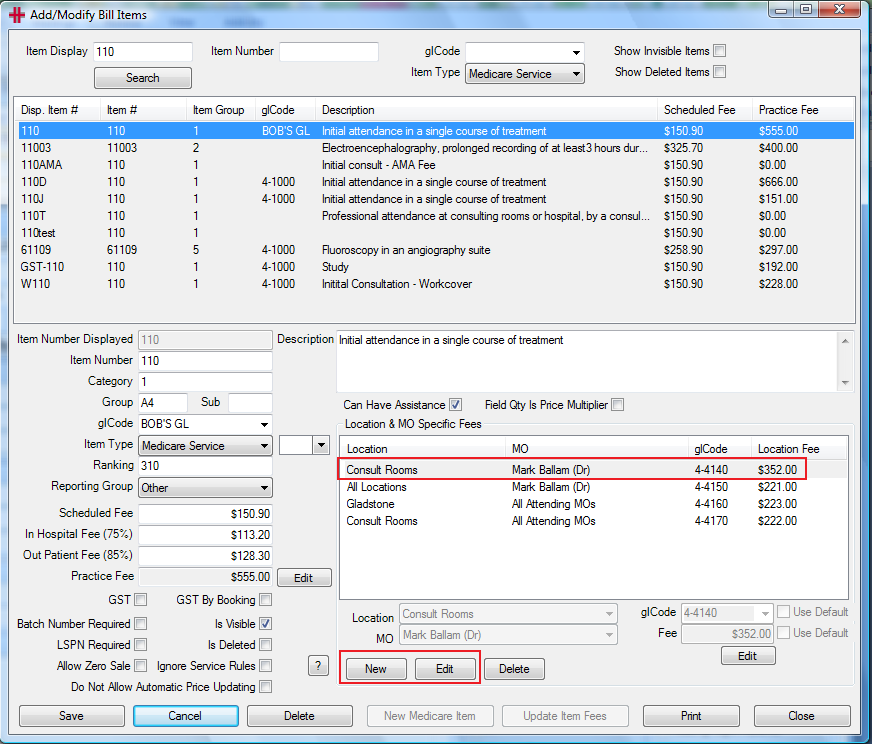
Use the Edit button over to the right side, underneath the “Fee” text box, to create a custom fee.
In the example above you can see that despite the default practice fee for item 110 being $555, if Dr Mark Ballam were to perform this item at Consult Rooms (ie: the invoice’s Service Location and Attending MO were filled out as such) then the fee would instead be $352. If Dr Mark Ballam performed the service at any other location, the fee would instead be $221. This provides a large amount of flexibility in your pricing.
After changing a fee, staff will need to restart HealthTrack to pick up the change.
Setup AMA Fees
Setting up AMA fees is much the same as setting up practice fees. When adding the item in the menu Admin >> Billing >> Add/Modify Billing Items, enter the AMA Code into the Item Number field and Save. Then click the Edit button next to the Practice Fee field.
The Practice Fee Management screen will open. Select “Use AMA Fee” at the bottom of the screen:
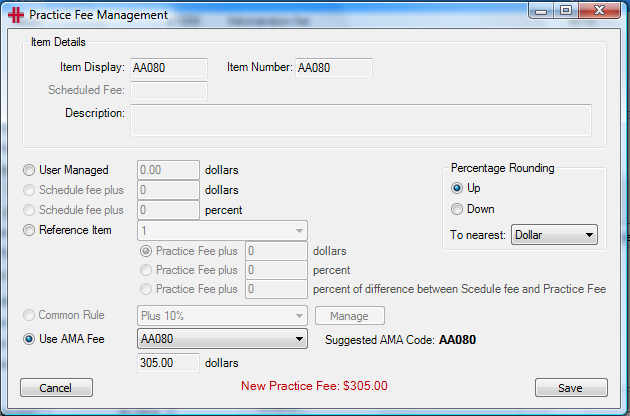
If the AMA Code is recognised, a suggested AMA Code will display along with the dollar amount. This can be changed by selecting a new code from the drop-down list. If the AMA Code is not recognised open the drop-down list to select the code required.
To set the fee click Save to close this screen and then Save the item number.
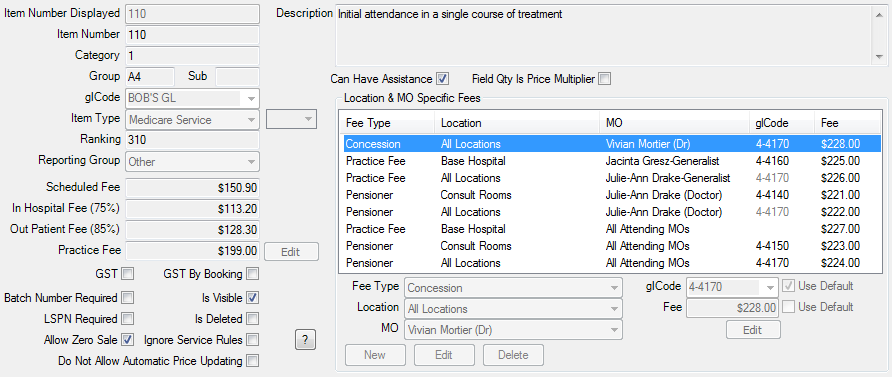
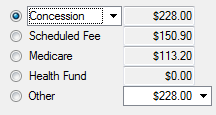
Customisable Price per Billing Class
You can now add override prices for an item number based on the billing class (aka Fee Type).
In the example below the item 110 has a standard practice fee of $199. I have added an override so that if the doctor Vivian Mortier bills a patient at Concession rates the fee will instead be $228.
Different doctors and locations can be set for these different fee types. For Pensioners you’ll find Julie-Ann Drake at Consult rooms charges $221, and any other doctors at Consult Rooms will charge $223. Julie-Ann Drake at any other location other than Consult Rooms charges $222.
The price calculation system is based on the order of priority below:
1. Billing Class, Doctor and Location match
2. Billing Class, Doctor ID match and All Locations
3. Billing Class, Location ID match and All Doctors
4. Billing Class, All Locations and All Doctors
5. Doctor and Location match
6. Doctor ID match and All Locations
7. Location ID match and All Doctors
8. Use item generic practice fee
Default Practice Fee rates for invoicing
When creating a new invoice the Practice Fee radio button contains a list of values containing the Billing Classes from the demographics. Medicare and Schedule Fee are standard, and any additional are site configured e.g. Pensioner and Concession etc.
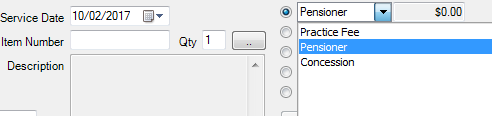
The default selected value is set to the patient’s Billing Class, as per
the Demographic screen.

When you type in an item number it will automatically determine the ‘override’ price for the selected fee type, in this case Pensioner.
You do not need to type in the “110D” or “110P” item numbere, nor do you have to create or maintain separate item numbers for each alternative pricing.

If you decide to bill this patient at a different rate to their default, you can override it by changing the dropdown to a different fee type. E.g.: Concession, or even the standard practice fee for that item:
This is customisable per item, so you can bill one item at concession and a different one at standard price, exactly as you described your doctors sometimes do.
Item number code recognition for alternative pricing
Each alternate billing class / fee type is configured with a short code or suffix that you can use to identify it. The two examples used are C for Concession and P for Pensioner.
When typing in your item number instead of manually choosing the fee type, you’ll use for this 110, you can type in the item number and identifier in the format “110-C” or “110-P”, etc, and it will automatically choose that override fee type for you.
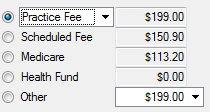
E.g. below. Patient has not had a default billing class set up. Entering in a “110” will bring up the standard pricing for a 110.
Then by adding the ‘-C’, the suffix for Concession, the fee type is selected and the price updated:

If it is changed to a 110-P it then updates to Pensioner:
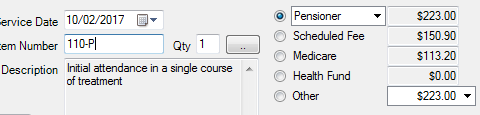
If the doctor/location is changed it will also update the applicable fee:

HealthTrack automatically realises you’re trying to get the concession pricing for a 110 and retrieves that price instead. All of this is automated. You do not need to set up different item numbers such as 110D.
The two configuration steps are:
-
Set up the billing classes you want, such as Discount, and put in the suffix as D via the List Manager.
-
In Add/Modify Bill Items for the item 110 you add in the custom pricing each doctor uses for discount, by selecting “Discount” as the Fee Type, choosing the doctor and the custom price
The invoicing system will now detect that when you type in 110-D you mean the Discount variant pricing, and will automatically determine the price for each doctor/location combo as well.
If you already have item numbers set up that conflict with this suffix those existing item numbers are obeyed first. If you already have added a billing item called 110-D then it will populate when the code is inserted. You will need to delete that item number or choose a different suffix if you wanted to use this system for 110-D.
Provided you don’t already have a 110-D defined in the bill items and you’re using this system it understands that the item you have typed in is still a 110 and the suffix D is just asking for “discount pricing instead”. When you add the item to the invoice it will be added as 110, with 110 description, and will show up in your Item Fees Report as a 110
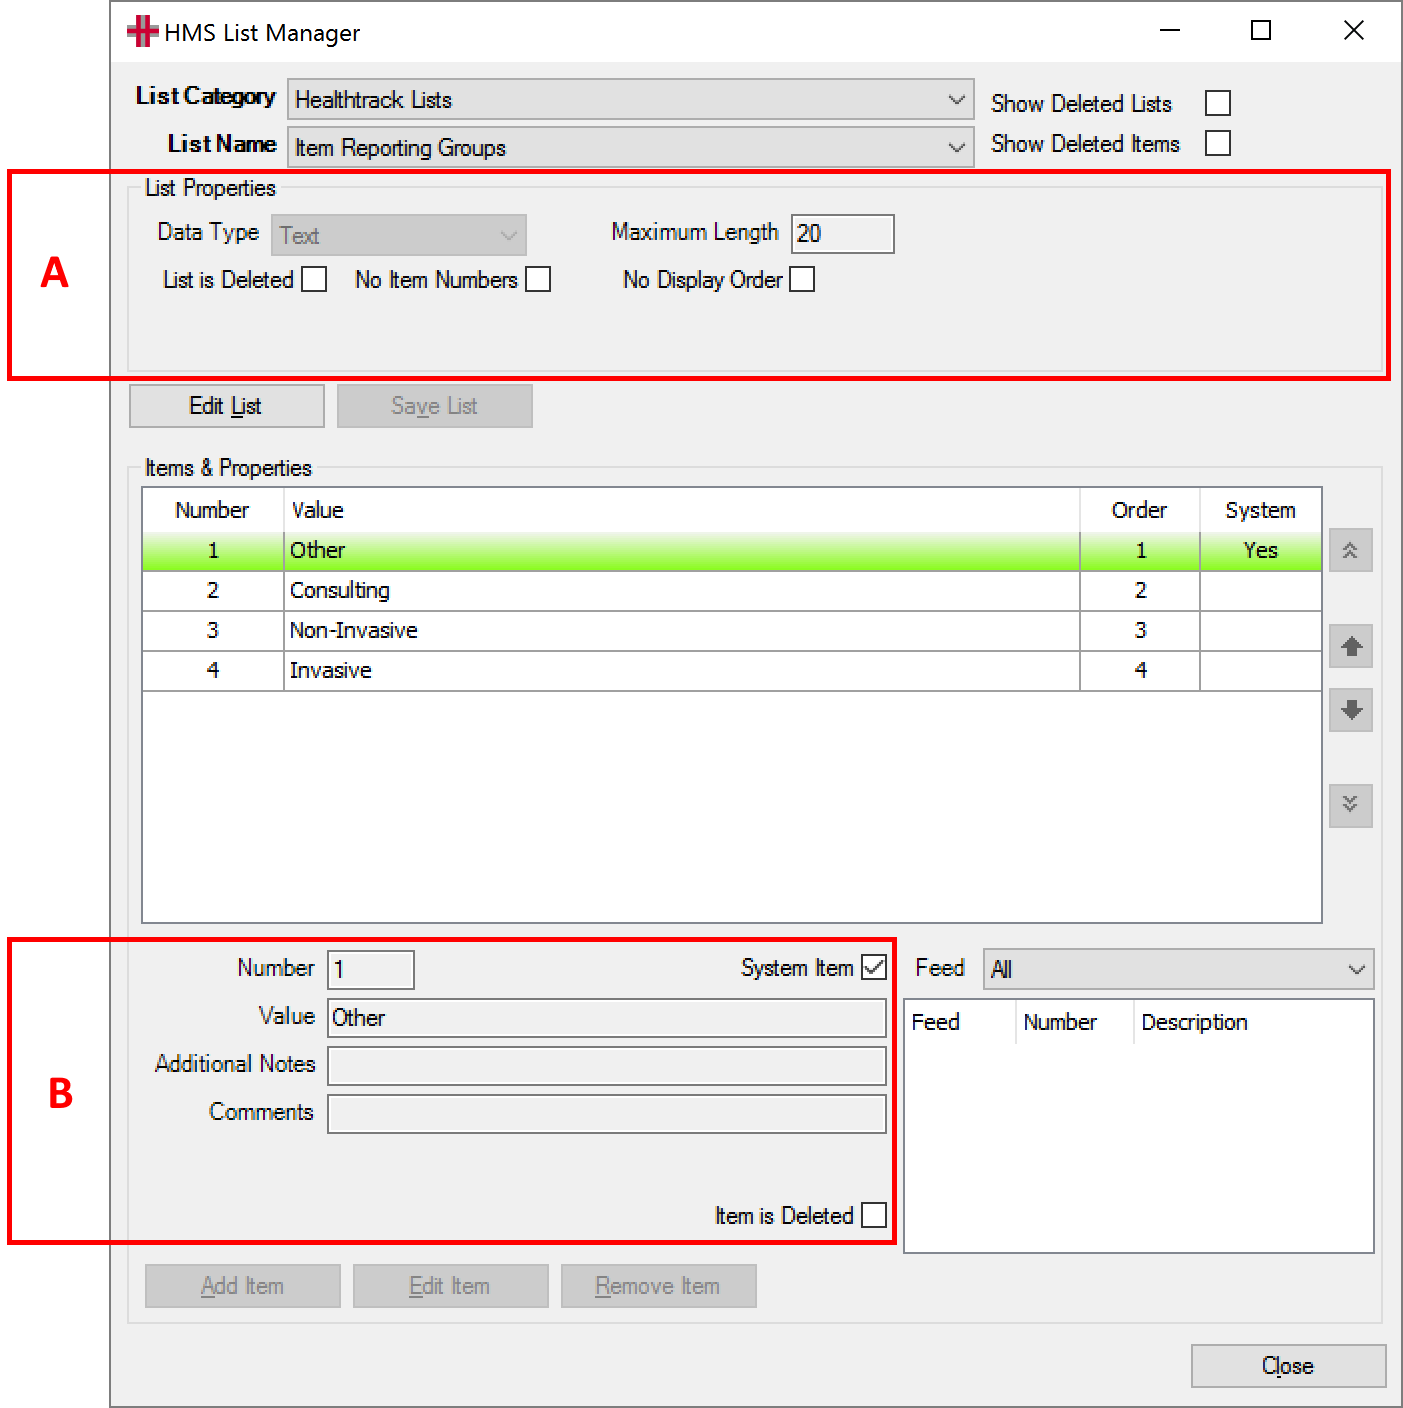
Add an Item Number to a Report Group
What is a report group? A report groups allows you to group together a set of item numbers to use in reports. An item number can only be assigned to one group. For example, if you wanted to run an Items and Fees report on all consults that have been performed for the last month, if you were to do this per item number you would need to repeat this report for each item number and then total them. However, if you created a Consult group then you could run this report on report group instead of item numbers and HealthTrack will combine the results for you.
The first step is to set up your report groups. The report groups are set up in the List Manager and can be accessed two ways:
- Admin >> List Manager select ‘HealthTrack Lists’ and ‘Item Reporting Group’
- Admin >> Billing >> Add/Modify Billing Items go to Edit an item number then right click on the Report Group drop down arrow and select Edit List Contents
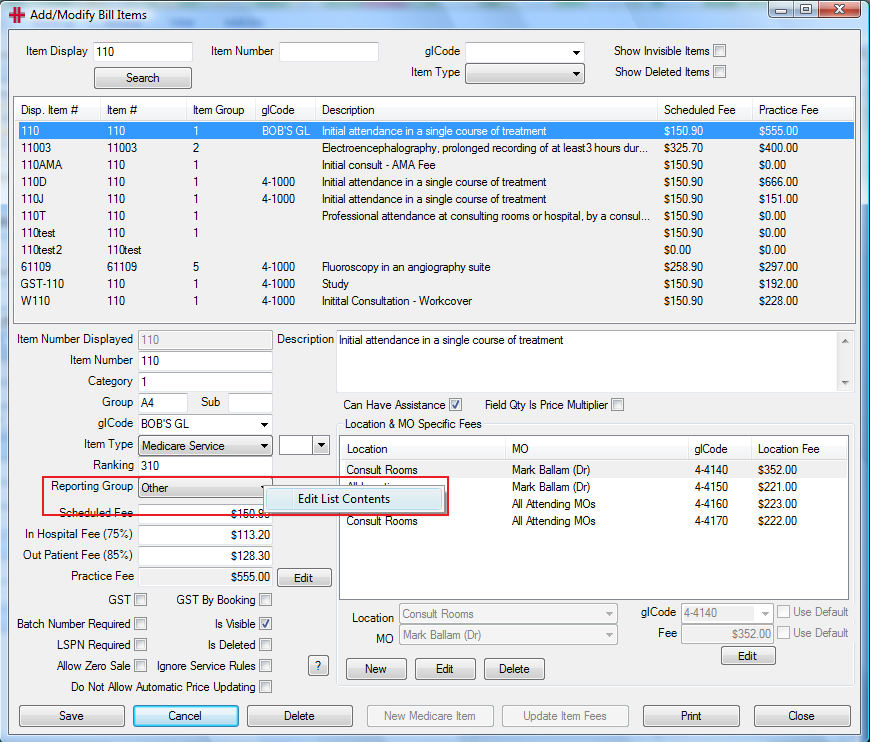
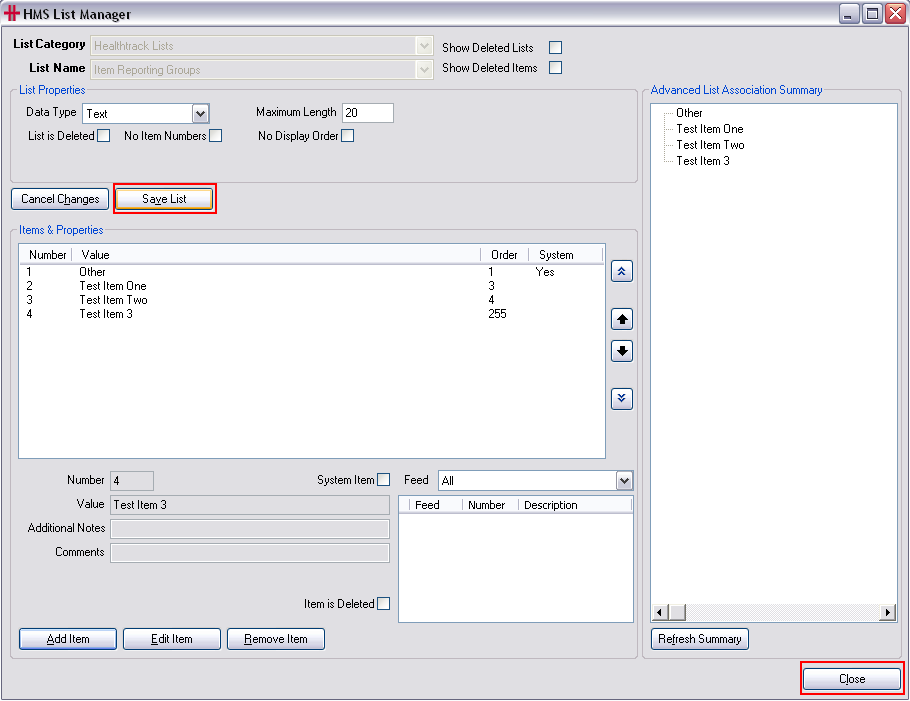
Edit the list to add the groups required. (Figure 4 - Items Reporting Groups List Manager)
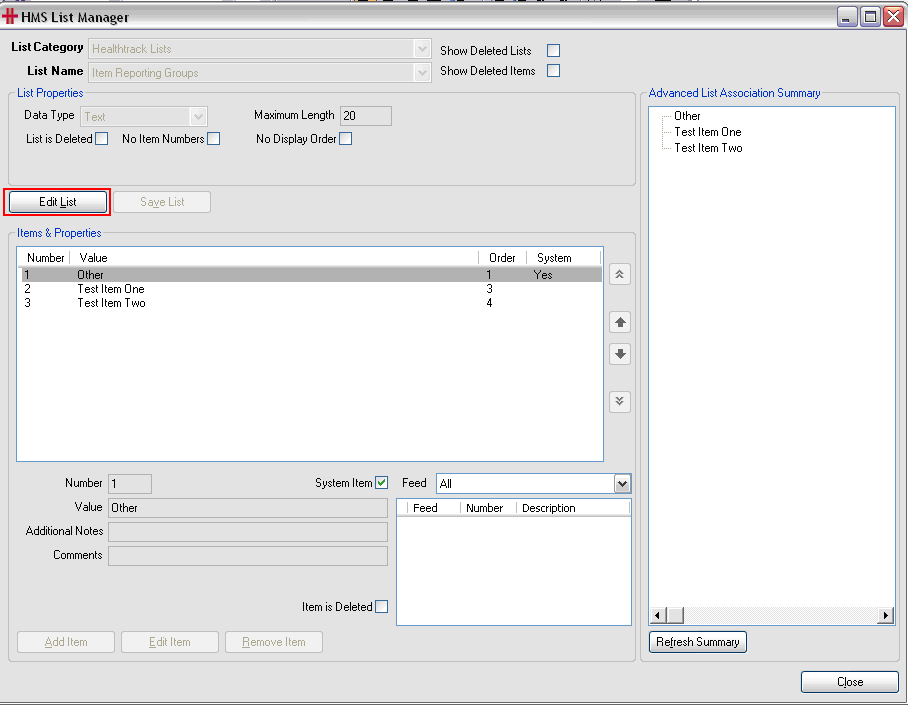
Figure 4 - Items Reporting Groups List Manager
To make any changes to this list you must first click the Edit List button (Figure 4 - Items Reporting Groups List Manager) this will activate the list for editing:
-
EDIT an existing group by selecting the group and clicking Edit Item. Make the required changes and click *Save Item. *
-
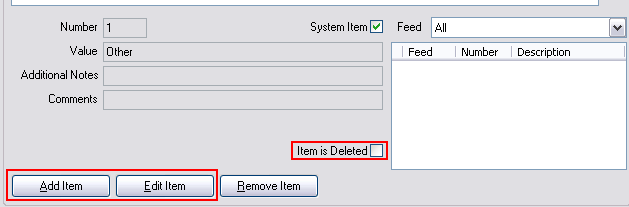
ADD an item by clicking Add Item then enter the new group into the Value field. You can add Additional Notes and Comments if required. Once completed click Save Item.
-
DELETE an item by clicking Edit and check the ‘Item is Deleted’ checkbox. This will keep the item in the back ground to reference any previous data which may have been assigned to it but it will no longer show in the options list.
-
ORDER - to order your list, right click on the item in the display table and select Change Display Order
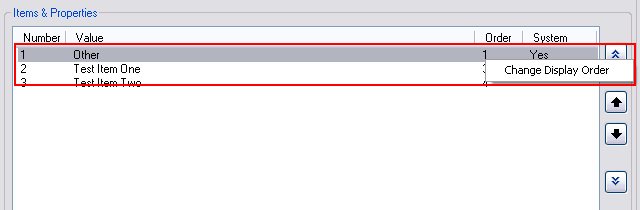
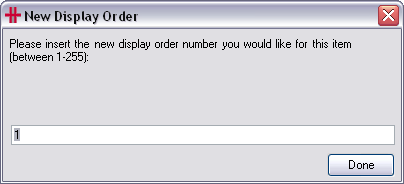
The New Display Order screen will be displayed. Enter the display number then click Done to save your changes. It is recommended to have the display intervals with a difference of at least 5 to allow for easy additions of new groups into your list. For example the display order would be 5, 10, 15, 20 etc.
Now that you have created your new report group and updated the list click Save List prior to closing the form. This will save the entire listing including any ordering changes made.
HealthTrack will need to be restarted to activate this list. After restarting in Add/Modify Billing Items select the new report groups. Search for the item to add to the group, select the item and click Edit. Go to the Reporting Group Field and select the group the item number is to be part of.
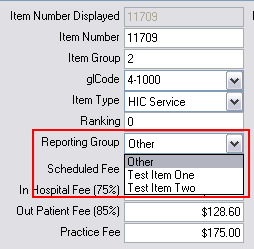
Once the Reporting Group is selected click Save. Repeat this process for all item numbers to be assigned to the reporting group(s). Once finished, you will need to restart HealthTrack to activate these changes. The report groups can then be used when generating reports. An example of this is in the Items and Fees Report.
Update Medicare and Health Fund Fees
As the new Medicare and Health Fund Fees become available HealthTrack will enter these into the system a couple of days prior to the effective date. The new fees will be available for you to update in HealthTrack as of the effective date. Updating the fees can be completed at anytime by following the steps outlined below.
When should this update be completed? There are two options as to the timing of the update and it is up to each practice as to when they wish to run the update.
- Update Completed On Effective Date:
If you update before business or during the morning of the effective date this will ensure that all consults from the effective date are charged at the new rate. However if there are outstanding accounts when the fees are updated then these accounts will be charged at the new rate. Though when the account is paid by Medicare/Health Funds they will adjust this and pay the account at the correct rate. This will require an adjustment to be performed in HealthTrack. Please Note – there may be more adjustments in month of the update due to these fee changes.
- **Update Completed Post Effective Date: **
If you refrain from updating the fees until all outstanding accounts have been invoiced this will ensure that all outstanding accounts will be invoiced at the correct rate and adjustments will not be required. However any consults performed from the effective date until the update has been completed will be charged at the old (lower) rate and this will not be adjusted by Medicare/Health Funds.
Please Note: The update can be run at anytime of the day and only needs to be run once per practice. It is important to ensure that each user restarts HealthTrack after the update has been completed to gain access to the new fees.
Updating your Medicare/Health Fund Fee Schedule:
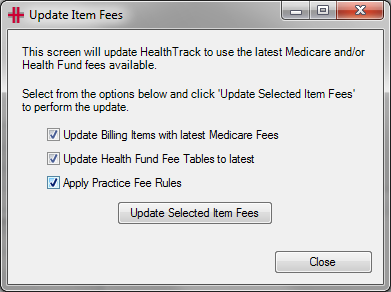
Select Admin >> Billing >> Add/Modify Billing Items
Click on Update Item Fees

A selection box will become available, select the Items you want updated and click on Update Selected Item Fees. There are options to update Medicare, Health Fund and Practice fees. You can select one or any combination of these to run. The Practice Fee is only needed if you use rules to calculate your Practice fee. If you are using the ‘User Managed’ option for your Practice Fees then you will not need to select ‘Apply Practice Fee Rules’ (please note if you select this and don’t have any rules it will not have any affect on your practice fees they will stay as is).
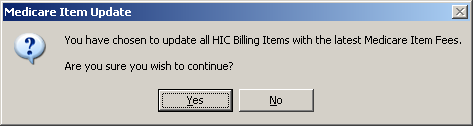
Medicare Item Fees:
A confirmation box will appear asking you to confirm the Medicare update
The update will then run and a message will appear once completed

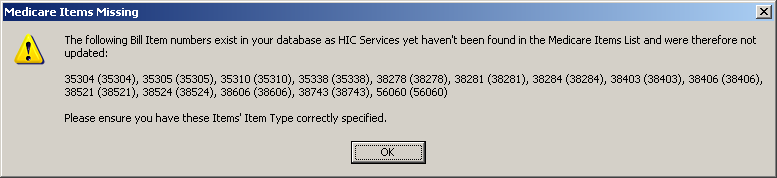
If there are any item numbers in your system recorded as a HIC Service but these aren’t in the Medicare Item List an information window will appear outlining these item numbers.
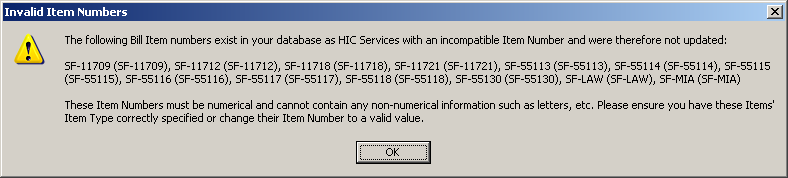
If there are any item numbers flagged as a HIC Service but which contain non-numeric characters in the code then they will be displayed in an information window as they are not HIC compatible item numbers and should be edited.
(If you only chose to update Medicare, restart HealthTrack to gain access to the new fees)
Health Fund Item Fees:
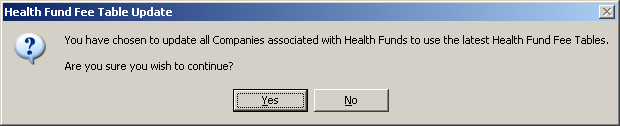
If you selected to update both Medicare and Health Funds or you chose only to update Health Funds then you will then get the following confirmation box to update the Health Fund Fees
An information box will appear once the update has been completed

Once this process has been completed restart HealthTrack to activate the update.
Ensure that anyone signed onto HealthTrack at the time of the update restarts their HealthTrack session to activate the updated fees.
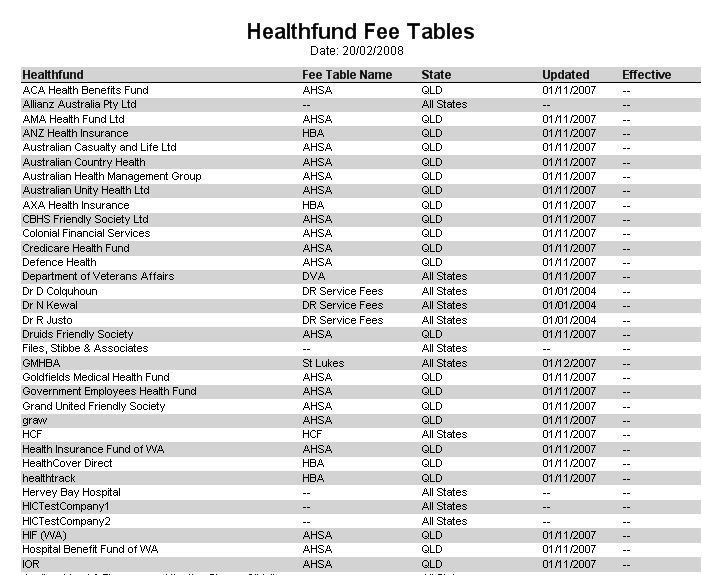
Confirming Fee Update
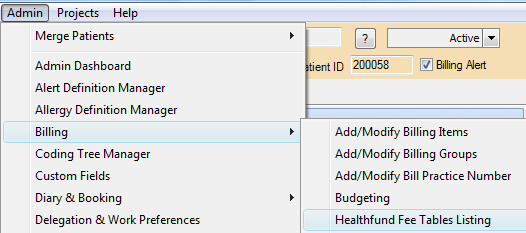
Once you have restarted HealthTrack print the Health fund Fee Tables Listing to confirm that the health funds are linked to the correct Fee Table and the latest up date is activated.
Health Fund is linked to the incorrect Fee Table
If the health fund is linked to the incorrect fee table this can be adjusted by completing the following steps:
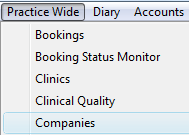
Click on Practice Wide >> Companies
Click on Select Company
Type in the company name which needs to be updated and click on Find – a list of companies will be shown based on the company name entered.
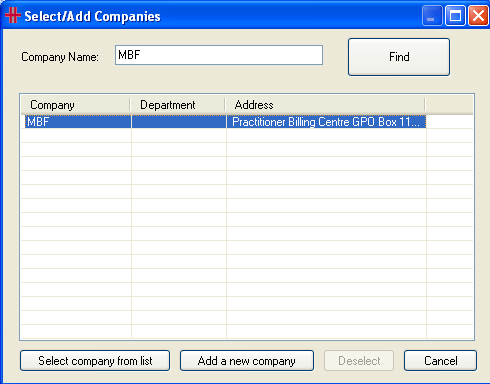
Select the company from the list
Click on the Health Fund Details tab
Click on Edit
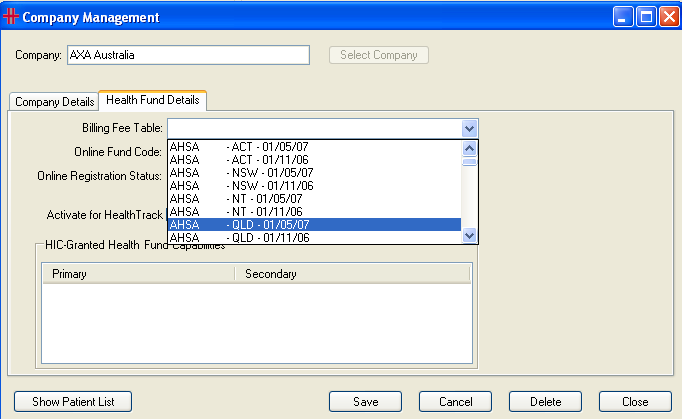
Select the correct fee table from the drop down list in the Billing Fee Table
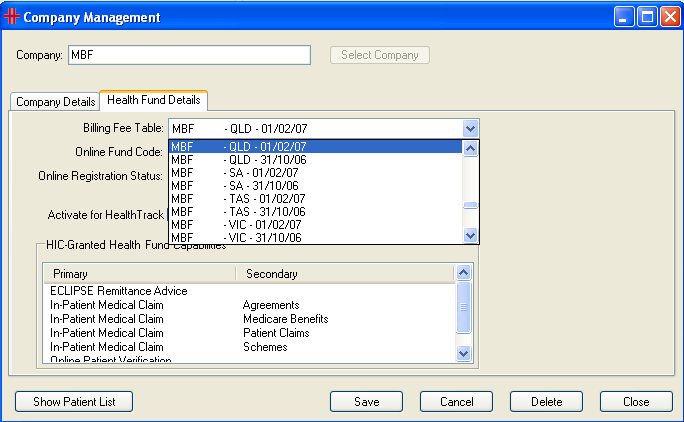
Click Save, the health fund is now linked to the correct fee table.
**
The Health Fund is not showing on this list:**
The reason that the health fund is not showing is because the company isn’t recorded in the data base as a health fund.
Click on Practice Wide – Companies
Click on Select Company
Type in the company name which needs to be updated and click Find – a list of companies will be shown based on the company name entered.
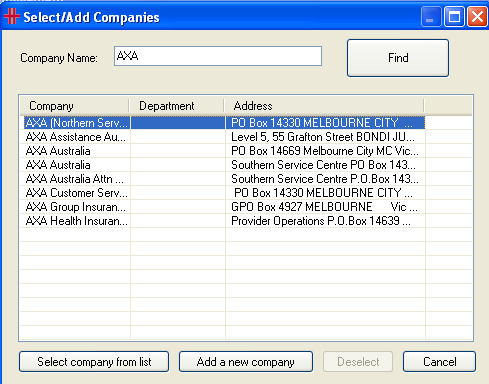
Select the company from the list
The Company is a Health Fund check box will be unchecked – click on Edit and click this check box to mark this company as a health fund.
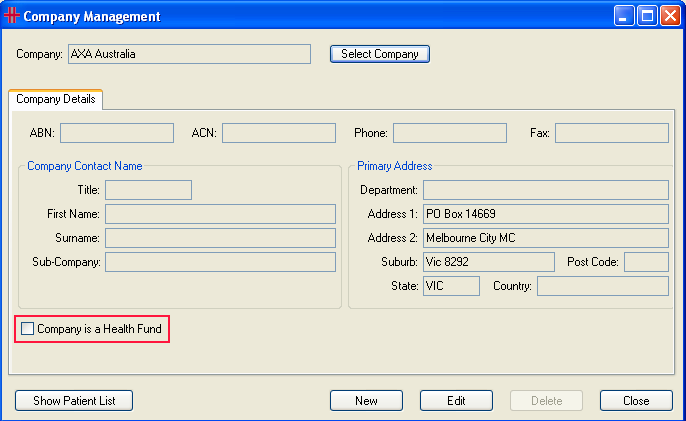
Once you have checked the Company is a Health Fund box you will notice that the Health Fund Details tab is now available.
Click on this tab and select the appropriate fee table from the Billing Fee Table drop down list. This list is sorted by Health Fund, then State and then the Effective Date of the Fee Tables.
Click Save, the company will now be recorded as a Health Fund and linked to the correct Fee Table.
Add/Modify Bill Practice Number
A Bill Practice Number is the Practice ID or Payee ID provided by the Health Funds, these are used by the Health Funds when manual claiming is performed to enable efficient processing by the fund. Not all funds require this to be recorded, the current funds that do are the BUPA funds; MBF, HBA, Mutual Community, NRMA, SGIC, SGIO and ANZ. To ensure that your Practice ID/Payee ID is printed on the HealthTrack batch header the following set up will need to be completed. The first step is to flag the health funds that require the Practice ID to be added.
To do this go to Practice Wide >> Company, select the company and click on Edit. Click on the Health Fund Details Tab
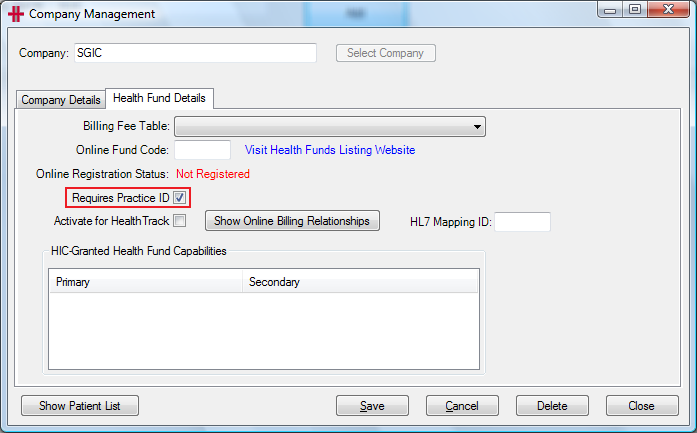
Tick the ‘Requires Practice ID’ checkbox. You will need to complete this for all Health Funds requiring the Practice ID to be recorded. Please Restart HealthTrack once the company details have been updated.

Go into Admin >> Billing >> Add/Modify Bill Practice Number. The following screen will appear.
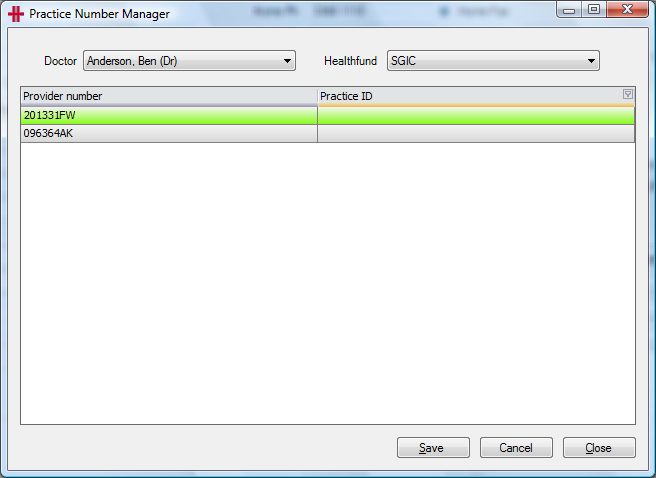
Select the Doctor from the doctor drop down list, then the Health Fund. The Health Fund list is limited to only those Health Funds that are flagged as requiring a Practice ID. If there are no health funds showing in the list but you have flagged Health Funds in the company screen please restart HealthTrack.
All of the provider numbers for the doctor will be displayed. For each provider number that requires a Practice ID please enter it in the Practice ID column. If there is more than one provider number with the same Practice ID the Practice ID can be copied and pasted.
After adding the Practice Ids for a Doctor and Health Fund press Save before changing to the next Health Fund or Doctor.
Once all changes have been made HealthTrack will need to be restarted for the changes to take affect.
**Batch Header Examples: **
Batch Cover Sheet Detailed

Batch Cover Sheet Detailed Invoice
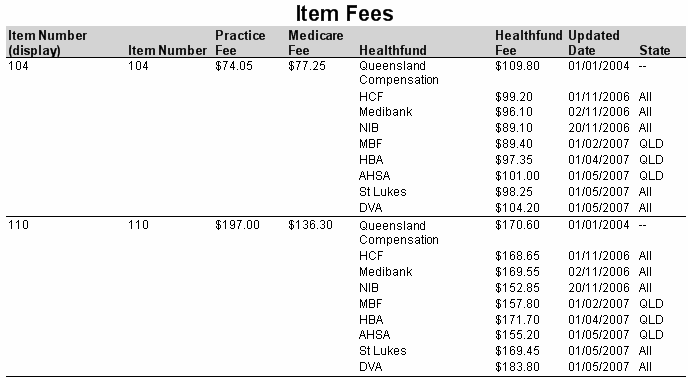
Item Fees Listing
An additional report which can be run to check the fees are correct is the Item Fees Listing. This report lists for each item number the Health fund, the Health Fund Fee, the Updated Date and the State.

Missing Update:
If you have received notification or are aware of a Health Fund update that has not occurred in HealthTrack, please confirm this update with the health fund and contact HealthTrack.
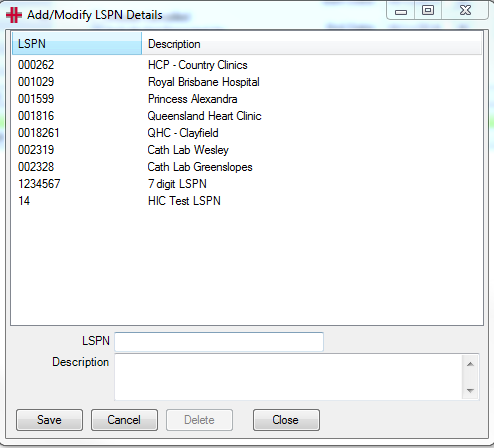
LSPN Details
A Location Specific Practice Number (LSPN) is required by practices that provide diagnostic imaging or radiation oncology services to provide Medicare funded services.

To add or modify a LSPN in HealthTrack go to Admin >> Billing >> LSPN Details. The following screen will appear, where new LSPN’s can be added or existing ones modified.
Fee Contract Manager
Refer the Admissions Section in the Online Help user guide for Fee Contract Manager, under Private/Day Hospital Billing.
Security and Permissions
Adding a New User
When a user first logs into HealthTrack, their account will be created with the default permission group. The user will then need to have the appropriate groups assigned to them so they can access the required functionality in HealthTrack. Alternatively if you would like to set up the user before they first logon to HealthTrack you can create their account prior to them logging on, to do so you will need to know their computer / Windows username.
The Security Group Manager is located in the Admin Menu. This screen can be broken into three sections as outlined in Figure 5 - Security Group Manager.

Figure 5 - Security Group Manager
The first column highlighted in the red box shows a list of either the Users or the Groups. This can be switched between the two via the radio buttons underneath the list. The middle section highlighted in the blue box shows the groups assigned to the user or base group. By selecting Show Permissions in the red box this will display all permissions assigned to the user. The third section highlighted in the green box provides a list of all groups and then a list of all permissions. It is from these lists that you can assign either the group or permission to the user or the group. When you select either a group or permission a description will appear.
HealthTrack has a set of pre-defined groups, these are prefixed with HMS, and these groups cannot be modified by the users. When your HealthTrack system was initially configured a number of role based groups would have been created. For example Doctor, Reception, Technician, Admin etc. These are the groups that should be assigned to new users.
If the user has already logged into HealthTrack then their username will be listed in the red box, if not click Create New User and enter in their computer / Windows username and their other New User’s Personal Details in the relevant fields in the Create New User panel. You then have the option to create the user with no permissions and then add permissions via the HMS Security Groups Manager screen or to copy the permissions from another user. To Copy “Permissions From This User’’ select this radio button and the User ID drop list of values.
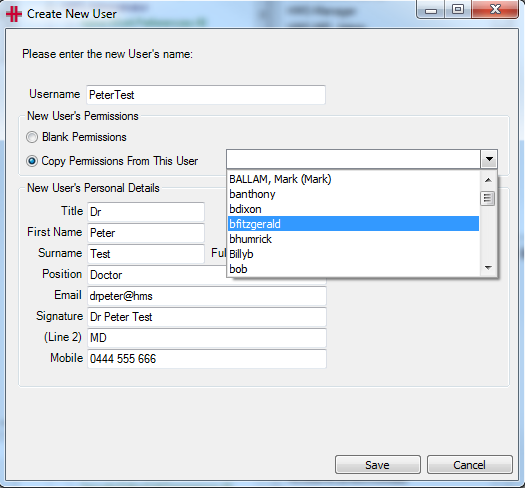
If you are creating a New User and no existing users profile contains the permissions you want to assign then you can create the user with Blank Permissions by selecting that radio button, then select Save to complete.
In the HMS Security Groups Manager select the user then from the All Groups list select the group that needs to be assigned to the user. In the example below the new user is joining the reception team so they will need to have the Reception Group assigned to them. Right Click on the Group in this case Reception and then click Assign Group.
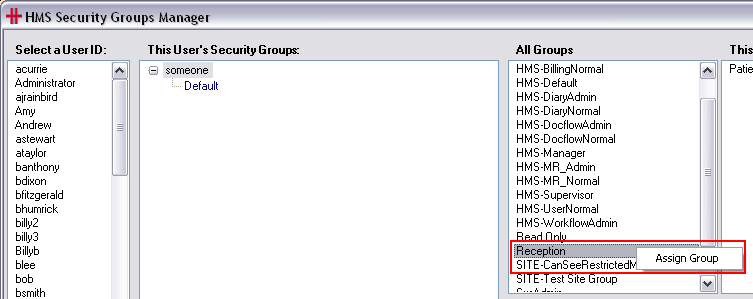
Figure 6 - Assigning a group
The Group will now be assigned to the user.
Add Location Permissions
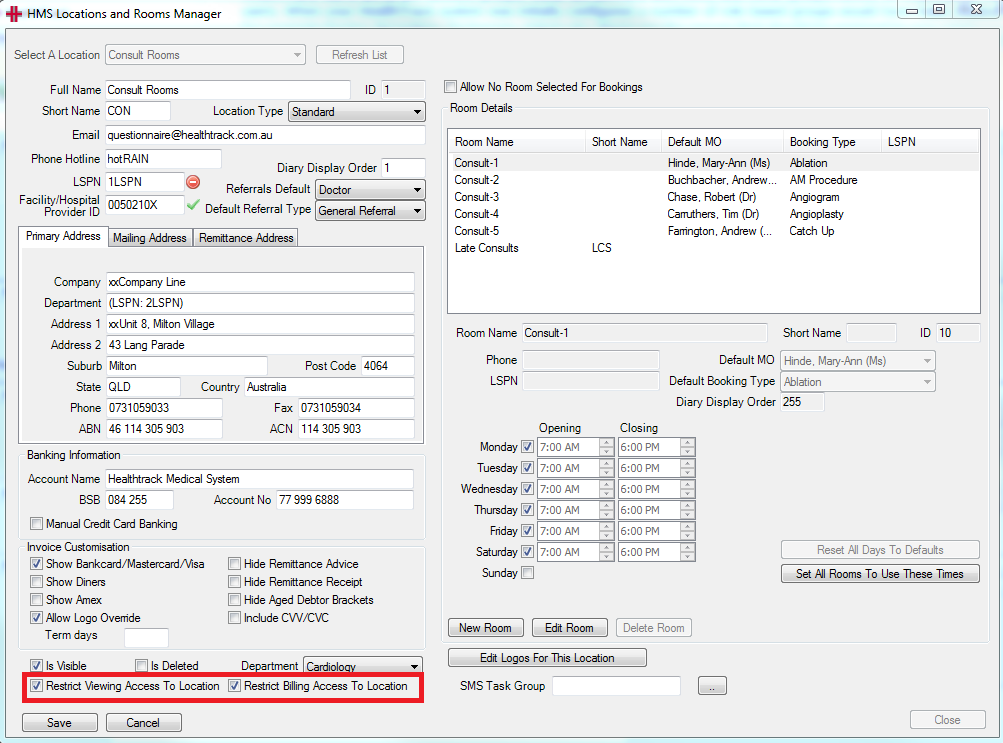
Viewing Access and Billing Access can be restricted by Location, this requires a combination of configuration through the HMS Locations and Rooms Manager and HMS Security Groups Manager.
To activate the restriction for a Location, in the HMS Locations and Rooms Manager Select a Location and press Edit.
At the bottom of the screen tick the ‘Restrict Viewing Access To Location’ to
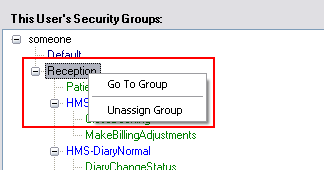
Un-assigning groups / permissions:
To un-assign a group or permission from a user select the user from the User Id column, then right click on the Group or Permission and select Unassign Group. Please note that you cannot unassign permissions within a group when working in user mode.
List Manager Permissions
| Keyword | Description | |
|---|---|---|
| A | ListManagerListAccess | Allow user to edit list properties in the List Manager screen. |
| B | ListManagerItemAccess | Allow user to edit item properties in the List Manager screen. |
Setting up Smart Text
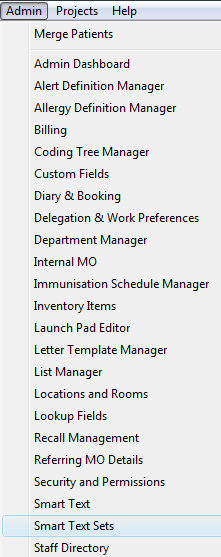
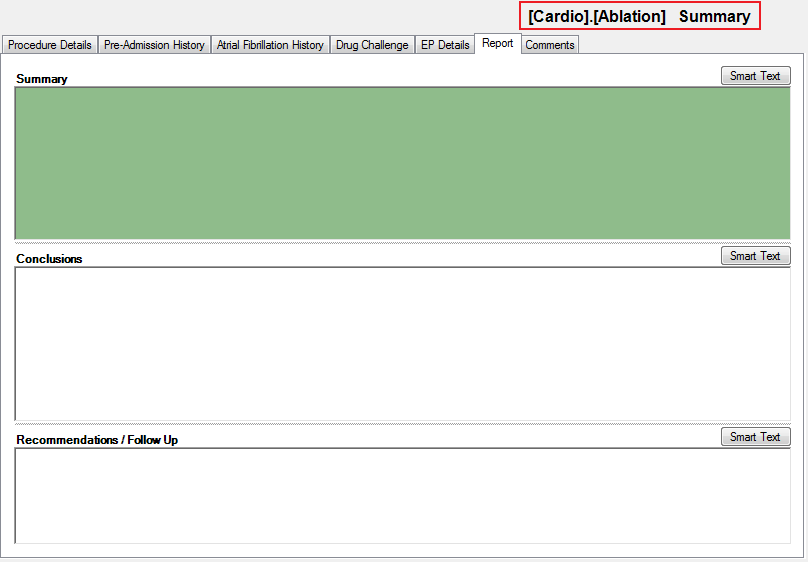
The first step is to set up your base node (Folder) for the section where you want to add your Smart Text Set. To do this click on the Admin Menu >> Smart Text Sets.
From the table on the left, select the Set Name to add Smart Text to. If unsure of what your Set Name is please see ‘Determining Set Name’ at the end of this document.
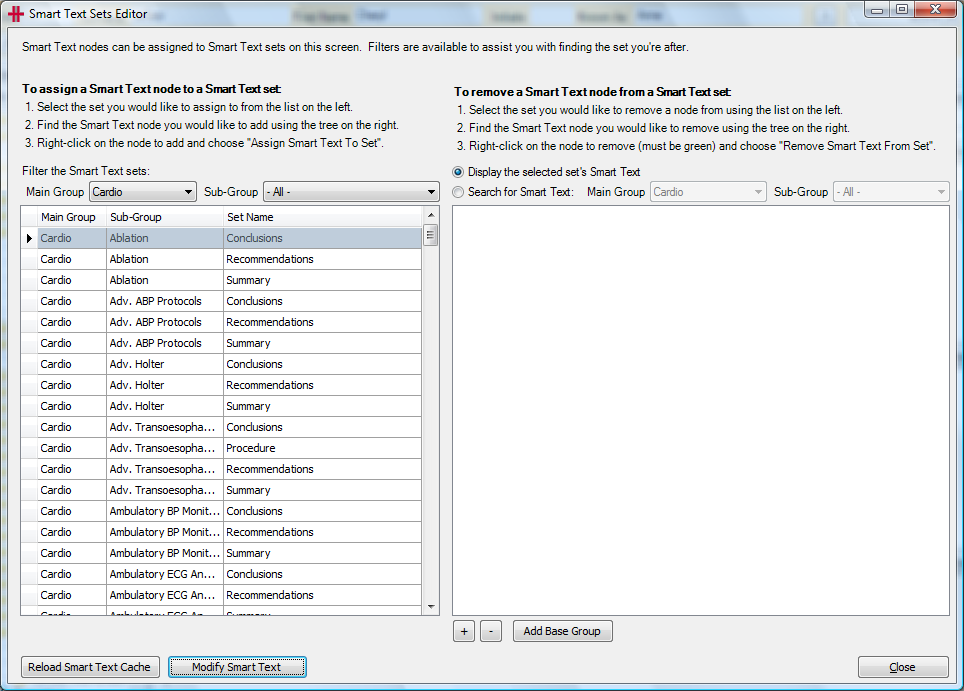
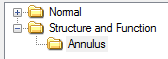
After selecting the Set Name add this to the Base Group. The Base Group is the leading node/folder in your Smart Text tree for this set. For this example we are going to set up the Mitral Valve Comments Smart Text in the Echocardiogram clinical record and call the Base Group “Normal”.
Click the Add Base Group button and type in “Normal”.
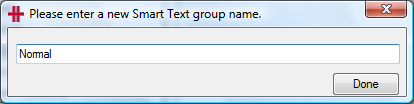
Click the Done button, your Base Group has now been added.
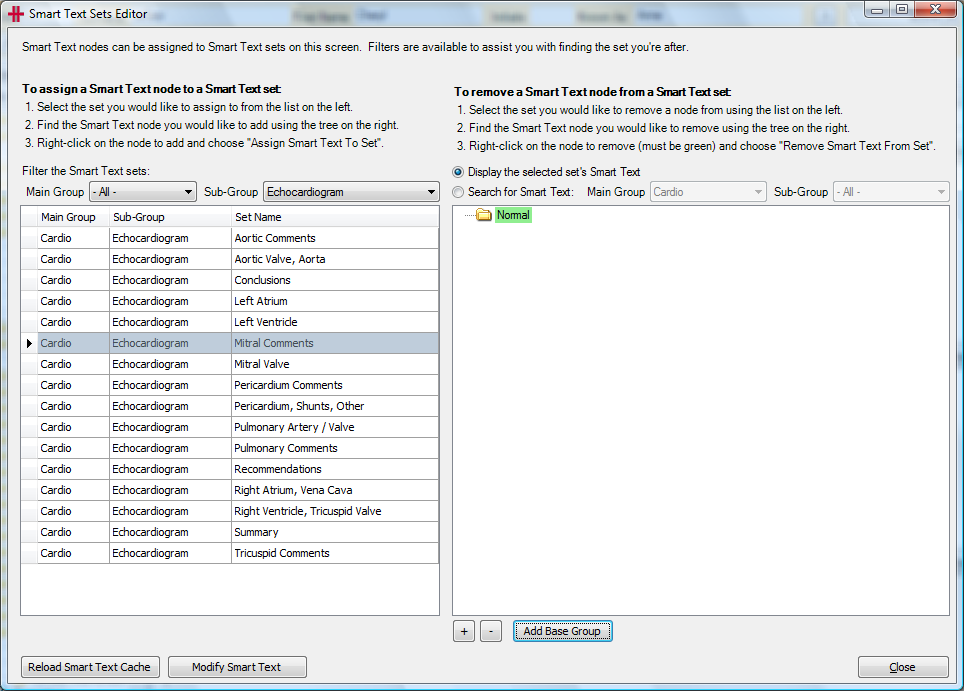
Here is how to add more than one Base Group to this set. For this example we will add a Base Group called Structure and Function. You are now ready to add the Smart Text to this Set click on the Modify Smart Text button in the Smart Text Sets Editor alternatively you can access this via the Admin menu.
Smart Text
Now you need to setup the actual text in the ‘Smart Text’ associated with each ‘Smart Text Set’. To access the text go to Admin >> Smart Text
The Smart Text Editor will then open ready to add or modify your Smart Text.
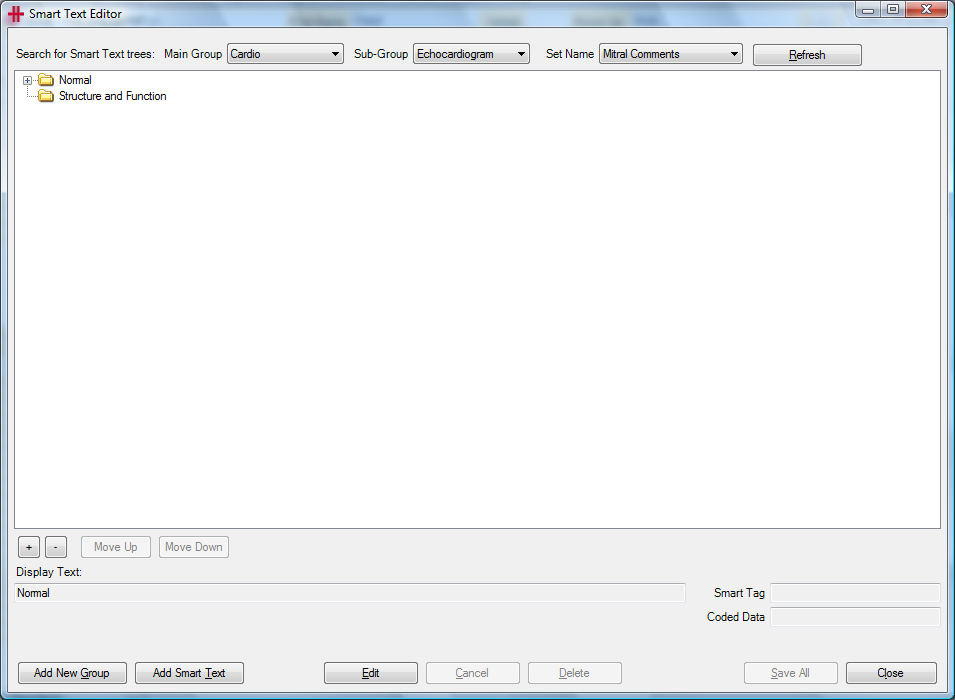
Please check that you have the correct Main Group, Sub-Group and Set Name selected prior to adding any Smart Text. Smart Text cannot be transferred from one Smart Text Set to another.
You can either add a new group underneath the Base Group or add Smart Text. For this example we will add Smart Text to the group .
To add click the Add Smart Text button.

Enter the Smart Text into the Display Text field. If this information is in a document it can be copied and pasted into this field. Once entered, you can add a Short Description and a Smart Tag. Smart Tags can be used to quickly type your report by only using the tags. The Smart Tag functionality is optional. Once finished entering Smart Text click the Save button. The Smart Text added will now show in the Normal group.

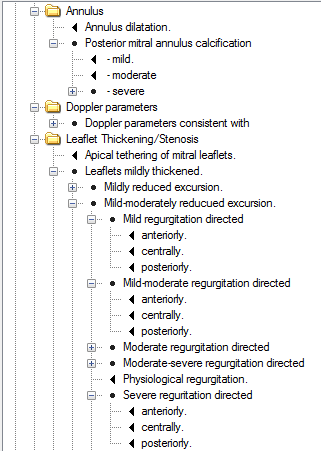
The text that has just been added “Leaflets thin and mobile. Unremarkable annulus.” is only the start of the comment to be added by the user. There are 3 alternative endings to this Smart Text. To add these possible endings select the text as shown (highlighted in blue) and then click the Add Smart Text button. Once you have then entered and saved this Smart Text it will sit the next level down in the tree. It is possible to add as many options/levels as you like. Please ensure you are selecting the Group or Smart Text that you want the new text to be linked to. Alternatively you could set the Smart Text up to be a complete sentence or paragraph (up to 4000 characters in length).
The next screen shot shows many options being added to the above sentence.
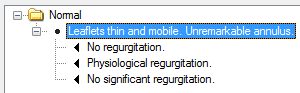
When using Smart Text in the clinical record if the patient’s Mitral Valve comment was “Leaflets thin and mobile. Unremarkable annulus. Physiological regurgitation.” Then the user will expand the normal Smart Text tree and double click on the “Physiological regurgitation” option and the complete sentence will be added for the user – no typing required.
We are now going to add a New Group to this Smart Text tree. This group will sit within the Base Group: Structure and Function. Click the Group Name (Structure and Function) and then click the Add New Group button.
The lower section of the screen will now become enabled to enter the new group.
In the Display Text field type in the group name e.g. Annulus and click the Save button.
The new group has been added and you can now add additional Smart Text and Groups as required. Here is an example tree:
Determining Set Name
If unsure what Main Group, Sub-Group or Set Name to add or modify you can check this by going into the clinical record. The top section of the smart text screen will show you the Main Group . Sub-Group Set Name.
Please note the layout of the Smart Test screen is based on screen size so your screen may have a different layout to the one pictured above.
Export Data
This screen provides the ability to export raw data from your HealthTrack system.
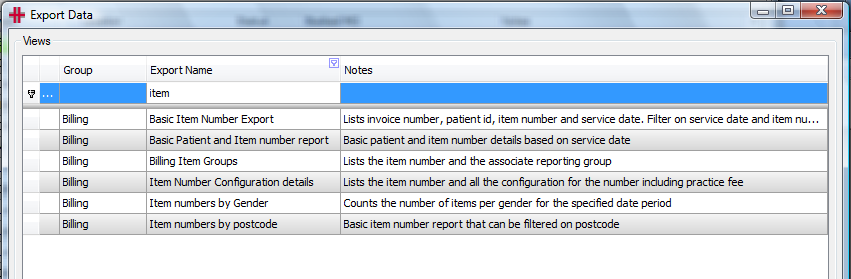
The Export Data screen is accessed from the Admin > Exports & Imports > Export Data.
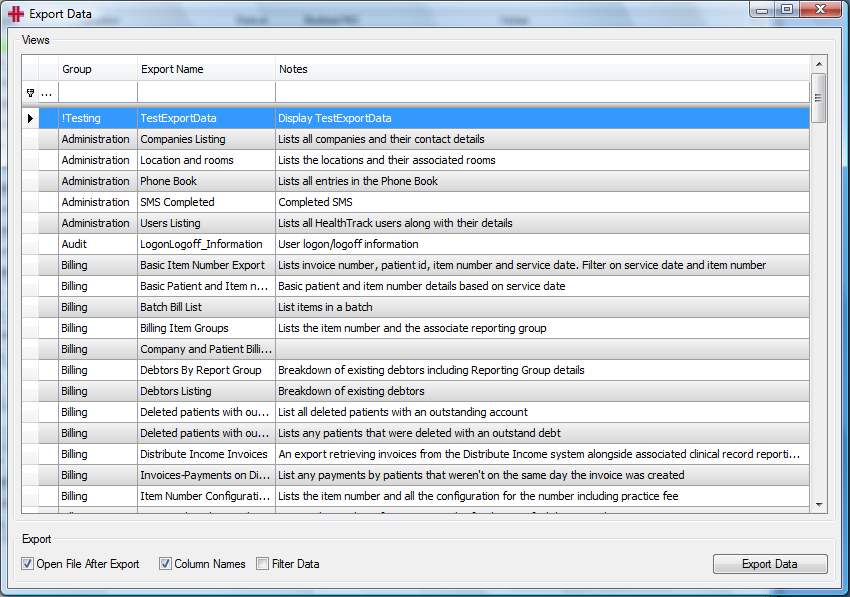
To quickly find an export type part of the name into the white search boxes beneath the column headings. For example to find all exports for billing item numbers, type “item” into the field at the top of the Export Name column:
Select the export you wish to run and select any or all of the following options:
-
Open File After Export: The file will be automatically opened by the system’s default viewer (e.g. Microsoft Excel) after the data has been exported.
-
Column Names: The first row in the exported data will display a heading for each column.
-
Filter Data: Options to filter the data to a specific set will be presented in the export process. This can be used to export data for a single patient, or Doctor for example.
To generate the export click the
 button. A Save As window will open, select the location to save the
exported file to and enter a file name. The format options for the file
are a comma separated values file (.csv) or a Microsoft Excel file
(.xls).
button. A Save As window will open, select the location to save the
exported file to and enter a file name. The format options for the file
are a comma separated values file (.csv) or a Microsoft Excel file
(.xls).
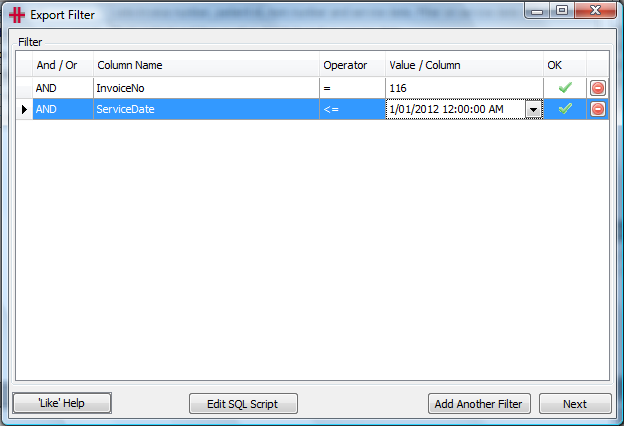
If the Filter Data option was ticked an Export Filter screen will open. Here a number of filters can be set, to apply to the data before it is exported. The filters shown in the following example, limit the exported data to invoices that contain a 116 item number, with a service date on or before 1/1/2012.
The
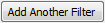 button will add a new, blank
row to the filters list.
button will add a new, blank
row to the filters list.
To remove a filter click the
 delete button.
Clicking the
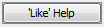 button provides more
details of characters that can be used to filter data:
button provides more
details of characters that can be used to filter data:
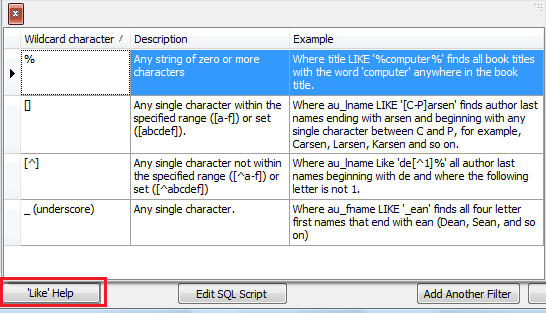
The
 button closes the Export
Filter screen and opens the exported data file.
button closes the Export
Filter screen and opens the exported data file.
Notification Manager
The HealthTrack Notification Manager facilities the complete management of SMSs and Emails sent from HealthTrack. Authorised users have the ability to add, edit and delete message templates and apply the rules for when these are to be sent.
Messages can be created which will be automatically sent from HealthTrack to remind patients of appointments, provide information regarding the appointment or any other message that needs to be delivered.
The Notification Manager can be divided into 3 main areas:
-
Messages
-
Message Description
-
Rules for Message.
The Notification Manager is accessed from Admin >> Notifications >> Notification Manager
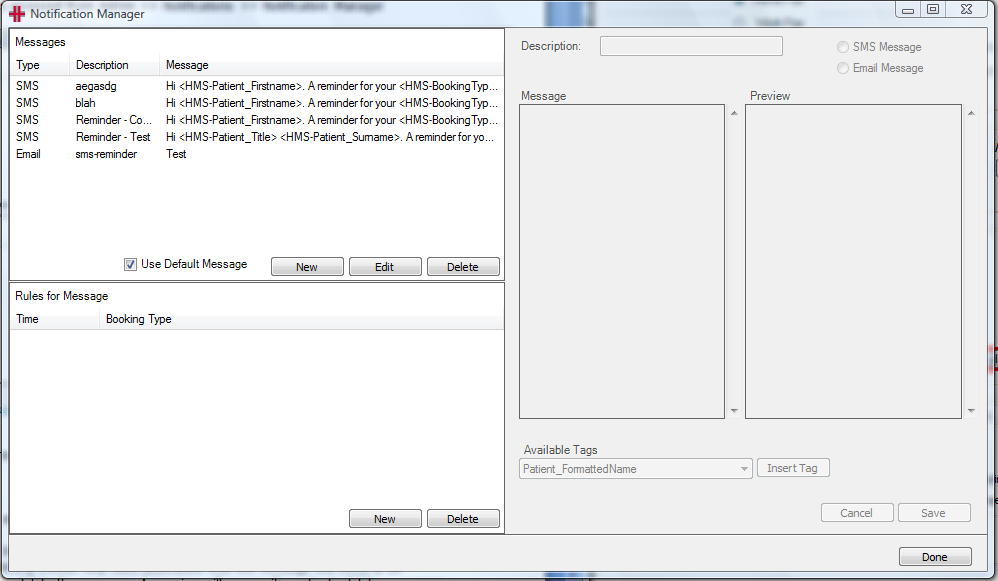
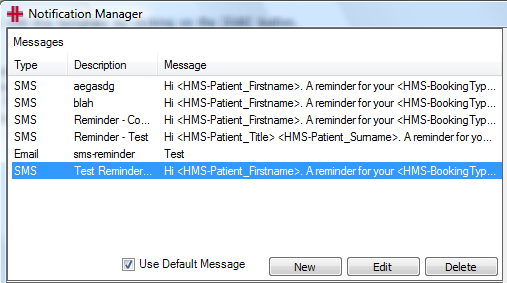
Messages:
The Messages section of the Notification Manager provides a list of all messages that have been set up.
From this section you can:
-
Create new messages either using the default message or with a blank message by clicking the New button.
-
Edit current messages by clicking *Edit *
-
Delete messages by clicking Delete. Any rules associated with the message will need to be removed before you can delete the message. A warning will appear if you try to delete a message which has rules attached.
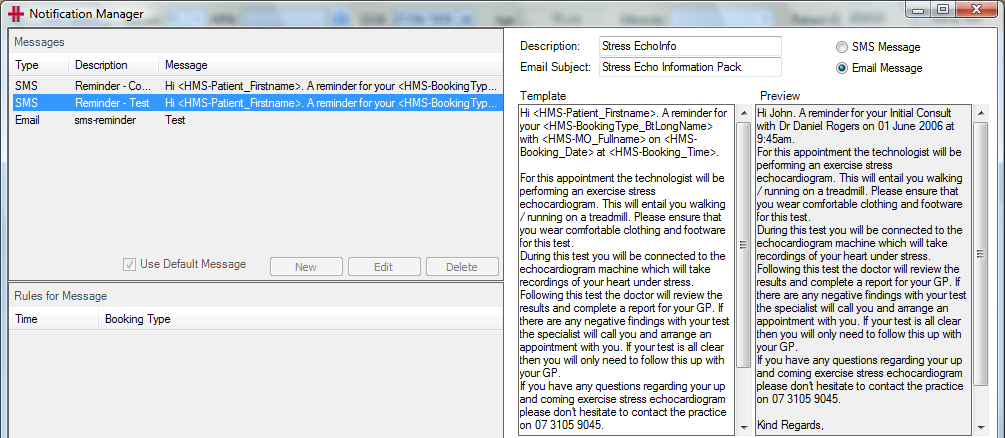
Message Description:
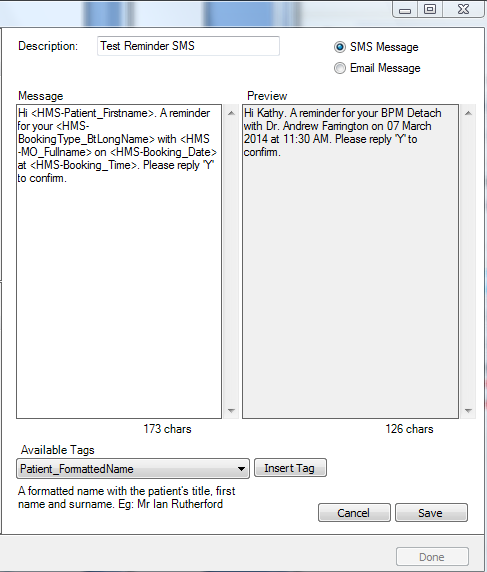
The right side of the Notification Manager is for adding the text to be sent either via SMS or Email.
Description: Enter a brief description of the message for example reminder-consult.
Email Subject: If setting up an email message you will need to enter in the subject of the email for example Stress Echocardiogram Test Information.
Message: For typing in the message. There is a drop down list below called Available Tags which can be used to populate the patient specific data, such as booking date & time, patient name.
Preview: Shows what your message will look like once the tags have been replaced with the patient’s information.
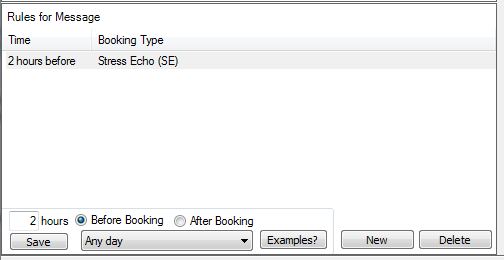
*Rules for Message: *
The rules for the message specify which booking types the message will be sent for and at what time the messages will be sent. The rules will be displayed showing the time when the message will be sent for each booking type selected.
For any message a number of rules can be set up, for multiple times and multiple booking types.
Using the Notification Manager – By Example:
For this example we will be setting up a reminder SMS for Tests.
Firstly we will use the default message and modify this message slightly to include the address. Once the SMS message has been created we will add two rules to this message for the booking types that the message needs to be sent for. These booking types are Stress Echo and Doppler Echocardiogram.
For these messages they will be set to send 2 hours prior to the booking.
Once the message is setup with its rules we will go through how to Edit and Delete.
- In the Messages table click the New button

Please note: By default the Use Default Message is ticked, if you don’t want to use the default click on this box to un-check it prior to clicking the New button.
- Enter a Description for the message
- In the Message box make any changes to the message required.
For this example we will add the location of the booking after the tag for the booking name.
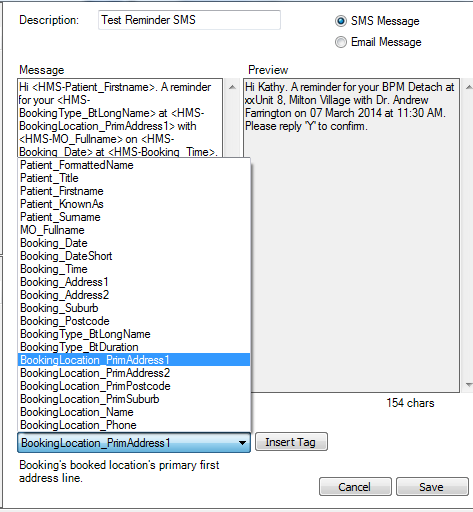
Enter in the word ‘at’ followed by a space after the booking type tag then using the list of available tags select BookingLocation_PrimAddress1 and then click Insert Tag. Complete this process to add the Address2 line (from the Locations and Rooms Manager) or other tags.
- Then click Save once finished editing the message.
The message has now been saved and has been added to the Messages section of the Notification Manager.
At any time you can edit this template by clicking Edit.
Adding Rules for the Message:
- Select the message in the Messages section, scroll down to the Rules for Message section and click New.
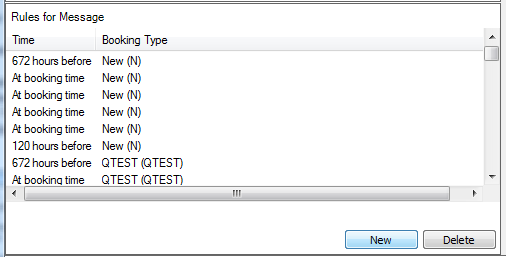
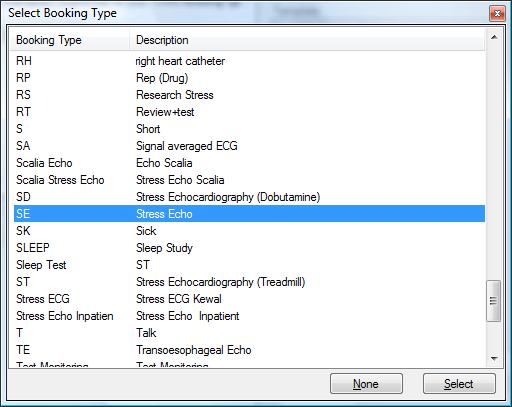
- The Select Booking Type list will appear. Choose the booking type that this message is to be sent for and click the Select button.
For this example the message will be sent for the booking type Stress Echo.
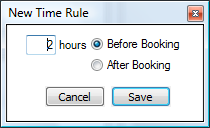
- Next enter how many hours before or after the booking the message is to be sent.
For this example we will use 2 hours before the booking. Click the Save button
- The rule will now be listed in the Rules for Message section.
- To change when the messages are sent click the drop down arrow next to ‘Any day’ and select e.g. Business hours
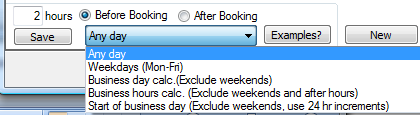
The Examples? button is useful for determining when the messages will be sent with the different selection options (business days, business hours etc.).
There is no limit to the number of rules that can be attached to one message. The next step is to add any other booking types that will use the same reminder message.
Editing and Deleting Messages and Rules:
Messages and rules can be edited or deleted at any time by using the Edit and Delete buttons. Please note that you will need to delete all rules attached to a message before you can delete the message.
SMS Auto-confirmation
How the SMS Auto-confirmation works:
If a message is received back from the patient HealthTrack will automatically Confirm the booking if the message contains one of the following.
“OK”
“Y”
“YES”
“TY”
“THANKS”
“THANK YOU”
“CONFIRM”
“CONFIRMED”
These reply options are based on around 400 responses received via SMS that were analysed to create this list. The words will only match if followed by a space, a full stop or the end of message. For example “You’ve got the wrong number” will not trigger a booking confirmation.
If the message received doesn’t trigger HealthTrack to auto-confirm the appointment a HealthTrack task will be created containing the message response for review and follow up.
View Messages
To view all messages that have been sent and received open from the Admin menu >> Notifications >> View Messages
There are two tabs for viewing Outbound and Inbound messages.
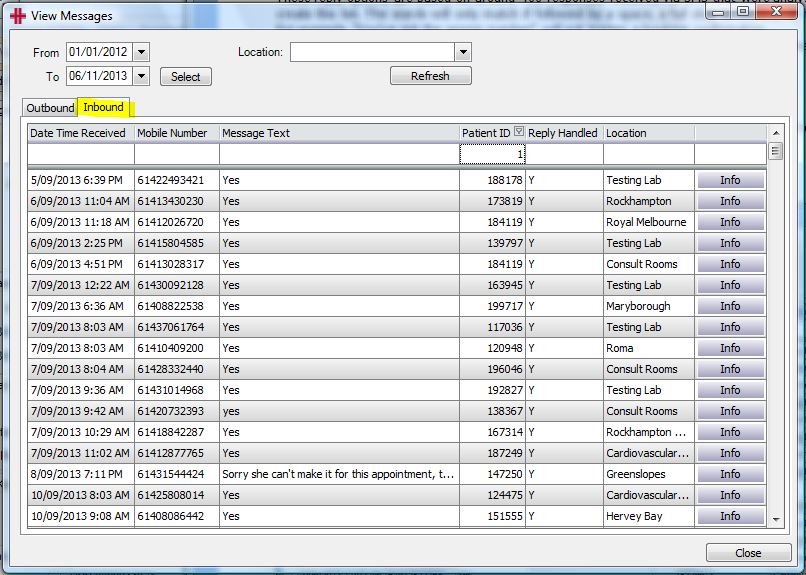
To search the message logs, type in the white fields underneath the column headings e.g. in the Patient ID field.
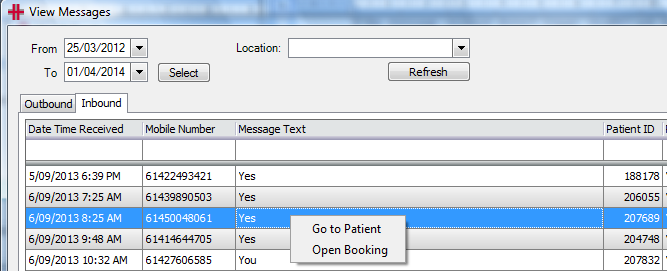
There is the option to open the patient’s record or booking. Right click on the message row and choose either ‘Go to Patient’ or ‘Open Booking’.
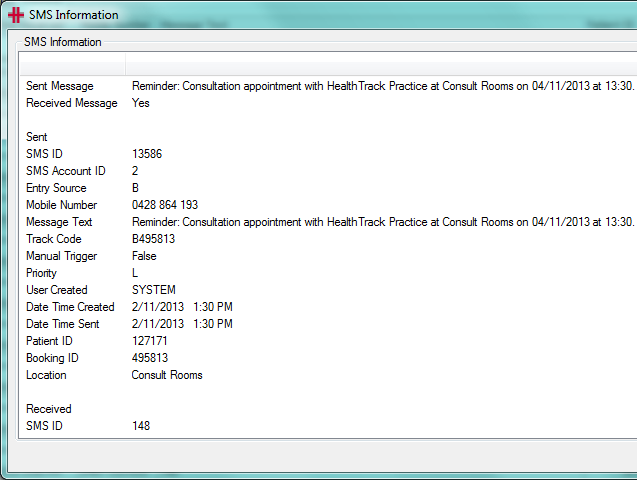
To analyse a single message in more detail, click the Info button and the SMS Information screen opens.
Analyse Usage
To review how many SMSs and faxes have been sent and check credits, open from the Admin menu >> Credit Management
There are two tabs for viewing SMS messages and Faxes.
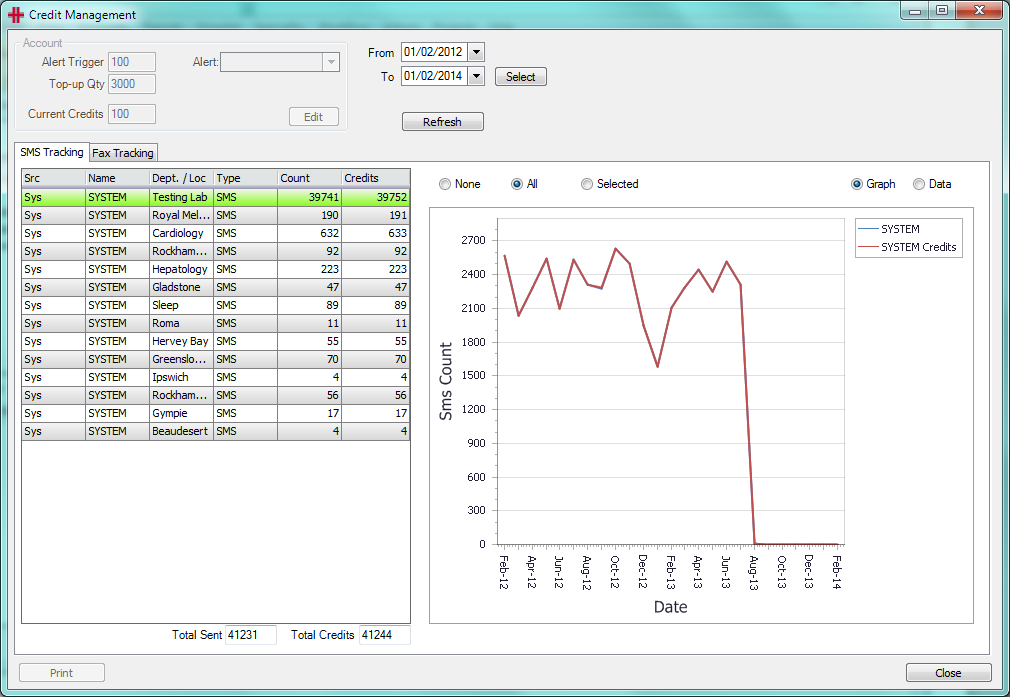

To view the data in a graph, choose either ‘All’ or ‘Selected’ to view all data or just the row selected in the table on the left hand side.
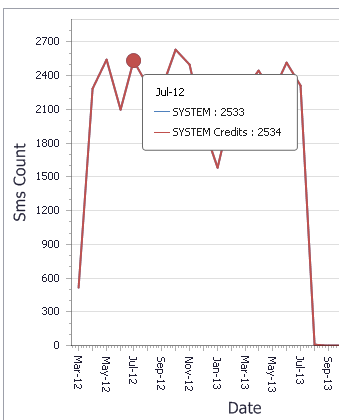
The exact counts appear when hovering over the graph:
To view the data in a table instead of in a graph, click the ‘Data’ option instead of ‘Graph’.
Setting up Email Messages
The set up, editing and deleting of SMS and email messages are very similar with only one difference. When setting up the email message you will need to include the subject line of the email.
Admin Dashboard
In the HealthTrack main screen open the menu Admin >> Admin Dashboard.
Summary tab
The Summary tab provides an overview of incoming documents and the status of any interfaces and processors. This includes an overview of the pathology and radiology results that are waiting to be matched or approved along with when you last received results from each company.
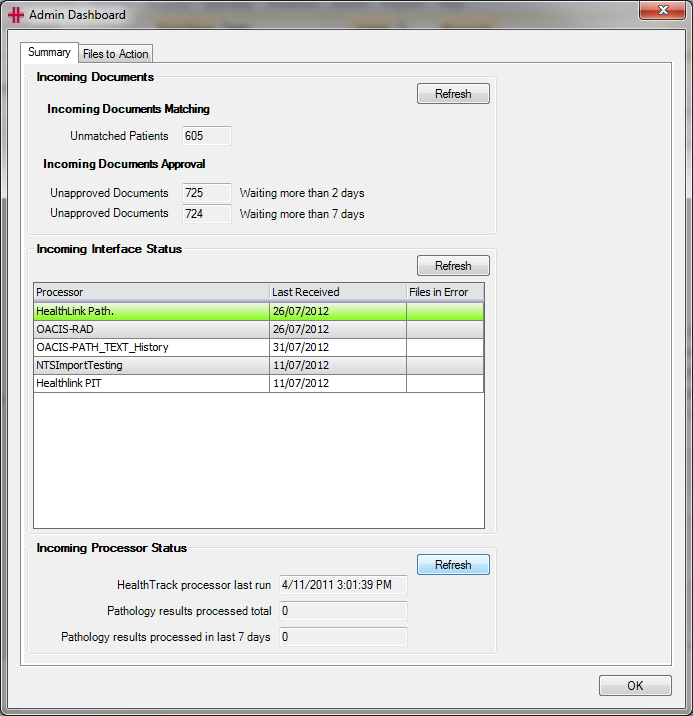
If the Incoming Approval counts are quite large then you will need to follow up with the Doctors to ensure that they are approving their results. Likewise if the Incoming Matching is building up then the staff responsible for this will need to be notified.
Click the Refresh button next to each section to update the totals.
Files to Action tab
When files are imported automatically from a 3rd party, such as an offsite typing service or reports of test results, any files that cannot be automatically matched to patients will appear in the Files to Action tab.
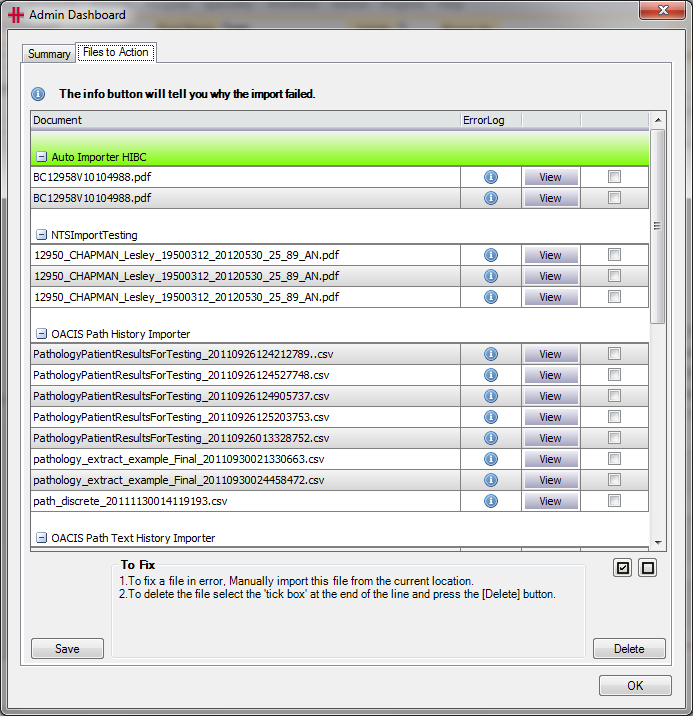
The documents will be grouped based on their type for example, in the screenshot above there are four different auto-imports set up – HIBC, NTS, OACIS Path History and OACIS Path Text History.
The
 button shows the error message
for each file and the View button opens the file.
button shows the error message
for each file and the View button opens the file.
If there is a time out error like in the example below, tick the checkbox next to the file and click the Save button. This will send the document for re-importing. Multiple entries can be ticked prior to clicking Save.

The file may need to be renamed to match the required file layout and bring the document into the HealthTrack Distribution List.
The standard file layout for imported documents is the
following:
HMSID_Surname_Firstname_DOB-yyyymmdd_Testdate-yyyymmdd_SourceUniqueID_ReferredToMOID_BookingType.fileextension**
**
HMSID: This is the HealthTrack patient ID.
Example file name:
1000_Surname_Firstname_20000101_20140325_B12345_PC_ECHO.rtf
To rename a file click on the document name (it will be highlighted in green) and enter or change the filename. Once a file has been renamed, tick the checkbox next to the file and click the Save button. HealthTrack will then attempt to match this file to the patient. If successful, the file will appear in the Distribution List within a few hours. If HealthTrack is not able to match the file to a patient, the file will reappear in the Admin Dashboard.
If a document is not required and does not need to be imported and recorded in the patient’s record, tick the checkbox next to the document and click the Delete button.