Label printing
Set up a label printer in Windows and HealthTrack
Section A: Installing the DYMO Label Writer Printer
A printer should only need to be installed to a computer once. However, if there are issues with accessing the Printing Preferences as specified in Section B, you will need to follow through the steps in this section to reinstall the printer.
1. Open up the ‘Printers and Faxes’ screen by going to the Start Menu, Settings and clicking on ‘Printers and Faxes’
2. Locate the old DYMO LabelWriter, right-click on it and select ‘Delete’:
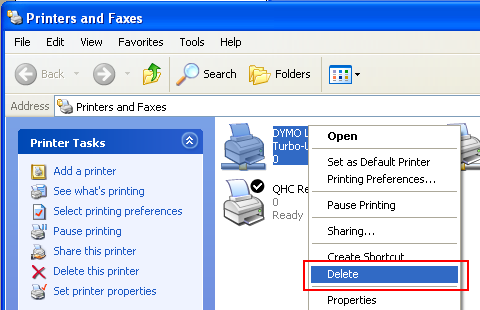
3. Click ‘Yes’ to confirm you wish to delete this printer.
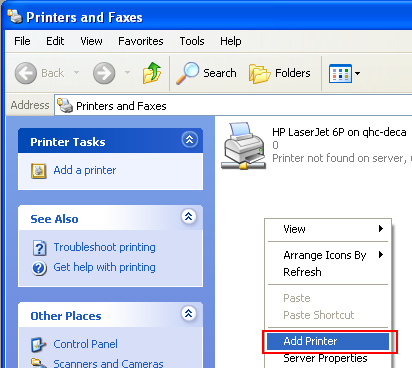
4. Right-click in the Printers and Faxes screen and select ‘Add Printer’ to start the wizard that will install the new printer for you:
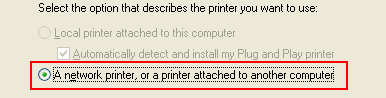
5. The ‘Add Printer Wizard’ will now have started, click Next on this first screen. On the second screen, select ‘A network printer, or a printer attached to another computer” (since the printer is attached to another computer in the network) and click Next:
6. Select ‘Find a printer in the directory’ to locate this printer and click Next:

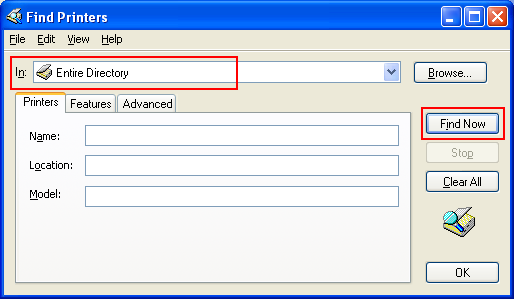
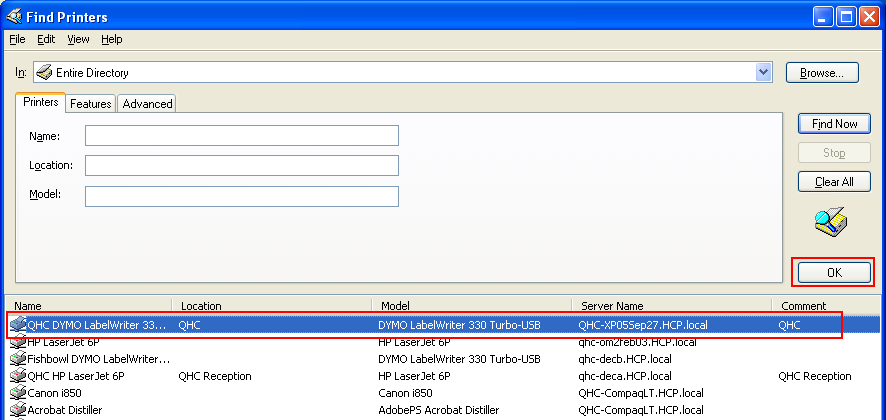
7. On the Find Printers screen, ensure ‘Entire Directory’ is selected then click ‘Find Now’:
8. This next screen is the trickiest part. A list will appear of all the printers available in the network, so while there will be a dozen or so printers available there are several tell-tale signs to point you towards the one that you need to select.
For example, if you are after QHC’s LabelWriter you will usually see “QHC” in the printer’s Name and the Location should be “QHC” as well. Sometimes the Server Name will have “QHC” in it as well (an example of this will be in the following screenshot).
If you’re after HCP’s LabelWriter in a particular building, it will most likely mention “HCP” in the printer’s Name, Location and Server Name. Select the printer required and click ‘OK’:
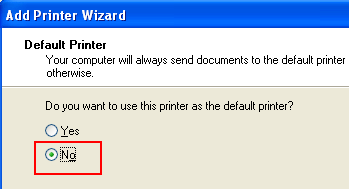
9. With the LabelWriters, we do not need for them to be set up as the default printer so choose ‘No’ on this next screen and click Next:
10. The LabelWriter should now be set up correctly, so just click ‘Finish’ and you’re ready to proceed to setting up the printer’s preferences.
Section B: Configuring the DYMO Label Writer for the computer
The steps in this section assume that the printer has been installed correctly. If there are issues with accessing the Printing Preferences as specified in this section, you will need to follow through the steps in Section A to reinstall the printer.
1. Open up the ‘Printers and Faxes’ screen by going to the Start Menu, Settings and clicking on ‘Printers and Faxes’
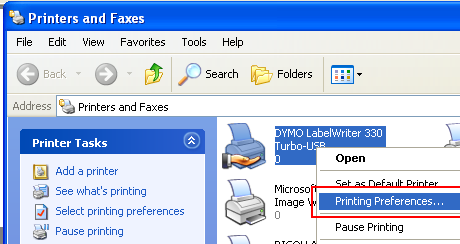
2. Locate the DYMO LabelWriter, right-click on it and select ‘Printing Preferences…’:
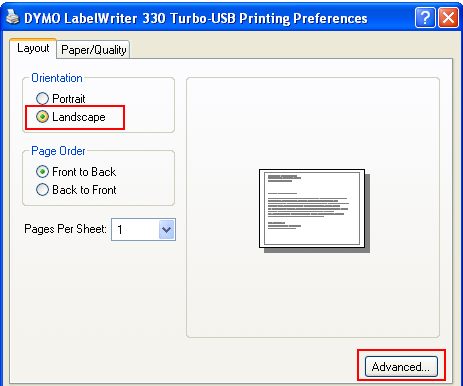
3. In the Printing Preferences, make sure that the ‘Landscape’ Orientation has been selected, then click ‘Advanced…’:
4. In the Advanced Options screen, change the Paper Size to ‘30321 Large Address’:
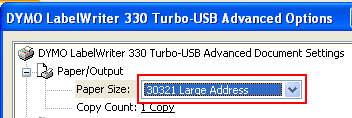
5. Click ‘OK’ to the Advanced Options, click ‘OK’ to the Printing Preferences.
Section C: Configuring the DYMO Label Writer for HealthTrack
1. Open Healthtrack and select the patient to print a label for (if you are just setting HealthTrack up you do not need to select any particular patient).
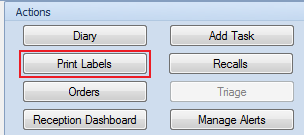
2. Open the Demographic tab, go to the Actions section and click the ‘Print Labels’ button:
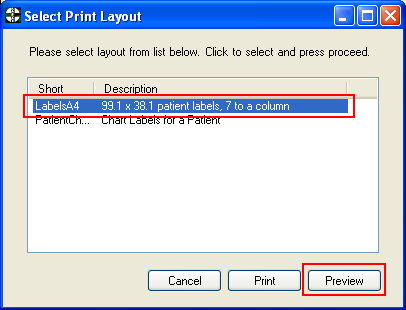
3. Select the ‘LabelsA4’ Print Layout and click Preview:
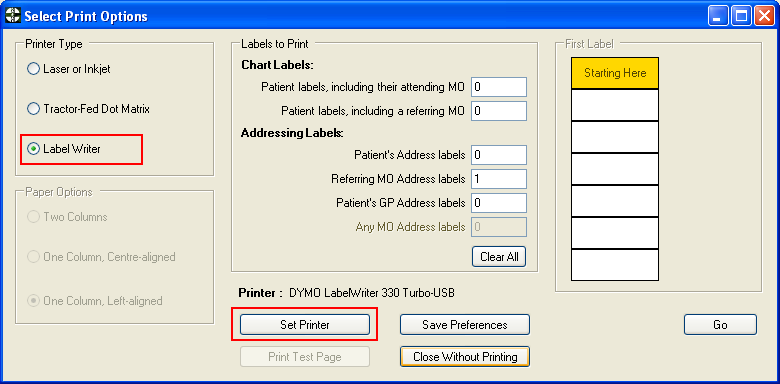
4. Select the Printer Type as ‘Label Writer’ and click ‘Set Printer’. This will allow you to choose the printer to be used and set up its preferences:
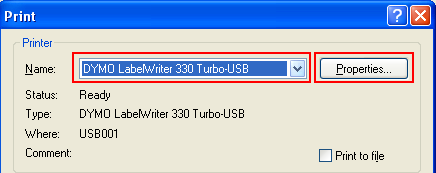
5. Make sure the Printer has been set to ‘DYMO LabelWriter…’ and click the ‘Properties’ button:
6. Perform Steps 3 to 5 from Section B, ie.. change the Orientation and Paper Size.
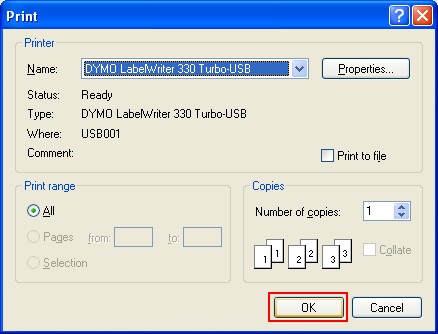
7. Once you have completed Step 5 from Section B, select ‘OK’ from the Print screen:
8. Click ‘Save Preferences’ on the Select Print Options screen to ensure these new settings are saved, then print out a test label with the ‘Go’ button:

9. This label should now be printing out correctly, if there are any issues please contact your IT support provider.