Documents and letters
The Documents Tab
The Documents tab is used primarily by clerical users, including reception and typing users. This screen is for users to create letters, as well as importing scanned documents and referrals. The Documents tab has many similarities with the Clinical Records tab, which is used primarily by clinical staff.
The Documents tab comprises of a preview screen, with a folder tree panel on the left-hand side to navigate between files. These files may comprise of letters created within HealthTrack, imported files such as images or scanned referrals, and files received via secure messaging services such as referrals or discharges from other clinics.
The files can be listed By Category or By Date, depending on each user’s own preference. When listed By Category, files will be contained within a folder that can be expanded or collapsed as needed.
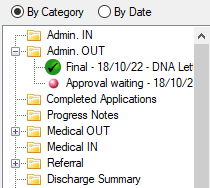
While some users may prefer to view files By Date, all files are required to be classified in a suitable folder.
-
Letters created in HealthTrack will be configured with a default folder nominated.
-
Imported referrals are typically configured to be filed in the ‘Referral’ folder.
-
Users can set their own default folder preference for other imported files in File > User Preferences.
Users have the ability to change the folder for individual files as they see fit. This can be done in the Classify screen at the time of creating/importing the file, or later in the Reclassify screen.
All files in the folder tree will be display a symbol to reflect the Status of the file.
Above the preview screen, the following buttons can be accessed:
Import Documents & Images – this button opens a new window that allows files to be imported. Please see the Importing Documents section for more information.
Modify Multipage Document – this button allows the user to change the order of images if imported as a single item.
Create New Letter – this button will prompt the user with the Letter Template Selector window, allowing them to choose a template for a new letter. Please see the Creating Letters section for more information.
Attachments – this button will open a Manage Attachments window, where users can add attachments to a file for internal use or to be distributed. Please see the Attachments section for more information.
Print Labels – this button opens a new window with a list of templates, such as label and envelope templates.
At the bottom of the Documents tab, the follow buttons can be accessed:
☑ Quick Classify – when ticked, this allows the user to double-click on a file to open the Reclassify screen. Files can also be moved to other folders by dragging them in the folder tree.
Reclassify – this button opens the Reclassify screen to update information about the file. Please see the section below on Classifying & Reclassifying Documents.
Open – this button will open the selected file in a new window to edit or view.
Save Copy – this button will prompt the user to save a copy the selected file to a location external to HealthTrack, e.g. a USB.
Classifying & Reclassifying Documents
All files in HealthTrack are classified when created, and it is not uncommon for them to be reclassified. The Reclassify Document screen is where users can choose the folder for documents, rename the Synopsis, assign files to specific users, and more.
Please see below for an explanation of each detail in this window.

| Date | This is the date the document relates to, such as the date a booking took place or the date a referral was issued. |
|---|---|
| Location | This is the location a document relates to, such as the location a booking took place at. |
| Synopsis | The Synopsis is often populated to reflect if a file was imported or to display the recipients of a letter. This can be overwritten to provide a concise description of the document. |
| Type | The Type is used to categorise the file in the folder tree. |
| ? | This button provides details on who created the file and when it was created, as well as the details on the last modifications. |

| Status | Documents can move through several states before being finalised and distributed. The Status will also affect which users will see the file in the Document Management screen. |
|---|---|
| Priority | The Priority can be used to mark a file as ‘Urgent’ so that it is reviewed and distributed sooner. |
| ☑ Use Workflow | When ticked, files will be included the Document Management screen. Please see the Document Workflow System section for more information. |
| Distribution Type | The Distribution Type can change the way the file is received by other software systems when distributed using third-party secure messaging. |
| Distribution List | This button opens the Distribution List screen for a specific document. |
| ☑ Not For Distribution | Having this option ticked prevents the file from being automatically distributed once finalised. |
| Identifiers | This can be ticked to reflect that the user has checked three points of identification for a patient, ensuring the patient is correct. |
| Consent | This can be used to reflect whether a patient has given consent, should this be required. |
| WF | The WF (WorkFlow) button will display changes to the Status of a document, as well as information on printing the document. |

| Owner / Approver | The Owner / Approver is the person that may be named on a letter, who dictated a letter, or the person signing off on a letter. This is generally the person finalising the letter prior to distribution. This typically remains as one individual. The External , Doctor , and User buttons can be used to show a list of relevant staff for selecting the Owner / Approver. |
|---|---|
| Assignee | The Assignee is the individual or group of users a letter is assigned to. This may change at a letter moves through various statuses. |
| Created By | This listed the user that created a file, and the date and time of creation. This cannot be changed. |

| Booking | This will populate a Booking ID, as well as the date and time of the related booking. These details will populate if a booking is selected when creating a letter, or by choosing the Select Booking button. |
|---|---|
| Referring Doctor | This will populate the name and provider number for the referring doctor. These details will populate based on selections made when creating a letter, or by choosing the Select Referring Doctor button. |
| Referral | This will populate a Referral ID. These details will populate based on selections made when creating a letter, or by choosing the Select Referral button. This will also populate the Referring Doctor properties above. |
| Episode | This will populate the Description and ID for an Episode. This can be populated using the Select Episode button. Multiple Episodes can be selected. |
| Accession Number | This will populate the Accession Number from a DICOM integration. |

| In Patient ☑ | Ticking this option will reflect that the file relates to an inpatient visit. |
|---|---|
| Admission | This can be used to record an admission number for an inpatient record. |
| Ward | This can be used to record the ward for an inpatient record. |
| Bed | This can be used to record the bed number for an inpatient record. |
| Find Admission | This button will provide a list of admissions for the patient, which can automatically populate the Admission, Ward, and Bed fields. |

| Restrict Access ☑ | Ticking this option at the time of creating the file, if permitted, will restrict which users are able to view the file. |
|---|---|
| Original Stored as | This option can be used to specify how the original copy of an imported file is being stored, e.g. on a disc or at an offsite location. |
| Storage Reference | This field can be used to record details of where the original copy is being stored. |
Creating Letters
A new letter can be created by pressing Create New Letter from the Documents tab of the patient’s record. This will open the Letter Template Selector window to select from the templates configured for HealthTrack.
-
From the Documents tab, select the Create New Letter button.
-
Highlight the template to be used for the new letter.
-
Select the Create button.
-
Depending on the configuration of a letter template, the user may receive the following prompts:
-
Select From Interested Parties – this allows the user to choose recipients for a letter from a patient’s interested parties. The first recipient is highlighted in green and is considered the primary recipient addressed on the letter. Select the Continue button to proceed.
-
Select a Booking – this allows the user to choose a booking (or multiple bookings), and details relevant to the booking/s will populate on the letter. Highlight/tick the relevant booking/s, then choose the Select button to proceed.
-
Please select the referral – this allows the user to choose a referral, and details relevant to the referral will populate on the letter. Highlight the relevant referral, then choose the Select button to proceed.
-
-
When prompted with the Classify Letter window, the user can make any changes required, then choose the OK button to proceed.
The letter should now open in the HealthTrack Document Editor or in the default editor for your computer, such as Microsoft Word.
You can change what program letters open in by updating the Word Editor Preference in File > User Preferences > Document Management & Importing. In the editor, you can continue to make content changes to the letter. Once your changes are complete, the letter can be saved by navigating to File > Save, and the letter editor can be closed. Your changes will appear in HealthTrack after a few moments.
Attachments
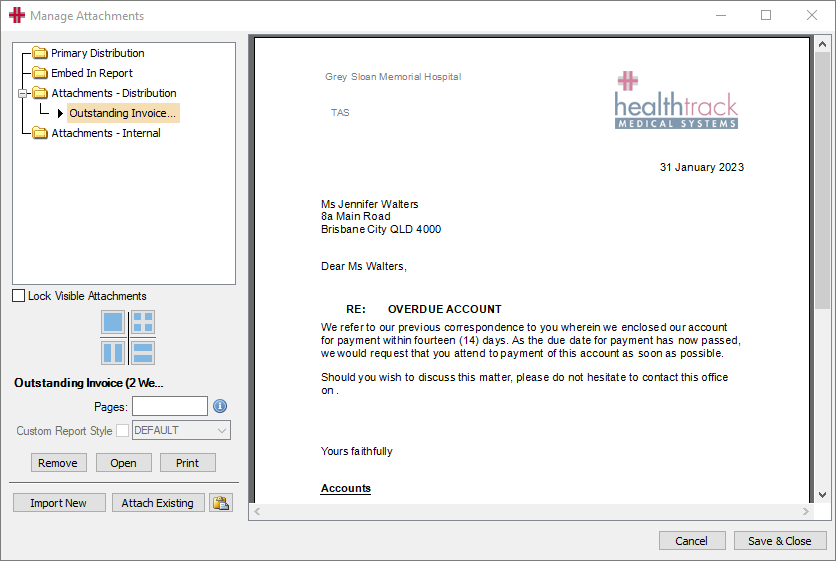
The Attachments button can be used to add files to a document for internal reference or for distribution.
Many electronic secure messaging systems have a file size limit. Adding files to your distribution may cause the total file to be too large for distribution using these systems, and may need to be distributed via other channels.
If there are any attachments for a file selected in the document tree, the ✅ Attachments button will appear with a green tick.
There are four categories for attachments:
Primary Distribution – an attachment in this category will be distributed in place of the document.
Embed In Report – an attachment in this category will be embedded in a document for distribution.
Attachments - Distribution – these attachments will be included as additional pages in the final document distributed.
Attachments - Internal – these attachments will not be distributed, but are attached to the document for internal reference.
Attach an Existing Document
This method allows you to attach a file that already exists in HealthTrack, such as pathology results and previous letters.
-
In the Documents tab, highlight the main file from the document tree.
-
Select the Attachments button from the top of the window.
-
Choose the category you would like the new attachment to be added in.
-
In the bottom left, choose the Attach Existing button.
-
In the Attach Existing Documents and Records window, choose a Category from the drop-down on the left.
- The Category will correspond with a folder in the document tree, and will list the files available in this folder.
-
Select a file from the list on the left-hand side of the window. A preview of the file can be shown on the right-hand side.
-
Choose the Attach button.
-
After attaching the required files, select the Save & Close button.
Attach a New Document
This method allows you to attach a file that does not already exist in HealthTrack
-
In the Documents tab, highlight the main file from the document tree.
-
Select the Attachments button from the top of the window.
-
Choose the category you would like the new attachment to be added in.
-
In the bottom left, choose the Import New button.
-
In the Import Documents & Images window, browse to a location on your computer on the left-hand side of the window.
-
Select a file from the list on the left-hand side of the window. A preview of the file can be shown on the right-hand side.
-
Choose the Import button.
-
Fill in any relevant details in the Classify Document window and choose the OK button. Please see the Classifying & Reclassifying Documents section above for further details.
-
After importing the required files as attachments, select the Save & Close button.
Quick Paste
This option allows you to copy a file external to HealthTrack at any point before Step 4, and it can be pasted within HealthTrack. A file can be copied by right-clicking on it and choosing the Copy option.
-
In the Documents tab, highlight the main file from the document tree.
-
Select the Attachments button from the top of the window.
-
Choose the category you would like the new attachment to be added in.
-
Select the Quick Paste icon – this is the button of a clipboard, to the right of the Attach Existing button.
-
After the pasted file’s preview is visible, choose the Save & Close button.
You can highlight and copy several files external to HealthTrack, and these can be added to HealthTrack simultaneously using the Quick Paste functionality.
Drag & Drop
This method allows you to drag files from outside of HealthTrack, which can be dropped into the desired folder.
-
In the Documents tab, highlight the main file from the document tree.
-
Select the Attachments button from the top of the window.
-
From a location external to HealthTrack, click and drag a file into the Manage Attachments window, and release into one of the folder categories.
-
After the dragged file’s preview is visible, choose the Save & Close button.
You can highlight several files external to HealthTrack, and these can be added simultaneously as attachments in HealthTrack using the drag and drop functionality.
Other Functions
Rename – double-clicking on the existing file name will allow you to enter a new description for the file.
Re-order – files can be dragged above or below other attachments to appear in a set order when distributed. Files can also be dragged into other folder categories.
🔒 Padlock – this icon, displayed to the left of an individual attachment, indicates that the file is locked, and it is not able to be renamed or removed as an attachment.
Lock Visible Attachments – ticking this option prevents the file preview from changing as other attachments are selected. This may be useful when clicking on other files to rename or re-order them, without loading a preview of each file.

Top left – preview a single attachment at a time.
Top right – preview up to four attachments.
Bottom left – preview two attachments side by side.
Bottom right – preview two attachments above and below one another.
Pages – this option can be used to specify the exact pages of an attachment which are to be included in the distribution.
Custom Report Style – if the Report of a Clinical Record is being attached, there may be other layouts available to change the way the report is displayed.
Remove – this button can be used to remove file that has been attached.
Open – this button will open the highlighted file in a new window, with may be a program external to HealthTrack, depending on the file type and user preferences.
Print – this option can be used to print a copy of the highlighted attachment.
Document Workflow System
The Document Workflow System is used to move documents through a process of drafting, approval, and finalisation, followed by distribution, with each part of the process often performed by different users.
The Document Management window can be opened in a number of ways:
-
Via the Documents and Clinical Records widgets on My Dashboard.
-
By navigating to Workflow > Document Management.
-
By selecting the Document Workflow button in the Clinical Summary tab.
-
By selecting the Workflow button in the Clinical Records tab.
This system is used to ensure that documents intended for distribution are checked by the appropriate user/s before anything is finalised and sent.
In order for a document to appear in the Document Workflow System, the Use Workflow option must be ticked in the Classify screen (for letters and documents) or the Info screen (for clinical reports).
When a document is included in the Document Management Screen, the Owner / Approver should be the user who will have their name on the letter or report.
For example, a letter dictated by a doctor should have that doctor listed as the Owner / Approver, and the person that typed the letter may be the Assignee. When the letter has been typed and is ready for the doctor’s review, the assignee can update the status to Approval Waiting. At this point, the letter will appear on the doctor’s Dashboard and will be shown in the Document Management window for the doctor.
Not all documents need to be included in the Document Workflow. This often applies to clerical documents, such as appointment reminders, consent forms, and information sheets. In these situations, it is common for the Assignee and the Owner / Approver to be the same person, and the document may not be included in the workflow by unticking the Use Workflow box on the Classify screen.
Document Groups
HealthTrack users can optionally be classified into Document Groups. These groups are DM-Admin, DM-Doctor, DM-Tech, and DM-Typist.
Document Groups can be used as the Assignee and/or the Owner / Approver for documents and reports. When a Document Group is used in place of an individual user, the document will appear in the Document Management window for all users within the group, allowing any member to take ownership. These documents will also appear on the user’s Dashboard.
Example: Your practice has 3 typists, with each typist working a different day of the week. A letter has been reviewed by the doctor, and corrections are required. While Typist 1 may have originally written the letter, this user won’t be available for several days. By assigning the letter to the DM-Typist group, the letter is visible to all users in the group, so Typist 2 or Typist 3 can see that corrections are needed and can take ownership of the letter to make the necessary corrections.
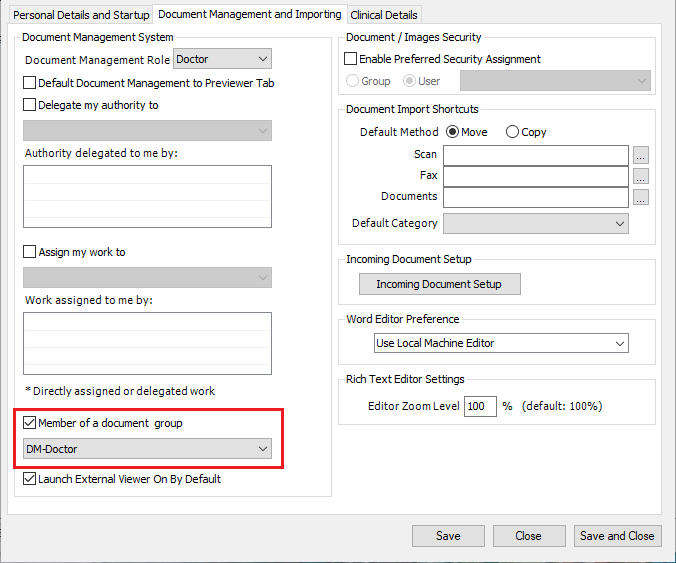
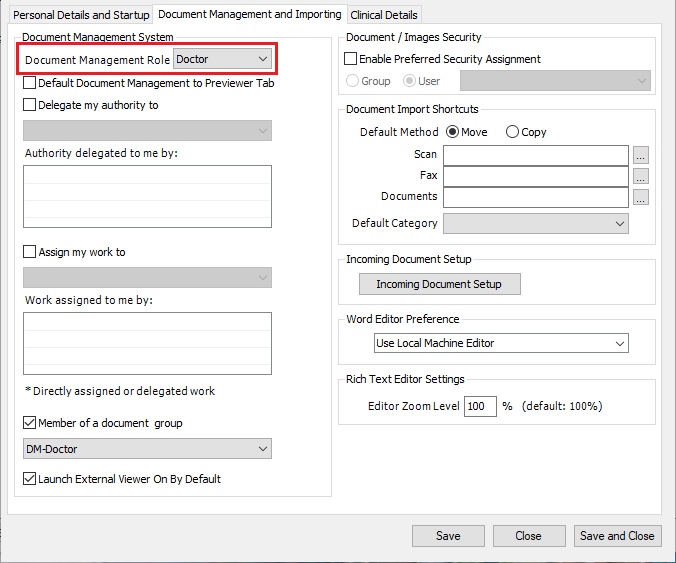
The Document Group can be set by individual users in File > User Preferences > Document Management & Importing.
-
Navigate to File > User Preferences.
-
Select the Document Management & Importing tab.
-
In the bottom left, tick the box for Member of a document group.
-
From the drop-down menu below this, choose the grouping that best suits the user’s role.
-
Select the Save and Close button.
Managers can also review and update the Document Group for all users in Admin > Delegation & Work Preferences.
-
Navigate to Admin > Delegation & Work Preferences.
-
Choose a user from the drop-down menu at the top of the window.
-
If any changes are required, select the Edit button at the bottom of the window.
-
At the bottom of the window, tick the box for Member of a document group.
-
From the drop-down menu below this, choose the grouping that best suits the user’s role.
-
Select the Save button.
-
If no further changes are required for other users, select the Close button.
Document Management Roles
All users should have a Document Management Role specified, as this will determine what content is visible to them in the Document Management window, based on the Status of a document.
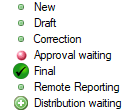
The standard Document Management Roles are:
Doctor – can see documents in the Approval Waiting status
Typist – can see documents in the New, Correction, Draft, and Distribution Waiting statuses
All – can see documents in all statuses
Distribution Waiting – can see documents in the Distribution Waiting status
Remote Reporting – can see documents in the Remote Reporting status
Technician – can see documents in the New, Correction, and Draft statuses
Example: As a doctor, you might only be interested in viewing documents that actively require your attention. By setting the Document Management Role as Doctor, this ensures that only documents in the Approval Waiting status are shown to you by default, and documents that are still being written aren’t crowding your view.
The Document Management Role can be set by individual users in File > User Preferences > Document Management & Importing.
-
Navigate to File > User Preferences.
-
Select the Document Management & Importing tab.
-
In the top left is the Document Management Role drop-down; from the drop-down menu, choose the role that best suits what documents the user will be involved with.
-
Select the Save and Close button.
Managers can also review and update the Document Management Role for all users in Admin > Delegation & Work Preferences.
-
Navigate to Admin > Delegation & Work Preferences.
-
Choose a user from the drop-down menu at the top of the window.
-
If any changes are required, select the Edit button at the bottom of the window.
-
At the bottom of the window is the Role drop-down; from the drop-down menu, choose the role that best suits what documents the user will be involved with.
-
Select the Save button.
-
If no further changes are required for other users, select the Close button.
Notes
Both the Document Management and Previewer tabs have a section for viewing notes. In the Document Management tab, this is reflected in the Note column by a yellow ‘sticky note’ icon, while the Previewer tab shows the notes in the panel to the right of the preview.
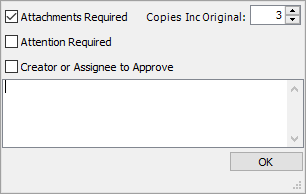
The Notes can include a text box with any specific instructions or details, as well as the following specifications:
☑ Attachments Required – this can indicate that there are attachments required for the document, which may need to be added or reviewed.
☑ Attention Required – this may be ticked to indicate that the document requires attention, which may include a note. While ticked, the document will not be distributed.
☑ Creator or Assignee to Approve – ticking this option authorises the document’s assignee can finalise the document, rather than the Owner/Approver. This would be ticked when the assignee’s permissions do not include the ability to finalise documents. An example of this would be a doctor assigning a document to a secretary to tidy the formatting, and the document can then be finalised directly by the secretary.
Copies Inc Original – this reflects how many copies should be printed for distribution, i.e. the number of recipients when finalised.
Notes can also be recorded from the Note button at the top of Clinical Records.
Document Management
The Document Management window can be displayed in two ways, depending on individual user preference.
-
The Document Management tab shows a detailed list of documents.
-
The Previewer tab shows a preview of documents.
At the top of the Document Management window are a number of filters.

| Clinical | When selected, only clinical reports will be displayed in the Document Management window. The heading in the top left will also change to a blue “Clinical” heading. |
|---|---|
| Letters | When selected, only letters will be displayed in the Document Management window. The heading in the top left will also change to a yellow “Letters” heading. |
| Clinical & Letters | When selected, both clinical reports and letters will be displayed in the Document Management window. The heading in the top left will also change to a green “Clinical & Letters” heading. |
| User | This section displays the username of the logged in user, and their Document Management Role. |
| Date Filters | By default, the date filters will display the past 18 months of documents from the current date. This date range cannot exceed 18 months. |
| ☑ Include Records Created During | This option will ensure that documents created within the above date range are also displayed in Document Management. This may be useful for documents that are being backdated. |
| 📅 Date Range | This button can be used to a different date range, and includes some presets for choosing a date range. |
| Default | This button can be used to return to the default date range, which is today’s date and the prior 18 months. |
| ☑ My Work | When ticked, the Document Management window will include documents where the current user the creator, assignee, or owner / approver will be listed. |
| ☑ My Workgroup | When ticked, the Document Management window will include documents where the assignee or owner / approver is the Document Group the user is a member of. |
| ☑ Delegated Work | A user can choose to temporarily delegate their work and document permissions to another person. When ticked, the Document Management window will include documents relevant to other users that may have delegated their work. |
| ☑ Assigned Work | A user can choose to temporarily assign their work to another person. When ticked, the Document Management window will include documents relevant to other users that may have specified their work to be assigned to another user. |
| ☑ All Work | When ticked, the Document Management window will include documents regardless of the creator, assignee, or owner / approver. This filter requires the CanUseDocumentManagementAllWork permission. |
At the bottom of the Document Management window are some additional functions.
☑ Launch External Viewer – when a user opens a Clinical Record from the Document Management window, the viewer for images (e.g. DICOM) can be launched simultaneously when this option is ticked. This can be enabled by default in File > User Preferences > Document Management & Importing by ticking the Launch External Viewer On By Default option.
DICOM Pre-Load – this button will open the Prepare DICOM Pre-Load window, where the user can select records with sufficient study information to begin loading the images ahead of viewing them. This may be beneficial in offsite environments with a slower internet connection.
Send to Remote Reporting – this relates to a licensed feature. Using this button allows for selected studies to be sent to a nominated Remote Reporting Doctor.
Refresh List – this button can be used to refresh the Document Management window, which may add or remove documents from view if they have been updated.
Close – this button will close the Document Management window.
Document Management Tab
When viewed using the Document Management tab, the window will list the relevant document as its own row with details of each document, the state, and shortcut options. There are also a number of actions that can be performed against each row, and shortcuts to manage the document.
The list of documents are grouped by their Priority, then listed alphabetically by patient surname.
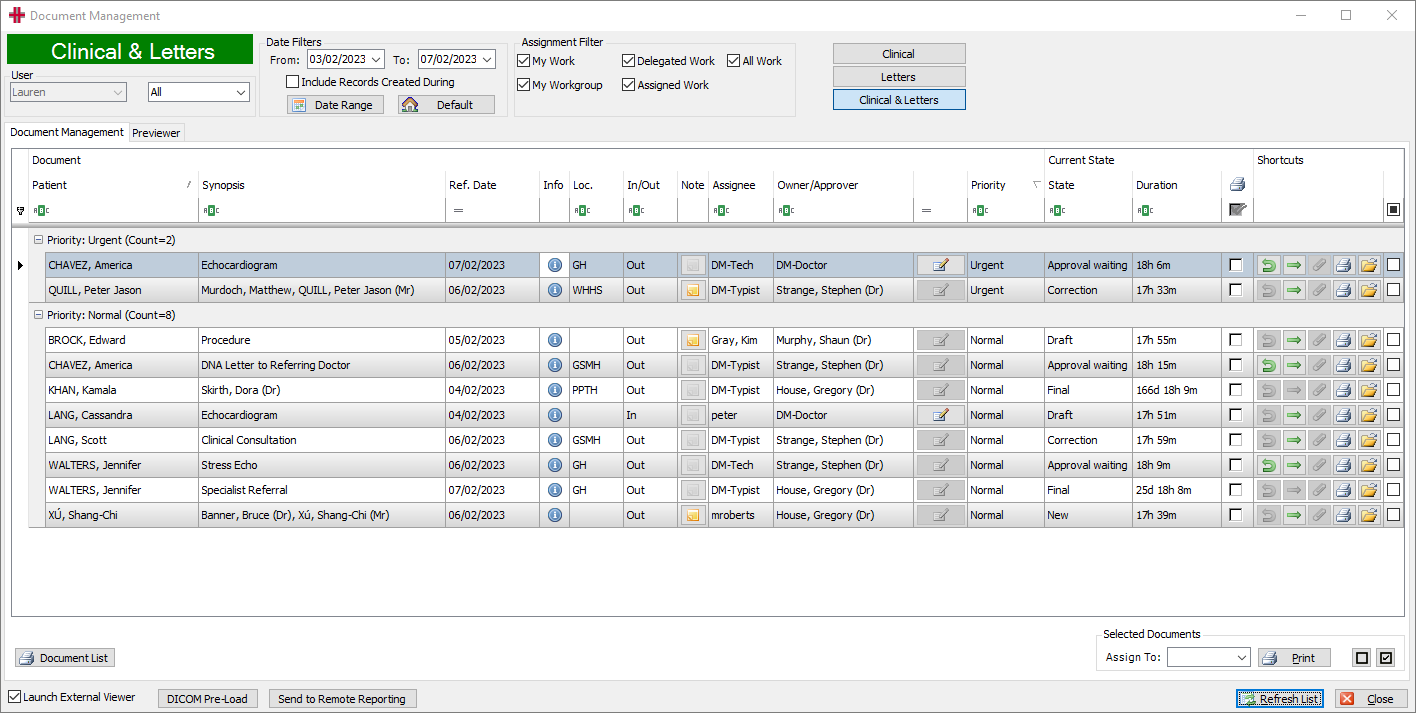
| Patient | This column lists the name of the patient the document relates to. |
|---|---|
| Synopsis | This column lists the Synopsis, which may be the type of report or the recipient list for the document. |
| Ref. Date | This column displays the date of the document, as specified in the Classify/Info screen. |
| Info | Selecting the ‘i’ icon in the Info column will list who the record was captured by. For letters, this is the person that created the file. This does not apply to Clinical Records. |
| Loc. | This column lists the ‘short name’ for the location the document relates to. |
| In/Out | This column will display ‘In’ if the document has been marked as relating to an Inpatient admission, and ‘Out’ if there is no admission specified in the Classify/Info screen. |
| Note | When the ‘Note’ icon is yellow, this indicates that there are notes on the document. For more information, see the Notes section. |
| Assignee | This column lists the Assignee for the document. Clicking in this column will open the Search for Assignee window to change who the document is assigned to. |
| Owner/Approver | This column lists the Owner/Approver for the document. |
| Take Ownership button | If the Owner/Approver is a Document Group, this column will show a button allowing the current user to take ownership of the document. This will set the current user as the Owner/Approver. |
| Priority | This column displays the Priority for the document, as set in the Classify/Info screen. Clicking in this column will allow the user to choose a different priority for this document. |
| State | This column displays what status the document is in, as set in the Classify/Info screen. Clicking in this column will allow the user to choose a different status for this document. |
|---|---|
| Duration | This column displays the amount of time the document has been in the current state. When the state is changed, the duration will be reset. |
| Print ☑ | This box is used to reflect whether the document has been printed. Ticking this box manually will not print the document. |
| Previous State button | This button can be used to move the document back to a previous status, such as ‘Correction’. |
|---|---|
| Next State button | This button can be used to move the document forward to the next status, such as ‘Final’. |
| 📎 Attachments button | This icon indicates whether there are attachments for the document. |
| Print button | The print icon can be used to print a document from the Document Management window. |
| 📂 Open button | The open icon can be used to open a document in the default editor. |
| Select ▣ | This box can be used to select documents, and can be used for the DICOM Pre-Load , Send to Remote Reporting , and Assign To drop-down, and Print buttons. |
In the bottom left corner of the Document Management tab is the option for Document List . This can be used to print a list of documents that are currently displayed, however this does not print the documents themselves. This may be useful to provide to users as a list of documents manually work through.
In the bottom right corner of the Document Management tab is the Selected Documents section. When documents have been selected using the tick box at the end of each row (or by using the select/deselect all boxes), you can choose to change the assignee in bulk for these documents using the Assign To drop-down menu. The documents that have been selected can also be printed in bulk by choosing the Print button.
Previewer Tab
The Previewer tab can be used to see copy of each document directly from the Document Management window. The left-hand side of this view will list the documents grouped by their Priority, while the right-hand side provides further details and shortcuts.
The Previewer tab is used to view a copy of a document, but cannot be used to edit the document’s contents.
The documents listed may have different background colors:
-
Orange background: the Attention Required box has been ticked
-
Blue background: the Assignee is a group, rather than a specific individual (e.g. DM-Technician)
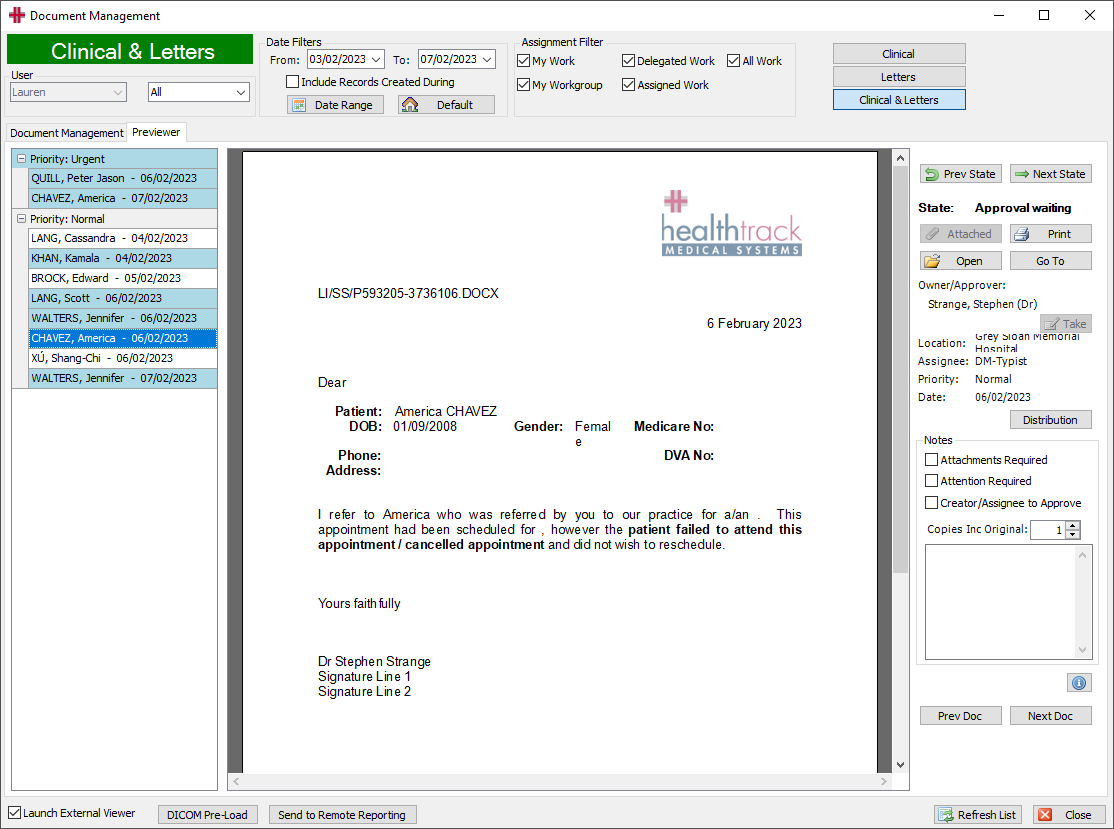
| Prev State | This button can be used to move the document back to a previous status, such as ‘Correction’. |
|---|---|
| Next State | This button can be used to move the document forward to the next status, such as ‘Final’. |
| State | This displays the current status of the document, as set in the Classify/Info screen. |
| 📎 Attached | When this button is available, there are attachments for the document. Selecting this button will open the Manage Attachments window. |
| Print a copy of the document from the Document Management window. | |
| 📂 Open | Open the document in the default editor. |
| Go To | This button can be used for letters to go to the specific patient’s record. |
| Owner/Approver | The Owner/Approver for the document. |
| Take | If the Owner/Approver is a Document Group, this button will be available to allow the current user to take ownership of the document. This will set the current user as the Owner/Approver. |
| Location | This is the location the document relates to. |
| Assignee | The Assignee for the document. |
| Priority | The Priority for the document, as set in the Classify/Info screen. |
| Date | The date of the document, as specified in the Classify/Info screen. |
| Distribution | This button opens the Distribution List window for the document. Please see the Distribution List section for more information. |
| ☑ Attachments Required | This may be ticked to indicate that there are attachments required for the document, which may need to be added or reviewed. |
| ☑ Attention Required | This may be ticked to indicate that the document requires attention, which may include a note. While ticked, the document will not be distributed. |
| ☑ Creator/Assignee to Approve | This is used to authorise the document’s assignee can finalise the document, rather than the Owner/Approver. This may be ticked for users that do not have permission for finalising documents. |
| Copies Inc Original | This reflects how many copies should be printed for distribution, i.e. the number of recipients when finalised. |
| Notes | This box can be used for notes, which may relate to the above options of Attachments Required or Attention Required. Please see the Notes section above for more information. |
| Info | The ‘i’ icon in the will open a Document Information window to list who the record was captured by. For Letters, this is the person that created the file. This does not apply to Clinical Records. |
| Prev Doc | This button can be used to display the previous document listed on the left-hand side of the Previewer tab. |
| Next Doc | This button can be used to display the next document listed on the left-hand side of the Previewer tab. |
To zoom on a document preview, hold the Ctrl key on your keyboard and use the scroll wheel on your mouse to increase/decrease the preview size.
Document Distribution
The document distribution module is used to classify and either electronically send letters and reports to all selected interested parties, or flag those which need to be manually distributed.
HealthTrack connects to many different document exchange companies for electronic faxing and distribution such as ArgusConnect, Health Link and Medical Objects. Whichever company your referring providers are using, the HealthTrack component of document distribution remains the same.
Initial Set Up:
For HealthTrack to be able to distinguish between Doctors who can receive documents electronically or by fax you will need to ensure that the Doctor has the correct settings applied for electronic sending.
To do so, enter the Add/Modify MO Details, by going into Admin >> Referring MO Details:
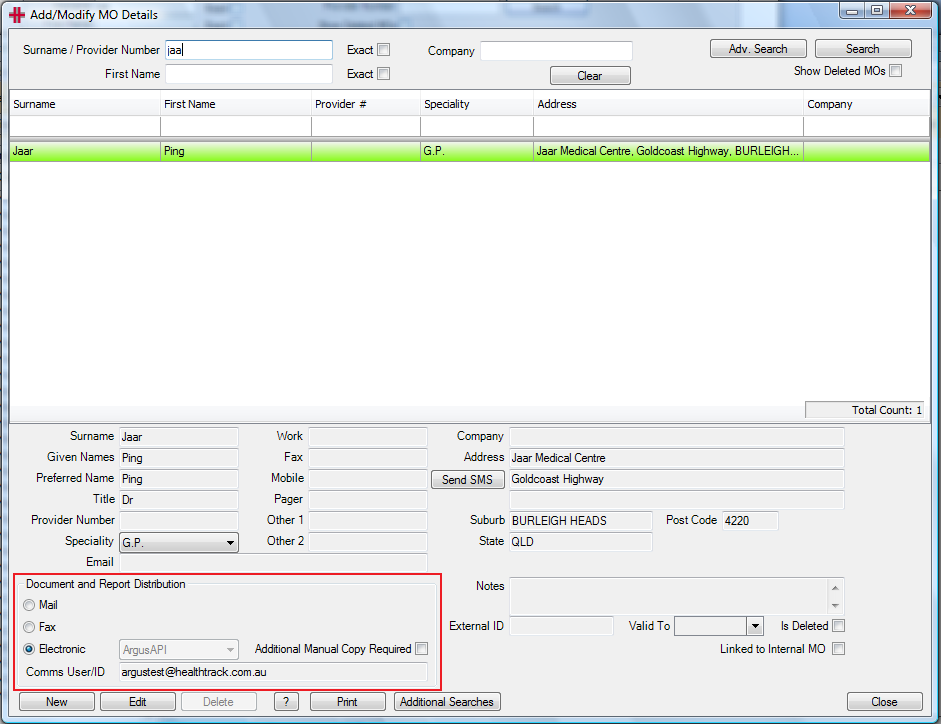
Doctors that do not have the above fields filled out will be flagged by HealthTrack for manual distribution for staff to print and mail any documents to these Doctors.
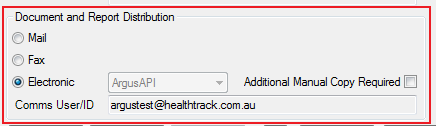
Current preferred methods are highli9ghted in Green:
| Method | Description | Plaintext | Notes | |
|---|---|---|---|---|
| ArgusHL7 | Preferred method of sending PDF reports embedded in HL7 messages via Argus. | No | Yes | Will never include plaintext report (as per Argus specification) |
| ArgusPIT | PIT report sending via Argus. | Yes | No | |
| Email with report as PDF attachment | No | Yes | ||
| ePost | Printed version of the PDF report mailed physically to the recipient. | No | Yes | |
| Fax | PDF report sent via Fax. | No | Yes | |
| HealthLink | Legacy method of sending PIT formatted reports via HealthLink. Used for recipients that aren’t capable of receiving PDF in their software systems. | Yes | No | |
| HealthLinkHL7 | Preferred method of sending PDF reports embedded in HL7 messages via HealthLink. | Yes | Yes | Sends both plaintext report and PDF versions of the report in the one message. |
| HealthLinkHL7NZ | New Zealand standard method of sending PDF reports embedded in HL7 messages via HealthLink. | No | Yes | |
| HMSPatientPortalViaToken | Used by Patient Portal system | - | - | |
| For manual mail processing to recipients (Sets ‘Action Manual’ on the Distribution entry) | - | - | ||
| Medical Objects | Legacy method of sending Plaintext reports via Medical Objects. Used for recipients that aren’t capable of receiving PDF in their software systems. | Yes | No | |
| MedicalObjectsHL7 | Preferred method of sending PDF reports embedded in HL7 messages via Medical Objects. | Yes | Yes | Sends both plaintext report and PDF versions of the report in the one msg. |
| MMEx | PDF report sending via MMEx | No | Yes | Custom version of HealthLink in use at some sites in WA. Sends HL& message with Link to a Web Repository. |
| Promedicus | PIT report sending via Promedicus. | Yes | No | |
| ReferralNetPIT | PIT report sending via ReferralNet. | Yes | No |
The Distribution List
Once a letter or clinical record has been created, the selected interested parties will be added to the Distribution List. The Distribution list can be accessed via the Workflow Menu – Distribution List. When accessing the distribution list from here it will automatically select All Patients.
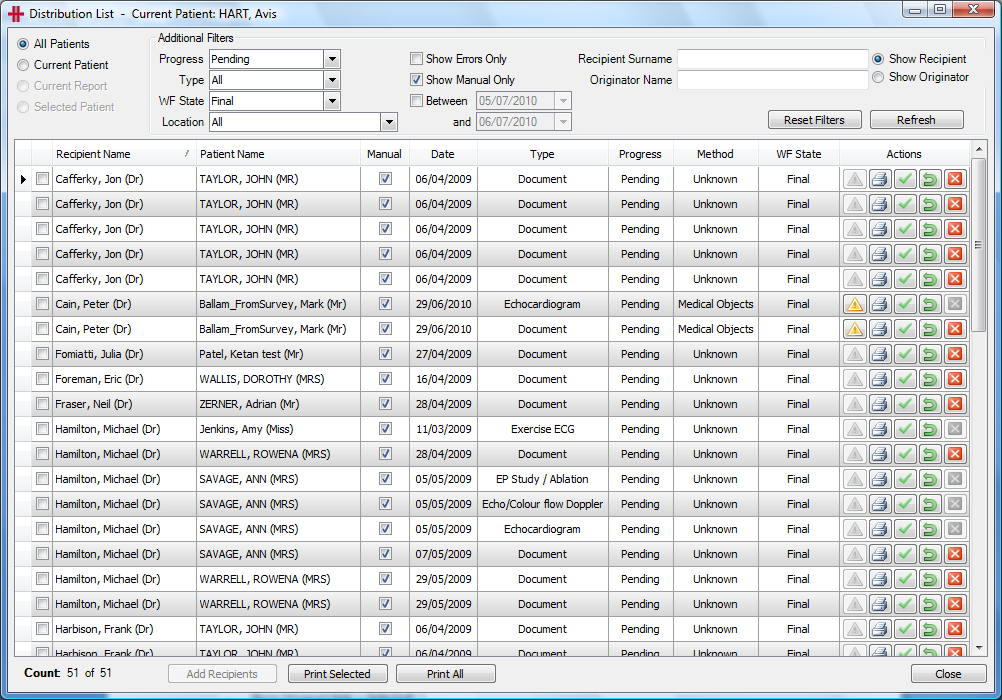
The Distribution List comprises two main sections – filters and grid. The filters are displayed in the top section of the screen. When you first open the Distribution List from the Workflow Menu the filters will be set to:
-
All Patients
-
Progress – Pending
-
Type – All
-
– Final
-
Location – All
-
Show Manual Only – Selected
Additional options to filter by:
-
Current patient
-
Current report
-
Selected patient
-
Show errors only
-
Date range
-
Recipient surname
-
Originator surname
These filters can be changed at any time, to revert back to the default filters click the Reset Filters button. By default the distribution list displays the manual distribution documents for staff to action.
The main section of the screen is the grid where any documents matching the above filters are displayed. This grid contains the following information:
-
Selection Box
-
Recipient Name – the person who the document is being sent to or Originator if selected in the filters
-
Patient Name – the name and HealthTrack ID of the patient that the document / record relates to
-
Manual – if the Doctor is not set up to receive documents/records electronically then they will be ticked for manual sending. This requires the staff member to print and send the document to the interested party.
-
Date
-
Type – highlights whether it is a Document or a Clinical record.
-
Location – where document was created.
-
Progress – Pending or Complete (refers to the distribution of the document)
-
Method – the type of distribution. The state will be unknown and HealthTrack will go through all items in the distribution list and establish if the referring Doctor is set up for electronic distribution. If the referring Doctor can receive electronic distribution then HealthTrack will update the status to the type of distribution for example ArgusPIT.
-
WF state – Workflow state is the current workflow state of the document/clinical record. HealthTrack will not electronically send the document/clinical record until the workflow status is final.
-
Actions:
-
Yellow Exclamation Mark – enabled if there have been any errors in the process, by clicking on the exclamation mark an error message appears.
-
Print Icon – prints the associated document/clinical record
-
Green Arrow – resends the document/record. Is unable to resend if there is already the same document/clinical record for that referring Doctor in the pending status.
-
Red X – deletes the document/record for that recipient from the Document Distribution System. Some records are not able to be deleted e.g. for a clinical record the referring MO cannot be deleted from the distribution list. To remove this Doctor the clinical record needs to be amended to the correct referring MO. Once the document has been sent, it cannot be removed from the distribution list.
-
If you right click on one of the entries in the grid there are 3 options:
-
Go to Record – takes you to the record or document in the patient’s file.
-
Go to Doctor Info – takes you to the Add/Modify Referring MO screen for that patient.
-
Show this patient’s records – lists all distribution for that patient only.
Using the Distribution System:
How is a record or document added to the Distribution System?
Any document that uses the Interested Parties selection screen or any clinical record that has a referring MO recorded, will automatically be added to the distribution system. The distribution system isn’t dependant on the workflow, only the status of the document. A record or document doesn’t need to be added into the workflow to be included in the distribution system.
*How is the record or document distributed? *
Once a document has been finalised, HealthTrack will review the recipients on the document and distribute as required. For any recipients that require a manual copy to be sent, or for any documents that fail, the distribution method will be flagged as manual.
Staff will need to access the distribution list on a regular basis. They will need to come in and manually print and send any documents that couldn’t be automatically sent. There is a print all button on the bottom of the Distribution List that will print all manual documents that are in a manual state with a status of final and don’t have any errors associated with them. Using this button will then only leave the documents in error to be reviewed. Alternatively, to the Print All button the user may use the selection tick box and select the ones that they want printed and then print the Print Selected button or print each document individually by clicking on the associated print icon.
Documents with errors: the errors will need to be reviewed and this can be done by clicking on the yellow exclamation icon. There are two options for the documents that have the error you can fix the issue – e.g. correct the username/fax number and then un-tick the manual check box; this will then send the document through with the next distribution run. Or alternatively you can manually print the document and send via post.
The Distribution List replaces the Admin section of the Document Management screen. If the users are currently using this to print their letters then they will no longer need to view this page they will need to use the Distribution list instead.
Adding Interested Parties to Letters / Documents and Clinical Records:
Letters / Documents:
Create the letter using the normal process as outlined above. Any doctors selected in the Interested Parties screen will automatically be added to the Distribution List. Once the letter has been classified you can add additional interested parties if required.
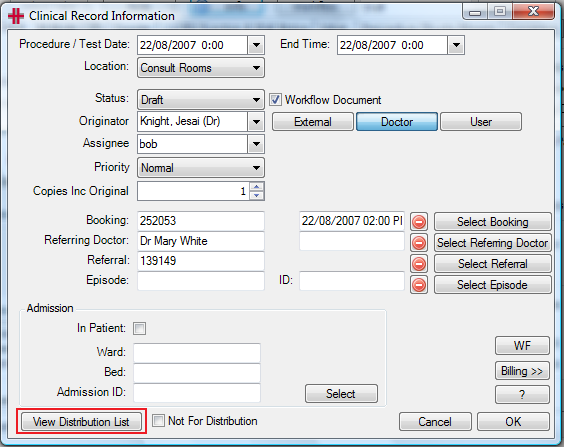
To view the distribution list for a specific letter, select the letter in the document tree and click Reclassify. In the bottom left hand corner you will notice that the View Distribution List is now enabled click on this button.
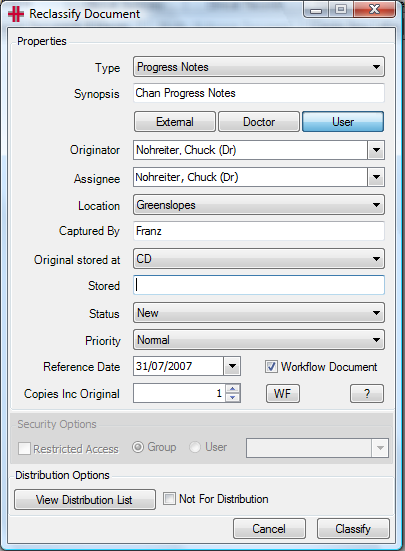
Figure 1 - Reclassify Document - View Distribution List
Clinical Records:
The distribution list for the clinical records is maintained in the Clinical Record Information screen accessed via the information button.
 Figure
2 - Clinical Record Information
Figure
2 - Clinical Record Information
The referring doctor will automatically be added to the distribution list, to add additional interested parties to the distribution list click on the View Distribution List button.

Figure 3 - Distribution List
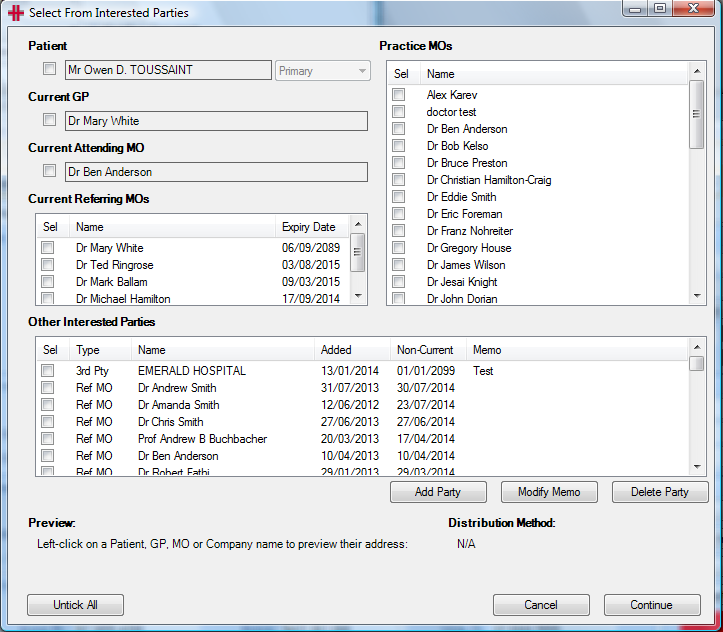
Click on Add Recipients this will provide you with the interested parties screen for this patient. All current interested parties will be displayed and can be selected from alternatively if they are not a current interested party you can add them using *Add Party. *
Figure 4 - Select from Interested Parties
**
**Incoming Documents (Automated)
The Incoming Document System, is an automated method of receiving referrals, discharge summaries, letters and test reports from other health care providers. The documents are received and matched electronically. Then based on the Doctors settings the results can be either:
-
Automatically approved and saved in the selected document folder
-
Approved by the doctors’ secretary and then saved in the selected document folder
-
Approved by the doctor and then saved in the selected document folder
Using the Incoming Distribution System and automating your incoming mail will:
-
Save your practice many hours of administration time each week.
-
Reduce the number of documents imported onto the incorrect patient.
-
Ensure that the documents are received moments after they have been sent.
There is a site Default configuration for the incoming documents. This is set up in the Admin section of HealthTrack. Then for each doctor they have the option to set up their individual configuration settings. The doctors can update their configuration through the User Preference screen.
Setting up the Site Default configuration:
To set up the configuration go into the Admin menu – Maintenance and then select ‘Incoming Document Setup.
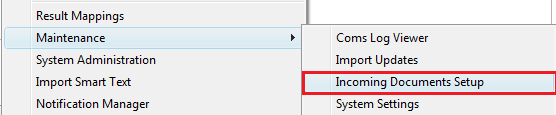
The Incoming Documents Import Setup screen will become available.
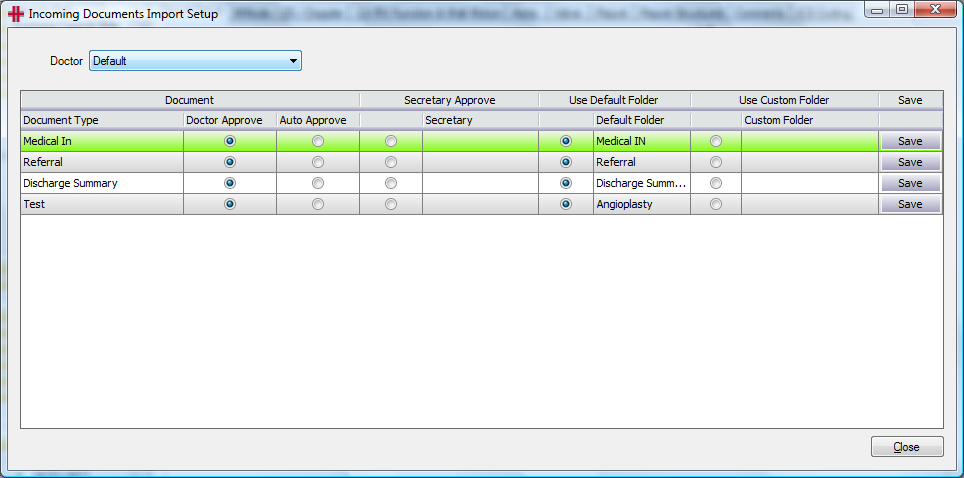
Figure 5 - Incoming Documents Import Setup
The Doctor drop down field will list all internal MOs and a Default option. The first step is to setup the Default configuration.
There are four different Document Types that are received:
-
Medical In (letters)
-
Referrals
-
Discharge Summaries
-
Tests
For each of these document types you need to specify who is approving the document:
-
Doctor or
-
Auto approve
For the default setting you cannot select secretary to approve, this can only be done on an individual doctor level.
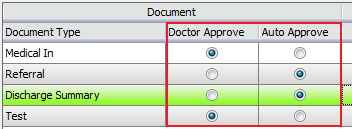
Select either the doctor or auto approve for each document type, if you change any of the current settings ensure that you click on the S*ave* button on the corresponding row to save your changes.
Then you need to specify the default folder in which these are stored. If the documents aren’t being auto approved then the folder can be changed if required when approving the documents.
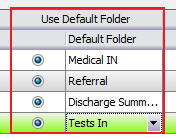
To change any of the default folders click on the folder you need to change and select the required folder from the drop down list.
Once you have selected your default folders and clicked on the corresponding *Save* buttons – your Default configuration has been completed.
The doctors by default will use the Default configuration, unless this is modified for the individual doctor. This can either be changed by an administrator in the Admin – Maintenance – Incoming Document Setup section or by the individual doctor via their User Preference screen.
To do this the Doctors will need to open File >> User Preferences. For more details please refer to the User Preferences section of this Usability Guide.
Using the Incoming Documents Module
When a document is received by HealthTrack it will try to match the document to a patient within HealthTrack. If it can match the patient in HealthTrack it will do one of two things:
-
Automatically import it into the patient’s file OR
-
Import it into the Incoming Approval screen for either the Doctor or Secretary to approve.
If HealthTrack cannot match the document to a patient then the document will be placed into the Incoming Matching screen for the user to match to a patient. Once it has been manually matched it will need to be approved prior to being filed into the patients file. If you require more information on the matching please see the Incoming Matching
The Incoming Documents Module works similar to the Incoming Pathology and Radiology system. Any documents that are imported into HealthTrack and can’t be matched to the patient are placed into the Incoming Matching screen. Please see the Incoming Matching section of this manual for more details.
If the document can be automatically imported or once it has been matched by the user it will come
Internal Document Review
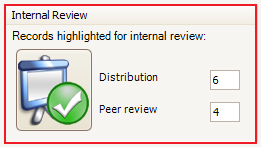
The Internal Document Review system provides the users with a preview of reports and documents for reviewing and comments. The Internal Document Review screen is not only for doctors and can be used by all staff.
The Internal Document Review has two main Source types:
-
Distribution
-
Peer Review
Distribution is only used by HealthTrack systems that have a licence to use the Distribution System. When the Distribution system needs to send a document to an internal doctor, the document will be sent to the recipients Internal Document Review list opposed to sending it externally.
Peer Review allows one user to send a document/clinical record to another user for their review and or feedback. The sending user can add notes to the document / clinical record for the receiving recipient, once the receiving recipient has reviewed the document if required they can send back with a comment or mark the document as reviewed.
Adding a Document for Internal Review:
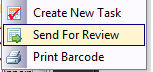
To send a document or clinical record to another user for review right click on entry in either the clinical records tree or the document tree and select ‘Send For Review’
The following screen will appear:
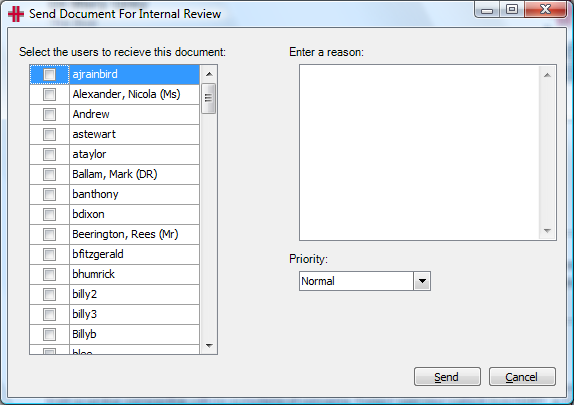
Figure 6 - Send Document for Internal Review
Select the user or users that you want to send this document to for review. To do this click in the box that corresponds to their name.
If you want to send through a note with your review request then you need to type this note into the ‘Enter a reason:’ text box.
Specify the Priority for the review. By default this will be .
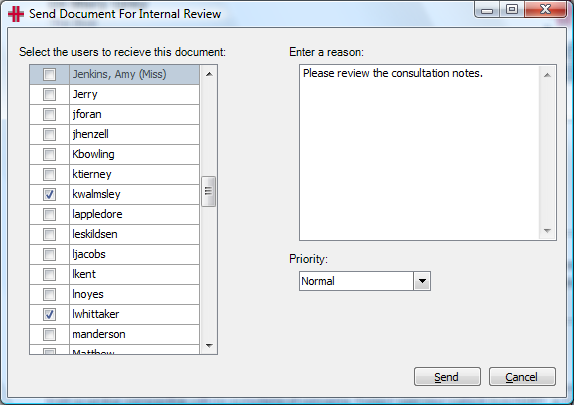
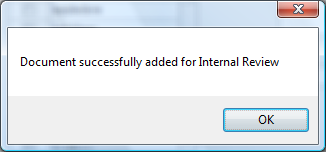
Then click on the Send button. A window will then pop up telling you that the document has been added for review.
Reviewing your Documents:
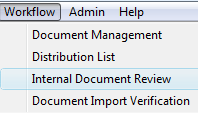
The Internal Document Review screen is located in the Workflow menu
Or alternatively by clicking on the Internal Review Icon on the Doctor Dashboard screen
When you first open the Internal Document Review screen it will default to display All Incoming documents/clinical records that are outstanding (regardless of the date). Using the filters at the top of the screen you can change this if necessary otherwise you can start reviewing your documents.
The filters are:
Source: All Incoming, Distribution, Review or Sent by you. All incoming will show both Distribution and Review documents.
Status: Outstanding, Reviewed Only or All
: By ticking the between check box you can specify the date range you wish to filter by.
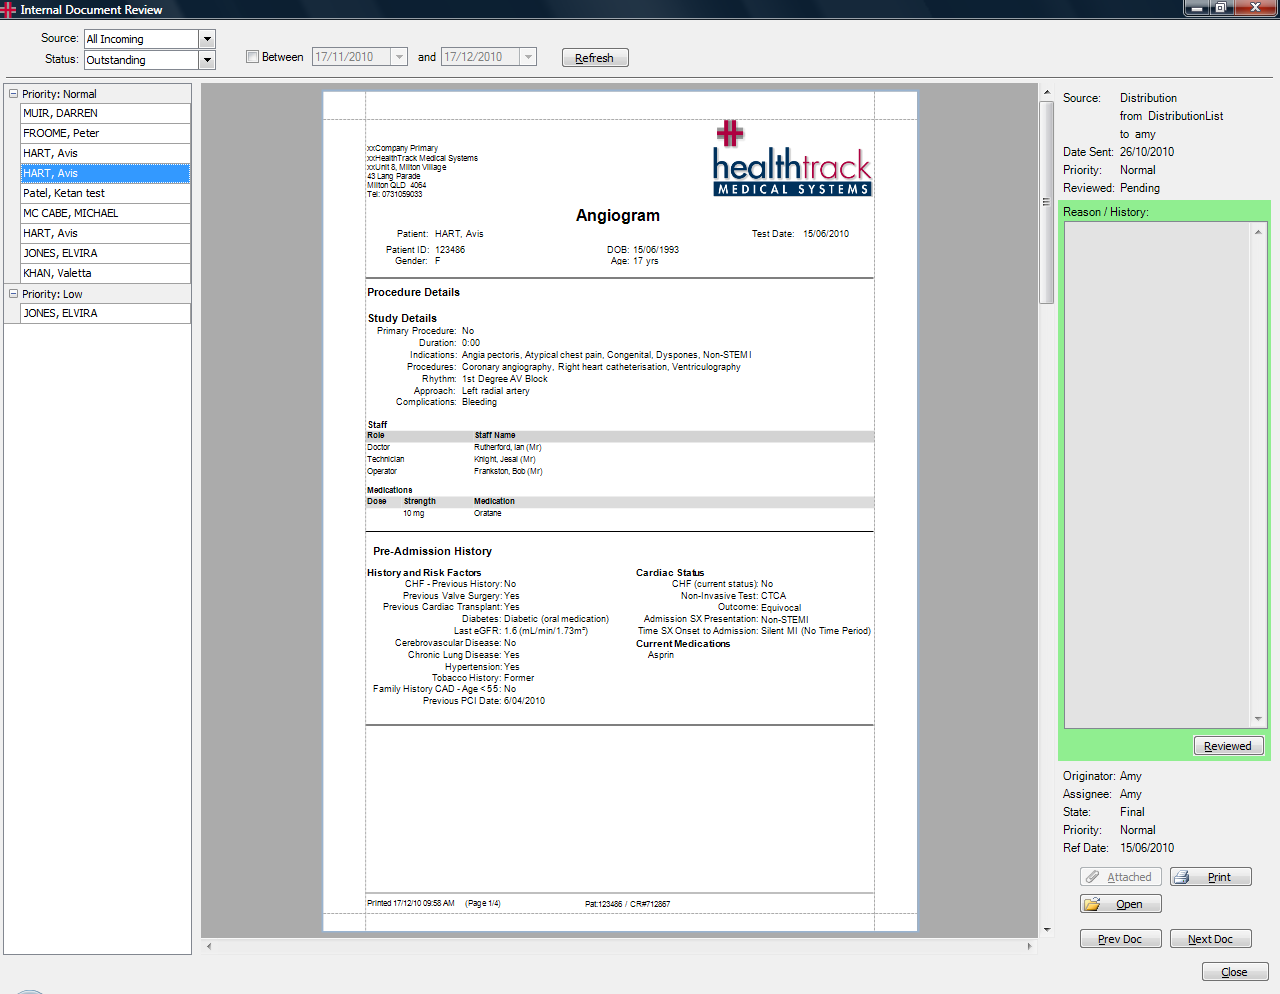
Figure 7 - Internal Document Review
The Internal Document Review screen will display a list of patient names on the left hand-side of the screen; these are the documents/clinical records waiting to be reviewed. The one highlighted in blue is the document/clinical record currently being viewed.
The middle section of the screen will be the document that is to be reviewed. To change the size of this document you can zoom in and out. To do this left click once on the document, then hold down the control (Ctrl) and use the mouse wheel to change the zoom size.
The column on the right hand-side of the screen provides you with details about the document, the notes and some action buttons.
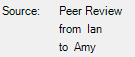
Source: Is the type of review. This will either be Distribution or Peer Review. If the source is peer review it will state who it is from and who it is to.
Date Sent: Will be the date that the document was added to the Peer Review List. This is either the date that the Distribution System sent the document or the date the user assigned that document for review.
Priority: The priority of the document for review can either be; Low, Normal or Urgent.
Reviewed: This is the date that the document is marked as reviewed by the user until it has been marked as reviewed it will be in a Pending status.
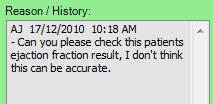
Reason/History: This is where the notes from each user will be recorded. A running history will be displayed until the document is marked as reviewed.
Reviewed: This button will either be Reviewed or Reply. When reviewing documents that have come through via the distribution system you will not have the ability to reply you will only be able to Review. If the Document has been sent to you for your Review then a free text box will become available underneath the Reason/History box for you to type in comments. If you do type in some comments the button will change to Reply.
Originator: The specified originator for the document/clinical record
Assignee: The specified assignee for the document/clinical record
State: The status of the document
Priority: The workflow priority of the document/clinical record
Reference Date: The reference/test date
Attached Will be enabled if there are any documents attached
Print Will print the document/clinical report
Open Will open the document/Clinical report
Go To The Go To button will become enabled when reviewing documents. This will allow you to go to the patients file in HealthTrack.
Prev Doc This will move you to the previous document in the list
Next Doc This will move you to the next document in the list
Marking a document as Reviewed or Replying:
Once you have finished reviewing a document to remove it from your list and mark the document as being reviewed all you need to do is click onto the *Reviewed* button.
Once you have clicked on this button HealthTrack will mark the document as reviewed, remove it from your outstanding list and move you onto the next document awaiting your review.
Reply: For documents that have come via the Peer Review function you have the ability to reply to the sender. Below the Reason/History box will be a Reply to Sender box, you can use this box to send a note back to the sender. If you don’t want to send a note back then you can simply click on the *Reviewed* button and HealthTrack will mark the document as reviewed, remove it from your outstanding list and move you onto the next document awaiting your review.
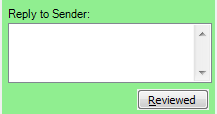
To send a note back, simply type your message in this box, you will notice that the *Reviewed* button has now changed to Reply
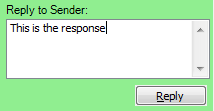
Once you have added your note and clicked on the Reply button HealthTrack will send this document back to the recipient, remove it from your outstanding list and move you onto your next document for review.
Importing Documents
HealthTrack provide the user with the functionality to import documents and images into a patient’s file. The Import Documents and Images is accessed via the Import Documents& Images button on the Documents tab.
Open a patient’s Document screen and press Import Documents & images button. This will open the Import Documents and Images screen.
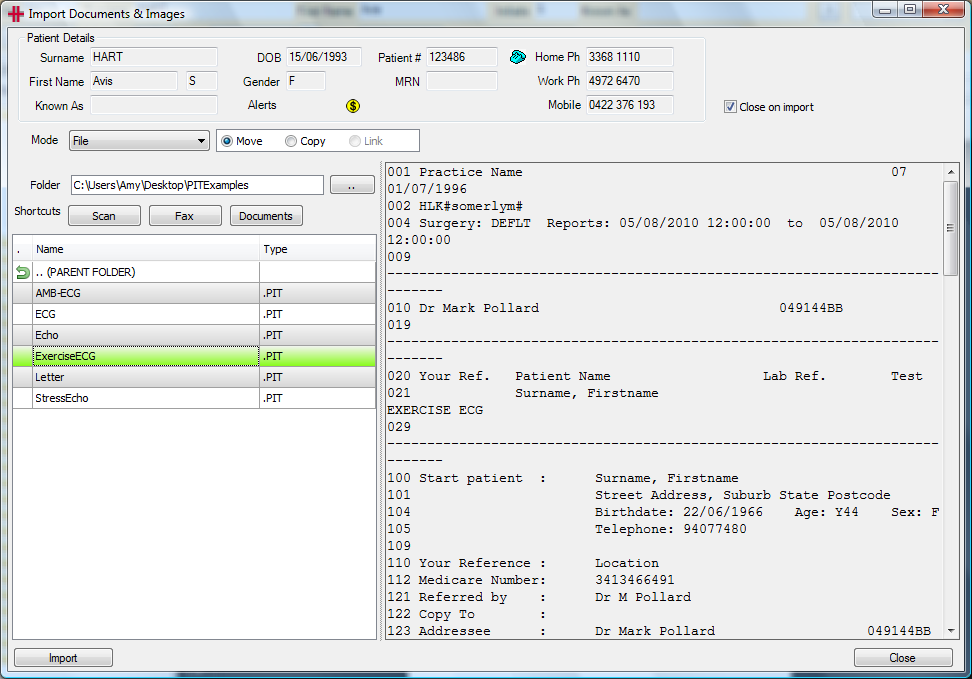
Figure 8 - Import Documents & Images
The top section of this screen will display the patient’s basic demographic details, this is the person who you are importing the document for. If you have the incorrect patient selected you will need to close out of this patient and go to the correct patient.
Close on Import – will by default be selected. If you are importing multiple (separate) documents into the patients record then you can untick this check box and the import screen will remain open. If you are importing documents for multiple patients please see Practice Wide – Import Documents.
Mode – Please select File or Multipage File.
Move – Will remove the document from where it is currently stored in and save it in HealthTrack.
Copy – Will save a copy in HealthTrack and leave the original document in its current location. (The copy function used to be known as ‘Leave original’).
Folder – Is where the documents are currently stored. To find the folder you can use the button with the two dots or alternatively there are three short cut buttons Scan, Fax and Documents. These short cuts are set for each user and can be set up in the user preference section or alternatively once you have selected the folder you can use the Save Shortcut button.
All items in the selected directory will be displayed in the list below. Select the file that you want to import by clicking on the file in this list. If HealthTrack is able to a preview of the file will be displayed in the Preview section, please note that there are some file types that will not be able to be previewed.
Click on the Import button to import the document into HealthTrack. The classification screen will now become available. Select the folder that the document is to be imported into and update the other details as required. Click on Classify and the document will be imported into the patients file.
If you need to import multiple documents as separate files with the same classification for the same patient (e.g. 3 medical in documents) then select the first document in the list and then hold your shift key down whilst you select the other documents. Then click on the import document and classify as per normal.
Multipage Import
Multipage import allows for you to import multiple documents into the one file within HealthTrack. For example if you have scanned in a document that is four individual files you can import all of these into the one HealthTrack file. This saves you from having multiple documents listed in the documents tab.
To import multiple pages select Multipage File in the Mode dropdown list.
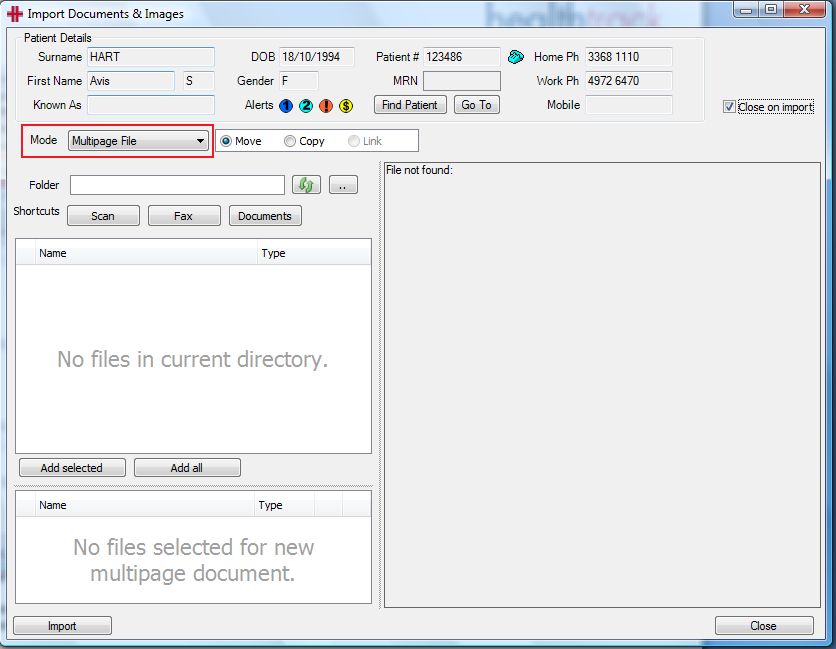
Figure 9 - Multipage Import
The screen will now display a second list box below the Files, this is where you add the files to create one document in HealthTrack.
To select the documents you want included in the multipage document, double click on the file. The file will then be moved from the top list to the bottom list. If you add the wrong file then you can simply double click on the file in the second list and remove it from your multipage document.
Once you have added the file to the bottom list you will notice there will be an up and down arrow for each file. Using these buttons you can re-arrange the order of the pages in the multipage document.
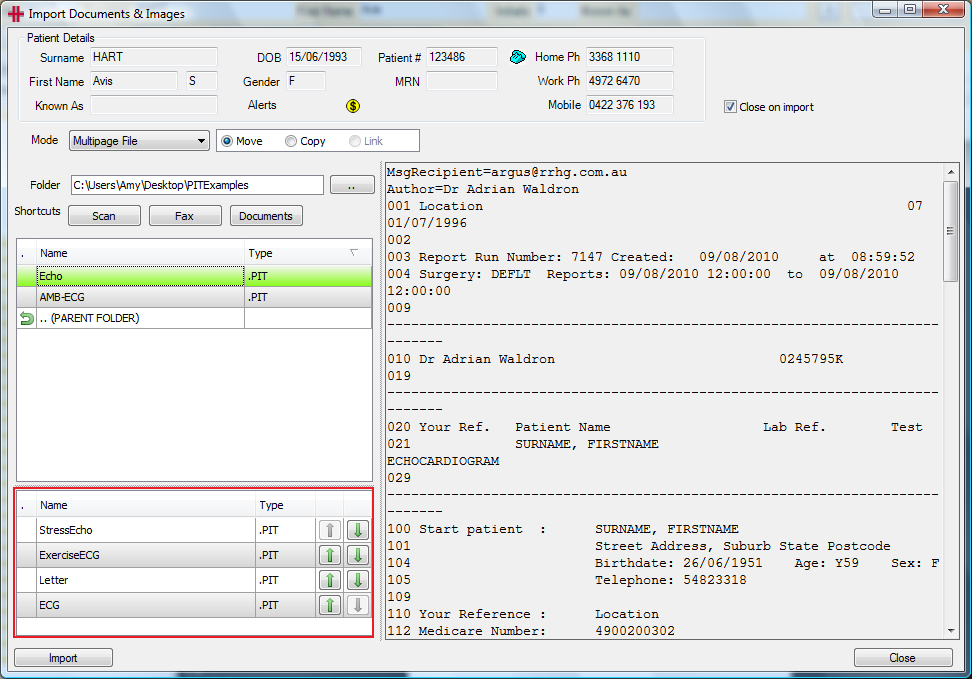
Figure 10 - Selecting files for multipage import
Once you have selected all pages click on Import. The classification screen will become available for you to complete and then classify.
When the document is imported into HealthTrack it will be displayed as the one file. On the bottom right hand corner there is a guide to show you how many pages are included. You can also move through the pages by using the right and left arrows or by selecting the page from the drop down list.
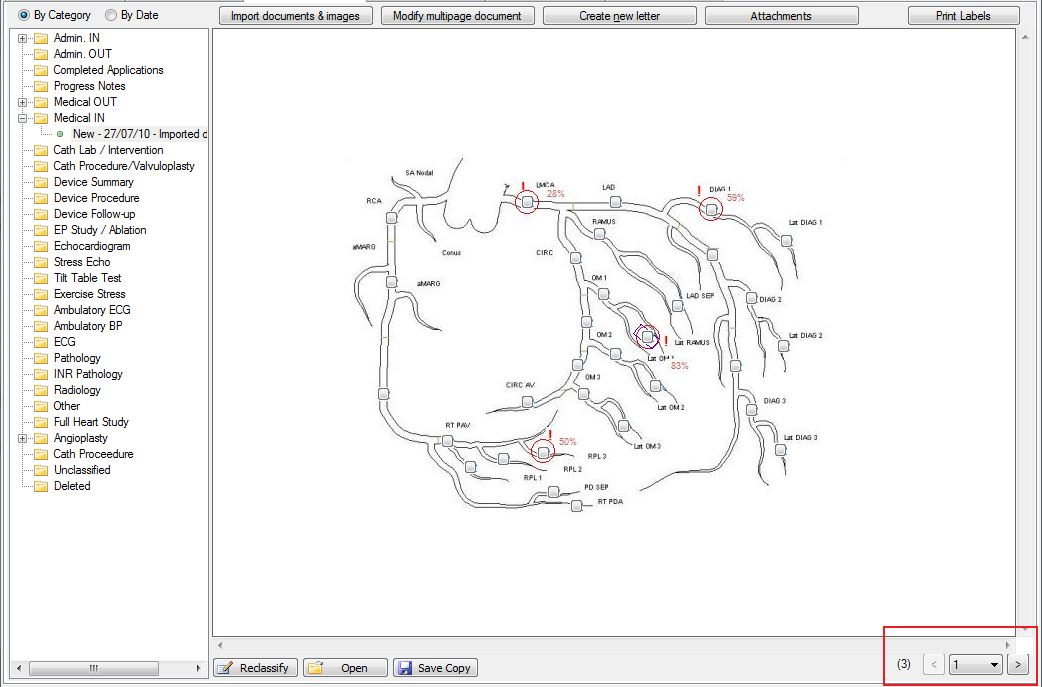
Figure 11 - Multipage document in document tab
Practice Wide – Import Documents
The Import Documents function used via the Practice Wide menu is used when importing documents for a number of different patients. The Import Documents screen is essentially the same as the Import Documents screen used on the patient’s documents tab, with a couple of minor differences:
-
There will be a Patient button so that you can change the patient you are importing the document onto
-
The Close on Import check box will be unticked. This will allow you to quickly move through your importing without having to reopen the Import Screen each time you have to change patients.
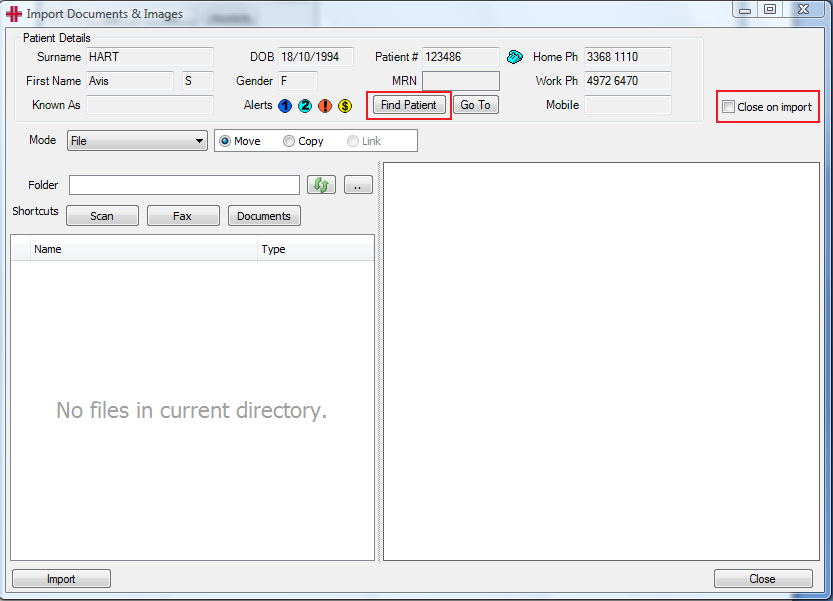
Figure 12 - Practice Wide Import Documents & Images
The process of importing documents is basically the same as discussed above you would complete the following steps:
-
Select the folder that you will be importing the documents from
-
Preview the first document so you can identify the patient
-
Click on the Find Patient button and find the correct patient
-
Click on the import button
-
Complete the Classification screen
-
Click on the Classify button
-
Repeat this process from step two until all files have been imported
For more detailed instructions on how to use the Import Documents & Images screen please see How to Import Documents and Images.
Barcode Importer
The Health Industry Bar Code Standard (HIBC) is an ANSI standard that defines the structured content of a barcode for the health industry.
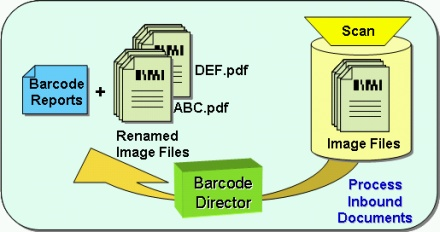
The HealthTrack HIBC Barcode Importer is user friendly, as there is no user interaction required, once the process has been setup.
The following directories must be created:
-
Scanner folder path - typically: \\server\HMS-Interfaces\HIBC_Scanner
-
Manual import path - typically: \\server\HMS-Interfaces\HMS_ManualImport
The scanner must be setup with the following characteristics:
-
“scan to pdf”, and
-
The destination of the scan file set as the “Scanner folder path” defined above.
Process
Admin staff can print the note sheets in a number of ways.
-
In the Diary, the barcoded sheets can be printed in bulk for a doctor or a location. This can be done using the Print button in the Diary and choosing the option for Daysheet – Barcode.
-
From a specific booking in the Diary by right-clicking a booking and choosing Print (Labels / Info), then choosing the option for Patient Details with Barcode.
-
From the patient’s Demographic screen, by selecting the Print button and choosing the option for Patient Details with Barcode.
-
From the patient’s Documents tab by right-clicking on the appropriate folder and selecting Print Barcode.
The Doctor can write on the barcoded page and place it in a tray after each patient. If more than one page of notes is required, any additional pages should be plain/blank pages and must be placed in order for scanning. Alternatively, the barcoded header page can be used to import past notes, documents, results, images, etc.
Periodically or at the end of the day, place the full stack of pages into the scanner, select the destination, and scan the notes in bulk.
HealthTrack will pick up the scanned notes, and uses the barcodes to separate each set of notes and identify the patient. The notes are filed for the patient, to the predefined HealthTrack Documents folder. If the barcoded note sheets are generated via the Diary, HealthTrack is reading the barcode and extracting the bookingID to know the booking type, date and patient. There can be either a single pdf with multiple patient notes for different patients, or 1 patient note per pdf file.
Error Management
If HealthTrack has any difficulties reading the document or barcode, it will place the document in the manual import directory for user intervention.
Additionally, should the “HealthTrack HIBC Barcode Importer” have any issues with the imported document, then it will be placed in the HealthTrack import error folder and be accessible via Admin > Admin Dashboard > Files to Action. Such errors include attempting to import a document into a deleted patient’s folder.
Sample
The following is a sample barcode header for a patient booking:
Chart Tracking
HealthTrack has an advanced Chart / Medical Record Tracking System to track where a patient’s chart is currently located. This is useful for multi-location sites and when there is an additional off-site record storage facility.
The
button can be used to select a
new location for the chart and to record a note. The system
automatically records which user moved the chart and the date and time.

Click the
 button to update the
chart’s location.
button to update the
chart’s location.
To view information about a chart movement, double click the entry or
click the
button.
The
 button opens the Chart
Tracking screen:
button opens the Chart
Tracking screen:
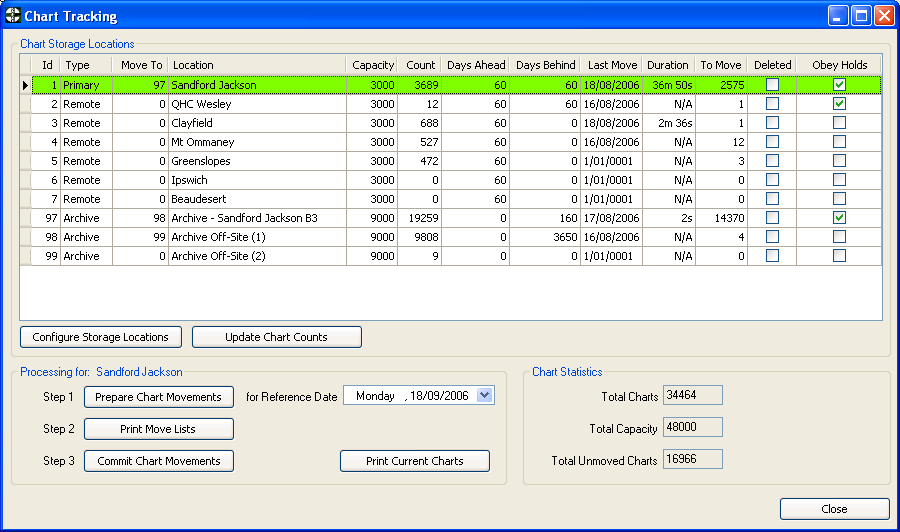
Each storage location is setup with characteristics and requirements. To
manage chart storage locations click the
 button. The
 button will initiate an automatic
move-list that can be printed and managed en mass. The
button will initiate an automatic
move-list that can be printed and managed en mass. The
 button generates a report of all
charts at a location.
button generates a report of all
charts at a location.
Creating & Managing Letter Templates
Letter Templates are documents that can be used for a range of purposes, including letters, certificates, and information sheets. Letter templates are often created to include letter tags; these tags allow a range of information to populate on the letter, such as information about the patient, booking, or recipient. You can learn more about these tags on the Document Letter Template Tags page.
There are two components to a letter template:
-
The base letter template file (e.g. .docx), which has been created with letter template tags;
-
The letter template configuration, which defines details such as where to save the letter and whether the letter can be distributed.
Creating the Base Letter Template
Word Document
Before you can create a new letter template in HealthTrack, you will need to have a base template. Creating the base letter template can generally be done external to HealthTrack, in programs such as Microsoft Word. Using Microsoft Word, your template can be configured with a header and footer, as well as the main contents of the letter. Within this document, HealthTrack’s Letter Template Tags can be placed to populate information such as a patient’s names, addresses, and medications, as well as the details of bookings and referring doctors.
The below image is an example of a template that has been populated with tags. In this example, you will see the tags throughout the template, which begin and end in angle brackets ‘<’ and ‘>’.
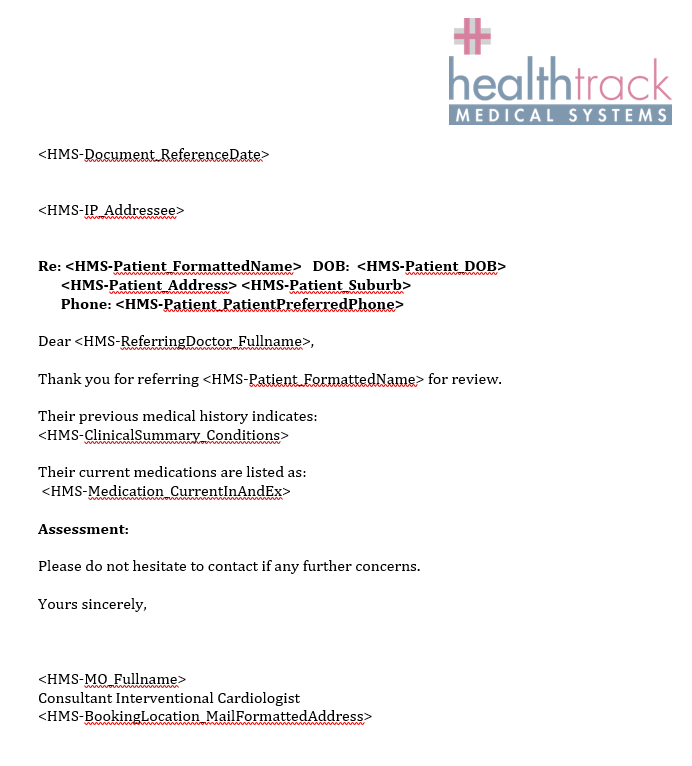
You should ensure that your template is saved to your computer. If created using Microsoft Word, this will typically be a .docx file type by default, which is suitable for use with HealthTrack.
PDF Form
In some situations, you may wish to use a PDF as your base template. To create a base PDF template that includes letter tags, you will need a PDF Editor. While there are high-end editors, such as those offered by Adobe, you can also find low-cost products that will include functionality to edit a PDF. Please speak with your nominated IT Support Representative for assistance with third-party software of this nature.
As there are a number of PDF Editors that can be used, the instructions for configuring the template will vary. The key component is to ensure you add ‘form fields’ on your template, rather than plain text. The tags will use a different format for a PDF template, which is explained in the Document Letter Template Tags page.
The below image is an example of a PDF template with that has been populated with tags. In this example, you will see the tags throughout the template, which begin and end in a pair of angle brackets ‘<<’ and ‘>>’.
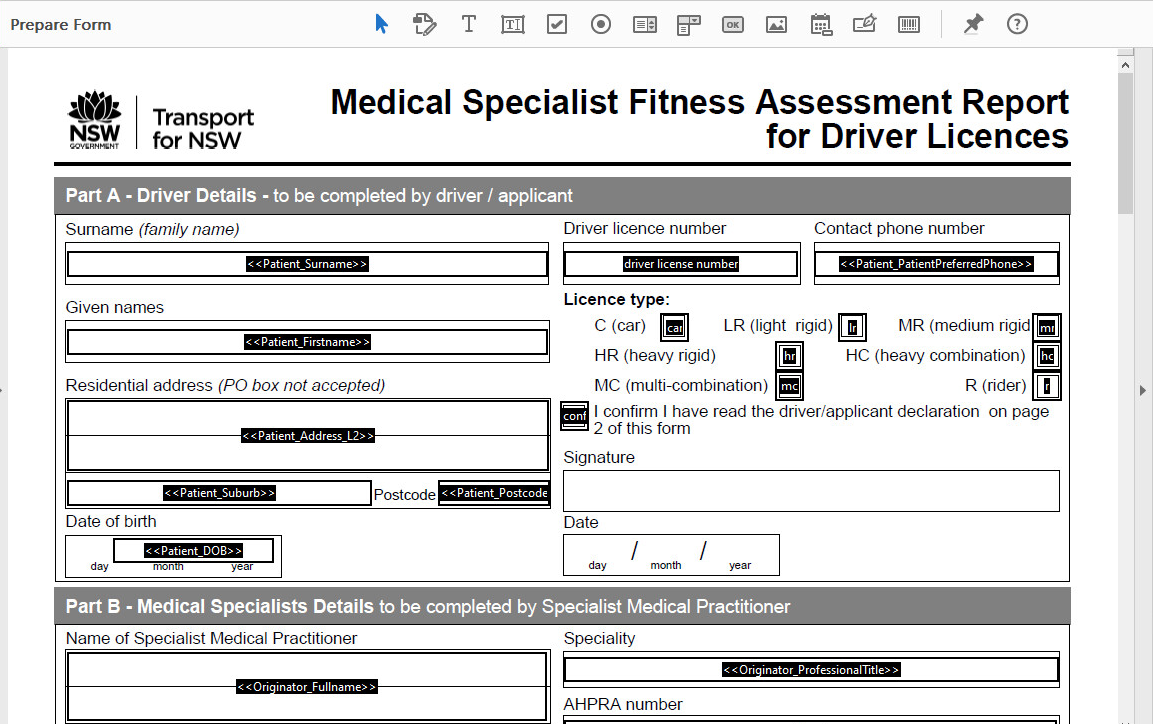
PDF forms often include details that are not recorded in HealthTrack, and therefore not all sections on a PDF form can be populated automatically. If you have placed form fields on your PDF template that do not correspond with a HealthTrack letter tag, these can often be used to type the data manually, or tick boxes manually.
Importing a Base Template to the File Manager
Once a base template has been created, either as a Word Document or PDF, it will need to be imported into HealthTrack.
To import a new template:
-
Navigate to Admin > Letter Template Manager.
-
Select the File Manager button.
-
Select the Import button.
-
In the Select a File window that opens, you can browse your computer locate your letter template file. Highlight the file and select the Open button, or double-click on the file.
- You may be asked to enter a new name for your template if the file name already exists, or if the file name is too long. Please enter a new name if prompted and select Done .
-
You should receive a prompt advising the file copied successfully. Select the OK button.
You can continue to import each of your templates using Steps 3-5 above. After importing all templates, select the Done button to close the Template File Manager screen.
You will now be able to use this file to create new letter templates in HealthTrack.
Configuring the Letter Template
If you have a base file available for your letter template, you can proceed to configure how the template will behave in HealthTrack.
-
Navigate to Admin > Letter Template Manager.
-
In the bottom left, below the Templates label, select the New button.
-
In the Letter Template Settings screen, select the File from the drop-down menu. This will be a file previously imported to HealthTrack.
-
Enter the Description for the template. This is the template name that users will see when they create the letter for patients.
-
Specify where to Save Document To. This will be a folder listed in the Documents tab, but users can override this on a case-by-case basis.
-
Enter the Synopsis for the template. This is the name that users will see for the letter in the list of Documents for the patient.
-
Select the Save button.
For a full explanation of the settings shown in this window, please see below.
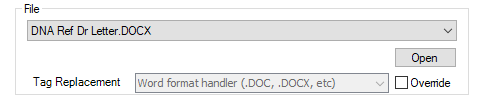
| File | The File is the base template in use, which has previously been imported to HealthTrack. |
|---|---|
| Tag Replacement | The Tag Replacement should list the file type of the template, e.g. .doc or .docx. The Override option allows this to be changed. |

| Description | The Description is the name users will see when creating a letter for a patient. |
|---|---|
| Position | The Position is the folder the template is listed in within the Letter Template Manager. |
| Patient Connect Enabled | Ticking Patient Connect Enabled allows this template to be used for Patient Connect (e.g. recalls). |
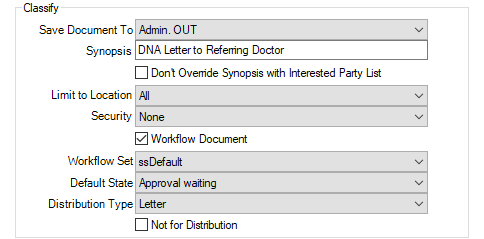
| Save Document To | This determines the default folder within the Documents tab that the letter will be saved to when created for a patient. Users are able to change where the document is saved to on a case-by-case basis. |
|---|---|
| Synopsis | This is the title used for the letter when viewed in the Documents tab. Users can alter the Synopsis on a case-by-case basis. |
| Don’t Override Synopsis with Interested Party List | By default, the Synopsis will list the letter’s recipients. If you would prefer the letter to not list recipients, you can tick this option to disable this, and the Synopsis will be shown instead. |
| Limit to Location | This setting allows a template to only be available to users that have logged into HealthTrack at the corresponding location. This may be desirable when a template contains a location-specific letterhead. |
| Security | This setting allows the template to be restricted to a custom group of users. |
| Workflow Document | The Workflow Document option should be ticked for any templates that undergo a review process before being distributed. |
| Workflow Set | This defines the standard approval process the letter undergoes when Workflow Document is ticked. |
| Default State | This allows the letter to be created with a particular state set, such as Approval Waiting or Final. |
| Distribution Type | Setting the Distribution Type can change the way the template is received by other software systems when distributed using third-party secure messaging. |
| Not for Distribution | This option can be ticked to prevent a letter from being distributed. |

| Preset Originator | Preset Originator will ensure a nominated person is always listed as the Owner/Approver. This may be preferred if a base template has been designed with a specific individual’s information. |
|---|---|
| Doctor / User | Clicking these buttons will filter the drop-down menu to only display a list of doctors or a list of all users. |
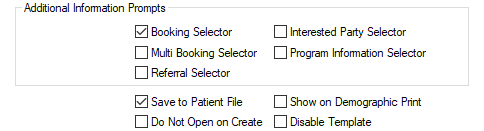
| Booking Selector | The Booking Selector will allow the user to select a patient’s booking at the time of creating the letter. This may be important to populate information on the template, such as a date or doctor. |
|---|---|
| Multi Booking Selector | The Multi Booking Selector will allow the user to select two or more bookings to be listed on a letter. The template will require customised tags to differentiate between each booking. |
| Referral Selector | The Referral Selector will prompt the user to select a referral when creating a letter. This will populate any tags on the template that relate to the referral. |
| Interested Party Selector | The Interested Party Selector prompts the user to nominate recipients for a letter. This will also populate any tags on the letter that relate to the recipient, such as a name and address. |
| Program Information Selector | The Program Information Selector prompts the user to select a program, which will populate specific tags within a letter. This is a licensed feature. |
| Save to Patient File | When ticked, the letter will be saved in the patient’s Documents. Not all templates may need to be saved, e.g. labels or consent forms. |
| Do Not Open on Create | Ticking this option will prevent a template from opening when created. This may be ticked if the user does not need to add any information to the letter. |
| Show on Demographic Print | On the Demographic screen is a Print button, which can list a number of templates for quick access. These templates are not saved in the Documents tab when created this way. |
| Disable Template | The Disable Template option can be ticked when a template is no longer going to be used. |
Managing Letter Templates
Within the Letter Template Manager, there is a number of buttons that can be used for managing and organising templates.
Templates
New – this button is used for creating a new letter template.
Edit – this button opens the settings for the highlighted template, allowing you to make configuration changes. You can also open the base template file to make content changes. Please see the Editing an Existing Letter Template section below for more information.
Copy – this button will allow you to duplicate an existing template with a new name. Please see the Editing an Existing Letter Template section below for more information.
Delete – this button will delete a template that may no longer be in use. The base template will still be available to use on other letter templates.
Preview – this button will open a split-screen preview that shows the template with un-populated and populated tags (where possible). You can also choose to view a plain text preview in this screen, which is the way a template appears without formatting.
IDs – ticking this box will show an ID number next to the name of a template.
Folders
New – this button creates a new folder, which can be used to group templates of a similar nature.
Rename – this button allows the highlighted folder to be renamed.
Delete – this button will delete a folder, as well as the templates contained in the folder.
The arrow buttons listed can be used to move templates between folders:
↑ – the ‘Up’ arrow moves the highlighted template to be ordered above others.
↓ – the ‘Down’ arrow moves the highlighted template to be ordered below others.
→ – the ‘Right’ arrow moves the highlighted template into the folder listed directly above.
← – the ‘Left’ arrow moves the highlighted template out of the folder it is currently contained in.
We suggest you place frequently used letter templates in the base directory, i.e. not within a folder.

Editing an Existing Letter Template
From time to time, you will need to make changes to the file your letter template is based on. This can be done using the steps below.
-
Navigate to Admin > Letter Template Manager.
-
Highlight the relevant template and select the Edit button.
-
In the upper right, select the Open button. This will open the template in your preferred Word Editor.
-
Make any required changes to the template.
-
Save your changes and close the template.
-
In the Editing Draft Template screen, select the Save Draft button.
After saving your draft, a new row will appear beneath the existing template with (draft) appended to the title.
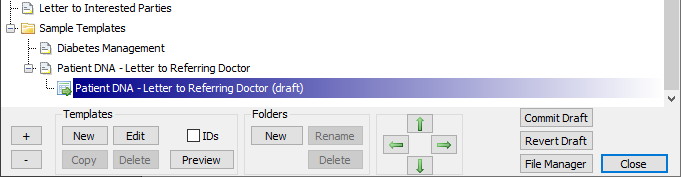
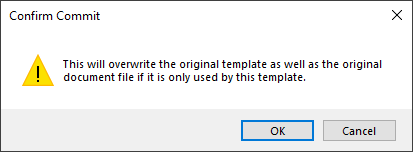
While this draft exists, you can continue to make changes to the template, which will not affect the active version. When all changes are complete, you can use the Commit Draft button to make the updated template active. When committing a draft, you will be prompted with the below prompt confirming that the original document file may be updated.
If you do not wish to proceed with the drafted changes, you can use the Revert Draft button to discard the draft version. When reverting a draft, you will be prompted with the below prompt confirming that the draft will be deleted.
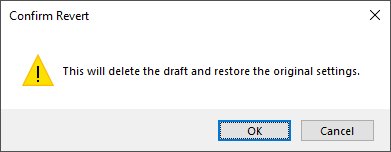
The above steps can also be used to make adjustments to a letter that has been duplicated. In this scenario, you should additionally ensure the Tag Replacement Override box has been ticked in the settings, which will allow Word format handler to be selected from the drop-down menu.